当前位置:网站首页>[lorawan node application] the application and power consumption of Anxin ra-08/ra-08h module in lorawan network
[lorawan node application] the application and power consumption of Anxin ra-08/ra-08h module in lorawan network
2022-06-30 00:34:00 【Anxinco Technology】
Catalog
Preface
This article mainly introduces how to configure Ra-08H module / Development board access LoRaWAN Relevant contents of the service .LoRaWAN The difference in LoRa Technology lies in ,LoRa The signal transmission goes through the physical layer , and LoRaWAN Is the media control layer protocol , Mainly used for network layer protocol .LoRaWAN The main components of the architecture are :LoRaWAN gateway 、LoRaWAN node 、LoRaWAN Network services and LoRaWAN The application service consists of four parts . The server to be connected this time is the server integrating network services and application layer services , The gateway uses .
1 Hardware preparation
1.1 Hardware preparation
| Hardware | Number |
|---|---|
| Ra-08H module | 1 individual |
| DuPont line | A number of |
| USB turn TTL modular | 1 individual |
| Ra-08H-Kit Development board | 1 individual |
| Android cable | 1 root |

1.2 Wiring instructions
Ra-08H The module burning wiring is shown in the following table :
| Ra-08H module | USB turn TTL module |
|---|---|
| 3.3V | 3.3V |
| GND | GND |
| RXD0 | TXD |
| TXD | RXD |
| IO2 | DTR |
| RST | GND |
1.3 Firmware burning instructions
The firmware burning tool and firmware can be downloaded from the official website of Anxin , For a link :https://docs.ai-thinker.com/lorawan
1.3.1 Ra-08H Module burning operation
After wiring as described above , Set the... On the module RST Unplug the pin wiring , Open the firmware burning tool , Select the firmware to burn , Click on “Erase All”, Clear the original firmware in the module , After erasing successfully , Click on “Start”, Burn new firmware .
1.3.2 Ra-08H-Kit Development board burning operation
Via Android cable Ra-08H-Kit Development board and PC End connection ,IO2 The key remains pressed , A short press RST Key , Open the firmware burning tool , Select the firmware to burn , Click on “Erase All”, Clear the original firmware in the module , After erasing successfully , Click on “Start”, Burn new firmware .
2 The server controls the platform operation
2.1 Configure the gateway docking content
Configure the gateway frequency band , Select frequency band , Configure the center frequency of the receiving window , Maximum and minimum transmission frequencies , bandwidth , Spread spectrum factor and other related parameters .
2.2 Configure network service related parameters
Configure the data rate of the receive window 、 Receiving window 2 Frequency size of 、 Transmit power, adaptive rate and other related parameters .
2.3 Create nodes
2.3.1 Create an application
Create a new application , Set the name of the app , Select the application key type , Save application .
Configure application secret key , Can generate random numbers , Other content uses the default configuration , Click save and apply .
2.3.2 Create a node
Click to enter the created application , input device EUI( Customizable ), Click on “ add to ”
Set the relevant parameters of the node , Include : Equipment name 、 How nodes work (Class A/Class B/Class C)、 Network access mode (ABP(Activation By Personalization)/OTAA(Over The Air Activation)), Other configurations default to , Click save and apply .
OTAA The network access mode configuration interface is as follows :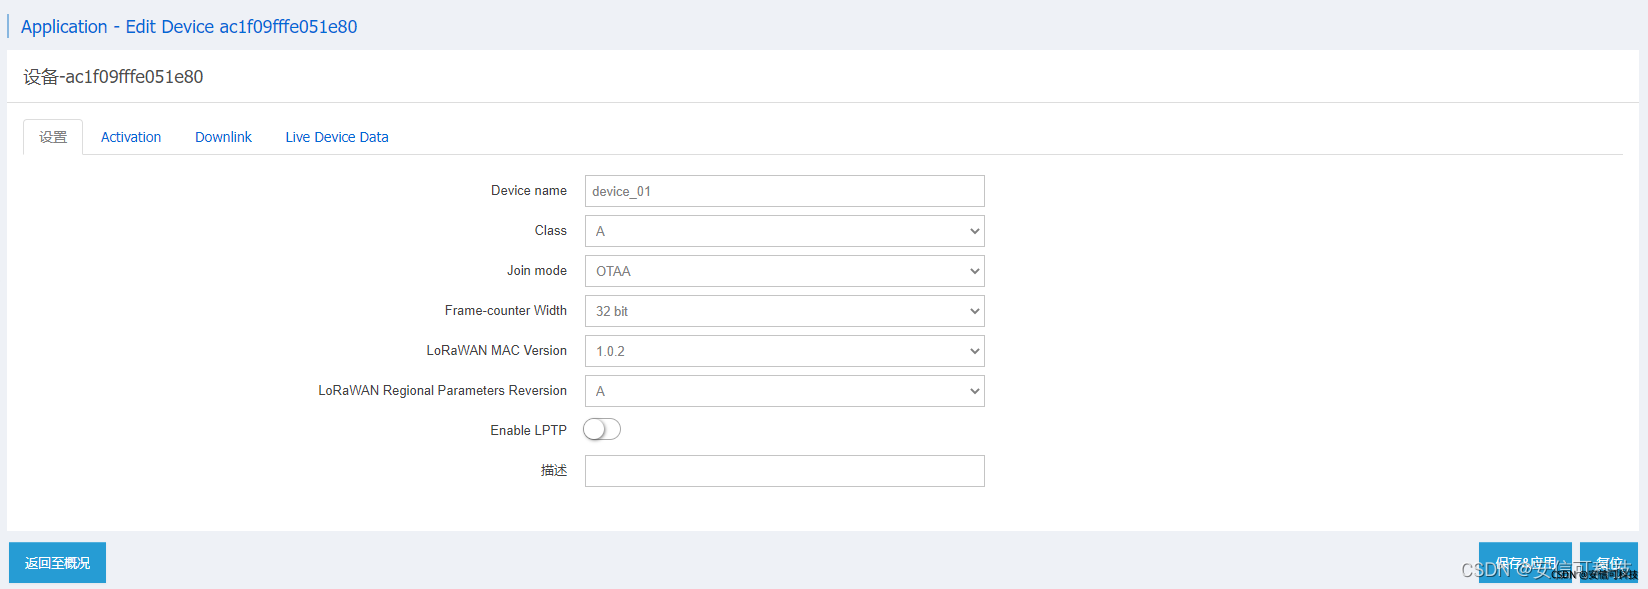
Set up ABP Network access mode , Fill in the equipment address 、 Set the random number with the session secret key 、 Set random number for network session key , Other configurations remain default , Here's the picture :
3 Ra-08H Module instruction operation
3.1 OTAA Network access mode AT Command operation
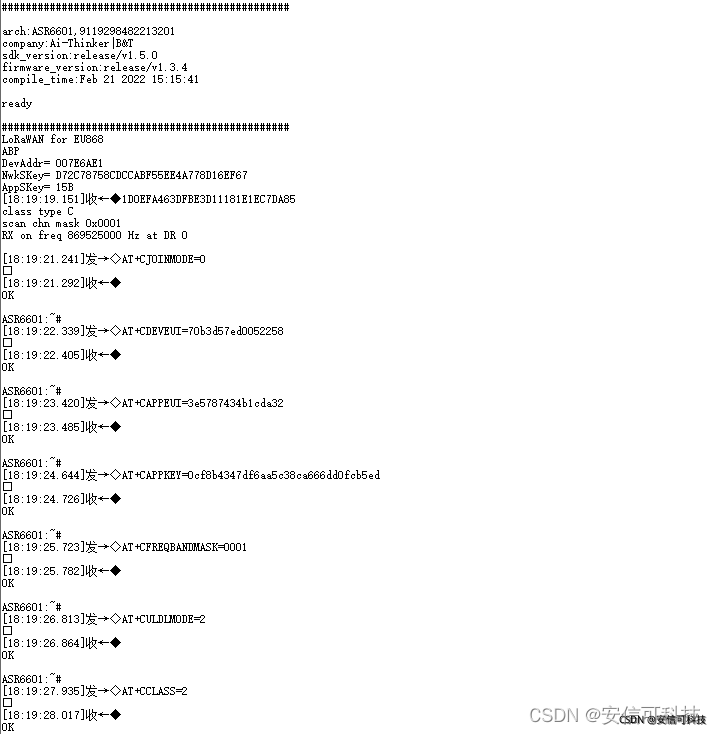
AT+CJOINMODE=0		# Set the network access mode (0:OTAA 1:ABP)
AT+CRXP=1,1,869525000		# Set the receiving window parameters ,Rx01,Rx02,Rx02 frequency
AT+CDEVEUI=70B3D57ED0052256	# Set up the device EUI
AT+CAPPEUI=0000000000000000	# Set up network access application EUI
AT+CAPPKEY=8D5EC8F6834BDE677A3D815E81A14981	# Set application key
AT+CFREQBANDMASK=0001	# Set the channel mask (0001: Set up 0~7 channel ;0002: Set up 8~15 channel )
AT+CULDLMODE=2			# Set whether the uplink and downlink data are on the same channel (1: Set the same channel ;2: Set up different channels )
AT+CCLASS=0				# Set network access CLASS type (0:Class A;1:Class B;Class C)
# Set network access parameters
# value1:Join Operation mode ,0: Stop joining ;1: Begin to join or rejoin
# value2: Set whether to automatically access the network ,0: No automatic networking ;1: Set automatic network access
# value3: Set the network access cycle ,10 Then for 10s
# value4: Set the maximum number of connections ,8 Express 8 Time
AT+CJOIN=1,0,8,3
AT+DTRX=0,2,6,445566		# send data
3.2 ABP Network access mode AT Command operation
AT+CJOINMODE=1		# Set the network access mode (0:OTAA 1:ABP)
AT+CRXP=1,1,869525000		# Set the receiving window parameters ,Rx01,Rx02,Rx02 frequency
AT+CDEVEUI=AC1F09FFFE051E80	# Set up the device EUI
AT+CNWKSKEY=f37d6a9c1acc2106411f8c13a5eb20bf	# Set the network session key
AT+CAPPSKEY=7c5132451d140e15d72a1993d62f1c31	# Set the application session key
AT+CAPPPORT=1									# Set the device port number
AT+CFREQBANDMASK=0001		# Set the channel mask (0001: Set up 0~7 channel ;0002: Set up 8~15 channel )
AT+CULDLMODE=2				# Set whether the uplink and downlink data are on the same channel (1: Set the same channel ;2: Set up different channels )
AT+CCLASS=0					# Set network access CLASS type (0:Class A;1:Class B;Class C)
AT+CJOIN=1,0,10,8			# Open network access
AT+DTRX=0,2,6,445566		# send data
4 Network access effect

5 Power consumption
Module connection power consumption :
When the module is idle , The power consumption is 10mA. When the module enters the network , The power consumption is 14mA.
Contact us
The above is the content of this issue , The purpose is to let everyone quickly adapt to the development of new products , More information can be obtained from our official website .
Official website :https://www.ai-thinker.com
Development of information :https://docs.ai-thinker.com/
Official forum :http://bbs.ai-thinker.com
Technical support :[email protected]
边栏推荐
- Events in JS
- 关联性——典型相关分析
- How much is the fixed asset management system and the price of the fixed asset management system
- Common interview questions for network workers: Telnet, TTL, router and switch
- Which securities company is better and which platform is safer for stock speculation account opening
- Floating point communication
- 间歇采样转发干扰
- leetcode-1. 两数之和
- 01 backpack problem
- SOFARegistry 源码|数据同步模块解析
猜你喜欢

01 backpack problem

Mr. Hu Bo, CIO of weiduomei, a scientific innovator: digitalization is a bloodless revolution, and the correct answer lies in the field of business

Preliminary syntax of JS

Quick Pow: 如何快速求幂

TwinCAT 3 EL7211模块控制倍福伺服

Mysql Duplicate entry ‘xxx‘ for key ‘xxx‘

Yunna | advantages of fixed assets system management, what are the characteristics of fixed assets management system

Yunna | fixed assets information system management, information-based fixed assets management

Use of shortcut keys for idea tools

How to write controller layer code gracefully?
随机推荐
固定资产管理系统多少钱,固定资产管理系统价格
蛇形矩阵(数组模拟方向, d代表转弯)
GET 和 POST请求的本质区别是什么?
Connection query of SQL Server database
leetcode 416. Partition Equal Subset Sum 分割等和子集(中等)
TwinCAT 3 el7211 module controls Beifu servo
网络方向哪个发展更好?数据通信工程师学习路线分享
TwinCAT 3 EL7211模块控制倍福伺服
How about stock online account opening and account opening process? Also, is it safe to open an account online?
What is the essential difference between get and post requests?
SSH key disclosure (module B competition topic) -- Application Service Vulnerability scanning and utilization
Quick pow: how to quickly find power
Three postures of anti CSRF blasting
MySQL高级篇2
[QNX Hypervisor 2.2用户手册]6.2.2 Guest与Host之间通信
【UML】UML的几种关系(依赖-关联-聚合-组合-继承-实现)
自动融合,驰骋海外丨跨境电商YescomUSA携手云扩实现一站式自动化服务
Small and medium-sized enterprises should pay attention to these points when signing ERP contracts
Mysql Duplicate entry ‘xxx‘ for key ‘xxx‘
vim插件管理器vim-plug安装方法