当前位置:网站首页>DOM 渲染系统(render mount patch)响应式系统
DOM 渲染系统(render mount patch)响应式系统
2022-07-03 08:41:00 【大海里没有水】
项目仓库代码:https://github.com/chenfenbgin/vue_source
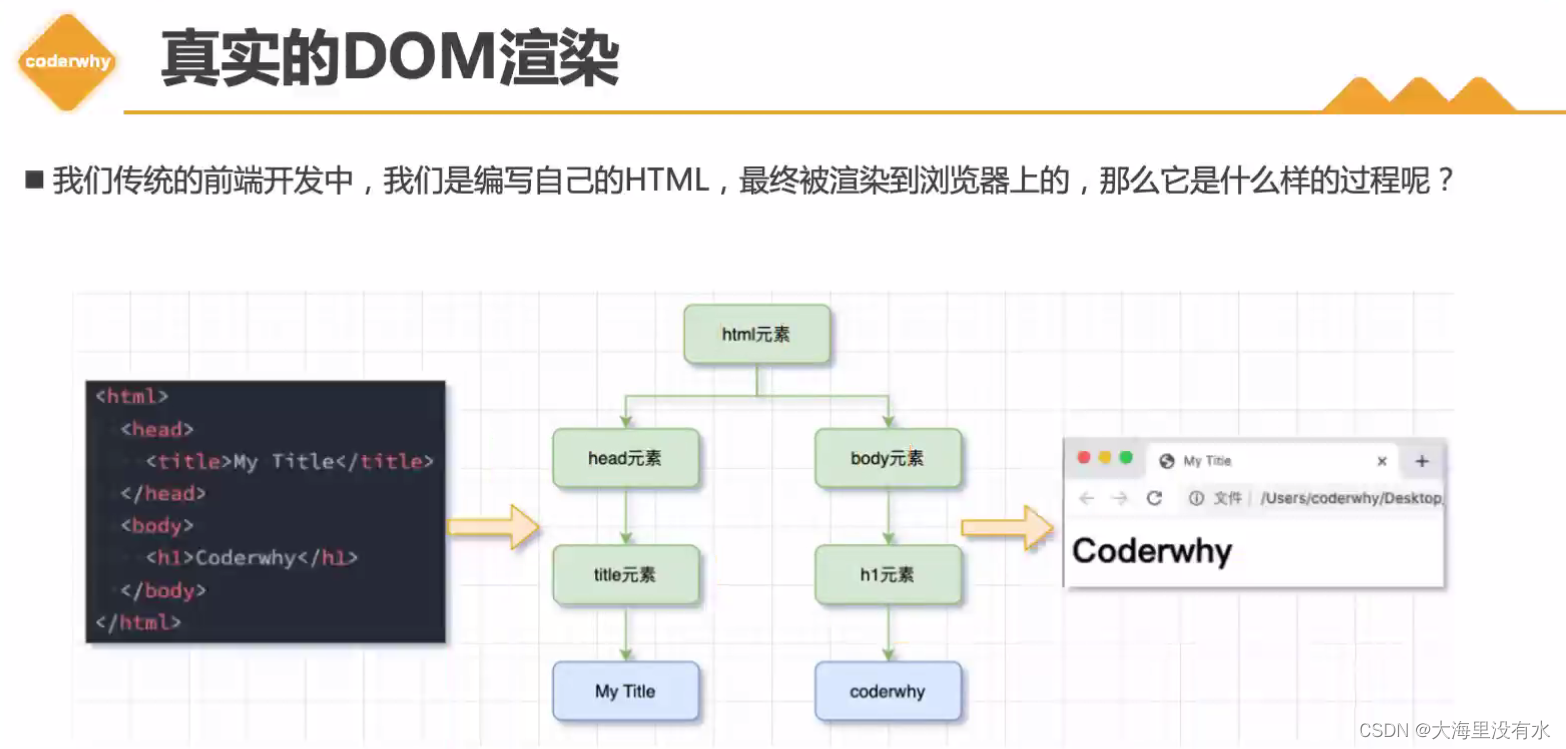
一、DOM
1、真实DOM 、虚拟DOM
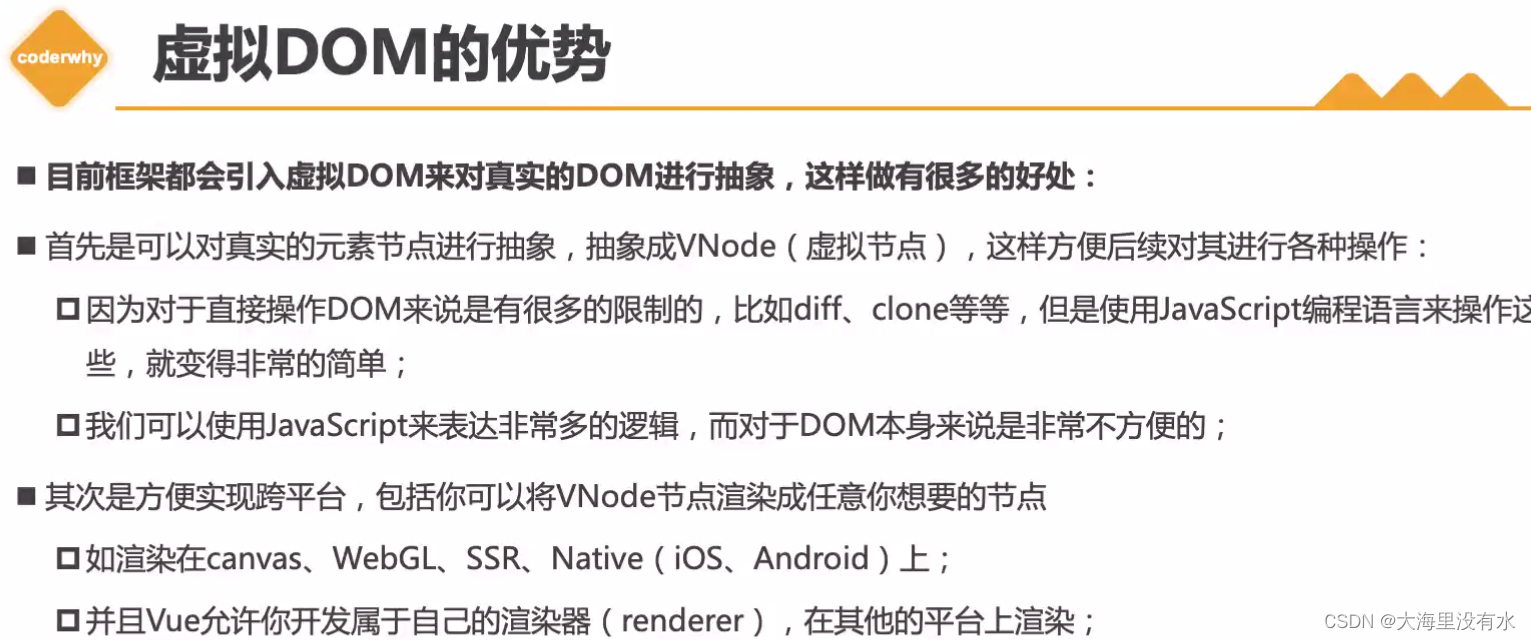
注:操作虚拟DOM比真实DOM更加方便,diff算法需要比较子元素、类型等,clone属性,元素属性跟方法是很多的。另外,如果操作真实DOM,会造成浏览器的回流,会重新进行渲染。通过vnode节点可以渲染成你想要的任意控件/节点。
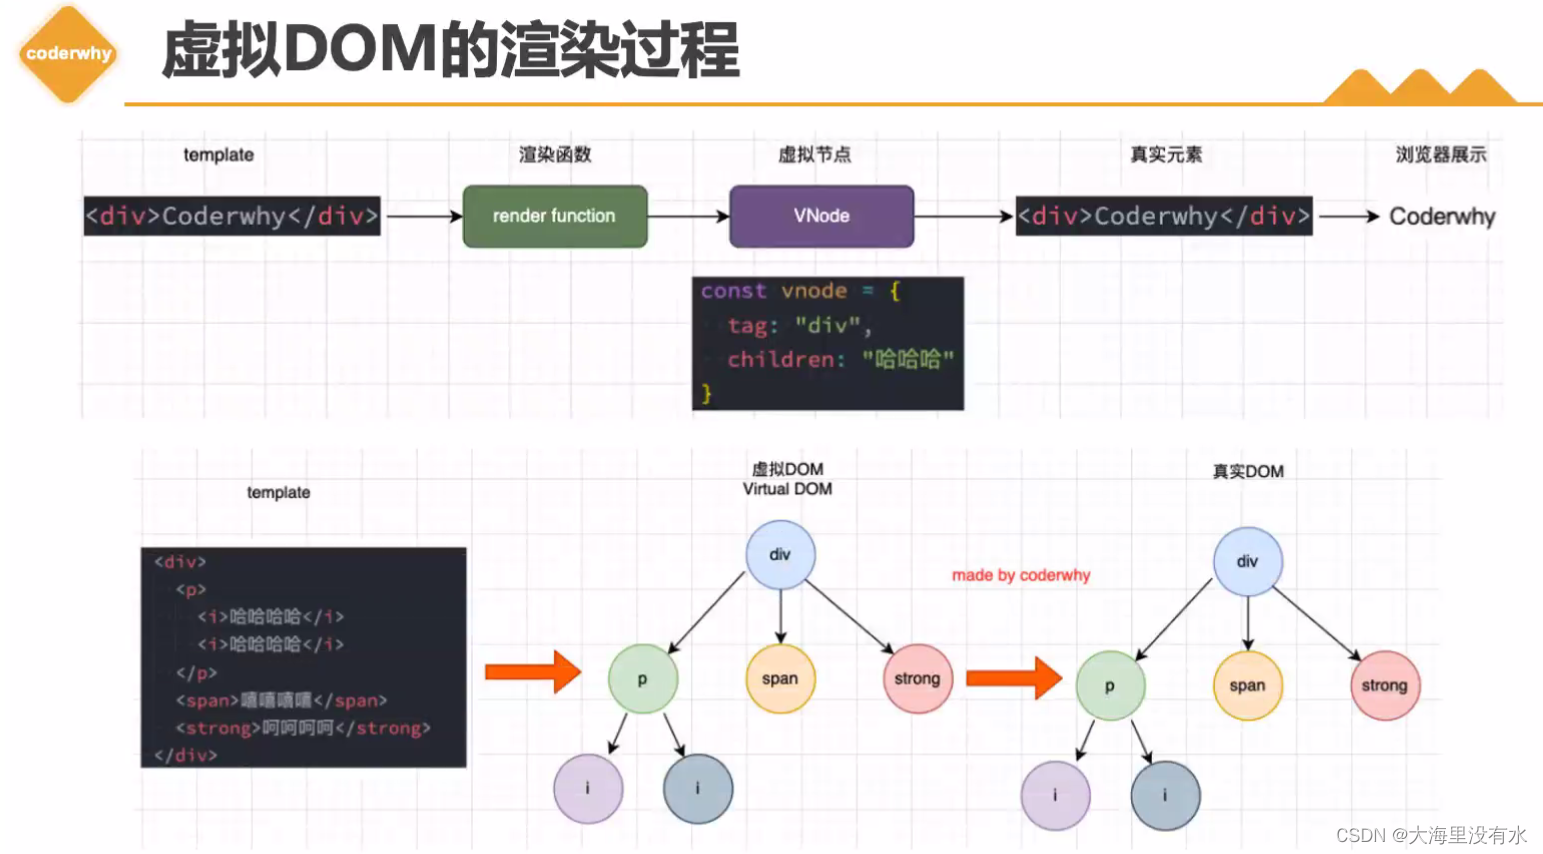
2、虚拟DOM的渲染过程
3、核心模块
注:
1、template交给compiler模块编译成render函数,形成虚拟node,进行挂载/patch操作,在形成真实元素交给浏览器展示。


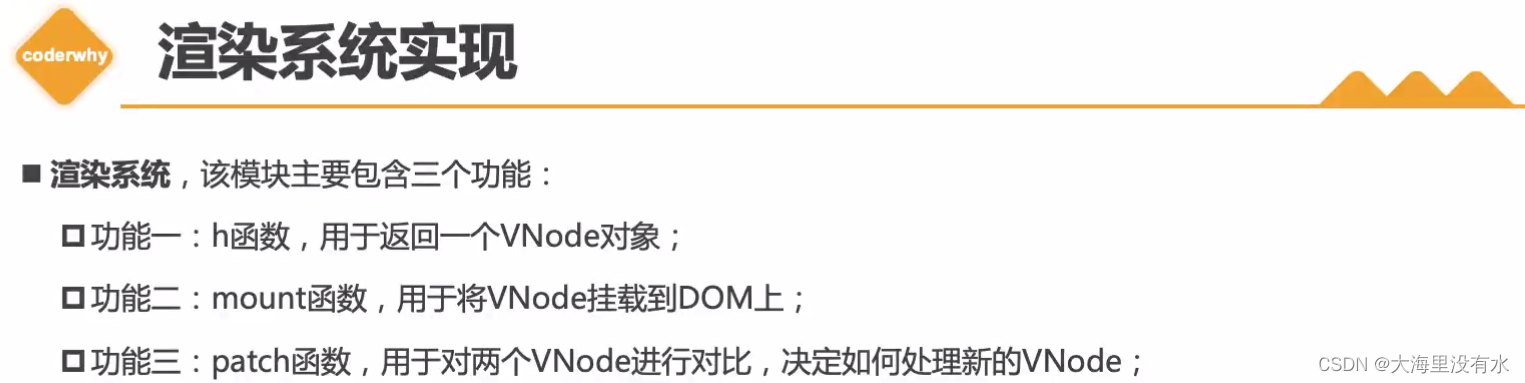
4、渲染系统实现
render.js:
注:渲染系统实现
	1、h函数的实现: 返回js对象,包裹{
    tag, props, children}
	2、mount函数:
		a.创建真实DOM元素:document.createElement(vnode.tag)
		b.处理props属性:forEach ->  el.setAttribute(key, value)
		c.处理children,我们只处理数组和字符串
		d.直接使用递归调用
		e.将el挂载到container上
步骤一:h函数实现
// 渲染器实现-----1、h函数的实现,自定义h函数
const h = (tag, props, children) => {

  //vnode就是一个 javascript对象, -> {}
  return {

    tag,
    props,
    children,
  };
};
步骤二:mount函数实现
// 渲染器实现-----2、创建、处理、挂载DOM元素
// a、创建真实的DOM元素,
// b、处理遍历props,
// c、对第三个参数进行处理,传入的是子节点进行处理
const mount = (vnode, container) => {

  //vnode -> element, 把vnode转成真实的DOM元素,通过createElement就行了
  // a、创建出真实的元素,并且在vnode上保留真实的DOM:el,后面会使用到的
  const el = (vnode.el = document.createElement(vnode.tag));

  // b、处理props, 如果标签上有class等属性。
  // h("div", { class: "why" }, [
  // h("h2", null, "当前计数: 100"),
  // h("button", { onclick: function () {} }, "+1"),
  // ])
  if (vnode.props) {

    for (const key in vnode.props) {

      const value = vnode.props[key];

      // 如果是传入函数,需要进行特殊处理, 对事件监听的判断
      if (key.startsWith("on")) {

        //以on开头的进行判断
        // onclick,截掉on,剩下Click,将其转成小写click,
        el.addEventListener(key.slice(2).toLowerCase(), value);
      } else {

        el.setAttribute(key, value);
      }
    }
  }

  // c、处理children,我们只处理数组和字符串
  if (vnode.children) {

    if (typeof vnode.children === "string") {

      el.textContent = vnode.children;
    } else {

      vnode.children.forEach((item) => {

        console.log("item", item);
        // d、直接使用递归调用
        mount(item, el);
      });
    }
  }

  // e. 将el挂载到container上
  container.appendChild(el);
};
步骤三:patch函数实现 - diff算法简单实现
// 渲染器实现-----三、patch
// 传进来的是两个vnode
const patch = (n1, n2) => {

  // 第一步:比较类型:当类型都不相同的时候,就是这么做的,直接移除DOM
  if (n1.tag !== n2.tag) {

    // n1.el是可以拿到当前这个元素的,因为之前我们把真实DOM保存到vnode里面了(在创建真实元素的时候)
    // 要想移除掉,需要拿到当前元素的父元素
    const n1ElParent = n1.el.parentElement;
    n1ElParent.removeChild(n1.el);
    mount(n2, n1ElParent);
  } else {

    // 比较类型:类型相同的时候
    // 1.取出element对象,并且在n2中进行保存
    const el = (n2.el = n1.el);

    // 2. 处理props, 当n1.props为空的时候,给它一个{}
    const oldProps = n1.props || {
    };
    const newProps = n2.props || {
    };

    // 2.1获取所有的newProps添加到el里面
    for (const key of newProps) {

      const oldValue = oldProps[key];
      const newValue = newProps[key];
      // 只有当id里面的值不相同是,才设置key/value
      if (oldValue !== newValue) {

        if (key.startsWith("on")) {

          const value = oldProps[key];
          el.addEventListener(key.slice(2).toLowerCase(), value);
        } else {

          el.setAttribute(key, newValue);
        }
      }
    }

    // 2.2 删除旧的props
    for (const key of oldProps) {

      if (!(key in newProps)) {

        if (key.startsWith("on")) {

          const value = oldProps[key];
          el.removeEventListener(key.slice(2).toLowerCase(), value);
        } else {

          el.removeAttribute(key);
        }
      }
    }

    // 3. 处理children
    const oldChildren = n1.children || [];
    const newChildren = n2.children || [];

    // 情况一: newChild本身就是一个String
    if (typeof newChildren === "string") {

      //边界情况(edge case)
      if (typeof oldChildren === "string") {

        if (newChildren !== oldChildren) {

          el.textContent = newChildren;
        } else {

          el.innerHTML = newChildren;
        }
      }
    } else {

      // 情况二: newChild本身就是一个数组
      if (typeof oldChildren === "string") {

        el.innerHTML = "";
        newChildren.forEach((item) => {

          mount(item, el);
        });
      } else {

        // 情况三:都是数组
        // oldChildren: [v1, v2, v3]
        // newChildren: [v1, v2, v3, v4, v5]
        // 1.前面有相同节点的元素进行patch操作
        const commonLength = Math.min(oldChildren.length, newChildren.length);
        for (let i = 0; i < commonLength; i++) {

          patch(oldChildren[i], newChildren[i]);
        }

        // 2. 添加操作: newChildren > oldChildren,
        if (newChildren.length > oldChildren.length) {

          newChildren.slice(oldChildren.length).forEach((item) => {

            mount(item, el);
          });
        }

        // 3.移除操作: newChildren.length < oldChildren.length
        if (newChildren.length < oldChildren.length) {

          oldChildren.slice(newChildren.length).forEach((item) => {

            el.removeChild(item.el);
          });
        }
      }
    }
  }
};
index.html
<!DOCTYPE html>
<html lang="en">
  <head>
    <meta charset="UTF-8" />
    <meta http-equiv="X-UA-Compatible" content="IE=edge" />
    <meta name="viewport" content="width=device-width, initial-scale=1.0" />
    <title>Document</title>
  </head>

  <body>
    <div id="app"></div>

    <script src="./render.js"></script>
    <script> // 1.通过h函数来创建一个vnode const vnode = h("div", {
       class: "why" }, [ h("h2", null, "当前计数: 100"), h("button", {
       onclick: function () {
      } }, "+1"), ]); // 2. 通过mount函数, 将vnode挂载到div中#app上 mount(vnode, document.querySelector("#app")); // 3. 创建一个新的vnode, 两个vnode做diff算法 // const vnode1 = h('div', { class: "coderchen" }, '哈哈哈哈') // patch(vnode, vnode1) setTimeout(() => {
       const vnode1 = h("h2", {
       class: "coderchen" }, "哈哈哈哈"); patch(vnode, vnode1); }, 2000); </script>
  </body>
</html>
二、响应式系统
1、响应式dep类的实现
1、给每个dep类定义一个集合,收集到的副作用函数不重复(set)
2、往set集合中添加需要执行的函数(add方法)
3、通知notify() -> 遍历set集合 -> 执行里面的函数
// 依赖
class Dep {

  constructor() {

    // 给每个Dep一个集合. 里面的元素不会重复
    this.subscribers = new Set();
  }

  addEffect(effect) {

    //往集合中添加元素,不是push,是add
    this.subscribers.add(effect)
  }

  //通知所有subscribers执行
  notify() {

    this.subscribers.forEach(effect => {

      effect()
    })
  }
}


const info = {
     counter: 100 }
const dep = new Dep();

function doubleCounter() {

  console.log(info.counter * 2)
}

function powerCounter() {

  console.log(info.counter * info.counter)
}

// doubleCounter();
// powerCounter()
// 当有数据发生改变的时候,如果有地方有依赖,应该再次执行
dep.addEffect(doubleCounter);
dep.addEffect(powerCounter);

// 发生改变,直接调用dep.notify
info.counter++;
dep.notify()
2、watchEffect的封装
1、封装watchEffect,将函数传进来。让后封装depend方法,让其自己添加到set里面。
// 依赖
class Dep {

  constructor() {

    // 1、给每个Dep一个集合. 里面的元素不会重复
    this.subscribers = new Set();
  }

  // addEffect(effect) {

  // // 2、往集合中添加元素,不是push,是add
  // this.subscribers.add(effect)
  // }

  depend() {

    if (activeEffect) {

      this.subscribers.add(activeEffect);
    }
  }

  // 3、通知所有subscribers执行
  notify() {

    this.subscribers.forEach((effect) => {

      effect();
    });
  }
}

let activeEffect = null;
function watchEffect(effect) {

  // dep.addEffect(effect);
  activeEffect = effect;
  dep.depend();
  effect(); //第一次就执行
  activeEffect = null;
}

const info = {
     counter: 100, name: "chem" };
const dep = new Dep();

// watchEffect1
watchEffect(function doubleCounter() {

  console.log(info.counter * 2, info.name);
});

// watchEffect2
watchEffect(function powerCounter() {

  console.log(info.counter * info.counter);
});

// watchEffect3
watchEffect(function powerCounter() {

  console.log(info.counter + info.counter, info.name);
});

// doubleCounter();
// powerCounter()
// 4、当有数据发生改变的时候,如果有地方有依赖,应该再次执行(缺陷1)
// dep.addEffect(doubleCounter);
// dep.addEffect(powerCounter);

// 发生改变,直接调用dep.notify
info.counter++;
dep.notify(); //(缺陷2:依赖需要自己调notify())

info.name = "lisi";
dep.notify(); //(缺陷3:不应该依赖都收集到dep中)
3、vue2响应式的实现 - 数据劫持
// 依赖
class Dep {

  constructor() {

    // 1.给每个Dep一个集合. 里面的元素不会重复
    this.subscribers = new Set();
  }

  // addEffect(effect) {

  // // 2.往集合中添加元素,不是push,是add
  // this.subscribers.add(effect)
  // }

  // 6、封装depend()
  depend() {

    if (activeEffect) {

      this.subscribers.add(activeEffect);
    }
  }

  // 3.通知所有subscribers执行
  notify() {

    this.subscribers.forEach((effect) => {

      effect();
    });
  }
}

// 5、封装watchEffect
let activeEffect = null;
function watchEffect(effect) {

  // dep.addEffect(effect);
  activeEffect = effect;
  // dep.depend();
  effect();
  activeEffect = null;
}

// 8、返回dep对象
// Map({key:value}): 要求key是一个字符串
// WeakMap({key(对象): value}): 要求key是一个对象,这个对象是弱引用,弱引用的好处设置为空,垃圾回收机制会回收掉
const targetMap = new WeakMap();
function getDep(target, key) {

  // 1.根据target对象取出对应的Map对象
  let depsMap = targetMap.get(target);
  if (!depsMap) {

    depsMap = new Map();
    targetMap.set(target, depsMap);
  }

  // 2. 根据key(比如counter,name)取出具体的dep对象
  let dep = depsMap.get(key);
  if (!dep) {

    dep = new Dep();
    depsMap.set(key, dep);
  }
  return dep;
}

// 7、 vue2 对 row 进行劫持传入的对象
function reactive(raw) {

  // Objecet拿到所有的key,然后遍历它
  Object.keys(raw).forEach((key) => {

    const dep = getDep(raw, key);
    let value = raw[key];

    Object.defineProperty(raw, key, {

      // 获取数据使用get,只要调用watchEffect,里面使用了info.name,就会来到这里
      get() {

        dep.depend();
        return value;
      },
      // 设置数据使用set
      set(newValue) {

        value = newValue;
        dep.notify();
      },
    });
  });
  return raw;
}

// 上面是封装的响应式代码, 下面都是测试代码

const info = reactive({
     counter: 100, name: "chen" });
// info.name = "feng";

const foo = {
     height: 1.23 };

// const dep = new Dep();

// watchEffect1
watchEffect(function () {

  console.log("1:", info.counter * 2, info.name);
});

// watchEffect2
watchEffect(function () {

  console.log("2:", info.counter * info.counter);
});

// watchEffect3
watchEffect(function () {

  console.log("3:", info.counter + 10);
});

watchEffect(function () {

  console.log("4:", foo.height);
});

// doubleCounter();
// powerCounter()
// 4、当有数据发生改变的时候,如果有地方有依赖,应该再次执行
// dep.addEffect(doubleCounter);
// dep.addEffect(powerCounter);

// 发生改变,直接调用dep.notify
info.counter++;
info.name = "xiu";
// dep.notify();
4、vue3响应式的实现 - 数据劫持proxy

class Dep {

  constructor() {

    this.subscribers = new Set();
  }

  depend() {

    if (activeEffect) {

      this.subscribers.add(activeEffect);
    }
  }

  notify() {

    this.subscribers.forEach(effect => {

      effect();
    })
  }
}

let activeEffect = null;
function watchEffect(effect) {

  activeEffect = effect;
  effect();
  activeEffect = null;
}


// Map({key: value}): key是一个字符串
// WeakMap({key(对象): value}): key是一个对象, 弱引用
const targetMap = new WeakMap();
function getDep(target, key) {

  // 1.根据对象(target)取出对应的Map对象
  let depsMap = targetMap.get(target);
  if (!depsMap) {

    depsMap = new Map();
    targetMap.set(target, depsMap);
  }

  // 2.取出具体的dep对象
  let dep = depsMap.get(key);
  if (!dep) {

    dep = new Dep();
    depsMap.set(key, dep);
  }
  return dep;
}


// vue3对raw进行数据劫持
function reactive(raw) {

  return new Proxy(raw, {

    get(target, key) {

      const dep = getDep(target, key);
      dep.depend();
      return target[key];
    },
    set(target, key, newValue) {

      const dep = getDep(target, key);
      target[key] = newValue;
      dep.notify();
    }
  })
}

// const proxy = reactive({name: "123"})
// proxy.name = "321";


// // 测试代码
const info = reactive({
    counter: 100, name: "why"});
const foo = reactive({
    height: 1.88});

// watchEffect1
watchEffect(function () {

  console.log("effect1:", info.counter * 2, info.name);
})

// watchEffect2
watchEffect(function () {

  console.log("effect2:", info.counter * info.counter);
})

// watchEffect3
watchEffect(function () {

  console.log("effect3:", info.counter + 10, info.name);
})

watchEffect(function () {

  console.log("effect4:", foo.height);
})

// info.counter++;
// info.name = "why";

// foo.height = 2;
边栏推荐
- Talking about: is the HashSet set ordered or disordered /hashset set unique, why can we store elements with the same content
- Unity editor expansion - the framework and context of unity imgui
- Es8 async and await learning notes
- 了解小程序的笔记 2022/7/3
- 使用base64编码传图片
- [concurrent programming] collaboration between threads
- Message queue for interprocess communication
- Chocolate installation
- 【Rust 笔记】07-结构体
- Find the intersection of line segments
猜你喜欢

Query XML documents with XPath

Monotonic stack -42 Connect rainwater

First Servlet
![P1596 [USACO10OCT]Lake Counting S](/img/a7/07a84c93ee476788d9443c0add808b.png)
P1596 [USACO10OCT]Lake Counting S

ES6 promise learning notes
OpenGL learning notes

Chocolate installation
![[MySQL] MySQL Performance Optimization Practice: introduction of database lock and index search principle](/img/b7/7bf2a4a9ab51364352aa5e0a196b6d.jpg)
[MySQL] MySQL Performance Optimization Practice: introduction of database lock and index search principle

Log4j2 vulnerability recurrence and analysis

Analysis of Alibaba canal principle
随机推荐
[K & R] Chinese Second Edition personal questions Chapter1
22-06-27 Xian redis (01) commands for installing five common data types: redis and redis
First Servlet
Osgearth starry background
22-06-28 西安 redis(02) 持久化机制、入门使用、事务控制、主从复制机制
Visual Studio (VS) shortcut keys
Development experience and experience
[rust notes] 12 closure
GIS实战应用案例100篇(七十八)-多规合一数据库设计及数据入库
【Rust笔记】05-错误处理
请求参数的发送和接收
Concurrent programming (V) detailed explanation of atomic and unsafe magic classes
MySQL index types B-tree and hash
Intersectionpicker in osgearth
【Rust 笔记】07-结构体
Life cycle of Servlet
file_ put_ contents
[updating] wechat applet learning notes_ three
How does unity fixedupdate call at a fixed frame rate
php-fpm软件的安装+openresty高速缓存搭建