当前位置:网站首页>Introduction to QT: video player
Introduction to QT: video player
2022-07-08 02:16:00 【Strawberry sauce toast】
Recently, due to engineering needs , Begin to learn QT Programming .
Two points learned in this process :
- The program is not simply stacked , Be sure to understand the role of every sentence you write ;
- Careful and patient , look for bug It's a great waste of patience , So think about it before you start .
This article introduces you to use QT The process of implementing a simple video player , Introduce some entry-level knowledge points encountered in this process , And the solution .
introduction
1. QT Of “ Cross platform ” characteristic
I only knew QT It's cross platform , But yes. “ platform ” Your understanding is not accurate .
When we talk about developing applications , Platform may have many different meanings , Including operating system type 、 Operating system version 、 Compiler type 、 Compiler version and processor architecture (32 position 、64 position 、ARM etc. ).
QT frame : Open source application development framework widely used to create rich visual effects , You can build and compile between different platforms , And hardly need to change any line of code , But the premise is that no non QT Or platform specific libraries .(e.g. stay Windows The next program , If used windows The library of , You cannot migrate directly to ARM The use of .)
2. QT Supported compilers
MSVC , MinGW, GCC
3. OpenCV brief introduction
OpenCV It's open source 、 Cross platform library , For developing computer vision applications , Focus on speed and performance , It can be divided into main module and additional module .
OpenCV The main module :
- Core functions (core modular ), Included by all others OpenCV All basic structures used by the module 、 Constants and functions ,(e.g. Mat class );
- The image processing (imgproc modular ), Including image filtering 、 Different algorithms of image transformation ,(e.g. median, mean,......);
- Two dimensional feature frame module (feature2d), Contains classes and methods for feature extraction and matching ;(e.g. SURF, SIFT,......)
- Video module , Contains for motion estimation 、 Algorithms for background subtraction, tracking and other topics .
4. How to be in QT Of .pro Configuration in file OpenCV?
First , You need to select any folder ( Usually choose to build OpenCV Folder , To ensure that all are related to OpenCV All relevant files are in the same folder ), Create a folder named “opencv.pri” Text file for ;
Windows user
(1) stay opencv.pri Enter the following in the file :
INCLUDEPATH += C:/opencv/build/install/include
Debug:{
LIBS += -LC:/opencv/build/install/x64/vc16/lib/opencv_world330d
}
Release:{
LIBS += -LC:/opencv/build/install/x64/vc16/lib/opencv_world330
}
(2) take OpenCV Of DLL Add folder to system Path route ,DLL Folder location :C:/opencv/build/install/x64/vc16/bin
Macos/Linux user
stay opencv.pri Add the following to the file , There is no need to configure the path
INCLUDEPATH += /usr/local/include
LIBS += -L/usr/local/lib \
        -lopencv_world
To configure .pro file
stay .pro Add at the end of the file :
include(C:/opencv/opencv.pri)One 、 Interface layout
At first, I was in a state of confusion , Several projects have been established , Decide to build the interface first and then write the code . This process really breaks through itself “ be anxious for success ” Mentality and habits , I feel that learning programming is really like wild fungus , Learning in scattered ways is not enough to get started , So this semester always falls into ” How can I do this “ In self doubt ( I must have written too little to make this kind of critical hit more violent )
The final interface is shown in the figure 1
- Use QLabel Control displays an image
- Contains the selection file , Start 、 Pause play , Forward 、 back off , Display current progress and total length of video ;
- Save function : Save a single frame , Save a video ;
- Display adjustment : brightness 、 Contrast adjustment ; Enlarge the display and display the original size .
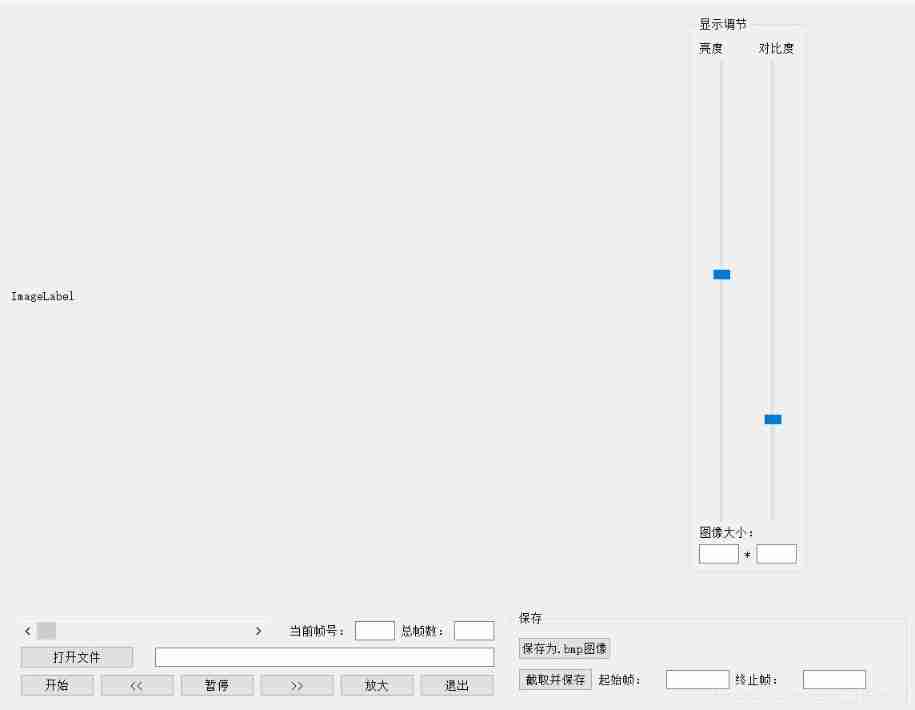
chart 1 Video player layout and functions to be realized
Two 、 Open file
The mode selected here is : Click on “ Open file ”, eject “ File selection dialog ”, The function used is :
https://blog.csdn.net/liyj127/article/details/54090705
QString filename = QFileDialog::getOpenFileName(this, "Open Input File",
                    QDir::currentPath(), "FileType (*.jpg *png *.bmp)");
if (QFile::exists(filename))
{
    ……
}
QString turn char*
QString  str;
char*  ch;
QByteArray ba = str.toLatin1(); // must
ch=ba.data();
3、 ... and 、QLabel Display images
The trouble with this step is that the author reads pixel values byte by byte from the file , And the value needs to be grayscale mapped and displayed as 8bit grayscale .
- Used to store 16-bit And 8-bit The data types of pixel values of are selected as unsigned short And unsigned char;
- To use QLable The display image needs data type conversion :unsigned char---> QImage---> QPixmap;
unsigned char Array rotation QImage
QImage qimg = QImage(&ch[0], img_width, img_height, m_width, QImage::Format_Grayscale8);The first parameter is zero char Array address ; second 、 The three parameters are the width and height of the image ; The fourth parameter is the number of bytes per line of the image ; The fifth parameter refers to QImage Format Introduction .
QLable Display images
//  Display image size and QLabel Same size
ui->ImageLabel->setPixmap(QPixmap::fromImage(qimg).scaled(ui->ImageLabel->size()));

//  Display the size of the original image
ui->ImageLabel->setPixmap(QPixmap::fromImage(qimg));

// QImage  turn  QPixmap
QPixmap pixmap = QPixmap::fromImage(qimg);
Four 、 Refresh the interface
Interface refresh use QTimer class
//  establish QTimer object
QTimer* qtimer = new QTimer(this);

//  Set refresh rate
qtimer->start(200);  //  Every time 200ms Refresh once

//  perhaps
qTimer->setInterval(200);
qTimer->start();

//  Judge timer The state of
qtimer->isActive();  // true --  Start refreshing ;false --  Stop refreshing

//  Stop refreshing
qtimer->stop();

//  binding update() function
connect(qtimer, SIGNAL(timerout()), this, SLOT(update()));
update() The function can be replaced by a custom slot function , But this function should include update() function .
5、 ... and 、 some Bug
1. Right click the control to automatically create a slot function , After the slot function is deleted ,moc_..... File compilation error
Solution : Not only in .cpp Delete the definition of slot function in the file , Also delete .h File slot function declaration and rebuild the project , Otherwise, an error will be reported when building the project .
2. Custom slot function
The custom slot function must be declared in private slots: below , For example, customized and timer Bound slot function
Otherwise connect It won't work !
3. Use pointer with caution
边栏推荐
- #797div3 A---C
- leetcode 866. Prime Palindrome | 866. prime palindromes
- WPF custom realistic wind radar chart control
- 关于TXE和TC标志位的小知识
- Le chemin du poisson et des crevettes
- Beaucoup d'enfants ne savent pas grand - chose sur le principe sous - jacent du cadre orm, non, ice River vous emmène 10 minutes à la main "un cadre orm minimaliste" (collectionnez - le maintenant)
- 谈谈 SAP 系统的权限管控和事务记录功能的实现
- Keras深度学习实战——基于Inception v3实现性别分类
- Semantic segmentation | learning record (4) expansion convolution (void convolution)
- Principle of least square method and matlab code implementation
猜你喜欢
![[knowledge map paper] attnpath: integrate the graph attention mechanism into knowledge graph reasoning based on deep reinforcement](/img/36/8aef4c9fcd9dd8a8227ac8ca57eb26.jpg)
[knowledge map paper] attnpath: integrate the graph attention mechanism into knowledge graph reasoning based on deep reinforcement

Many friends don't know the underlying principle of ORM framework very well. No, glacier will take you 10 minutes to hand roll a minimalist ORM framework (collect it quickly)

leetcode 865. Smallest Subtree with all the Deepest Nodes | 865. The smallest subtree with all the deepest nodes (BFs of the tree, parent reverse index map)

C language -cmake cmakelists Txt tutorial
Nmap tool introduction and common commands
Leetcode featured 200 channels -- array article

What are the types of system tests? Let me introduce them to you
![[knowledge map paper] r2d2: knowledge map reasoning based on debate dynamics](/img/e5/646ae977b8a0dc1b1ac2250602a2b9.jpg)
[knowledge map paper] r2d2: knowledge map reasoning based on debate dynamics
![[recommendation system paper reading] recommendation simulation user feedback based on Reinforcement Learning](/img/48/3366df75c397269574e9666fcd02ec.jpg)
[recommendation system paper reading] recommendation simulation user feedback based on Reinforcement Learning
![[knowledge atlas paper] minerva: use reinforcement learning to infer paths in the knowledge base](/img/cb/2cc490c11d88841e39c8b42dd88189.jpg)
[knowledge atlas paper] minerva: use reinforcement learning to infer paths in the knowledge base
随机推荐
Kwai applet guaranteed payment PHP source code packaging
CV2 read video - and save image or video
Semantic segmentation | learning record (1) semantic segmentation Preface
#797div3 A---C
Leetcode featured 200 channels -- array article
金融业数字化转型中,业务和技术融合需要经历三个阶段
Cross modal semantic association alignment retrieval - image text matching
MySQL查询为什么没走索引?这篇文章带你全面解析
Flutter 3.0框架下的小程序运行
Nacos microservice gateway component +swagger2 interface generation
See how names are added to namespace STD from cmath file
Semantic segmentation | learning record (3) FCN
Where to think
The way fish and shrimp go
VIM string substitution
魚和蝦走的路
VIM use
[recommendation system paper reading] recommendation simulation user feedback based on Reinforcement Learning
C language -cmake cmakelists Txt tutorial
Can you write the software test questions?