当前位置:网站首页>Explain the camera in unity and its application
Explain the camera in unity and its application
2022-07-28 20:54:00 【Dream small day young】
Preface
Unity in , Show players the wonderful game world through the camera . Developers can fix the player's perspective through the camera , Render a specific picture to present to the player . This paper introduces Camera Relevant parameters of components and some application examples and misunderstandings of how to use the camera .
Catalog
- Preface
- One 、 Introduction to camera components and parameters
- 1.ClearFlags: Clear the mark ( background )
- 2.Culling Mask: Select a render layer
- 3.Projection: Projection mode ( perspective ( Default ) and orthogonal )
- 4.Clipping Planes: Clipping plane
- 5.Viewport Rect: View rectangle ( Camera position width and height )
- 6.Depth: depth ( Camera rendering order )
- 7.Occlusion Culling: Shielding elimination switch
- 8. Other properties , Temporarily unavailable , I won't go into that
- Two 、 Example application of camera
- 3、 ... and 、 Summary and references
Front row reminders : This article only represents personal views , For exchange and learning , If you have different opinions, please comment , The author must study hard , Day day up .
When reading this article , If there is something you don't understand , It is recommended to watch the references listed in this article for comparison .
Unity edition [2019.4.10f1] Dream small day young & Prohibited reproduced 2022.4.3
Video Explanation :
Detailed explanation Unity The video camera _BiLiBiLi
One 、 Introduction to camera components and parameters
When you create a scene ,Unity It will automatically create one Main Camera, If you delete it , Then your world will be dark . We can do it in Hierarchy Window right , Create a Camera, Then you will find , Your world is bright again .
When we build Camera, Then you will find , It mounts three components , Namely Transform、Camera and Audio Listener, among Transform It is owned by every game object ,Camera and Audio Listener The ears and eyes of this camera . Now let's introduce in detail about Camera Component related parameters .

Create a new one Camera, Automatically add these three components .
1.ClearFlags: Clear the mark ( background )
When the camera renders the view , Will cache color and depth information , The part of the drawn image that is not drawn is blank , By default, the color of the sky box will be displayed .
- Sky Box: Use the sky box to fill the blank space , Render settings are used by default [Window-Rendering-Lighting Settings] Sky box in , If the rendering settings do not set the sky box , Will use the background color .

- Solid Color: Fill the blank with the camera background color
- Depth Only: No fill
It's easy to understand , Parts other than painting are filled with default black , If there are other cameras at this time (Depth Lower than current ), Fill in other camera pictures .

- Don’t Clear: Do not clear the color and depth cache .( Not much use here , No explanation. , Anyway, I don't understand )
Background: The background color ( When ClearFlags choice Solid Color when , This option works )
2.Culling Mask: Select a render layer
Render the object of the specified layer by selecting the layer ,Unity Each object in is assigned a layer , The default is “Default” layer

I put the cylinder and cube on the layer “Camera Culling Mask”, Through the demonstration, the reader should be able to understand that this parameter does
adopt Camera.cullingMask To modify this value in the code ,Int type , The default value is 0
3.Projection: Projection mode ( perspective ( Default ) and orthogonal )
- FOV Axis: Visual field axis
Vertical: Vertical axis , After this item is set , adjustment FieldOfView It will change the opening and closing angle of the camera
Horizontal: Horizontal axis , After this item is set , adjustment FieldOfView It will change the opening and closing angle of the camera - Field Of View: Range of view ( The camera's field of view is stretched ), The bigger the perspective , The larger the field of vision , At the same time, the shorter the focal length

Code can be passed through Camera.fieldOfView Class variable to modify this value , Unit degree , When the camera is in orthographic mode , This parameter is ignored
- Physical Camera: later , I haven't figured it out yet
- Size( Orthographic mode options ): Camera viewport size , Half of the area drawn by the camera in the vertical direction of the screen .
4.Clipping Planes: Clipping plane
seeing the name of a thing one thinks of its function ,Near and Far Specifies the region range of its clipping , If it is not in this range, it will not be rendered , It can save the amount of calculation , How many settings are appropriate , See the demand .

In the code, you can use Camera.farClipPlane and Camera.nearClipPlane Class variable to modify this value
5.Viewport Rect: View rectangle ( Camera position width and height )
Here are four values , among X and Y Represents the origin of the camera , Generally no change .
W and H Represents the width and height of the camera , Default 1 It is full screen , The screen coordinate system is used here to calculate , Readers who don't understand can go to my column to check about Unity Explanation of coordinate system in ( expect 22.4.10 Will write it out ),
It can be modified by W and H The effect of superimposing the views of two cameras . How to apply , Let's talk about it later

Here I set up two cameras , The main camera is rendered first , Then the camera in the lower left corner is rendered , And set the camera ClearFlags by Depth Only, This will not render superfluous parts , The effect shown in the above figure is achieved .
6.Depth: depth ( Camera rendering order )
Used to control the camera rendering order , Generally, those with small values will be rendered first , Larger values will be superimposed on the previous camera , The last example used , The order of cameras in the lower left corner is :0, The order of main background cameras is :-1, Therefore, it can ensure that the main background camera is rendered first , Then it is superimposed by the camera in the lower left corner .
adopt Camera.depth Class variable to modify this value in the code
7.Occlusion Culling: Shielding elimination switch
Checking this option will help improve game performance , For example, objects outside the scope of the camera , Will not be rendered

It should be noted that , Objects in the scene need to be pre calculated , And it is a static object , When checked Unity Can quickly and real-time judge whether the object is within the range of the camera .
8. Other properties , Temporarily unavailable , I won't go into that
In fact, I didn't understand , Add it after I understand
Two 、 Example application of camera
With the above parameters , Readers should basically understand Unity The camera in , Let's consolidate it with a few simple cases .
1. Control camera scene roaming
demand : adopt WASD To move the camera back and forth, left and right , adopt QE It can be lifted and lowered , Hold down Shift Can speed up .
You can zoom the view through the mouse wheel , Press the right mouse button and move , You can rotate the camera
The dynamic diagram of the demonstration is as follows :

In fact, the whole part of the code does not apply too many camera related parameters , The example is simple . But the code is smelly and long , For novice reference , No quality . And this code has Bug, The rotation is not locked Z Axis , This will cause the camera to rotate around the center for no reason .
High EQ : Please find out Bug And repair
Low EQ : I'm too lazy to write
    public Camera camera_;
    //  Camera movement speed and rotation sensitivity
    public float mouseSenstivity = 100;
    public float speed = 5;
    void Update()
    {
        // The keyboard controls the camera movement
        Move_Update();

        // The mouse wheel controls the scene zoom
        MousewheelZoom_Update();

        // Right click to control the scene rotation
        MousergihtRot_Update();
    }
    private void Move_Update()
    {
        if (Input.GetKey(KeyCode.W))
        {
            camera_.transform.Translate(Vector3.forward * Time.deltaTime * speed);
        }
        if (Input.GetKey(KeyCode.S))
        {
            camera_.transform.Translate(Vector3.back * Time.deltaTime * speed);
        }
        if (Input.GetKey(KeyCode.A))
        {
            camera_.transform.Translate(Vector3.left * Time.deltaTime * speed);
        }
        if (Input.GetKey(KeyCode.D))
        {
            camera_.transform.Translate(Vector3.right * Time.deltaTime * speed);
        }
        if (Input.GetKey(KeyCode.Q))
        {
            camera_.transform.Translate(Vector3.up * Time.deltaTime * speed);
        }
        if (Input.GetKey(KeyCode.E))
        {
            camera_.transform.Translate(Vector3.down * Time.deltaTime * speed);
        }

    }
    private void MousewheelZoom_Update()
    {
        if (Input.GetAxis("Mouse ScrollWheel") < 0)
        {
            camera_.fieldOfView += 2;
        }
        if (Input.GetAxis("Mouse ScrollWheel") > 0)
        {
            camera_.fieldOfView -= 2;
        }
    }
    private void MousergihtRot_Update()
    {
        if (Input.GetMouseButton(1))
        {
            // X The shaft controls up and down rotation ,Y The axis controls the left and right rotation
            float mouseX = Input.GetAxis("Mouse X") * Time.deltaTime * mouseSenstivity;
            float mouseY = Input.GetAxis("Mouse Y") * Time.deltaTime * mouseSenstivity;

            //  Pay attention here because X The axis controls up and down ,Y The axis controls the left and right
            //  and mouseX The left and right values of the screen are returned , All of them switched
            //  Again because mouseY Downward is negative , And the camera Y When the axis is downward, it is positive , On the other hand mouseY A negation is made .
            //  If you can't understand it here , I recommend reading the first blog post in resources , Sum up Unity Related movement control methods .
            camera_.transform.Rotate(new Vector3((0f - mouseY), mouseX, 0));
        }
    }
3、 ... and 、 Summary and references
1. summary
There's nothing to summarize , Mainly remember the functions of several parameters of the camera .
2. Reference material
[1]. Dream of a young man . Detailed explanation Unity Mobile control implementation
[2]. Dream of a young man . Detailed explanation Unity Several mobile ways of
[3]. Xueting .unity in camera Camera control details
[4]. Lingbao'er .Unity Physical Camera in Focal Length and Field of View Relationship
[5].syddf_shadow. Sky box (SkyBox) The implementation principle and details of
[6]. Game bulls .[ Manniu tutorial ] Unity3D elementary analysis -Camera( The camera )
[7]. Xingxiaopeng .unity movie camera depth Pattern _Unity3d Camera details
边栏推荐
- Learn about the native application management platform of rainbow cloud
- 7/27 训练日志(位运算+后缀数组)
- 太空射击第11课: Sound and Music
- What is data center? What value does the data center bring_ Light spot technology
- Fragment中使用ViewPager滑动浏览页面
- Space shooting Lesson 11: sound and music
- Record an error in runtime. Getruntime().Exec ("command")
- [complete collection of common ADB commands and their usage (from a comprehensive summary of [wake up on Sunday)]
- 关于正则的两道笔试面试题
- 【1331. 数组序号转换】
猜你喜欢
Thinking and summary of R & D Efficiency
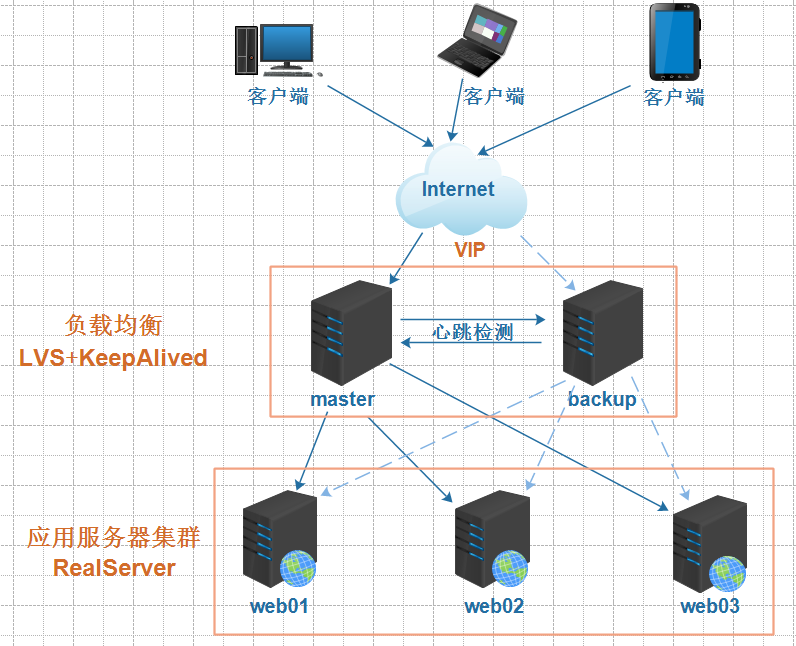
LVS+KeepAlived高可用部署实战应用

Redis入门二:redhat 6.5安装使用

How bad can a programmer be? Nima, they are all talents

Learn about the native application management platform of rainbow cloud

第六七八次作业

js图表散点图例子

既要便捷、安全+智能,也要颜值,萤石发布北斗星人脸锁DL30F和极光人脸视频锁Y3000FV

不懂就问,快速成为容器服务进阶玩家!

Classes and objects (medium)
随机推荐
Algorithm interview high frequency problem solving guide [1]
Interpretation of ue4.25 slate source code
js图表散点图例子
一文了解 Rainbond 云原生应用管理平台
3D激光SLAM:LeGO-LOAM论文解读---简介部分
View the thread stack according to the lwtid of opengauss/mogdb.
Unity typewriter teaches you three ways
Classes and objects (medium)
阿里云 MSE 支持 Go 语言流量防护
Integrating database Ecology: using eventbridge to build CDC applications
作业 ce
Establishment of flask static file service
What is "security"? Volvo tells you with its unique understanding and action
PXE_ KS unattended system
js可拖拽alert弹窗插件
js飞入js特效弹窗登录框
Lvs+keepalived high availability deployment practical application
Random talk on GIS data (VI) - projection coordinate system
什么是数据中台?数据中台带来了哪些价值?_光点科技
Alibaba cloud MSE supports go language traffic protection