当前位置:网站首页>Express接收请求参数
Express接收请求参数
2022-07-27 05:23:00 【THER1881】
一、Express接收请求参数
1、接收get请求参数:使用req.query接收
req.query.参数名
演示;
1.1、在WebStrom中创建express项目:

1.2、创建完成后,运行服务器,检查是否在3000端口上成功运行:
1.3、创建路由,命名为gets.js:
const express = require('express')
const router = express.Router()
//创建get请求的处理代码
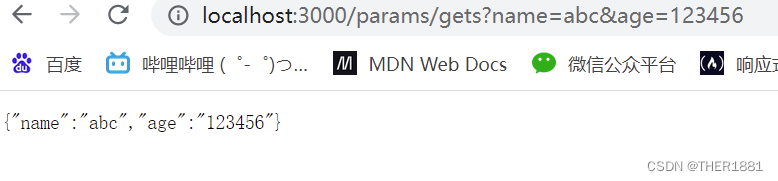
http://localhost:3000/params/gets
router.get('/gets',(req, res) => {
//通过req.query接收get请求的参数
res.send(req.query)
console.log(req.query)
})
module.exports = router
1.4、配置app.js文件:
var getparamsRouter=require('./routes/getparams');
app.use('/params',getparamsRouter);
需要注意的是在配置app.js时,导入自定义路由文件时必须放在
var app = express()前,否则可能会出现错误。
图示:
1.5、在Apipost中进行调试

2、接收post请求参数:使用req.body接收
req.body.参数名
post请求前期的创建express项目等步骤和get请求一致,这里就不在做演示。
2.1、创建post.js
演示:
const express = require('express')

const router = express.Router()

//创建post请求的处理代码

router.post('/posts',(req, res) => {

    res.send(req.body)
    console.log("姓名"+req.body.username)
    console.log("密码"+req.body.pwd)

})

module.exports = router
依旧先在Apipost中调试
2.2在客户端中进行验证:
首先创建HTML页面:
<!DOCTYPE html>
<html lang="en">
<head>
<meta charset="UTF-8">
<meta http-equiv="X-UA-Compatible" content="IE=edge">
<meta name="viewport" content="width=device-width, initial-scale=1.0">
<title>Document</title>
</head>
<style>
div{
width: 300px;
margin: 100px 600px 500px 400px;
}
</style>
<body>
<div>
<form action="http://localhost:3000/params/gets" method="get">
<label for="">
用户名:
<input type="text" name="username">
</label>
<br><br>
<label for="">
密 码:
<input type="password" name="pwd" id="">
</label>
<br><br>
<button type="submit">提交</button>
</form>
</div>
</body>
</html>
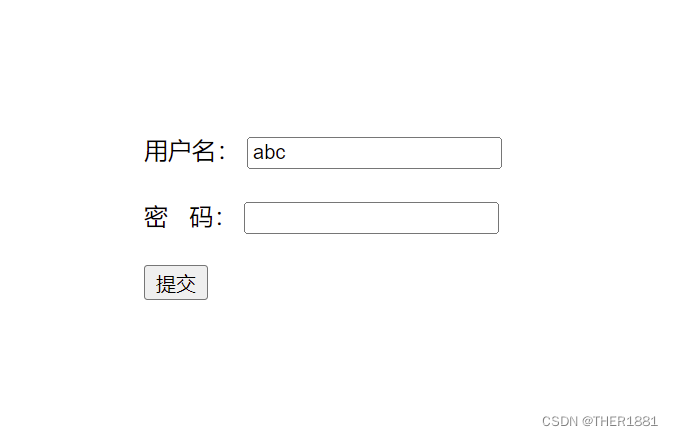
点击提交后:

3、接收路由参数
定义路由时,在请求路径中传递的参数例如请求路径“/find/:id”中的“:id”是一个参数占位符,当浏览器向“/find/:id”地址发送请求时,“:id”对应的值就是参数值。在接收参数时,使用req.params
演示:
3.1、gets.js:
const express = require('express')
const router = express.Router()
router.get('/find/:id/:addr',(req, res) => {

    res.send(req.params)
    console.log('路由参数:'+req.params.id)
    console.log('路由参数:'+req.params.addr)
})
module.exports = router
3.2、进行验证:

边栏推荐
- 自己动手实现容器
- About the problem that Druid can't connect to the database
- The difference between malloc and new - Practical chapter
- shell--条件语句(if语句、case语句)
- 项目实训经历1
- Soul continues to make efforts to list its social channels in Hong Kong. Why is "soul style social" popular?
- Use of getattr, hasattr, delattr and setattr in reflectors
- LAMP--源码编译安装
- Explanation of server related indicators
- 1. Install redis in CentOS 7
猜你喜欢


随机推荐
Cesium tutorial (1) interface introduction -3dfiles loading - change mouse operation settings
ArcGIS for JS API entry series
Establishment of FTP server
网站服务器被攻击怎么办?向日葵提示防范漏洞是关键
Markdown文档常用字体及颜色设置
Decorator functions and the use of class decorators
Rsync remote synchronization
KVM command set management virtual machine
Iptables firewall
shell--变量的运算
Shell脚本删除自动清理超过大小的文件
Basic knowledge of English: Rules for using attributives Part 2
Concept and principle of DHCP
shell函数
What "hard core innovations" does Intel have in the first half of 2022? Just look at this picture!
1. CentOS 7 安装 redis
NAT(网络地址转换)
torch加载自定义模型的问题
Soul持续发力社交渠道赴港上市,“Soul式社交”凭什么火出圈?
Webodm win10 installation tutorial (personal test)