当前位置:网站首页>MySQL installation steps (detailed)
MySQL installation steps (detailed)
2022-06-30 00:52:00 【Programmer base camp】
One 、 brief introduction
MySQL It's Sweden MySQL AB The company develops a relational database management system , At present belongs to the Oracle Its products .MySQL Is one of the most popular relational database management systems , stay WEB Application aspect ,MySQL It's the best RDBMS (Relational Database Management System, Relational database management system ) Application software .
Two 、 Installation steps
1. download MySQL Installation package , You can download it on the official website
https://dev.mysql.com/downloads/mysql/
You can also go to this address to download , Download the installation package already prepared here
link :https://pan.baidu.com/s/1Hv9U9vT078r9rkVIRhZqog
Extraction code :1234
2. Open the installation package after downloading , find mysql-5.5.58-winx64.msi, Double click to start installation 
3. single click 【Next】 continue installation 
4. license agreement , Check “I accept the terms…”, single click 【Next】 continue installation 
5. The select installation type window appears , Yes “typical( Default )”、“Complete( Completely )”、“Custom( User customization )” Three options , We choose “Custom”, Because customization can make us more familiar with its installation process , single click 【Next】 continue installation 
6… Select... In the user defined installation interface mysql Database installation path , What I'm setting up here is “d:\Program File\mysql”, Be careful : The installation path folder name cannot appear in Chinese , And then click 【Next】 continue installation 
7. Next, go to the ready to install interface , First confirm the previous settings , If there is any mistake , Press “Back” return , There is no mistake , single click 【Install】 Button to continue installation 
8. single click “Install” The following installation interface appears after the button , After a little time ,MySQL Database installation complete , Appear complete MySQL Installed interface 

9. Check the top “Launch the MySQL InstanceConfiguration Wizard” Options , This is startup MySQL Configuration of , single click 【Finish” Button 】 Enter the configuration interface 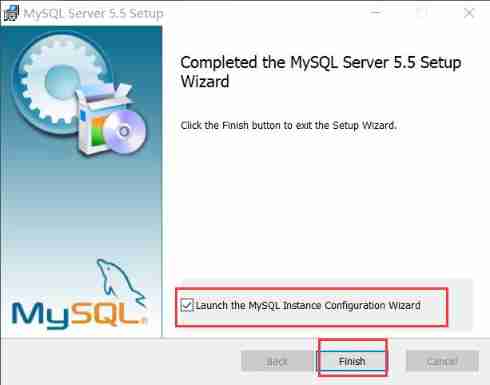
10.MySQL The database installation is very simple , The key is the configuration after installation , Click Finish to open the following configuration interface wizard , single click 【Next】 To configure 
11. Select the configuration method in the open configuration type window ,“Detailed Configuration( Manual precise configuration )”、“Standard Configuration( Standard configuration )”, To familiarize yourself with the process , We check the “Detailed Configuration”, single click 【Next】 continue 
12. In the window that appears , Select the type of server ,“Developer Machine( Develop test class )”、“Server Machine( Server type )”、“Dedicated MySQL Server Machine( Dedicated database server )”, We are just learning and testing , By default , single click 【Next】 continue 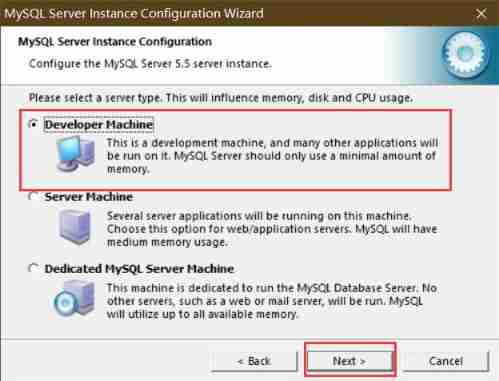
13. Select... In the configuration interface that appears mysql The purpose of the database ,“Multifunctional Database( Versatile )”、“Transactional Database Only( Server type )”、“Non-Transactional Database Only( Non transactional )”, Here I choose the first item , General installation , single click 【Next】 Continue configuration 
14. In the interface that appears , Carry out the alignment InnoDB Tablespace To configure , Is to InnoDB Database file select a storage space , If it changes , Remember the location , Choose the same place when reloading , Otherwise, the database may be damaged , Of course , It's OK to make a backup of the database 
15. In the open page , choice mysql Of visits , Number of simultaneous connections ,“Decision Support(DSS)/OLAP(20 about )”、“Online Transaction Processing(OLTP)(500 about )”、“ManualSetting( Manual settings , Set to 15 individual ) Here select manual settings , single click 【Next】 continue 
16. Set whether to enable... In the open page TCP/IP Connect , Set port , If not enabled , You can only access it on your own machine mysql Database , This is also the connection java The operation of , The default port is 3306, And enable strict syntax settings , single click 【Next】 continue 
17. In the open character encoded page , Set up mysql The character encoding to use , The first one is western language coding , The second is multi byte general purpose utf8 code , The third is manual , We choose utf-8 Or is it gbk, single click 【Next】 Continue configuration 
18. In the open page, select whether to mysql Installed as windows service , You can also specify Service Name( Service ID name ), Whether or not to mysql Of bin Add directory to WindowsPATH( After joining , You can use it directly bin The files under the , Instead of pointing out the directory name , For example, connection. ,“mysql –u username –p password;” That's all right. , single click 【Next】 Continue configuration 
19. In the open page, set whether you want to modify the default root user ( Super administrator ) Password ( The default is empty. ),“New root password”, If you want to modify , Just fill in the new password here , And enter the password again , Keep both entries the same , And enable the root Remote access function , Do not create anonymous users , single click 【Next】 Continue configuration 
20. All the configuration operations have been completed , single click 【Execute】 Button to execute configuration 
21. After a few minutes , The following prompt interface appears to represent MySQL The configuration is over , And prompt the successful information 
22. In the service mysql Database start , And enter... In the command window “mysql –h localhost –u root -p”, Then enter the user's password in the prompt that appears , As you can see from the diagram mysql After the database is started , Successfully logged in , Here we can operate the database 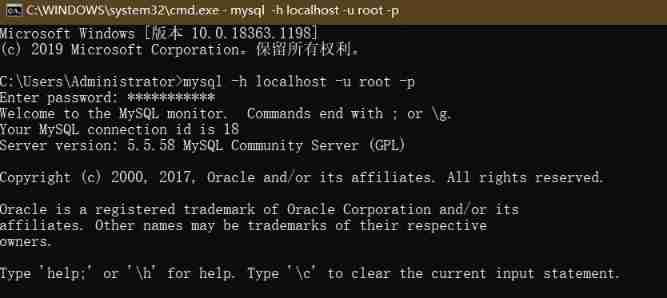
边栏推荐
- [lorawan node application] the application and power consumption of Anxin ra-08/ra-08h module in lorawan network
- Which department should the company's fixed assets be managed? How should the company's fixed assets be managed
- Comment personnaliser les modèles et générer rapidement le code complet dans l'idée?
- 【云原生】容器场景下的内核安全
- Birds in the corn field
- [PHP] PHP pressure test, error reporting: generally, each socket address (Protocol / network address / port) is only allowed to be used
- Modbus TCP RTU protocol chart
- How to design test cases
- [PHP] PHP variable memory release
- Live broadcast configuration of crmeb knowledge payment system program configuration (method 2)
猜你喜欢

Mysql Duplicate entry ‘xxx‘ for key ‘xxx‘

Online text digit recognition list summation tool

Mr. Hu Bo, CIO of weiduomei, a scientific innovator: digitalization is a bloodless revolution, and the correct answer lies in the field of business

What is the essential difference between get and post requests?

Common settings in idea

Which direction of network development is better? Data communication engineer learning path sharing

In 2022, the latest and most detailed idea associated database method and visual operation of database in idea (including graphic process)
优秀的测试/开发程序员与普通的程序员对比......
在线文本数字识别列表求和工具

作文总写不好怎么办?猿辅导:家长要注意这几点
随机推荐
Command line Basics
shell 规范日期格式
数据中台咋就从“小甜甜”变成了“牛夫人”?
Ml: introduction to confidence interval (the difference and relationship between precision / accuracy / accuracy), use method, and detailed introduction to case application
作文总写不好怎么办?猿辅导:家长要注意这几点
[garment software] what are the criteria for the selection of garment production management system?
出门在外保护好自己
Database learning notes (sql03)
开发者,为什么说容器技术的成熟预示着云原生时代的到来?
xshell中怎么切换到root用户
Bytek suffered a disastrous defeat in the interview: he was hanged on one side, but fortunately Huawei pushed him in, and he got an offer on three sides
TwinCAT 3 el7211 module controls Beifu servo
[proteus simulation] 8-bit port detection 8 independent keys
About the case of SQL statements
Which department should the company's fixed assets be managed? How should the company's fixed assets be managed
【云原生】容器场景下的内核安全
【深度学习编译】算子编译 IR 转换
阿四的情绪波动
[daily question 1] traversal of binary tree
Text classification using huggingface