当前位置:网站首页>MPLS综合实验
MPLS综合实验
2022-08-03 23:47:00 【qq_52178594】
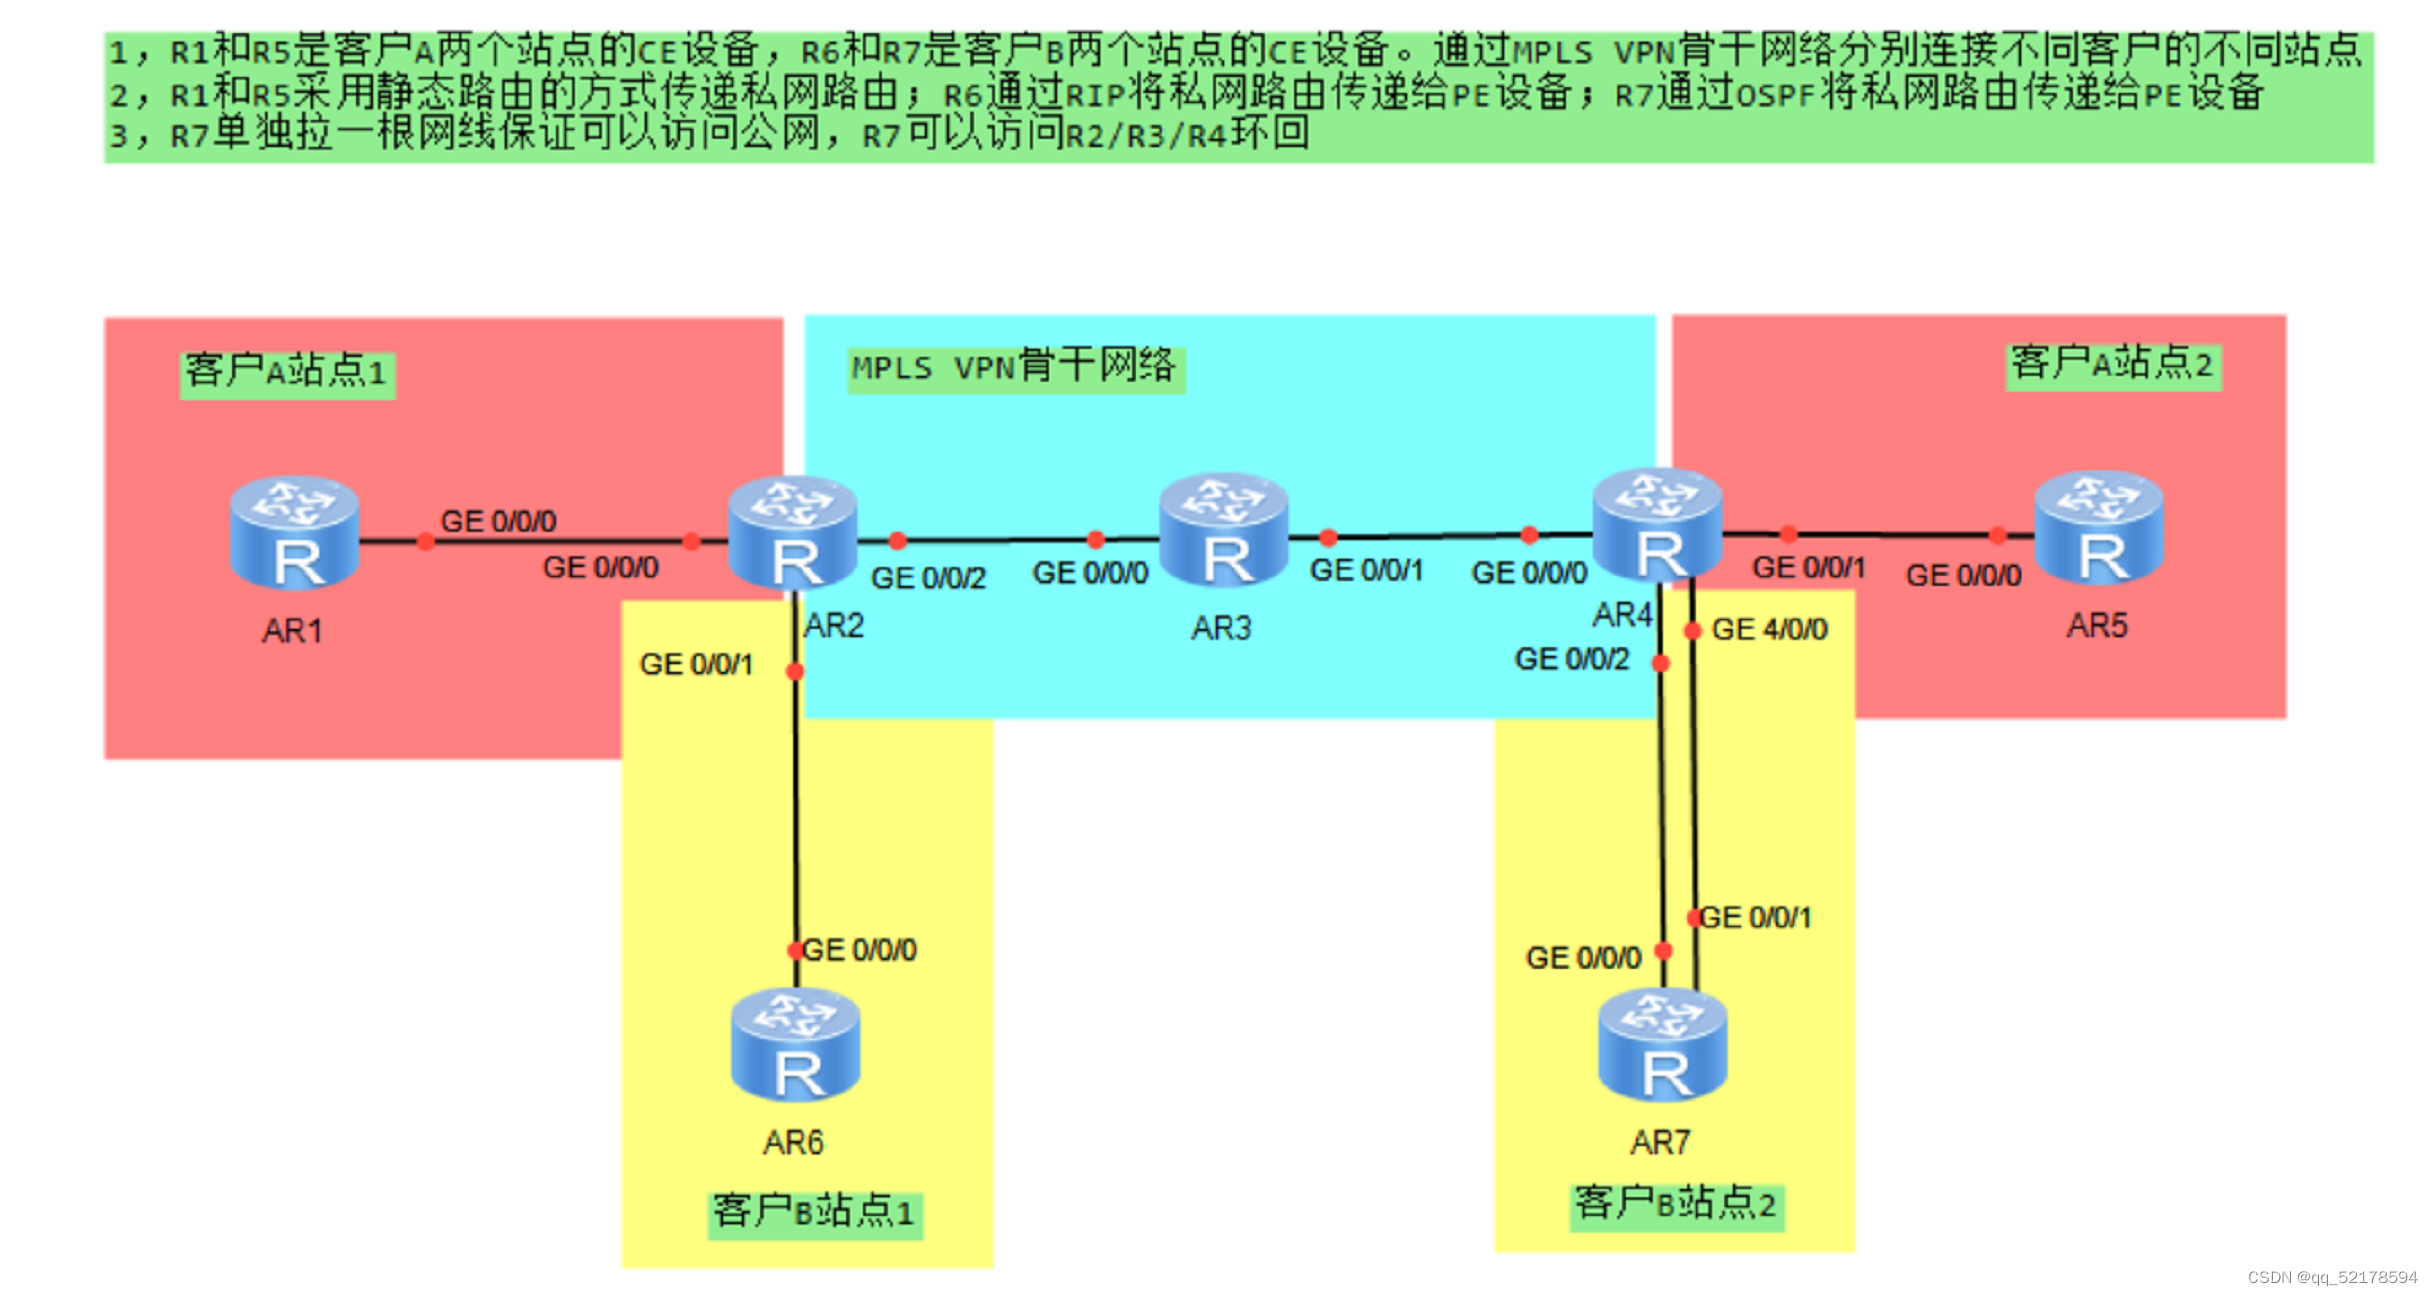
1.实验要求及其拓扑图:
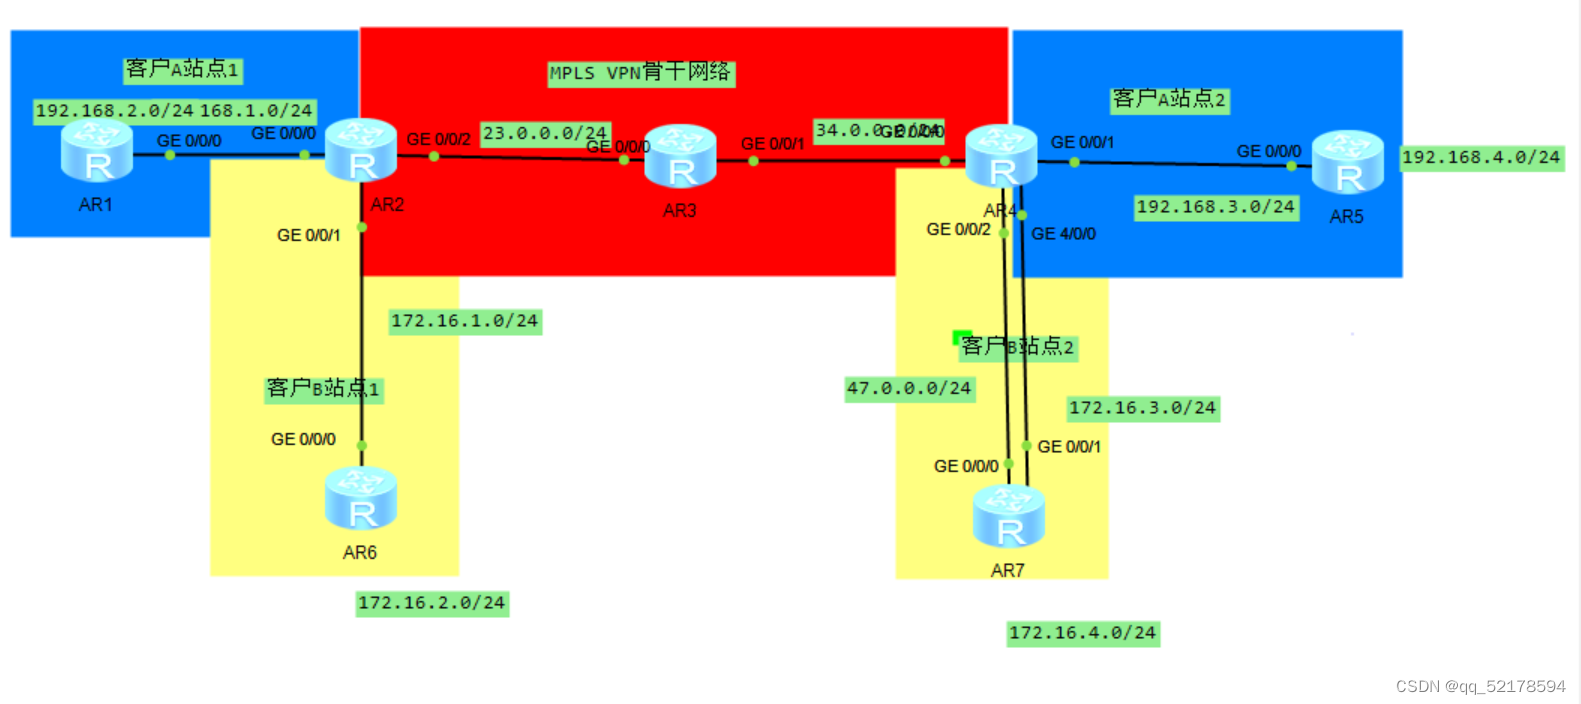
2.划分好IP 的拓扑图
3.实验分析:
1,R1和R5是客户A两个站点的CE设备,R6和R7是客户b两个站点的CE设备。通过MPLS VPN骨干网络分别连接不同客户的不同站点
2,R1和R5采用静态路由的方式传递私网路由;R6通过RIP将私网路由传递给PE设备;R7通过OSPF将私网路由传递给PE设备
3,R7单独拉一根网线葆证可以访问公网,R7可以访问R2/R3/R4环回
1.进行公网IP的配置同时创建环回接口(这里仅展示R2)
[r2]int g 0/0/2
[r2-GigabitEthernet0/0/2]ip ad 23.0.0.1 24
Aug  1 2022 15:33:31-08:00 r2 %%01IFNET/4/LINK_STATE(l)[0]:The line protocol IP
on the interface GigabitEthernet0/0/2 has entered the UP state.
[r2-GigabitEthernet0/0/2]int l0
[r2-LoopBack0]ip ad 2.2.2.2 24
[r2-LoopBack0]q
查看ip配置情况

2.用OSPF来宣告路由
R2 ospf配置
[r2]ospf 1 router-id 2.2.2.2
[r2-ospf-1]a 0
[r2-ospf-1-area-0.0.0.0]net 2.2.2.2 0.0.0.0
[r2-ospf-1-area-0.0.0.0]net 23.0.0.0 0.0.0.255


R3 ospf 配置
[r3]ospf 1 router-id 3.3.3.3
[r3-ospf-1]a 0
[r3-ospf-1-area-0.0.0.0]net 3.3.3.3 0.0.0.0
[r3-ospf-1-area-0.0.0.0]net 23.0.0.0 0.0.0.255
[r3-ospf-1-area-0.0.0.0]net 34.0.0.0 0.0.


R4 ospf 配置
[r4]ospf 1 router-id 4.4.4.4
[r4-ospf-1]a 0
[r4-ospf-1-area-0.0.0.0]net 4.4.4.4 0.0.0.0
[r4-ospf-1-area-0.0.0.0]net 34.0.0.0 0.0.0.255
查看用ospf获取到的路由(仅展示R4)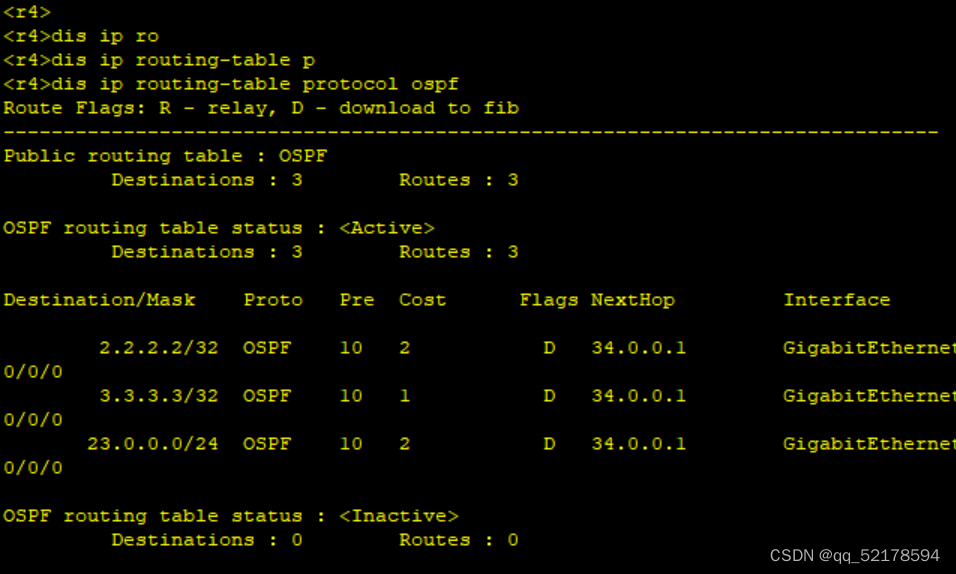
3.创建MPLS
[r3]mp lsr-id 3.3.3.3    ---mpls的router-id,要为本地设备的真实ip地址,且邻居可达
[r3]mpls                ---全局开启mpls协议
Info: Mpls starting, please wait... OK!
[r3-mpls]mpls ldp         ---激活LDP协议
接口开启且激活
[r3-mpls-ldp]int g 0/0/0
[r3-GigabitEthernet0/0/0]mpl
[r3-GigabitEthernet0/0/0]mpl ldp
[r3-GigabitEthernet0/0/0]int g 0/0/1
[r3-GigabitEthernet0/0/1]mpl
[r3-GigabitEthernet0/0/1]mpl ld

注:每个接口都需要
4.配置MPLS-VPN(R4也需配置)
[r2]ip v
[r2]ip vpn-instance a            ---创建名为a的vrf空间
[r2-vpn-instance-a]route-distinguisher 100:100	---配置RD值
[r2-vpn-instance-a-af-ipv4]vpn-target 100:1 both   ---配置PT值
[r2-vpn-instance-a-af-ipv4]q
[r2-vpn-instance-a]q
[r2]ip v
[r2]ip vpn-instance b
[r2-vpn-instance-b]route-distinguisher 200:200
[r2-vpn-instance-b-af-ipv4]vpn-target 200:1 both
[r2-vpn-instance-b-af-ipv4]q
[r2-vpn-instance-b]q
[r2]int g 0/0/0
[r2-GigabitEthernet0/0/0]ip binding vpn-instance a    ---关联到vrf空间
[r2-GigabitEthernet0/0/0]ip ad 192.168.2.2 24    ---配置私有ip地址
[r2-GigabitEthernet0/0/0]int g 0/0/1
[r2-GigabitEthernet0/0/1]ip binding vpn-instance b
[r2-GigabitEthernet0/0/1]ip ad 172.16.2.2 24
5.私网地址根据划分好的IP配置即可,该处省略
6.BGP建邻
R2
[r2]bgp 1
[r2-bgp]router-id 2.2.2.2
[r2-bgp]peer 4.4.4.4 as 1
[r2-bgp]peer 4.4.4.4 connect-interface LoopBack 0 ----选择环回建邻
[r2-bgp]ipv4-family vpnv4
[r2-bgp-af-vpnv4]peer 4.4.4.4 en

R4:
[r4]bgp 1
[r4-bgp]router-id 4.4.4.4
[r4-bgp]peer 2.2.2.2 as 1
[r4-bgp]peer 2.2.2.2 connect-interface LoopBack 0
[r4-bgp]ipv4-family vpnv4
[r4-bgp-af-vpnv4]peer 2.2.2.2 enable
7.静态路由配置
[r1]ip route-static 192.168.3.0 24 192.168.2.2
[r1]ip route-static 192.168.4.0 24 192.168.2.2

[r2]ip route-static vpn-instance a 192.168.1.0 24 192.168.2.1

[r4]ip route-static vpn-instance a 192.168.4.0 24 192.168.3.2

[r5]ip route-static 192.168.1.0 24 192.168.3.1
[r5]ip route-static 192.168.2.0 24 192.168.3.1
8.进入BGP中发布路由
[r2-bgp]ipv4-family vpn-instance a
[r2-bgp-a]import-route direct
[r2-bgp-a]import-route static


[r4-bgp]ipv4-family vpn-instance a
[r4-bgp-a]import-route d
[r4-bgp-a]import-route s
9.R6和R7分别进行RIP,和OSPF配置,并进行重发布(IGP配置略,只展示重发布)
[r2]bgp 1
[r2-bgp]ipv4-family vpn-instance b
[r2-bgp-b]import-route rip 1
[r2-bgp-b]q
[r2-bgp]q
[r2]rip
[r2-rip-1]import-route bgp

[r4]bgp 1
[r4-bgp]ipv4-family vpn-instance b
[r4-bgp-b]import-route ospf 2
[r4-bgp-b]q
[r4-bgp]q
[r4]ospf 2
[r4-ospf-2]import-route bgp
10.配置缺省,使R7可以访问R2/R3/R4环回。
[r7]ip route-static 0.0.0.0 0 47.0.0.14.实验结果验证:
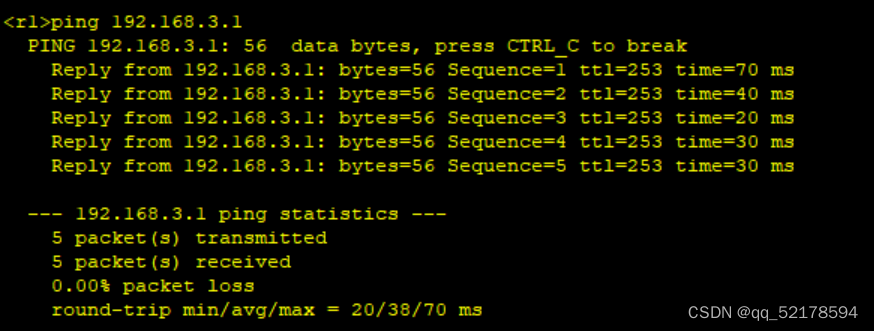
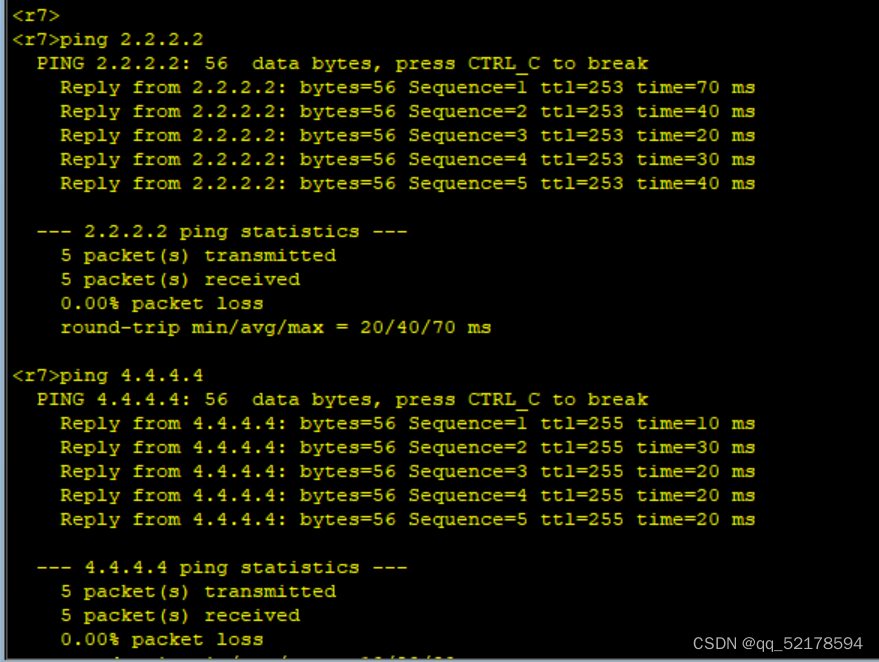
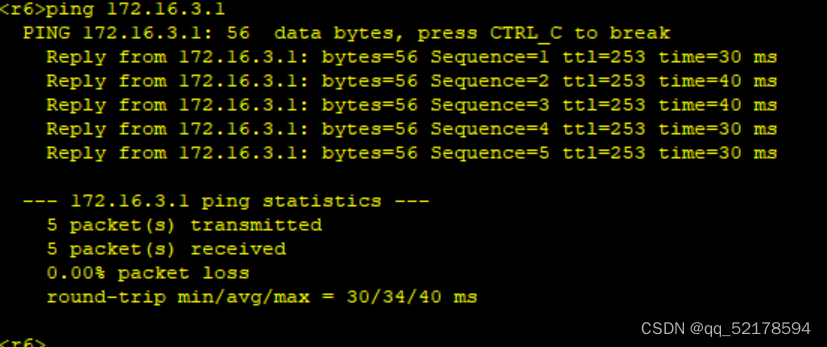
边栏推荐
- In V8 how arrays (with source code, picture and text easier to understand)
- 单例模式使用饿汉式和懒汉式创建一定安全?很多人不知
- A simple understanding of TCP, learn how to shake hands, wave hands and various states
- FinClip, help smart TV more imagination
- XSLT – 服务器端概述
- V8中的快慢数组(附源码、图文更易理解)
- 禾匠编译错误记录
- libnet
- 3D 语义分割——2DPASS
- Unity2021发布WebGL雾效消失问题
猜你喜欢
随机推荐
Creo 9.0二维草图的诊断:重叠几何
IELTS essay writing template
[2022强网杯] polydiv和gamemaster
射频芯片ATE测试从入门到放弃之参数测试
POE交换机全方位解读(下)
密码学基础以及完整加密通讯过程解析
Go编译原理系列7(Go源码调试)
2021年数据泄露成本报告解读
走迷宫 BFS
软件测试内卷严重,如何提升自己的竞争力呢?
七夕活动浪漫上线,别让网络拖慢和小姐姐的开黑时间
3D 语义分割——2DPASS
Code Casual Recording Notes_Dynamic Programming_416 Segmentation and Subsetting
libnet
redis持久化方式
响应式织梦模板餐饮酒店类网站
(PC+WAP)织梦模板不锈钢类网站
2022/8/3 Exam Summary
The Chinese Valentine's Day event is romantically launched, don't let the Internet slow down and miss the dark time
用两个栈模拟队列


