当前位置:网站首页>『网易实习』周记(三)
『网易实习』周记(三)
2022-08-02 01:40:00 【Liknananana】
『网易实习』周记(三)
本周知识清单:
- kotlin基础
- jar包和arr包的区别
- 分析Google的MVVM架构的案例
- LiveData与MutableLive的区别
- kotlin lamda语法
- kotlin的匿名内部类
- kotlin函数式编程
- RxJava
kotlin基础
学习一个知识当然是看官方文档了,推荐阅读:kotlin中文官方文档菜鸟教程 ,我前些时间看了文档之后在公司接手真实项目的时候,发现里面很多高级用法没怎么看懂,所以又去恶补了一下,关于这些我看的文章推荐:
从Java过渡到kotlin
"Kotlin"系列: 一、Kotlin入门
"Kotlin"系列: 二、Kotlin泛型
Lambda语法在Java中已经被广泛的运用,我们在开发Android中几乎上每一个项目也会在项目中接入Lambda插件,因为Lambda确实能减少很多的代码量。无独有偶,在Kotlin中也是Lambda语法的,在这篇文章中就详细的为大家讲解Lambda语法的编写与使用
后期自己也会出一些kotlin的读书笔记,欢迎关注
jar包和arr包的区别
最近学了组件化,发现我们公司组件化项目没有用ARouter路由组件,我很好奇,就去问了项目架构的前辈,他问我公司代码都是分文两个部分的
java包和sdk包,java就是真实的业务逻辑,不会暴露给外界,sdk包就是这个模块提供给外界的接口,我们通过把sdk打包成jar包,其他包要用的话直接引入就好了,这样也能实现页面跳转,为什么不用ARouter呢?前辈说:ARouter要配置路由路径,路由路径是字符串,如果配置错了很难被发现,但是如果调用接口的话,编译就没法通过了,算是一个减少错误出现的概率
**jar包与aar包文件的区别 **:
两者区别:
*.jar:只包含了class文件与清单文件,不包含资源文件,如图片等所有res中的文件。
*.aar:包含所有资源,class以及res资源文件全部包含
如果你只是一个简单的类库那么使用生成的.jar文件即可;如果你的是一个UI库,包含一些自己写的控件布局文件以及字体等资源文件那么就只能使用.aar文件。
推荐阅读:android studio library生成jar包和aar的方法总结
分析Google的MVVM架构的案例
案例地址:https://github.com/android/architecture-components-samples/tree/main/BasicSample
之前由于公司的项目都是MVVM的架构,自己为了跟的上然后自己学了Jetpack里面的ViewModel和DataBinding LiveData然后自己也没写过项目,所以对这个目前是一知半解,然后最近这一周有需求了,公司的项目很大,然后就看的头晕后来导师让我去阅读google的案例,谷歌的案例就是一个商品列表,点进去就是商品详情页,这次分析主要是从一次数据请求开始,分析一次完整的数据请求,特此记录一下

先看项目结构:
public class BasicApp extends Application {


    private AppExecutors mAppExecutors;

    @Override
    public void onCreate() {

        super.onCreate();
        // 创建一个线程处理类
        mAppExecutors = new AppExecutors();
    }

    //返回了一个数据库操做类
    public AppDatabase getDatabase() {

        return AppDatabase.getInstance(this, mAppExecutors);
    }

    // 返回以一个数据存储仓库的类
    public DataRepository getRepository() {

        return DataRepository.getInstance(getDatabase());
    }
}
//这个是主页加载那个list的商品类,就从这个类分析数据的加载请求
public class ProductListFragment extends Fragment {


    public static final String TAG = "ProductListFragment";

    private ProductAdapter mProductAdapter;

    private ListFragmentBinding mBinding;

    @Nullable
    @Override
    public View onCreateView(@NonNull LayoutInflater inflater, @Nullable ViewGroup container,
            @Nullable Bundle savedInstanceState) {

        // 这就是获取DataBinding
        mBinding = DataBindingUtil.inflate(inflater, R.layout.list_fragment, container, false);
        //。这是给主页的recycleview设置适配器
        mProductAdapter = new ProductAdapter(mProductClickCallback);
        mBinding.productsList.setAdapter(mProductAdapter);

        return mBinding.getRoot();
    }

    @Override
    public void onViewCreated(@NonNull View view, @Nullable Bundle savedInstanceState) {

        super.onViewCreated(view, savedInstanceState);
        // 获取页面的viewModel
        final ProductListViewModel viewModel =
                new ViewModelProvider(this).get(ProductListViewModel.class);
        // 这是搜索框里的查询
        mBinding.productsSearchBtn.setOnClickListener(v -> {

            Editable query = mBinding.productsSearchBox.getText();
            viewModel.setQuery(query);
        });
        //1.调用subscribeUi将商品数据展示在,重点关注这里他是这么去获取上Products的
        subscribeUi(viewModel.getProducts());
    }

    private void subscribeUi(LiveData<List<ProductEntity>> liveData) {

        // Update the list when the data changes
        liveData.observe(getViewLifecycleOwner(), new Observer<List<ProductEntity>>() {

            @Override
            // 这里就是LiveData的数据是看数据有没有变化
            public void onChanged(List<ProductEntity> myProducts) {

                if (myProducts != null) {

                    mBinding.setIsLoading(false);
                    mProductAdapter.setProductList(myProducts);
                } else {

                    mBinding.setIsLoading(true);
                }
                // espresso does not know how to wait for data binding's loop so we execute changes
                // sync.
                mBinding.executePendingBindings();
            }
        });
    }

    @Override
    public void onDestroyView() {

        mBinding = null;
        mProductAdapter = null;
        super.onDestroyView();
    }

    //这个回掉函数就是用来做当我点击页面的具体item数据的时候。跳到详情展示页面
    private final ProductClickCallback mProductClickCallback = product -> {

        if (getLifecycle().getCurrentState().isAtLeast(Lifecycle.State.STARTED)) {

            ((MainActivity) requireActivity()).show(product);
        }
    };
}
回到关注点1:我们进入了ProductListViewModel
public class ProductListViewModel extends AndroidViewModel {

    private static final String QUERY_KEY = "QUERY";

    private final SavedStateHandle mSavedStateHandler;
    private final DataRepository mRepository;
    private final LiveData<List<ProductEntity>> mProducts;

    public ProductListViewModel(@NonNull Application application,
            @NonNull SavedStateHandle savedStateHandle) {

        super(application);
        mSavedStateHandler = savedStateHandle;

        mRepository = ((BasicApp) application).getRepository();

        // Use the savedStateHandle.getLiveData() as the input to switchMap,
        // allowing us to recalculate what LiveData to get from the DataRepository
        // based on what query the user has entered
        // 3.这里可以看出这里是mProducts数据初始化的时候,我们可以看到这个数据就是来自Repository类
        mProducts = Transformations.switchMap(
                savedStateHandle.getLiveData("QUERY", null),
                (Function<CharSequence, LiveData<List<ProductEntity>>>) query -> {

                    if (TextUtils.isEmpty(query)) {

                        return mRepository.getProducts();
                    }
                    return mRepository.searchProducts("*" + query + "*");
                });
    }

    public void setQuery(CharSequence query) {

        // Save the user's query into the SavedStateHandle.
        // This ensures that we retain the value across process death
        // and is used as the input into the Transformations.switchMap above
        mSavedStateHandler.set(QUERY_KEY, query);
    }

    /** * Expose the LiveData Products query so the UI can observe it. */
    // 2.这就是那个第一个关注点调用的方法,然后我们看到这个类的构造方法
    public LiveData<List<ProductEntity>> getProducts() {

        return mProducts;
    }
}
回到DataReppsitory类,
public class DataRepository {


    private static DataRepository sInstance;

    private final AppDatabase mDatabase;
    private MediatorLiveData<List<ProductEntity>> mObservableProducts;

    private DataRepository(final AppDatabase database) {

        mDatabase = database;
        mObservableProducts = new MediatorLiveData<>();
        // 5.这里可以知道,数据又会从Database里面的productDao去调
        mObservableProducts.addSource(mDatabase.productDao().loadAllProducts(),
                productEntities -> {

                    if (mDatabase.getDatabaseCreated().getValue() != null) {

                        mObservableProducts.postValue(productEntities);
                    }
                });
    }

    public static DataRepository getInstance(final AppDatabase database) {

        if (sInstance == null) {

            synchronized (DataRepository.class) {

                if (sInstance == null) {

                    sInstance = new DataRepository(database);
                }
            }
        }
        return sInstance;
    }

    /** * Get the list of products from the database and get notified when the data changes. */
    // 4.可以知道关注点的数据是来自这里
    public LiveData<List<ProductEntity>> getProducts() {

        return mObservableProducts;
    }

    public LiveData<ProductEntity> loadProduct(final int productId) {

        return mDatabase.productDao().loadProduct(productId);
    }

    public LiveData<List<CommentEntity>> loadComments(final int productId) {

        return mDatabase.commentDao().loadComments(productId);
    }

    public LiveData<List<ProductEntity>> searchProducts(String query) {

        return mDatabase.productDao().searchAllProducts(query);
    }
}
回到AppDatabase,这个类就是Room数据库的操作类,这个类是个抽象类,我们调用productDao(),会去
ProductDao接口里面去执行sql语句
@Database(entities = {
    ProductEntity.class, ProductFtsEntity.class, CommentEntity.class}, version = 2)
@TypeConverters(DateConverter.class)
public abstract class AppDatabase extends RoomDatabase {


    private static AppDatabase sInstance;

    @VisibleForTesting
    public static final String DATABASE_NAME = "basic-sample-db";

    public abstract ProductDao productDao();

    public abstract CommentDao commentDao();

    private final MutableLiveData<Boolean> mIsDatabaseCreated = new MutableLiveData<>();

    public static AppDatabase getInstance(final Context context, final AppExecutors executors) {

        if (sInstance == null) {

            synchronized (AppDatabase.class) {

                if (sInstance == null) {

                    sInstance = buildDatabase(context.getApplicationContext(), executors);
                    sInstance.updateDatabaseCreated(context.getApplicationContext());
                }
            }
        }
        return sInstance;
    }

    /** * Build the database. {@link Builder#build()} only sets up the database configuration and * creates a new instance of the database. * The SQLite database is only created when it's accessed for the first time. */
    private static AppDatabase buildDatabase(final Context appContext,
            final AppExecutors executors) {

        return Room.databaseBuilder(appContext, AppDatabase.class, DATABASE_NAME)
                .addCallback(new Callback() {

                    @Override
                    public void onCreate(@NonNull SupportSQLiteDatabase db) {

                        super.onCreate(db);
                        executors.diskIO().execute(new Runnable() {

                            @Override
                            public void run() {

                                // Add a delay to simulate a long-running operation
                                addDelay();
                                // Generate the data for pre-population
                                AppDatabase database = AppDatabase.getInstance(appContext, executors);
                                List<ProductEntity> products = DataGenerator.generateProducts();
                                List<CommentEntity> comments =
                                        DataGenerator.generateCommentsForProducts(products);

                                insertData(database, products, comments);
                                // notify that the database was created and it's ready to be used
                                database.setDatabaseCreated();
                            }
                        });
                    }
                })
            .addMigrations(MIGRATION_1_2)
            .build();
    }

    /** * Check whether the database already exists and expose it via {@link #getDatabaseCreated()} */
    private void updateDatabaseCreated(final Context context) {

        if (context.getDatabasePath(DATABASE_NAME).exists()) {

            setDatabaseCreated();
        }
    }

    private void setDatabaseCreated(){

        mIsDatabaseCreated.postValue(true);
    }

    private static void insertData(final AppDatabase database, final List<ProductEntity> products,
            final List<CommentEntity> comments) {

        database.runInTransaction(() -> {

            database.productDao().insertAll(products);
            database.commentDao().insertAll(comments);
        });
    }

    private static void addDelay() {

        try {

            Thread.sleep(4000);
        } catch (InterruptedException ignored) {

        }
    }

    public LiveData<Boolean> getDatabaseCreated() {

        return mIsDatabaseCreated;
    }

    private static final Migration MIGRATION_1_2 = new Migration(1, 2) {


        @Override
        public void migrate(@NonNull SupportSQLiteDatabase database) {

            database.execSQL("CREATE VIRTUAL TABLE IF NOT EXISTS `productsFts` USING FTS4("
                + "`name` TEXT, `description` TEXT, content=`products`)");
            database.execSQL("INSERT INTO productsFts (`rowid`, `name`, `description`) "
                + "SELECT `id`, `name`, `description` FROM products");

        }
    };
}
很显然这一下就全解释了,这个数据的经历:
其他的细节想了解的自己去看看哦,就不一一写出来了
LiveData与MutableLive的区别
- LiveData是一个观察者模式的数据实体类,他可以和他的注册的观察者回调数据是否已更新
- LiveData 具有生命周期感知能力,意指它遵循其他应用组件(如 Activity、Fragment 或 Service)的生命周期。这种感知能力可确保 LiveData 仅更新处于活跃生命周期状态的应用组件观察者。
MutableLive与LiveData的区别
1.MutableLiveData的父类是LiveData
2.LiveData在实体类里可以通知指定某个字段的数据更新.
3.MutableLiveData则是完全是整个实体类或者数据类型变化后才通知.不会细节到某个字段
推荐阅读 :MutableLiveData详解
Kotlin:Lambda表达式
最近接手的那个需求都是kotlin开发,奈何前辈写的kollin很多都是lambda表达式,我一个初学者看起来确实难受,最近趁着周末把这个Lambda好好学了一下,特此记录一下。
Lambda的特征
- Lambda表达式总是被大括号括着
- 其参数(如果存在)在符号’->'之前声明(参数类型可以省略)
- 函数体(如果存在)在符号’->'后面。
- 简单来说,Lambda 就是一段可以作为参数传递的代码,它可以作为函数的参数,返回值,同时也可以赋值给一个变量
- Lambda 完整的表达式的语法结构:{ 参数名1:参数类型,参数名2:参数类型 -> 函数体 }
- 很多时候,我们会使用简化形式的语法结构,直接就是一个函数体:{函数体},这种情况是当 Lambda 表达式的参数列表中只有一个参数的时候,我们可以把参数给省略,默认会有个 it 参数
- Kotlin 中规定,当 Lambda 表达式作为函数的最后一个参数的时候,我们可以把 Lambda 表达式移到函数括号的外面
- Kotlin 中规定,当 Lambda 表达式是函数的唯一参数的时候,函数的括号可以省略
无参数:
val 函数名 = {函数体}
有参数:
val 函数名 : (参数1:类型, 参数2:类型, …) -> 返回值类型 = { 参数1, 参数2, … -> 函数体 }
val 函数名 = { 参数1:类型1, 参数2:类型2, … -> 函数体 }
只有一个参数的时候,返回值中的参数形参可以省略,引用时通过it进行引用
匿名函数:
val 函数名 = fun(参数1:类型1, 参数2:类型2, …): 返回值类型 { 函数体 }
高阶函数
Kotlin里面一切皆函数,引入了函数类型,函数也可以作为一个类型,当作参数传递,那么使用Lambda表达式就会有一种感觉好像是使用高中数学的复合函数一样,f(g(x))里面有很多替换
// 匿名函数
val sum = fun(a: Int, b: Int): Int {

    return a + b
}

// 具名函数
fun namedSum(a: Int, b: Int): Int {

    return a + b
}

// 高阶函数
fun highSum(a: Int, b: Int, f: (Int, Int) -> Int): Int {

    return f(a, b)
}

fun main(args: Array<String>) {

    // 通过()来执行匿名函数sum
    val add = sum(1, 2)
    println(add)
    // 通过lambda表达式来完成函数highSum
    val add2 = highSum(3, 4) {
     a, b -> a + b }
    println(add2)
    // 通过函数引用来完成函数highSum
    val add3 = highSum(5, 6, ::namedSum)
    println(add3)

    // forEach参数接收一个函数
    args.forEach({
     it: String -> println(it) })
    // 去掉返回值,自动推断
    args.forEach({
     it -> println(it) })
    // 只有一个参数的时候可以省略it
    args.forEach({
     println(it) })
    // lambda表达式在最后一个参数可以外移
    args.forEach() {
     println(it) }
    // 函数若无参数可以去掉()
    args.forEach {
     println(it) }
    // 引用函数
    args.forEach(::println)
}
函数类型与实例化
- :: 双冒号操作符表示对函数的引用
- lambda表达式
- 匿名函数
fun main(args: Array<String>) {

    // 引用函数
    println(test(1, 2, ::add))
    // 匿名函数
    val add = fun(a: Int, b: Int): Int {

        return a + b
    }
    println(test(3, 4, add))
    // lambda表达式
    println(test(5, 6, {
     a, b -> a + b }))// lambda作为最后一个参数可以提到括号外
    println(test(5, 6) {
     a, b -> a + b })
}

fun test(a: Int, b: Int, f: (Int, Int) -> Int): Int {

    return f(a, b)
}

fun add(a: Int, b: Int): Int {

    return a + b
}
推荐阅读:Kotlin修炼指南(二):lambda表达式的精髓Kotlin:Lambda表达式
Kotlin 的高阶函数、匿名函数和 Lambda 表达式
kotlin匿名内部类
Kotlin 中写匿名内部类和 Java 有一点区别,Kotlin 中因为抛弃了 new 关键字,改用 object 关键字就可以了
//java 中的匿名内部类
new Thread(new Runnable() {

     @Override
     public void run() {


     }
}).start();

//Kotlin 中可以这么写
Thread(object : Runnable{

    override fun run() {


    }
}).start()

/** * 我们接着来简化 Kotlin 中的写法 * 因为 Runnable 类中只有一个待实现方法,即使这里没有显示的重写 run() 方法, * Kotlin 也能明白后面的 Lambda 表达式就是要在 run() 方法中实现的内容 */
Thread(Runnable{


}).start()

//因为是单抽象方法接口,我们可以将接口名进行省略
Thread({


}).start()

//当 Lambda 表达式作为函数的最后一个参数的时候,我们可以把 Lambda 表达式移到函数括号的外面
Thread(){


}.start()

//当 Lambda 表达式是函数的唯一参数的时候,函数的括号可以省略
Thread{


}.start()
推荐阅读:如何在 kotlin 优雅的封装匿名内部类(DSL、高阶函数)
kotlin的函数式编程
函数式编程(FP)是基于一个简单又意义深远的前提的:只用纯函数来构建程序。这句话的深层意思是,我们应该用无副作用的函数来构建程序。什么是副作用呢?带有副作用的函数在调用的过程中不仅仅是只有简单的输入和输出行为,它还干了一些其它的事情。并且这些副作用会把影响扩散到函数外,比如:
- 修改一个外部变量(函数外定义)
- 设置成员变量
- 修改数据结构(List、Map、Set)
- 抛出异常或以一个错误停止
- 读取、写入文件
RxJava学习
最近项目里面有很多都是用了RxJava,自己也需要更新自己的知识库了,由于时间原因,我只学了RxJava的如何使用,RxJava很多的源码和其他的使用,有时间再回来恶补。
RxJava的简介
- RxJava:Reactive Extensions for the JVM ,基于JVM的Rx
- Reactive Extensions 是有微软提出的一个综合了异步和基于事件驱动编程的库
- RxJava的核心就是异步数据流和响应式编程:
1·把所有事件(数据)看作一条河流,他可以被观察,过滤或者操作,也可以和另外一条河流汇聚成一条新的河流
2·一旦事件产生或者发生变化,就可以触发观察这些事件的角色(观察者/订阅者)做出响应
RxJava优势及适用场景
- 具备响应式编程该有的特性
- 为异步而生,无需手动创建线程,具备线程切换能力
- 支持链式调用,保证代码的简洁性
- 各种操作符,功能非常强大,满足各种业务需求
- 简化了异常的处理
RxJava的适用场景:网络请求,数据库读写,文件读写,定时任务等各种耗时操作需哟啊通过异步来完成的操作都可以使用RxJava
RxJava 有以下三个基本的元素:
- 被观察者(Observable)
- 观察者(Observer)
- 订阅(subscribe)
// 导入依赖
implementation "io.reactivex.rxjava2:rxjava:2.2.21"
implementation "io.reactivex.rxjava2:rxandroid:2.0.2"
事件传递类似一条河流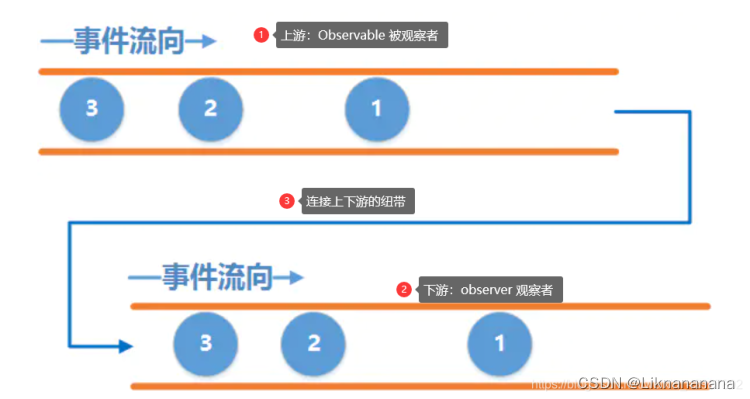
Observable.create(new ObservableOnSubscribe<Integer>() {

    //上游 Observable
    @Override
    public void subscribe(ObservableEmitter<Integer> e) throws Exception {
                //向水流中添加一个next事件,传递给下游有对应接收next事件的方法
        e.onNext(1);
        //在水流中的是一个complete事件,传递给下游有对应接收next事件的方法
        e.onComplete(2);
    }
})
    .subscribe(
    //subscible 就是纽带,将上下游连接起来
    new Observer<Integer>() {

        //observer 表示 下游
        Disposable d;
        //Disposable表示纽带开关
        @Override
        public void onSubscribe(Disposable d) {

            this.d=d;
        }
        @Override
        public void onNext(Integer integer) {

            //用来接受上游的next事件
            Log.d(TAG, "onNext: "+integer);
        }
        @Override
        public void onError(Throwable e) {

            Log.d(TAG, "onError: "+e.getMessage());
        }
        @Override
        public void onComplete() {

            //用来接受上游的complete事件`在这里插入代码片`
            Log.d(TAG, "onComplete ");
        }
    });
ObservableEmitter
ObservableEmitter: Emitter是发射器的意思,他就是用来发出事件的,他可以发出三种类型的事件,通过调用emitter的onNext(T value)、onComplete()和onError(Throwable error)就可以分别发出next事件、complete事件和error事件。
发出事件需要遵守一定的规则
- onNext():上游可以发出多个onNext事件下游也能接受到很多个onNext事件。
- onComplete():上游发出一个onComplete事件后,可以继续发出其他事件,但是下游接受到onComplete事件以后,就停止接收事件。
- onError():和onComplete相同,上游发出onError事件后继续发出其他事件,而下游接收到onError事件后不再接收事件。
- 上游可以不发出onComplete和onError事件
- onComplete和onError必须互斥且唯一,不可以同时发出多个onComplete事件也不可以同时发出多个onError事件,也不可以先发出onComplete事件再发出onError事件,反之亦然。
Disposable
他就相当于我们之前提到的纽带,当纽带被关闭即调用disposable.dispose()方法,下游就接收不到上游发出的任何事件。但这并不影响上游继续发出事件。
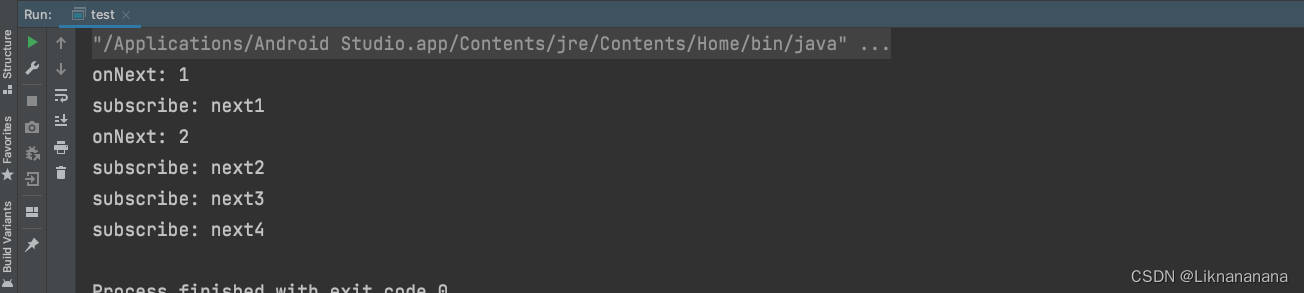
public class test {

    public static void main(String[] args) {

        String TAG="SHOW";
        Observable.create(new ObservableOnSubscribe<Integer>() {

            //被观察者
            @Override
            public void subscribe(ObservableEmitter<Integer> e) throws Exception {

                e.onNext(1);
                System.out.println("subscribe: next1");
                e.onNext(2);
                System.out.println("subscribe: next2");
                //e.onComplete();
                //System.out.println("subscribe: complete");
                e.onNext(3);
                System.out.println("subscribe: next3");
                e.onNext(4);
                System.out.println("subscribe: next4");
            }
        }).subscribe(new Observer<Integer>() {

            //观察者
            Disposable d;
            @Override
            public void onSubscribe(Disposable d) {

                this.d=d;
            }
            @Override
            public void onNext(Integer integer) {

                //Disposable能够切断水管
                if(integer>=2){

                    //当Integer大于2的时候关闭纽带,下游接受不到任何事件,上游可以继续发送
                    d.dispose();
                }
                System.out.println("onNext: "+integer);
            }
            @Override
            public void onError(Throwable e) {

                System.out.println("onError: "+e.getMessage());
            }
            @Override
            public void onComplete() {

                System.out.println("onComplete ");
            }
        });


    }
}
Schedulers
- Schedulers.newThread():一个常规的子线程
- AndroidSchedulers.mainThread():Activity所在的主线程
- Schedulers.io():适合IO密集型的操作
- Schedulers.computation():适合计算密集型的操作
subscribeOn
- 用来指定被观察者所在的线程,一般来说,我们在被观察者的内部执行网络请求或者IO操作,所以放在子线程去执行。
- 注意一点,subscribeOn方法如果被调用多次,以第一次调用时指定的线程为准,看如下代码
  observable.subscribeOn(Schedulers.computation())
                       .subscribeOn(Schedulers.io())
                       .subscribeOn(Schedulers.newThread())
这上面上次调用了subscribeOn方法,最后Observable会依照第一次调用时指定的线程运行。
observerOn
它用来指定观察者所在的线程,由于观察者接受了被观察者操作的结果,有可能需要更新UI,所以大部分情况下,我们都会将它指定在主线程之中。
同样需要注意一点,observerOn方法多次被调用时,以最后一次指定的线程为准,即调用一次observerOn方法,线程便会切换一次。
推荐阅读:RxJava2 只看这一篇文章就够了
写在最后:笔记只是记录学习的知识,可能必不全面,但是也是对自己的知识的一种输出,记录着自己的一点一滴,我是背着书包,漂泊在外的少年, 书包里装了我的梦想
边栏推荐
猜你喜欢
datagrip 报错 “The specified database userpassword combination is rejected...”的解决方法

typescript31-any类型

6-25漏洞利用-irc后门利用

Win Go开发包安装配置、GoLand配置
typescript32-ts中的typeof

百度、百图生科 | HelixFold-Single: 使用蛋白质语言模型作为替代进行无MSA蛋白质结构预测

hash table
6-24 exploit-vnc password cracking
GO开发环境配置

dbeaver连接MySQL数据库及错误Connection refusedconnect处理
随机推荐
Kubernetes — Calico
typescript29-枚举类型的特点和原理
Constructor instance method inheritance of typescript38-class (implement)
Flink_CDC construction and simple use
Day115. Shangyitong: Background user management: user lock and unlock, details, authentication list approval
6-25漏洞利用-irc后门利用
接口(第九天)
Rust P2P Network Application Combat-1 P2P Network Core Concepts and Ping Program
typescript33-typescript高级概述
PHP直播源码实现简单弹幕效果的相关代码
ALCCIKERS Shane 20191114
Flex layout in detail
JDBC PreparedStatement 的命名参数实现
ofstream,ifstream,fstream读写文件
检查IP或端口是否被封
3个月测试员自述:4个影响我职业生涯的重要技能
滴滴秋招提前批正式开始,现在投递免笔试
Kubernetes之本地存储
Constructor of typescript35-class
《自然语言处理实战入门》 基于知识图谱的问答机器人