当前位置:网站首页>OpenCV图像处理基础操作
OpenCV图像处理基础操作
2022-07-29 09:24:00 【我今年十六岁】
目录
3.1 高斯模糊 [就好像 近视眼的人没有戴眼镜看事物的情境---轻度近视]
3.2 XY轴模糊 [就好像 近视眼的人没有戴眼镜看事物的情境---重度近视]
一:读取显示图片操作
读取图片的路径选择,这里注意点是window下 \ 但是在ubuntu下是 / 在编写代码的时候需要修正

读取图片代码:
#include <iostream>
#include <opencv2/opencv.hpp>
using namespace std;
using namespace cv;

int main(int argc, char *argv[])
{
    Mat img = imread("D:/000imageopencv/333.jpg");//图片路径

    imshow("img",img);//显示图片

    waitKey(0);//等待按键

    return 0;
}
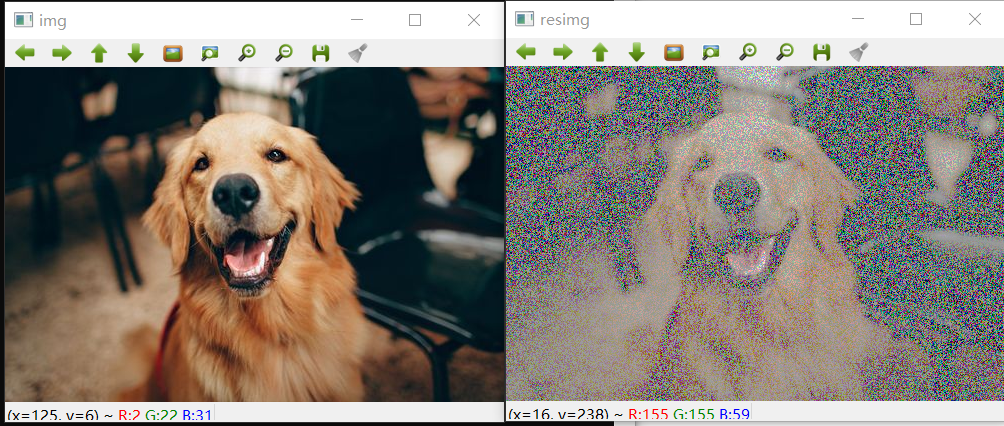
结果:

对图片可以滚轮放大查看RGB数值,不难看出,越是深色RGB数值越是接近0,越是浅色RGB数值越是接近255


查看分辨率 499 X 355,同时将鼠标移动至图片边缘处(看到 x=498,y=334 博主已经很尽力移到边缘啦,如果不信,你们自己操作一下,哈哈),由此可以知道图片就是由一个又一个的像素点构成的。


二:图像处理 像素点操作
2.1 雪花屏特效

相关代码如下:
#include <iostream>
#include <opencv2/opencv.hpp>
using namespace std;
using namespace cv;

Mat imageprocess(Mat &img)
{
    int row = img.rows;
    int col = img.cols * img.channels();

    for(int i=0;i<row;i++)
    {
        uchar * data = img.ptr<uchar>(i);
        for(int j=0;j<col;j++)
        {
            //雪花屏特效
            int q = rand()%col;
            data[q]=155;//某些通道随机改成155
        }
    }
    return img;
}

int main(int argc, char *argv[])
{
    Mat img = imread("D:/000imageopencv/333.jpg");//图片路径
    imshow("img",img);//显示图片

    Mat resimg = imageprocess(img);
    imshow("resimg",resimg);//显示接收图片

    waitKey(0);//等待按键
    return 0;
}
2.2 色彩反转

相关代码如下:
Mat imageprocess(Mat &img)
{
    int row = img.rows;
    int col = img.cols * img.channels();

    for(int i=0;i<row;i++)
    {
        uchar * data = img.ptr<uchar>(i);
        for(int j=0;j<col;j++)
        {
            //色彩反转
            data[j] = data[j] - 50;
        }
    }
    return img;
}
2.3 暗色处理

相关代码如下:
Mat imageprocess(Mat &img)
{
    int row = img.rows;
    int col = img.cols * img.channels();

    for(int i=0;i<row;i++)
    {
        uchar * data = img.ptr<uchar>(i);
        for(int j=0;j<col;j++)
        {
            //暗色处理
            data[j] = data[j]/2;
        }
    }
    return img;
}
2.4 毛玻璃特效

相关代码如下:
#include <iostream>
#include <opencv2/opencv.hpp>
using namespace std;
using namespace cv;

//毛玻璃特效
Mat imageGalss(Mat &img)
{
    RNG rng;
    int random = 0;
    int num = 5;
    for(int i=0;i<img.rows -5;i++)
    {
        for(int j=0;j<img.cols -5;j++)
        {
            random = rng.uniform(0,num);
            img.at<Vec3b>(i,j)[0] = img.at<Vec3b>(i+random,j+random)[0];
            img.at<Vec3b>(i,j)[1] = img.at<Vec3b>(i+random,j+random)[1];
            img.at<Vec3b>(i,j)[2] = img.at<Vec3b>(i+random,j+random)[2];
        }
    }
    return img;
}

int main(int argc, char *argv[])
{
    Mat img = imread("D:/000imageopencv/333.jpg");//图片路径
    imshow("img",img);//显示图片

    Mat resimg = imageGalss(img);
    imshow("resimg",resimg);//显示接收图片

    waitKey(0);//等待按键
    return 0;
}
三:图像处理 调用OpenCV库 封装函数
3.1 高斯模糊 [就好像 近视眼的人没有戴眼镜看事物的情境---轻度近视]

相关代码如下:
#include <iostream>
#include <opencv2/opencv.hpp>
using namespace std;
using namespace cv;

int main(int argc, char *argv[])
{
    Mat img = imread("D:/000imageopencv/333.jpg");//图片路径
    imshow("img",img);//显示图片

    Mat resimg;
    //高斯模糊
    cv::GaussianBlur(img,resimg,Size(5,5),0);

    imshow("resimg",resimg);//显示接收图片

    waitKey(0);//等待按键
    return 0;
}
3.2 XY轴模糊 [就好像 近视眼的人没有戴眼镜看事物的情境---重度近视]

相关代码如下:
#include <iostream>
#include <opencv2/opencv.hpp>
using namespace std;
using namespace cv;

int main(int argc, char *argv[])
{
    Mat img = imread("D:/000imageopencv/333.jpg");//图片路径
    imshow("img",img);//显示图片

    Mat resimg;
    //XY轴模糊
    cv::blur(img,resimg,Size(10,10));
    imshow("resimg",resimg);//显示接收图片

    waitKey(0);//等待按键
    return 0;
}
3.3 灰度化处理

相关代码如下:
#include <iostream>
#include <opencv2/opencv.hpp>
using namespace std;
using namespace cv;

int main(int argc, char *argv[])
{
    Mat img = imread("D:/000imageopencv/333.jpg");//图片路径
    imshow("img",img);//显示图片

    Mat resimg;
    //灰度处理
    cvtColor(img,resimg,CV_BGR2GRAY);
    imshow("resimg",resimg);//显示接收图片

    waitKey(0);//等待按键
    return 0;
}
3.4 中值滤波 视觉上就感觉像是油画

相关代码如下:
#include <iostream>
#include <opencv2/opencv.hpp>
using namespace std;
using namespace cv;

int main(int argc, char *argv[])
{
    Mat img = imread("D:/000imageopencv/333.jpg");//图片路径
    imshow("img",img);//显示图片

    Mat resimg;
    //中值滤波
    cv::medianBlur(img,resimg,5);
    imshow("resimg",resimg);//显示接收图片

    waitKey(0);//等待按键
    return 0;
}
四:OpenCV 视频操作
4.1 播放视频:那些年,我们一起追的女孩


#include <iostream>
#include <opencv2/opencv.hpp>
using namespace std;
using namespace cv;

int main(int argc, char *argv[])
{
    Mat frame;
    VideoCapture cap("D:/000000000000000ffmpeg/那些年,我们一起追的女孩.mp4");

    while (cap.read(frame))
    {
        imshow("frame",frame);
        waitKey(50);
    }
    return 0;
}
4.2 使用本机摄像头
这边博主就不露脸了哈!

#include <iostream>
#include <opencv2/opencv.hpp>
using namespace std;
using namespace cv;

int main(int argc, char *argv[])
{
    Mat frame;
    VideoCapture cap(0);

    while (cap.read(frame))
    {
        imshow("frame",frame);
        waitKey(50);
    }
    return 0;
}

边栏推荐
- Evaluation index of machine learning classification model and implementation of sklearn code
- 当 update 修改数据与原数据相同时会被更新吗?
- Safety is no longer the only selling point. Test drive "slash youth" Volvo C40
- "Defects" of prototype chain inheritance and constructor inheritance
- Cloud native management practice: business led Devops continuous delivery system
- Leetcode question brushing (6)
- Asp graduation project - based on C # +asp Design and implementation of enterprise investment value analysis system based on. Net + sqlserver (graduation thesis + program source code) -- enterprise in
- How to change MySQL into Chinese
- AxureRP原型设计 快速开始
- (Video + graphics) introduction to machine learning series - Chapter 1 Introduction
猜你喜欢

云原生管理实践:业务引领的DevOps持续交付体系

查看端口占用情况

On the charm of code language

NFA determination and DFA minimization based on C language

Quick sorting (quick sorting) (implemented in C language)

smart-webcomponents 14.2.0 Crack
Data representation and calculation (base)

Flowable UI制作流程图

Parameter initialization

23考研人撑住!考研第一波弃考高峰期已经到来!
随机推荐
How to export the old and new file names and locations to excel after file renaming
1.2.24 fastjson deserialization templatesimpl uses chain analysis (very detailed)
C# 使用RestSharp库实现POST请求
Discussion on the integration of storage and calculation and the calculation in storage
Leetcode:132. split palindrome string II
Redis command [gradually improved]
Handwritten character recognition
Basic part 2 of flowable
不用Swagger,那我用啥?
[performance optimization methodology series] III. core idea of performance optimization (2)
Outlook tutorial, how to create an electronic signature in outlook?
Using logistic regression and neural network to deal with complex binary classification problems
The use and Simulation of string function, character function and memory function
dataframe.to_sql() 一次性插入过多报错
Gutcloud technology restcloud completed the pre-A round of financing of tens of millions of yuan
mysql怎么换成中文
Cloud native management practice: business led Devops continuous delivery system
C # use restsharp library to realize post request
QMainWindow 详解
Vs2015 uses loadlibrary to call DLL library
