当前位置:网站首页>如何识别出轮廓准确的长和宽
如何识别出轮廓准确的长和宽
2022-06-29 10:16:00 【爱CV】

轮廓分析的例程为:
int main( int argc, char** argv ){//read the imageMat img = imread("e:/sandbox/leaf.jpg");Mat bw;bool dRet;//resizepyrDown(img,img);pyrDown(img,img);cvtColor(img, bw, COLOR_BGR2GRAY);//morphology operationthreshold(bw, bw, 150, 255, CV_THRESH_BINARY);//bitwise_not(bw,bw);//find and draw contoursvector<vector<Point> > contours;vector<Vec4i> hierarchy;findContours(bw, contours, hierarchy, CV_RETR_LIST, CV_CHAIN_APPROX_NONE);for (int i = 0;i<contours.size();i++){RotatedRect minRect = minAreaRect( Mat(contours[i]) );Point2f rect_points[4];minRect.points( rect_points );for( int j = 0; j < 4; j++ )line( img, rect_points[j], rect_points[(j+1)%4],Scalar(255,255,0),2);}imshow("img",img);waitKey();return 0;}
得到结果:

对于这样 的轮廓分析,标明出来的1和2明显是错误的。但是除了minAreaRect之外,已经没有更解近一步的方法。也尝试首先对轮廓进行凸包处理,再查找外接矩形,效果同样不好。
解题思路:仍然要从现有的、稳定运行的代码里面找方法。目前OpenCV函数getOrientation能够通过PCA方法找到图像/轮廓的方向。比如这样:

在项目图片上能够得到这样结果:

显然是更符合实际情况的,当然,叶柄这里产生了干扰,但那是另一个问题。获得主方向后,下一步就是如何获得准确的长和宽。PCA方法无法获得长宽,也尝试通过旋转矩阵的方法直接获得结果:
以RotatedRect的方式返回结果//RotatedRect box;//box.center.x = pos.x;//box.center.y = pos.y;//box.size.width = flong;//box.size.height = fshort;//box.angle = (float)atan2( eigen_vecs[0].y, eigen_vecs[0].x)*180/3.1415926; //弧度转角度绘制rotateRect//Point2f rect_points[4];//box.points( rect_points );//for( int j = 0; j < 4; j++ )// line( img, rect_points[j], rect_points[(j+1)%4],Scalar(0,0,255),2);
但是需要注意的是,这里的pca获得的center并不是绝对的center,而且在中线两边,轮廓到中线的长度不一定一样。为了获得最精确的结果,就需要直接去求出每个边的长度,并且绘制出来。思路很简单,就是通过中线(及其中线的垂线)将原轮廓分为两个部分,分别求这两个部分的到中线的最大距离(加起来就是长,分开来就是位置)。求的长轴端点:

求得到中线最远距离点(蓝色),这也就是到中线的距离。

距离的计算很多时候只是点的循环。最后存在一个问题,那就是这样一个图像,已经知道p0-03的坐标,和两条轴线的斜率,如何绘制4个角点?

实际上,这是一个数学问题,并且有解析解:
//通过解析方法,获得最后结果Point p[4];p[0].x = (k_long * _p[0].x - k_short * _p[2].x + _p[2].y - _p[0].y) / (k_long - k_short);p[0].y = (p[0].x - _p[0].x)*k_long + _p[0].y;p[1].x = (k_long * _p[0].x - k_short * _p[3].x + _p[3].y - _p[0].y) / (k_long - k_short);p[1].y = (p[1].x - _p[0].x)*k_long + _p[0].y;p[2].x = (k_long * _p[1].x - k_short * _p[2].x + _p[2].y - _p[1].y) / (k_long - k_short);p[2].y = (p[2].x - _p[1].x)*k_long + _p[1].y;p[3].x = (k_long * _p[1].x - k_short * _p[3].x + _p[3].y - _p[1].y) / (k_long - k_short);p[3].y = (p[3].x - _p[1].x)*k_long + _p[1].y;

成功!!!

得到最后结果,这正是我想要得到的。但是由于算法稳定性方面和效率的考虑,还需要进一步增强

p.s 重新翻了一下minarearect
cv::RotatedRect cv::minAreaRect( InputArray _points ){CV_INSTRUMENT_REGION()Mat hull;Point2f out[3];RotatedRect box;convexHull(_points, hull, true, true);if( hull.depth() != CV_32F ){Mat temp;hull.convertTo(temp, CV_32F);hull = temp;}int n = hull.checkVector(2);const Point2f* hpoints = hull.ptr<Point2f>();if( n > 2 ){rotatingCalipers( hpoints, n, CALIPERS_MINAREARECT, (float*)out );box.center.x = out[0].x + (out[1].x + out[2].x)*0.5f;box.center.y = out[0].y + (out[1].y + out[2].y)*0.5f;box.size.width = (float)std::sqrt((double)out[1].x*out[1].x + (double)out[1].y*out[1].y);box.size.height = (float)std::sqrt((double)out[2].x*out[2].x + (double)out[2].y*out[2].y);box.angle = (float)atan2( (double)out[1].y, (double)out[1].x );}else if( n == 2 ){box.center.x = (hpoints[0].x + hpoints[1].x)*0.5f;box.center.y = (hpoints[0].y + hpoints[1].y)*0.5f;double dx = hpoints[1].x - hpoints[0].x;double dy = hpoints[1].y - hpoints[0].y;box.size.width = (float)std::sqrt(dx*dx + dy*dy);box.size.height = 0;box.angle = (float)atan2( dy, dx );}else{if( n == 1 )box.center = hpoints[0];}box.angle = (float)(box.angle*180/CV_PI);return box;}
那么,这个官方函数首先就把轮廓找了hull矩。这个当然对于很多问题都是好方法,很简单直观(我这里的方法就繁琐很多)。但是忽视了一个重要问题:hull变换后,会丢失信息。显然这就是结果不准确的原因。
我也在answeropencv上进行了咨询,berak给出的comment是 maybe: find principal axes of your shape (PCA) rotate to upright (warp) boundingRect() (image axis aligned) 这个显然也不是很妥当,因为这个结果还需要rotate回去,这会很麻烦。感谢阅读至此,希望有所帮助。
2018年8月29日19:43:01 经过一段时间后反思这个项目,应该说这个算法有一定自创的元素在里面,但是由于这个问题比较小众,所以即使是在answeropencv上面,参与讨论的人也比较少,使得算法有很多不充分的地方在里面:最主要的问题就是在算法的后面部分,多次进行全轮廓循环,使得算法的效率降低。那么,有没有能够提速的方法了?还是之前做的一些数学的研究和在answeropencv上berak的comment提醒了我,注意看:
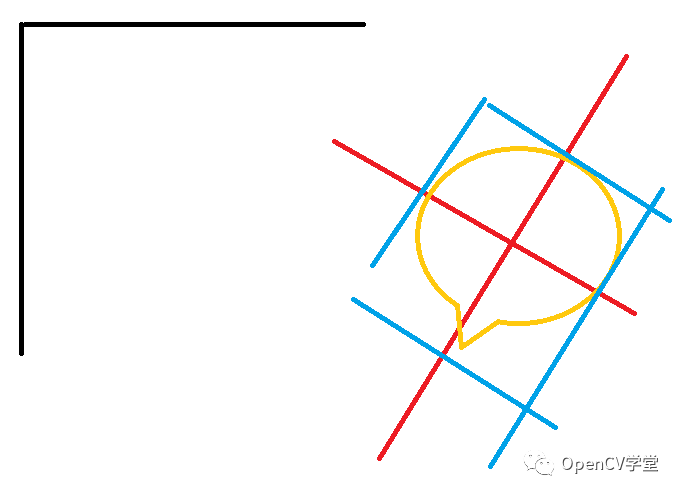
这里,黑色的是原始的OpenCV的坐标系,红色的是新求出来的坐标系,你花了那么大功夫去算交点,实际上,不如将这个图像旋转为正,将外界矩形算出来,然后再反方向旋转回去。这样的话思路就很清楚了,但是需要花一点修改的时间。但是正是因为这里的思路比较清晰,所以代码写起来,比较流畅,很快我就得到了下面的结果:
#include "stdafx.h"#include "opencv2/imgcodecs.hpp"#include "opencv2/highgui.hpp"#include "opencv2/imgproc.hpp"#include "opencv2/photo.hpp"using namespace std;using namespace cv;#define DEBUG FALSE//获得单个点经过旋转后所在精确坐标Point2f GetPointAfterRotate(Point2f inputpoint,Point2f center,double angle){Point2d preturn;preturn.x = (inputpoint.x - center.x)*cos(-angle) - (inputpoint.y - center.y)*sin(-angle)+center.x;preturn.y = (inputpoint.x - center.x)*sin(-angle) + (inputpoint.y - center.y)*cos(-angle)+center.y;return preturn;}Point GetPointAfterRotate(Point inputpoint,Point center,double angle){Point preturn;preturn.x = (inputpoint.x - center.x)*cos(-1*angle) - (inputpoint.y - center.y)*sin(-1*angle)+center.x;preturn.y = (inputpoint.x - center.x)*sin(-1*angle) + (inputpoint.y - center.y)*cos(-1*angle)+center.y;return preturn;}double getOrientation(vector<Point> &pts, Point2f& pos,Mat& img){//Construct a buffer used by the pca analysisMat data_pts = Mat(pts.size(), 2, CV_64FC1);for (int i = 0; i < data_pts.rows; ++i){data_pts.at<double>(i, 0) = pts[i].x;data_pts.at<double>(i, 1) = pts[i].y;}//Perform PCA analysisPCA pca_analysis(data_pts, Mat(), CV_PCA_DATA_AS_ROW);//Store the position of the objectpos = Point2f(pca_analysis.mean.at<double>(0, 0),pca_analysis.mean.at<double>(0, 1));//Store the eigenvalues and eigenvectorsvector<Point2d> eigen_vecs(2);vector<double> eigen_val(2);for (int i = 0; i < 2; ++i){eigen_vecs[i] = Point2d(pca_analysis.eigenvectors.at<double>(i, 0),pca_analysis.eigenvectors.at<double>(i, 1));eigen_val[i] = pca_analysis.eigenvalues.at<double>(i,0);}// Draw the principal components//在轮廓/图像中点绘制小圆//circle(img, pos, 3, CV_RGB(255, 0, 255), 2);计算出直线,在主要方向上绘制直线//line(img, pos, pos + 0.02 * Point2f(eigen_vecs[0].x * eigen_val[0], eigen_vecs[0].y * eigen_val[0]) , CV_RGB(255, 255, 0));//line(img, pos, pos + 0.02 * Point2f(eigen_vecs[1].x * eigen_val[1], eigen_vecs[1].y * eigen_val[1]) , CV_RGB(0, 255, 255));return atan2(eigen_vecs[0].y, eigen_vecs[0].x);}//程序主要部分int main( int argc, char** argv ){//读入图像,转换为灰度Mat img = imread("e:/sandbox/leaf.jpg");pyrDown(img,img);pyrDown(img,img);Mat bw;bool dRet;cvtColor(img, bw, COLOR_BGR2GRAY);//阈值处理threshold(bw, bw, 150, 255, CV_THRESH_BINARY);//寻找轮廓vector<vector<Point> > contours;vector<Vec4i> hierarchy;findContours(bw, contours, hierarchy, CV_RETR_LIST, CV_CHAIN_APPROX_NONE);//轮廓分析,找到for (size_t i = 0; i < contours.size(); ++i){//计算轮廓大小double area = contourArea(contours[i]);//去除过小或者过大的轮廓区域(科学计数法表示)if (area < 1e2 || 1e5 < area) continue;//绘制轮廓drawContours(img, contours, i, CV_RGB(255, 0, 0), 2, 8, hierarchy, 0);//获得轮廓的角度Point2f* pos = new Point2f();double dOrient = getOrientation(contours[i], *pos,img);//转换轮廓,并获得极值for (size_t j = 0;j<contours[i].size();j++)contours[i][j] = GetPointAfterRotate(contours[i][j],(Point)*pos,dOrient);Rect rect = boundingRect(contours[i]);//轮廓最小外接矩形RotatedRect rotateRect = RotatedRect((Point2f)rect.tl(),Point2f(rect.br().x,rect.tl().y),(Point2f)rect.br());//将角度转换回去并绘图Point2f rect_points[4];rotateRect.points( rect_points );for (size_t j = 0;j<4;j++)rect_points[j] = GetPointAfterRotate((Point)rect_points[j],(Point)*pos,-dOrient);for( size_t j = 0; j < 4; j++ )line( img, rect_points[j], rect_points[(j+1)%4],Scalar(255,255,0),2);//得出结果char cbuf[255];double fshort = std::min(rect.width,rect.height);double flong = std::max(rect.width,rect.height);sprintf_s(cbuf,"第%d个轮廓,长度%.2f,宽度%.2f像素\n",i,flong,fshort);}return 0;}
这段代码中值得一提的是
Point GetPointAfterRotate(Point inputpoint,Point center,double angle){Point preturn;preturn.x = (inputpoint.x - center.x)*cos(-1*angle) - (inputpoint.y - center.y)*sin(-1*angle)+center.x;preturn.y = (inputpoint.x - center.x)*sin(-1*angle) + (inputpoint.y - center.y)*cos(-1*angle)+center.y;return preturn;}

这个函数是直接计算出某一个点在旋转后位置,采用的是数学方法推到,应该算自己创的函数。很多时候,我们并不需要旋转整个图像,而只是要获得图像旋转以后的位置。
反思小结:应该说当时answerOpenCV上就给出了正确的结果提示,但是由于那时我钻在自己的算法里面,没能够接受新的想法;过去一段时间后回顾,才发现了更好的解决方法。但是走弯路并不可怕,只有不断、持续地思考,尽可能将现有的解决方法优化,才可能在面对新的问题的时候有更多的手段、更容易提出创造出“方便书写、效果显著”的算法。此外,基础能力非常重要,如果基础不牢,在创建新算法的时候会遇到更多的困难,毕竟:基础不牢、地动山摇。
边栏推荐
- 历史上的今天:马斯克出生;微软推出 Office 365;蔡氏电路的发明者出生
- Thoroughly understand JVM Series 7: what is the flow process of objects in the generational model?
- 9 easy to use JSON processing tools, greatly improving efficiency!
- 任职 22 年,PowerShell 之父将从微软离职:曾因开发 PowerShell 被微软降级过
- Shell 引号和转义从来很少被人注意,但平时写脚本又经常用
- By asp Net core downloading files according to the path
- (JS)捕获错误(异常)
- Daily question brushing record (VII)
- ModbusTCP协议网络学习型单路红外模块(中壳版)
- 加密市场接连爆雷,Celsius能避免破产吗?
猜你喜欢

When the "Ai x scientific computing" is in progress, Huawei's mindspore competition question is hot, waiting for you!

【每日3题(1)】判断国际象棋棋盘中一个格子的颜色

西门子S7-200SMART控制步进电机的具体方法及示例程序

当技术人成长为 CEO,应该修改哪些“Bug”?

数据分析方法与思维:漏斗分析

励志!专科“逆袭”读浙大硕士,3篇SCI,最终成清华博士!

Google Earth Engine(GEE)——GEDI L2A Vector Canopy Top Height (Version 2) 全球生态系统数据集

Multithreaded high concurrency server: three problems
ModbusTCP协议网络学习型单路红外模块(中壳版)
math_数学表达式&等式方程的变形&组合操作技巧/手段积累
随机推荐
BS-GX-017基于SSM实现的在线考试管理系统
Graduation season · advanced technology Er - workers in the workplace
“AI x 科学计算”进行时,华为昇思 MindSpore 赛题火热开启,等你来!
容器平台性能如何测试,稳定性、扩展效率、组件性能
crypto 1~5
5.移植uboot-设置默认环境变量,裁剪,并分区
添加通知公告,给在线用户发送通知
ModbusTCP协议WIFI无线学习型单路红外模块(圆壳版)
Map merges the same keys and values into a list
csdn涨薪秘籍之腾讯自动化软件测试面试题(含答案)
(JS)isNaN()方法判断undefined为true的原因
map合并相同的键,值合并为列表
Modbus RTU protocol 485 learning 2-way infrared module
nuc980 已成功启动
np. astype()
基于支持向量机的手写数字识别详解(MATLAB GUI代码,提供手写板)
TTL serial port learning infrared remote control module can be extended to network control
Using EasyX configuration in clion
Limit introduction summary
宁德时代麒麟电池有着更大的野心