当前位置:网站首页>Unity Shader学习(六)实现雷达扫描效果
Unity Shader学习(六)实现雷达扫描效果
2022-07-29 08:06:00 【ToDoNothing】
本期主要通过shader实现雷达扫描效果,如下所示
根据效果,我们需要先画一个轮廓圆,代码如下
Shader "Unlit/shader7"
{

    ///鼠标移动正方形
    Properties
    {

    _Center("Center",Vector)=(0,0,0,0)
    _Raduis("Radius",float)=0.1
    }
    SubShader
    {

        Tags {
     "RenderType"="Opaque" }
        LOD 100

        Pass
        {

            CGPROGRAM
            #pragma vertex vert
            #pragma fragment frag


            #include "UnityCG.cginc"
        struct v2f{

            float4 vertex:SV_POSITION;
            float4 position:TEXCOORD1;
            float2 uv:TEXCOORD;
        };
        v2f vert(appdata_base v){

            v2f o;
            o.vertex=UnityObjectToClipPos(v.vertex);
            o.position=v.vertex;
            o.uv=v.texcoord;
            return o;
        }
        //中心点
        float4 _Center;
        //半径
        float _Raduis;
        //绘制正方形
        float rect(float2 pt,float2 size,float2 center){

            float2 p=pt-center;
            float2 halfsize=size*0.5;
            float hotz=step(-halfsize.x,p.x)-step(halfsize.x,p.x);
            float vert=step(-halfsize.y,p.y)-step(halfsize.y,p.y);
            return hotz*vert;
        }
        //普通的实心圆
        float circle(float2 pt,float2 center,float radius){

            float2 p=pt-center;
            return 1.0-step(radius,length(p));
        }
        //边缘软化圆
          float circle(float2 pt,float2 center,float radius,bool soften){

            float2 p=pt-center;
            float edge=(soften)?radius*0.05:0.0;
            return 1.0-smoothstep(radius-edge,radius+edge,length(p));
        }
         //轮廓圆
        float circle(float2 pt,float2 center,float radius,float line_width){

            float2 p=pt-center;
            float len=length(p);
            float half_line_width=line_width/2.0;

            return step(radius-half_line_width,len)-step(radius+half_line_width,len);
        }

            fixed4 frag (v2f i) : SV_Target
            {

                float2 pos=i.position*2;
                float2 size=0.2;
                float outlineCircle=circle(pos,_Center,_Raduis,0.01f);
                fixed3 col=fixed3(1,1,0)*outlineCircle;
                return fixed4(col,1.0);
            }
            ENDCG
        }
    }
}
代码中的轮廓圆,是在实心圆的基础上进行绘制,实心圆需要绘制半径内所有点的颜色信息,而轮廓圆,只需要绘制轮廓线即可,因此只需要取半径radius+half_line_width和radius-half_line_width范围之内的点即可,如下图所示
,只要判断出在该点范围内进行输出即可。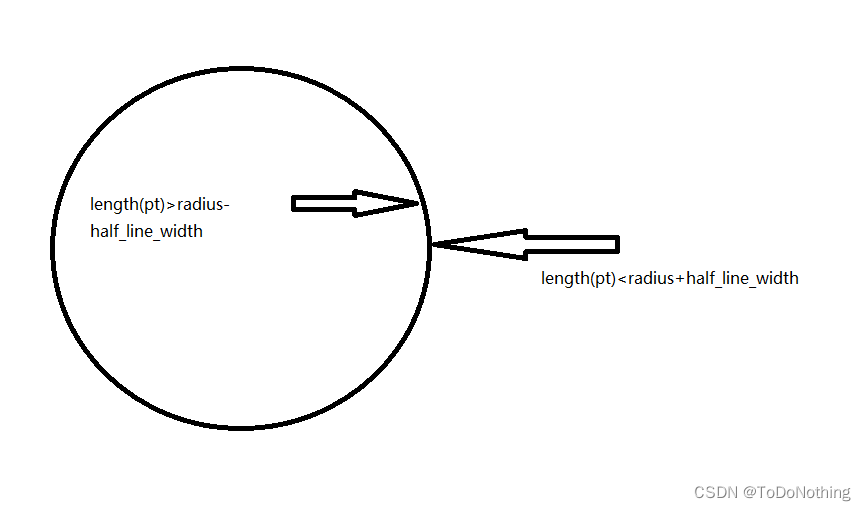
代码中使用到了两个step函数,可以将结果控制在该范围内,如下图所示,只要是在该范围内,就输出1,不在该范围,都输出0。
在以上代码的基础上,我们还需要画线,线的代码如下所示
 //画线
        float onLine(float a,float b,float line_width,float edge_thickness){

            float half_line_width=line_width*0.5;
            return smoothstep(a-half_line_width-edge_thickness,a-half_line_width,b)-smoothstep(a+half_line_width,a+half_line_width+edge_thickness,b);
        }
在该函数中,使用了smoothstep函数,该函数的意义如下
float smoothstep(float a, float b, float x)
{

  x = clamp((x - a) / (b- a), 0.0, 1.0);
  return x * x * (3 - 2 * x);
}
当a<b,x<a时 返回0 x>b时,返回1 否则在a和b之间平滑过渡
当a>b,x>a时,返回0,当x<b是,返回1。具体可参考了解shader函数
回到画线的函数中,a和b分别为线的x,y点位置,line_width为线的宽度,edge_thickness为线的厚度,通过smoothstep判断点是否在该范围内,这里根据的是x和y的坐标来判定的,稍微有一点难理解,最好就是自己画图输入参数证明一下。
完成画圈和直线的函数之后,在片元着色器里面处理一下
            fixed4 frag (v2f i) : SV_Target
            {

                float2 pos=i.position*2;
                float2 size=0.2;
                float ouline1=onLine(i.uv.y,0.5,0.002,0.001)*_AxisColor;
                float ouline2=onLine(i.uv.x,0.5,0.002,0.001)*_AxisColor;

                float outlineCircle=circle(pos,_Center,_Raduis,0.01f);
                fixed3 col=ouline1+ouline2+outlineCircle;
                col+=circle(pos,_Center,_Raduis-0.1,0.01f);
                col+=circle(pos,_Center,_Raduis-0.2,0.01f);
                return fixed4(col,1.0);
            }
可以得到以下图形:
接下来,画扫描线,需要用到一个非常关键的内置函数_Time,该函数可以实现循环输出数值的一个效果
t是自该场景加载开始所经过的时间,4个分量分别是 (t/20, t, t2, t3)
_Time float4 time (t/20, t, t2, t3)
   //扫描线
        float sweep(float2 pt,float2 center,float radius,float line_width,float edge_thickness){

            float2 d=pt-center;
            float theta=_Time.z;
            float2 p=float2(cos(theta),-sin(theta))*radius;
            float h=clamp(dot(d,p)/dot(p,p),0.0,1.0);
            float l=length(d-p*h);
            return 1.0-smoothstep(line_width,line_width+edge_thickness,l);
        }
扫描线主要是根据向量d的位置,计算到循环出来的p点的距离,然后判断距离是否在范围内,在这个过程中使用了点乘dot函数计算点d投影到p的长度,该长度h使用了clamp函数进行限制,限制范围在0-1内。得到h后,计算点到p的距离,先使用d-p*h获得该投影点的向量,再使用length函数。得到的效果如下:
最后,再加上扫描的延迟阴影,整体代码如下:
    //扫描线
        float sweep(float2 pt,float2 center,float radius,float line_width,float edge_thickness){

            float2 d=pt-center;
            float theta=_Time.z;
            float2 p=float2(cos(theta),-sin(theta))*radius;
            float h=clamp(dot(d,p)/dot(p,p),0.0,1.0);
            float l=length(d-p*h);
            float gradient=0.0;
            const float gradient_angle=UNITY_PI*0.5;
            if(length(d)<radius){

                float angle=fmod(theta+atan2(d.y,d.x),UNITY_TWO_PI);
                gradient=clamp(gradient_angle-angle,0,gradient_angle)/gradient_angle*0.5;


            return gradient+1.0-smoothstep(line_width,line_width+edge_thickness,l);
        }
延迟阴影这部分主要是针对点d与p之间的角度进行处理,原理也是对角度进行判断和计算,涉及到较多数学问题,后面有机会再细讲,这里只讲用到的函数
fmod:返回a / b的浮点余数
atan2:返回反正切值
完整代码:
Shader "Unlit/shader7"
{

    ///鼠标移动正方形
    Properties
    {

    _Center("Center",Vector)=(0,0,0,0)
    _Raduis("Radius",float)=0.1
    _AxisColor("AxisColor",Color)=(1,1,0,1)
    }
    SubShader
    {

        Tags {
     "RenderType"="Opaque" }
        LOD 100

        Pass
        {

            CGPROGRAM
            #pragma vertex vert
            #pragma fragment frag


            #include "UnityCG.cginc"
        struct v2f{

            float4 vertex:SV_POSITION;
            float4 position:TEXCOORD1;
            float2 uv:TEXCOORD;
            float4 screenPos:TEXCOORD2;
        };
        v2f vert(appdata_base v){

            v2f o;
            o.vertex=UnityObjectToClipPos(v.vertex);
            o.position=v.vertex;
            o.uv=v.texcoord;
            o.screenPos=ComputeScreenPos(o.vertex);
            return o;
        }
        //中心点
        float4 _Center;
        //半径
        float _Raduis;

        fixed4 _AxisColor;
        //绘制正方形
        float rect(float2 pt,float2 size,float2 center){

            float2 p=pt-center;
            float2 halfsize=size*0.5;
            float hotz=step(-halfsize.x,p.x)-step(halfsize.x,p.x);
            float vert=step(-halfsize.y,p.y)-step(halfsize.y,p.y);
            return hotz*vert;
        }
        //普通的实心圆
        float circle(float2 pt,float2 center,float radius){

            float2 p=pt-center;
            return 1.0-step(radius,length(p));
        }
        //边缘软化圆
          float circle(float2 pt,float2 center,float radius,bool soften){

            float2 p=pt-center;
            float edge=(soften)?radius*0.05:0.0;
            return 1.0-smoothstep(radius-edge,radius+edge,length(p));
        }
         //轮廓圆
        float circle(float2 pt,float2 center,float radius,float line_width){

            float2 p=pt-center;
            float len=length(p);
            float half_line_width=line_width/2.0;

            return step(radius-half_line_width,len)-step(radius+half_line_width,len);
        }
        //画线
        float onLine(float a,float b,float line_width,float edge_thickness){

            float half_line_width=line_width*0.5;
            return smoothstep(a-half_line_width-edge_thickness,a-half_line_width,b)-smoothstep(a+half_line_width,a+half_line_width+edge_thickness,b);
        }
        //扫描线
        float sweep(float2 pt,float2 center,float radius,float line_width,float edge_thickness){

            float2 d=pt-center;
            float theta=_Time.z;
            float2 p=float2(cos(theta),-sin(theta))*radius;
            float h=clamp(dot(d,p)/dot(p,p),0.0,1.0);
            float l=length(d-p*h);
            float gradient=0.0;
            const float gradient_angle=UNITY_PI*0.5;
            if(length(d)<radius){

                float angle=fmod(theta+atan2(d.y,d.x),UNITY_TWO_PI);
                gradient=clamp(gradient_angle-angle,0,gradient_angle)/gradient_angle*0.5;
            }
            return gradient+1.0-smoothstep(line_width,line_width+edge_thickness,l);
        }


            fixed4 frag (v2f i) : SV_Target
            {

                float2 pos=i.position*2;
                float2 size=0.2;
                float ouline1=onLine(i.uv.y,0.5,0.002,0.001)*_AxisColor;
                float ouline2=onLine(i.uv.x,0.5,0.002,0.001)*_AxisColor;

                float outlineCircle=circle(pos,_Center,_Raduis,0.01f);
                fixed3 col=ouline1+ouline2+outlineCircle;
                col+=circle(pos,_Center,_Raduis-0.1,0.01f);
                col+=circle(pos,_Center,_Raduis-0.2,0.01f);
                col+=sweep(pos,_Center,_Raduis,0.002,0.001)*_AxisColor;
                return fixed4(col,1.0);
            }
            ENDCG
        }
    }
}
边栏推荐
- What is the use of chat robots? What type? After reading these, you will understand!
- C# 之 volatile关键字解析
- 20 hacker artifacts
- STM32 printf problem summary semihosting microlib understanding
- Processes and threads
- Tcp/ip five layer reference model and corresponding typical devices and IPv6
- Day 014 二维数组练习
- Unity beginner 3 - enemy movement control and setting of blood loss area (2D)
- Implementation of simple matcap+fresnel shader in unity
- Arduino uno error analysis avrdude: stk500_ recv(): programmer is not responding
猜你喜欢

Do you want to meet all the needs of customers

网络安全之安全基线

Go, how to become a gopher, and find work related to go language in 7 days, Part 1

UE4 highlight official reference value

随机抽奖转盘微信小程序项目源码
![[paper reading | cryoelectron microscope] interpretation of the new subtomogram averaging method in relion 4.0](/img/8d/03e63d651b713f547b090e6e740b06.png)
[paper reading | cryoelectron microscope] interpretation of the new subtomogram averaging method in relion 4.0

UE4 principle and difference between skylight and reflecting sphere
![[beauty of software engineering - column notes] 29 | automated testing: how to kill bugs in the cradle?](/img/e1/8a61f85bf93801d842e78ab4f7edc7.png)
[beauty of software engineering - column notes] 29 | automated testing: how to kill bugs in the cradle?

Measured waveform of boot capacitor short circuit and open circuit of buck circuit

MySQL rownum implementation
随机推荐
330. Complete the array as required
Effective learning of medical image segmentation annotation based on noise pseudo tags and adversarial learning
Unity beginner 1 - character movement control (2D)
(Video + graphic) machine learning introduction series - Chapter 5 machine learning practice
STM32 printf problem summary semihosting microlib understanding
Chapter contents of the romance of the Three Kingdoms
阿里巴巴政委体系-第四章、政委建在连队上
Cyberpunk special effect shader
Process and concept of process
Resize2fs: bad magic number in super block
Processes and threads
[密码学实验] 0x00 安装NTL库
下推分析的限制
Up sampling deconvolution operation
Solve the problem that CSDN cannot publish blog due to unknown copyright
阿里巴巴政委体系-第一章、政委建在连队上
[cryoEM] Introduction to FSC, Fourier shell correlation
Tcp/ip five layer reference model and corresponding typical devices and IPv6
Network Security Learning chapter
Convert source package to RPM package