当前位置:网站首页>Custom view - Custom button
Custom view - Custom button
2022-07-24 16:04:00 【Xiao Xiao Feng】
Preface :
alas , Learn to customize view It's been a long time , I wanted to write custom for a long time view This kind of Blog , In this way, it can not only sort out and consolidate knowledge, but also help others . No matter how well planned, immediate action is more effective , So take advantage of the weekend to finish this month's plan first .
ok, Don't talk nonsense ( It seems that the front is full of nonsense ~ forehead ’), Cut to the chase .
On the subject :
Buttons in general applications (Button) Will be combined with their own application of the theme style to define , Such as :qq, Microblogging , Login button of Alipay , There is no mapping here , The common feature of their login buttons is rounded corners , The difference is that the background color is different . If you want to achieve something similar , What I want to say is so easy! that , If you see this , Whether you will or not , this bi I still want to install it .haha~
There are two ways to do this :
Method 1 :
You only need to customize the background attribute to achieve
First look at the renderings , Bordered , Because it's a static image, you can't see the effect of clicking

Okay , Start posting code
xml File layout code :
style=”?android:attr/borderlessButtonStyle”// This line of code is 5.0 Remove the above version Button Method with shadow effect
<Button  style="?android:attr/borderlessButtonStyle" android:layout_marginTop="50dp" android:layout_width="200dp" android:layout_height="wrap_content" android:background="@drawable/button_click_enabled" android:layout_gravity="center" android:text=" Set only the top two corners as rounded corners "/>
            <Button  android:layout_margin="20dp" android:layout_width="200dp" style="?android:attr/borderlessButtonStyle" android:layout_height="wrap_content" android:background="@drawable/button_click_enabled_5" android:layout_gravity="center" android:textColor="#fff" android:textSize="15dp" android:text=" Round corners "/>
button_click_enabled.xml file :
<selector xmlns:android="http://schemas.android.com/apk/res/android">
    <item android:drawable="@drawable/button_click_unchecked" android:state_pressed="false"></item>
    <item android:drawable="@drawable/button_click_checked" android:state_pressed="true"></item>
</selector>
selector The meaning of selector , As the name suggests, even if you haven't learned it, you already know what it does . Default display background @drawable/button_click_unchecked, When only press and hold the button (android:state_pressed=”true” when ) Will show background @drawable/button_click_checked
button_click_unchecked.xml file :
( Copy the code and delete the comments )
<shape xmlns:android="http://schemas.android.com/apk/res/android">
    <solid android:color="@color/colorAccent"// Control color
    />
    <corners
        android:bottomLeftRadius="0dp"// Set the fillet radius at the lower left corner to 0
        android:bottomRightRadius="0dp"// Set the fillet radius as 0
        android:topLeftRadius="20dp"// Set the fillet radius in the upper left corner to 20
        android:topRightRadius="20dp" // Set the fillet radius in the upper right corner to 20
        />
    <stroke
        android:width="2px"// The border is wide
        android:color="#2443D0"// Border color
         />
</shape>
button_click_checked.xml file :
<shape xmlns:android="http://schemas.android.com/apk/res/android">
    <solid android:color="#fe3"></solid>

    <corners  android:bottomLeftRadius="0dp" android:bottomRightRadius="0dp" android:topLeftRadius="20dp" android:topRightRadius="20dp" />
    <stroke  android:width="2px" android:color="#2443D0" />
</shape>
ok,
It's that simple .
Secretly telling you is not just button, Other controls can do the same , Find out for yourself !
Method 2 :
What I want to talk about next is customization view, This implementation method is relatively tall , First you need to customize view Have some knowledge of , It doesn't matter if you don't know , If you don't understand anything, please Baidu by yourself . If Method 1 It can realize the requirements , But you think it's too low 了 , Then don't go away ( Forced mode is on ~).
Again , Put a rendering : 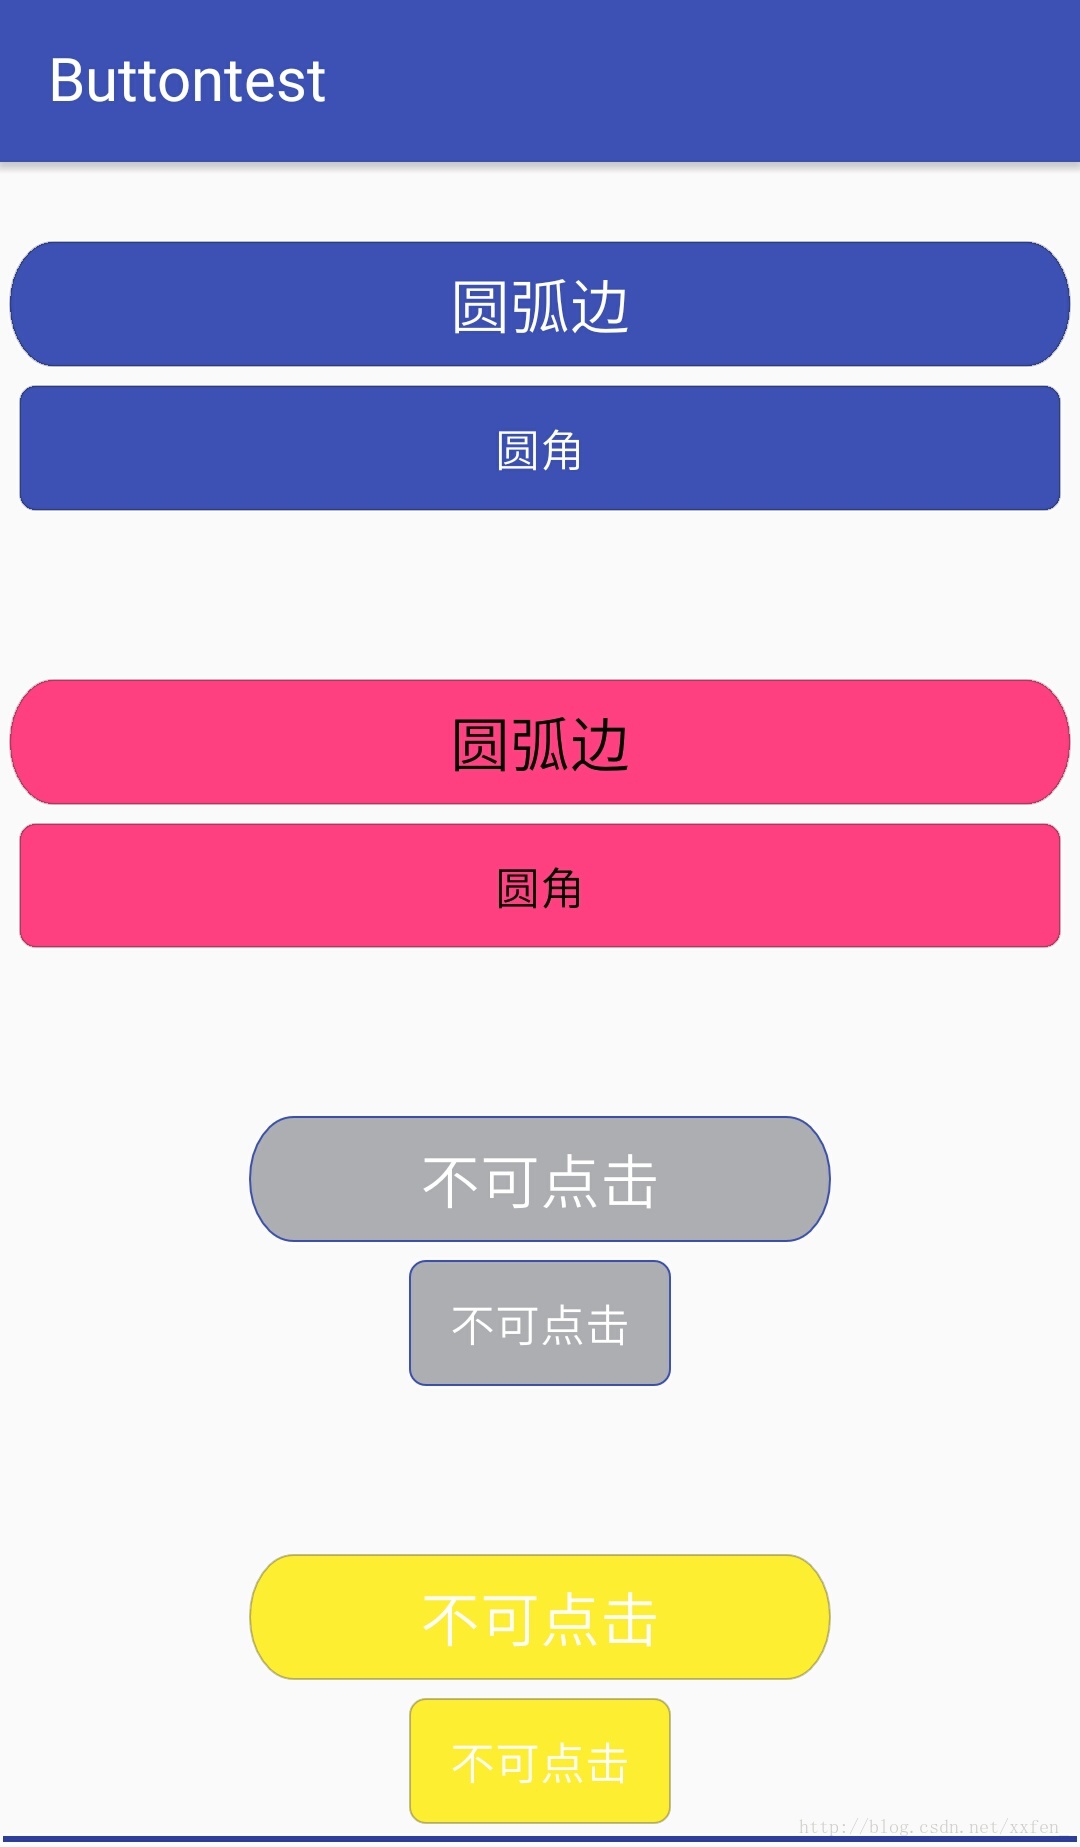
Realize the idea :
System Button It's inheritance Textview Of , So custom view Also inherited Textview.
Follow the steps :
1. Create a class cButton Inherit Textview
2. Set custom properties ( stay res/values/styles.xml in ):
 <declare-styleable name="cButton">
        <attr name="internalcolor" format="color" />// The interior fill color
        <attr name="clickedColor" format="color" />// Color after clicking
        <attr name="bordercolor" format="color" />// Border color
        <attr name="textcolor" format="color" />// Text color
        <attr name="textsize" format="dimension" />// Text size
        <attr name="textstr" format="string" />// written words
        <attr name="enablerd" format="boolean" />// Can I click
        <attr name="angletype" format="integer">// corner type
            <enum name="anglecirarc" value="1" />// Circular arc
            <enum name="anglecir" value="2" />// Small rounded corners
        </attr>
    </declare-styleable>
3. stay cButton Class to resolve custom attributes , Set the default value when parsing
 public cButton(Context context, AttributeSet attrs) {
        super(context, attrs);
        mContext = context;
        TypedArray ta = context.obtainStyledAttributes(attrs, R.styleable.cButton);
        enabler = ta.getBoolean(R.styleable.cButton_enablerd, true);// Can I click
        AngleType = ta.getInt(R.styleable.cButton_angletype, 1);// corner type
        clicked_color = ta.getColor(R.styleable.cButton_clickedColor, Color.parseColor("#6F4A4C58"));// The color after clicking
        border_color = ta.getColor(R.styleable.cButton_bordercolor, Color.parseColor("#40000000"));// Border color
        interna_Color = ta.getColor(R.styleable.cButton_internalcolor, Color.parseColor("#FF4A4C58"));// The background color
        text_Color = ta.getColor(R.styleable.cButton_textcolor, Color.BLACK);// Text color
        text_Size = ta.getDimension(R.styleable.cButton_textsize, 40);// Text size
        text = ta.getString(R.styleable.cButton_textstr);// written words
    }
4. Logic processing drawing graphics :
The point is , Draw text in the middle : Look here http://blog.csdn.net/u014702653/article/details/51985821
wide = Control width /2 - Text width /2;
high = Control height /2 + Text height /2;
tPaint.measureText(text);// Text width
Paint.FontMetricsInt fm = tPaint.getFontMetricsInt();
fm.bottom - fm.top// Text height
canvas.drawText(“ String text ”, wide , high , tPaint);// Draw text
protected void onDraw(Canvas canvas) {
        super.onDraw(canvas);
// Omit here n Codes
canvas.drawText(text, startX, startY, tPaint);// Draw text
canvas.drawRoundRect(rectF, rx, ry, Paint);// Draw a rounded rectangle
}
5.( After being able to draw normal images ) Define the click callback interface , And how to trigger a click
public boolean onTouchEvent(MotionEvent event) {
  //cListener.click(cButton.this);// Click event
   // Omit here n Codes
   return true;
}
 /** *  Defining interfaces  */
    public interface OncButtonListener {


        void click(View v);
    }
    /** *  Monitor callback methods  */
    public void setcButtonListener(OncButtonListener listener) {

        cListener = listener;
    }
6. Define the method of setting properties :
Every method must have invalidate() Method , Otherwise, the setting is invalid
    /** *  Set whether you can click  */
    public void setEnabler(boolean enabler) {

        this.enabler = enabler;
        if (enabler) {
            set_Color = interna_Color;
        } else {
   //
            set_Color = clicked_color;
        }
         invalidate();// Redraw
    }

    /** *  Set text  */
    public void setText(String text) {
        this.text = text;
        invalidate();// Repaint
    }

   // Omit
complete .
The specific code is posted below :
cButton class :
/** * Created by xxf on 2017/8/19. */

public class cButton extends TextView {

    /*  paint brush  */
    private Paint mPaint;//  fill
    private Paint bPaint;//  Frame
    private Paint tPaint;// Draw text

    private int mWith, mHeight;// wide 、 high
    private Rect oRect;//
    private String text;// written words
    private int clicked_color;// The color after clicking
    private int interna_Color;// Fill color
    private int set_Color;// Set the color
    private int text_Color;// Text color
    private float text_Size;// font size
    private OncButtonListener cListener;// Click monitor
    private Context mContext;
    private int border_color;
    private boolean enabler;// Set whether you can click
    private int AngleType;// Fillet style

    public cButton(Context context, AttributeSet attrs) {
        super(context, attrs);
        mContext = context;
        TypedArray ta = context.obtainStyledAttributes(attrs, R.styleable.cButton);
        enabler = ta.getBoolean(R.styleable.cButton_enablerd, true);// Can I click
        AngleType = ta.getInt(R.styleable.cButton_angletype, 1);// corner type
        clicked_color = ta.getColor(R.styleable.cButton_clickedColor, Color.parseColor("#6F4A4C58"));// The color after clicking
        border_color = ta.getColor(R.styleable.cButton_bordercolor, Color.parseColor("#40000000"));// Border color
        interna_Color = ta.getColor(R.styleable.cButton_internalcolor, Color.parseColor("#FF4A4C58"));// The background color
        if (enabler) {
            set_Color = interna_Color;
        } else {
   //
            set_Color = clicked_color;
        }

        text_Color = ta.getColor(R.styleable.cButton_textcolor, Color.BLACK);// Text color
        text_Size = ta.getDimension(R.styleable.cButton_textsize, 40);// Text size
        text = ta.getString(R.styleable.cButton_textstr);// written words
    }

    /* Used to measure the size of the view */
    protected void onMeasure(int widthMeasureSpec, int heightMeasureSpec) {
        super.onMeasure(widthMeasureSpec, heightMeasureSpec);
        mWith = MeasureSpec.getSize(widthMeasureSpec);    // Take the exact value of the width
        mHeight = MeasureSpec.getSize(heightMeasureSpec);    // Take out the exact value of the height

    }

    protected void onDraw(Canvas canvas) {
        super.onDraw(canvas);
        init();
        // Log.e(TAG, "onTouchEvent: " + interna_Color);
// RectF rectF = new RectF(0 + 10, 0 + 10, mWith - 10, mHeight - 10);
        if (AngleType == 1) {
            // Log.e(TAG, "onDraw: " + 1);
            RectF rectF = new RectF(0 + 10, 0 + 10, mWith - 10, mHeight - 10);
            canvas.drawRoundRect(rectF, mHeight / 2, mHeight / 2 + 30, mPaint);
            canvas.drawRoundRect(rectF,mHeight / 2, mHeight / 2 + 30, bPaint);// Frame
        } else if (AngleType == 2) {
            // Log.e(TAG, "onDraw: " + 2);
            RectF rectF = new RectF(0 + 20, 10, mWith - 20, mHeight - 10);
            canvas.drawRoundRect(rectF, mHeight / 9, mHeight / 9, mPaint);
            canvas.drawRoundRect(rectF, mHeight / 9, mHeight / 9, bPaint);
// canvas.drawRoundRect(rectF, mHeight / 4, mHeight / 4, bPaint);// Frame
        }


        // canvas.drawText("123",mWith/2,mHeight/2,tPaint);
        /* *  Control width /2 -  Text width /2 */
        float  v=  tPaint.measureText(text);// Text width
        float startX = getWidth() / 2 - v / 2;

        /* *  Control height /2 +  Text height /2, Draw text from the lower left corner of the text , therefore "+" */
       // float startY = getHeight() / 2 + oRect.height() / 2;
        Paint.FontMetricsInt fm = tPaint.getFontMetricsInt();
        //fm.bottom - fm.top// Text height
        int startY = getHeight() / 2 - fm.descent + (fm.bottom - fm.top) / 2;
        //  Draw text
        canvas.drawText(text, startX, startY, tPaint);
    }

    private void init() {
        mPaint = new Paint();
        mPaint.setStyle(Paint.Style.FILL);
        mPaint.setColor(set_Color);
        mPaint.setStrokeWidth(3);
        bPaint = new Paint();
        bPaint.setStyle(Paint.Style.STROKE);
        bPaint.setAntiAlias(true);
        bPaint.setColor(border_color);
        bPaint.setStrokeWidth(2);
        oRect = new Rect();
        tPaint = new Paint();
        tPaint.setAntiAlias(true);
        tPaint.setStyle(Paint.Style.FILL);
        tPaint.setTextSize(text_Size);
        tPaint.setColor(text_Color);
        tPaint.setAntiAlias(true);
        tPaint.getTextBounds(text, 0, text.length(), oRect);
        tPaint.setStrokeWidth(2);
    }

    /** *  call  getParent().requestDisallowInterceptTouchEvent(true); *  Method . Once the bottom View received touch Of action This method is called after  *  Then the parent layer View You won't call onInterceptTouchEvent 了  * * @param ev * @return */
    public boolean dispatchTouchEvent(MotionEvent ev) {
        if (enabler) {
        getParent().requestDisallowInterceptTouchEvent(true);
    }
        return super.dispatchTouchEvent(ev);
    }

    public boolean onTouchEvent(MotionEvent event) {
        if (enabler) {
            //  Finger press :
            switch (event.getAction()) {
                case MotionEvent.ACTION_DOWN:
                    set_Color = clicked_color;// Set press color

                    invalidate();// Redraw
                    break;

                // Raise your fingers :
                case MotionEvent.ACTION_UP:
                    if (cListener != null) {
                        if (event.getY() >= mHeight || event.getY() < 0 || event.getX() >= mWith || event.getX() < 0) {
                        } else {
                            cListener.click(cButton.this);
                        }
                    }

                    Log.e(TAG, "onTouchEvent: ------------" + event.getY());


                    if (enabler) {
                        set_Color = interna_Color;// Set the lift color recovery
                    } else {
                        set_Color = clicked_color;
                    }

                    invalidate();
                    break;

                //  Fingers are moving :
                case MotionEvent.ACTION_MOVE:
                    Log.e(TAG, "onTouchEvent: event.getX()===" + event.getX() + " mWith========" + mWith);

                    if (event.getY() >= mHeight || event.getY() < 0 || event.getX() >= mWith || event.getX() < 0) {
                        set_Color = interna_Color;

                    } else {
                        set_Color = clicked_color;// Set press color
                    }
                    invalidate();// Redraw
                    break;
            }
        }
        return true;
    }


    /** *  Defining interfaces  */
    public interface OncButtonListener {


        void click(View v);
    }
    /** *  Monitor callback methods  */
    public void setcButtonListener(OncButtonListener listener) {

        cListener = listener;
    }

    /** *  Set whether you can click  */
    public void setEnabler(boolean enabler) {

        this.enabler = enabler;
        if (enabler) {
            set_Color = interna_Color;
        } else {
   //
            set_Color = clicked_color;
        }
        setInvalidate();
    }

    /** *  Set text  */
    public void setText(String text) {
        this.text = text;

        setInvalidate();
    }

    /** *  Repaint  */
    public void setInvalidate() {
        invalidate();
    }
}
layout Use... In layout :
Declare a namespace :xmlns:cButton=”http://schemas.android.com/apk/res-auto”
<xxf.com.buttontest.cButton
                android:id="@+id/cButton"
                android:layout_width="match_parent"
                android:layout_height="48dp"
                android:layout_gravity="center"
                android:layout_marginTop="50dp"
                cButton:enablerd="true"
                cButton:internalcolor="@color/colorPrimary"
                cButton:textcolor="#fff"
                cButton:textsize="20dp"
                cButton:textstr=" Arc edge " />

            <xxf.com.buttontest.cButton
                android:layout_width="match_parent"
                android:layout_height="48dp"
                android:layout_gravity="center"
                cButton:angletype="anglecir"
                cButton:internalcolor="@color/colorPrimary"
                cButton:textcolor="#fff"
                cButton:textsize="15dp"
                cButton:textstr=" Round corners " />
end .
Source code :http://download.csdn.net/download/xxfen_/9941391
Thank you for watching !
边栏推荐
- Kubernetes GPU's Dilemma and failure
- [Luogu] p1908 reverse sequence pair
- Introduction to bermudagrass
- Application modification log path log4j.properties
- 'resultmap'must match' (constructor?, id*, result*, association*, collect problem solving
- Varnish4.0 cache agent configuration
- C# TCP客户端窗体应用程序异步接收方式
- Traverse, delete, judge whether JSON data is empty, and recursion
- Deploy ZABBIX monitoring system and email alarm mechanism in lamp architecture
- Image label processing -- converting JSON files into PNG files
猜你喜欢

Knowledge points of MySQL (12)

Dedecms editor supports automatic pasting of word pictures

Research on the efficiency of numpy array access

Rest style

yolov3 训练自己的数据集

Arduino IDE ESP32固件安装和升级教程

There are more than 20 categories of the four operators in MySQL. It took three days and three nights to sort them out. Don't collect them quickly
Small list of iptables common commands

Windows10 installation free redis
Mlx90640 infrared thermal imager temperature measurement module development notes (III)
随机推荐
若依 this.$router.push 同地址不同参,页面不刷新问题
Configuring WAPI certificate security policy for Huawei wireless devices
有了这个机器学习画图神器,论文、博客都可以事半功倍了!
EC200U-CN模块的使用
Lsyncd real time synchronization
2.19 haas506 2.0 development tutorial - Bluetooth - Bluetooth communication (only supports versions above 2.2)
[acwing] 909. Chess game
Deploy ZABBIX monitoring system and email alarm mechanism in lamp architecture
REST风格
31 next spread
Introduction to bermudagrass
电话系统规则
Arduino ide esp32 firmware installation and upgrade tutorial
Windows10 installation free redis
AttributeError: module ‘seaborn‘ has no attribute ‘histplot‘
Getting started with OpenMP
Machine learning notes - building a recommendation system (5) feedforward neural network for collaborative filtering
yolov3 训练自己的数据集
Dynamics 365: explain virtual entity from 0 to 1
Windows10安装免安装版redis