当前位置:网站首页>Pytorch advanced training skills
Pytorch advanced training skills
2022-07-25 12:21:00 【Alexa2077】
One ,Pytorch Advanced training skills
1.1 Custom loss function
PyTorch stay torch.nn The module provides common loss functions , such as :MSELoss,L1Loss,BCELoss…. But if you say , We need to use our own non general loss function ? We need to define ourselves .
In general , It is defined in the following two ways :
1.1.1 Function mode
In essence , The loss function is a function , Therefore use function How to define , For example, next :
def my_loss(output, target):
    loss = torch.mean((output - target)**2)
    return loss
1.1.2 In a class way
Compared with the simplicity of function , The definition of the way of class is more commonly used . When using classes to define loss functions ,Loss The function is partially inherited from _Loss, Partly inherited from _WeightedLoss, and _WeightedLoss Inherited from _loss, _loss Inherited from nn.Module. Therefore, we can regard it as a layer of neural network , The loss function needs to inherit nn.Module class .
Dice Loss It is a common loss function in the field of image segmentation :
The implementation code is as follows :
class DiceLoss(nn.Module):
    def __init__(self,weight=None,size_average=True):
        super(DiceLoss,self).__init__()

    def forward(self,inputs,targets,smooth=1):
        inputs = F.sigmoid(inputs)
        inputs = inputs.view(-1)
        targets = targets.view(-1)
        intersection = (inputs * targets).sum()
        dice = (2.*intersection + smooth)/(inputs.sum() + targets.sum() + smooth)
        return 1 - dice

#  Usage method
criterion = DiceLoss()
loss = criterion(input,targets)
besides , Another common loss function is BCE-Dice Loss,Jaccard/Intersection over Union (IoU) Loss,Focal Loss etc. .
notes : When defining the loss function , It's best to use it all the way Pytorch Tensor calculation interface provided , This facilitates the automatic derivation function and direct invocation cuda, Than using numpy convenient .
1.2 Adjust the learning rate dynamically
The selection of learning rate is an important problem in model training , The learning rate is set too low , It will greatly reduce the convergence speed , Increase training time ; Learning rate is too high , It may cause the parameters to oscillate back and forth on both sides of the optimal solution .
When an appropriate learning rate is selected , After many rounds of training , There may be accuracy fluctuations or loss No more falling, etc , It shows that the current learning rate can no longer meet the needs of model tuning . At this point, we can improve this phenomenon through an appropriate learning rate attenuation strategy , Improve our accuracy . This setting method is used in PyTorch Known as scheduler.
official API:PyTorch Already in torch.optim.lr_scheduler We have encapsulated some methods for dynamically adjusting the learning rate . As below :
lr_scheduler.LambdaLR
lr_scheduler.MultiplicativeLR
lr_scheduler.StepLR
lr_scheduler.MultiStepLR
lr_scheduler.ExponentialLR
lr_scheduler.CosineAnnealingLR
lr_scheduler.ReduceLROnPlateau
lr_scheduler.CyclicLR
lr_scheduler.OneCycleLR
lr_scheduler.CosineAnnealingWarmRestarts
API Use : Use official torch.optim.lr_scheduler when , Need to put scheduler.step() Put it in optimizer.step() Use later .
#  Choose an optimizer
optimizer = torch.optim.Adam(...)
#  Choose one or more of the methods mentioned above to dynamically adjust the learning rate
scheduler1 = torch.optim.lr_scheduler....
scheduler2 = torch.optim.lr_scheduler....
...
schedulern = torch.optim.lr_scheduler....
#  Training
for epoch in range(100):
    train(...)
    validate(...)
    optimizer.step()
    #  You need to dynamically adjust the learning rate after the optimizer parameters are updated
	scheduler1.step()
	...
    schedulern.step()
Customize scheduler: Custom function adjust_learning_rate To change param_group in lr Value , The description is as follows :
Suppose we are doing an experiment now , Need learning rate per 30 The wheel drops to the original 1/10, Suppose there is an official API There is nothing in the to meet our needs , Then you need to customize the function to change the learning rate .
def adjust_learning_rate(optimizer, epoch):
    lr = args.lr * (0.1 ** (epoch // 30))
    for param_group in optimizer.param_groups:
        param_group['lr'] = lr
With adjust_learning_rate Definition of function , In the process of training, we can call our function to realize the dynamic change of learning rate
def adjust_learning_rate(optimizer,...):
    ...
optimizer = torch.optim.SGD(model.parameters(),lr = args.lr,momentum = 0.9)
for epoch in range(10):
    train(...)
    validate(...)
    adjust_learning_rate(optimizer,epoch)
1.3 Fine tuning the model -torchvision
The purpose of model tuning :1, Over fitting of large model and small data ;2, The data set has a limited amount of data
The migration study : Migrate the knowledge learned from the source dataset to the target dataset .
Fine tuning the model : Find a well-trained model of the same kind , Replace it with your own data , Adjust parameters through training .
Process of model fine tuning :
1, In the source dataset ( Such as ImageNet Data sets ) Pre train a neural network model , namely Source model .
2, Create a new neural network model , namely Target model . It copies 了 Divide... On the source model 了 All model designs and their parameters outside the output layer . We assume that these model parameters contain 了 Knowledge learned from the source dataset , And this knowledge is also applicable to the target data set . We also assume that the output layer of the source model is closely related to the label of the source dataset , Therefore, it is not used in the target model .
3, Add an output to the target model ⼤ Xiao Wei ⽬ Number of data set categories Output layer , And randomly initialize the model parameters of this layer
4, Train the target model on the target data set . We will train the output layer from scratch , The parameters of other layers are obtained by fine tuning the parameters of the source model .
Common model structure :
Instantiate the network :
import torchvision.models as models
resnet18 = models.resnet18()
# resnet18 = models.resnet18(pretrained=False)  Equivalent to the above expression
alexnet = models.alexnet()
vgg16 = models.vgg16()
squeezenet = models.squeezenet1_0()
densenet = models.densenet161()
inception = models.inception_v3()
googlenet = models.googlenet()
shufflenet = models.shufflenet_v2_x1_0()
mobilenet_v2 = models.mobilenet_v2()
mobilenet_v3_large = models.mobilenet_v3_large()
mobilenet_v3_small = models.mobilenet_v3_small()
resnext50_32x4d = models.resnext50_32x4d()
wide_resnet50_2 = models.wide_resnet50_2()
mnasnet = models.mnasnet1_0()
Pass on pretrained Parameters : adopt True perhaps False To decide whether to use pre trained weights , By default pretrained = False, It means we don't use the weight obtained by pre training , When pretrained = True, It means that we will use the weights obtained by pre training on some data sets .
import torchvision.models as models
resnet18 = models.resnet18(pretrained=True)
alexnet = models.alexnet(pretrained=True)
squeezenet = models.squeezenet1_0(pretrained=True)
vgg16 = models.vgg16(pretrained=True)
densenet = models.densenet161(pretrained=True)
inception = models.inception_v3(pretrained=True)
googlenet = models.googlenet(pretrained=True)
shufflenet = models.shufflenet_v2_x1_0(pretrained=True)
mobilenet_v2 = models.mobilenet_v2(pretrained=True)
mobilenet_v3_large = models.mobilenet_v3_large(pretrained=True)
mobilenet_v3_small = models.mobilenet_v3_small(pretrained=True)
resnext50_32x4d = models.resnext50_32x4d(pretrained=True)
wide_resnet50_2 = models.wide_resnet50_2(pretrained=True)
mnasnet = models.mnasnet1_0(pretrained=True)
notes :
1, Usually PyTorch The extension of the model is **.pt or .pth**, When the program runs, it will first check whether there are downloaded model weights in the default path , Once the weights are downloaded , You don't need to download it next time .
2, In general, the download of pre training model will be slow , We can go directly through thunder or other ways here Look inside your model model_urls, Then download it manually , The weight of the pre training model is Linux and Mac The default download path of is... Under the user's root directory .cache Folder . stay Windows Next is C:\Users<username>.cache\torch\hub\checkpoint. We can do that by using torch.utils.model_zoo.load_url() Set the download address of the weight .
3, If it's too much trouble , You can also download your own weight and put it in the same folder , Then load the parameters into the network .
self.model = models.resnet50(pretrained=False)
self.model.load_state_dict(torch.load(‘./model/resnet50-19c8e357.pth’))
4, If you forcibly stop downloading halfway , Be sure to delete the weight file under the corresponding path , Otherwise, you may report an error
Train specific layers : By default , The properties of the parameter .requires_grad = True, If we start training or fine tuning from scratch, we don't need to pay attention here . But if we're extracting features and just want to calculate the gradient for the newly initialized layer , Other parameters will not be changed . Then we need to set requires_grad = False To freeze some layers .
def set_parameter_requires_grad(model, feature_extracting):
    if feature_extracting:
        for param in model.parameters():
            param.requires_grad = False
1.3 Fine tuning the model -timm
Besides using torchvision.models In addition to pre training , There is also a common pre training model library , be called timm.
Check the type of pre training model :timm The pre training model provided has reached 592 individual , We can go through timm.list_models() Method view timm Pre training model provided .
import timm
avail_pretrained_models = timm.list_models(pretrained=True)
len(avail_pretrained_models)
Use and modify the pre training model : Get the pre training model we want to use , We can go through timm.create_model() To create the model , We can pass in parameters pretrained=True, To use the pre training model . alike , We can also use torchvision Check the parameter types of the model in the same way as the model .
import timm
import torch

model = timm.create_model('resnet34',pretrained=True)
x = torch.randn(1,3,224,224)
output = model(x)
output.shape
Save model :imm The model created by the library is torch.model Subclasses of , We can use it directly torch The method of saving and loading model parameters built in the library , The specific operation is shown in the following code
torch.save(model.state_dict(),'./checkpoint/timm_model.pth')
model.load_state_dict(torch.load('./checkpoint/timm_model.pth'))
Detailed references :
https://www.aiuai.cn/aifarm1967.html
https://towardsdatascience.com/getting-started-with-pytorch-image-models-timm-a-practitioners-guide-4e77b4bf9055
https://yzsam.com/2022/03/202203170834122729.html
1.4 Semi precision training
Hardware device GPU, That is to say “ The graphics card ”.GPU The performance of is mainly divided into two parts : Computing power and memory , The former determines the speed of graphics card calculation , The latter determines how much data can be put into the graphics card at the same time for calculation .
When the amount of video memory used is certain , Each workout can load more data ( That is to say batch size Bigger ), It can also improve the training efficiency .
PyTorch The default floating-point storage method is torch.float32, More digits after the decimal point can certainly ensure the accuracy of the data , But most scenes don't need to be so precise , Retaining only half of the information will not affect the results , That is to use torch.float16 Format . Because the number has been halved , So it's called “ Semi precision ”
Reduce the occupation of video memory by half precision , Enable the graphics card to load more data .
Semi precision training is mainly applicable to the training of data itself size The larger ( for instance 3D Images 、 Video etc. ). When the data itself size When it's not big ( Like handwritten numbers MNIST The image size of the dataset is only 28*28), Using half precision training may not bring significant improvement
Setting of semi precision training : Use autocast Configure semi precision training , There are three steps :
1- Import :
from torch.cuda.amp import autocast
2- Model settings : In the model definition , Use python The way to decorate , use autocast In the decoration model forward function .
@autocast()
def forward(self, x):
    ...
    return x
3- Training process : In the process of training , Just put the data into the model and its subsequent parts into “with autocast():“ that will do
 for x in train_loader:
	x = x.cuda()
	with autocast():
        output = model(x)
        ...
1.5 Data to enhance -imgaug
In order to overcome the inability to obtain a large amount of data in some scenes , Use data enhancement to improve the size and quality of training sets .
imgaug: A data enhancement package commonly used in computer vision tasks , Compared with torchvision.transforms, It provides more data enhancement methods .
link :https://github.com/aleju/imgaug
https://github.com/aleju/imgaug-doc/tree/master/notebooks
Usage method :imgaug Only some methods of image enhancement are provided , However, the image is not provided IO operation .
1- Single picture processing :
import imageio
import imgaug as ia
%matplotlib inline

#  Picture reading
img = imageio.imread("./Lenna.jpg")

#  Use Image To read
# img = Image.open("./Lenna.jpg")
# image = np.array(img)
# ia.imshow(image)

#  Visualizations
ia.imshow(img)

# imgaug Contains a lot from Augmenter Inherited data enhanced operations . Here we are Affine As an example .
from imgaug import augmenters as iaa

#  Set random number seed
ia.seed(4)

#  Instantiation method
rotate = iaa.Affine(rotate=(-4,45))
img_aug = rotate(image=img)
ia.imshow(img_aug)
Do a variety of data enhancement processing for a picture : utilize imgaug.augmenters.Sequential() To construct our data enhanced pipline, The method and torchvison.transforms.Compose() Similar
iaa.Sequential(children=None, # Augmenter aggregate
               random_order=False, #  Whether for each batch Use... In different order Augmenter list
               name=None,
               deterministic=False,
               random_state=None)
#  Build processing sequence
aug_seq = iaa.Sequential([
    iaa.Affine(rotate=(-25,25)),
    iaa.AdditiveGaussianNoise(scale=(10,60)),
    iaa.Crop(percent=(0,0.2))
])
#  Process the pictures ,image Don't omit , It can't be written as images
image_aug = aug_seq(image=img)
ia.imshow(image_aug)
2- Processing batch pictures : Need to process more image data . here , Graph data can be divided into NHWC Of or consisting of a list HWC Processing batch images in the form of . It is mainly divided into the following two parts , The pictures of the batch are processed in the same way as the pictures of the batch are processed in parts .
Process the pictures of the batch in the same way : Put the image to be processed in a list in , And will image Change it to image You can perform data enhancement operations .
images = [img,img,img,img,]
images_aug = rotate(images=images)
ia.imshow(np.hstack(images_aug))
Only affine transformation is performed on the image , alike , We can also use a variety of enhancement methods for batch images , The method is similar to that of a single picture , We also need the help of Sequential To construct data enhanced pipline.
aug_seq = iaa.Sequential([
    iaa.Affine(rotate=(-25, 25)),
    iaa.AdditiveGaussianNoise(scale=(10, 60)),
    iaa.Crop(percent=(0, 0.2))
])

#  It is required to specify yes when importing images Parameters
images_aug = aug_seq.augment_images(images = images)
#images_aug = aug_seq(images = images)
ia.imshow(np.hstack(images_aug))
Process the pictures of the batch in parts :
imgaug Compared to other data enhanced Libraries , There is an interesting feature , That is, we can pass imgaug.augmenters.Sometimes() Yes batch Part of the picture application in Augmenters, The rest of the pictures apply another Augmenters.
iaa.Sometimes(p=0.5,  #  Represents the division proportion
              then_list=None,  # Augmenter aggregate .p The probability picture is transformed Augmenters.
              else_list=None,  #1-p The picture of probability will be transformed Augmenters. Pay attention to the application of transformed pictures Augmenter Can only be then_list perhaps else_list One of them .
              name=None,
              deterministic=False,
              random_state=None)
Process pictures of different sizes :
#  structure pipline
seq = iaa.Sequential([
    iaa.CropAndPad(percent=(-0.2, 0.2), pad_mode="edge"),  # crop and pad images
    iaa.AddToHueAndSaturation((-60, 60)),  # change their color
    iaa.ElasticTransformation(alpha=90, sigma=9),  # water-like effect
    iaa.Cutout()  # replace one squared area within the image by a constant intensity value
], random_order=True)

#  Load pictures of different sizes
images_different_sizes = [
    imageio.imread("https://upload.wikimedia.org/wikipedia/commons/e/ed/BRACHYLAGUS_IDAHOENSIS.jpg"),
    imageio.imread("https://upload.wikimedia.org/wikipedia/commons/c/c9/Southern_swamp_rabbit_baby.jpg"),
    imageio.imread("https://upload.wikimedia.org/wikipedia/commons/9/9f/Lower_Keys_marsh_rabbit.jpg")
]

#  Enhance the picture
images_aug = seq(images=images_different_sizes)

#  Visualization results
print("Image 0 (input shape: %s, output shape: %s)" % (images_different_sizes[0].shape, images_aug[0].shape))
ia.imshow(np.hstack([images_different_sizes[0], images_aug[0]]))

print("Image 1 (input shape: %s, output shape: %s)" % (images_different_sizes[1].shape, images_aug[1].shape))
ia.imshow(np.hstack([images_different_sizes[1], images_aug[1]]))

print("Image 2 (input shape: %s, output shape: %s)" % (images_different_sizes[2].shape, images_aug[2].shape))
ia.imshow(np.hstack([images_different_sizes[2], images_aug[2]]))
1.6 Use argparse Adjusting parameters
In order to modify the super parameters more conveniently , There is a library or function that can parse the command line parameters we enter and then pass them into the super parameters of the model . This is Python Part of the standard library :Argparse.
argparse Use :
1, establish ArgumentParser() object
2, call add_argument() Method to add parameters
3, Use parse_args() Analytical parameters In the following content , We will learn by practical operation argparse How to use
# demo.py
import argparse

#  establish ArgumentParser() object
parser = argparse.ArgumentParser()

#  Add parameter
parser.add_argument('-o', '--output', action='store_true',
    help="shows output")
# action = `store_true`  Will output The parameter record is True
# type  Specifies the format of parameters
# default  Default values are specified
parser.add_argument('--lr', type=float, default=3e-5, help='select the learning rate, default=1e-3')

parser.add_argument('--batch_size', type=int, required=True, help='input batch size')
#  Use parse_args() analytic function
args = parser.parse_args()

if args.output:
    print("This is some output")
    print(f"learning rate:{
      args.lr} ")
Use... On the command line python demo.py --lr 3e-4 --batch_size 32, You can see the following output :
This is some output
learning rate: 3e-4
argparse The parameters of can be divided into optional parameters and required parameters , The optional parameters are the same as ours lr Parameters are similar , If it is not entered, it will be set to the default value . The required parameters are the same as ours batch_size Parameters are similar , When we set the parameters required =True after , We must pass in this parameter , Otherwise you will report an error .
link :
https://geek-docs.com/python/python-tutorial/python-argparse.html
https://docs.python.org/3/library/argparse.html
1.7pytorch Project practice - be based on U-Net Model training practice of model
Please refer to the next article : be based on U-Net Model training practice of model ( Pit to be filled !)
Main reference DataWhale- Explain profound theories in simple language pytorch Course study .
边栏推荐
- Resttemplate and ribbon are easy to use
- scrapy 设置随机的user_agent
- Musk's "eternal soul": half hype, half flicker
- [multimodal] transferrec: learning transferable recommendation from texture of modality feedback arXiv '22
- 使用TensorBoard可视化训练过程
- Word中的空白页,怎么也删不掉?如何操作?
- Eureka注册中心开启密码认证-记录
- Introduction to the scratch crawler framework
- 利用wireshark对TCP抓包分析
- PyTorch进阶训练技巧
猜你喜欢

Application of comparative learning (lcgnn, videomoco, graphcl, XMC GaN)
【微服务~Sentinel】Sentinel降级、限流、熔断

Hydrogen entrepreneurship competition | Liu Yafang, deputy director of the science and Technology Department of the National Energy Administration: building a high-quality innovation system is the cor

Client open download, welcome to try

那些离开网易的年轻人

【GCN】《Adaptive Propagation Graph Convolutional Network》(TNNLS 2020)

Week303 of leetcode (20220724)
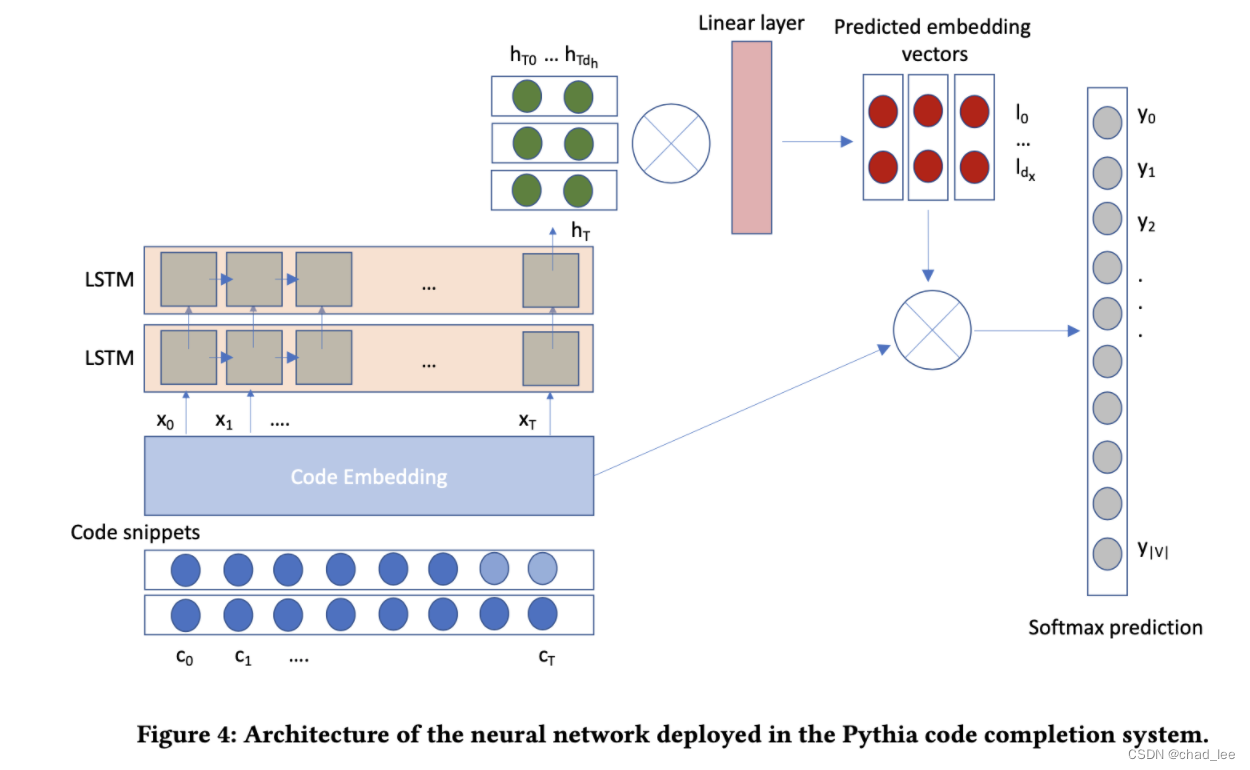
【AI4Code】《Pythia: AI-assisted Code Completion System》(KDD 2019)

Multi label image classification

WPF项目入门1-简单登录页面的设计和开发
随机推荐
Musk's "eternal soul": half hype, half flicker
3.2.1 what is machine learning?
【GCN-RS】MCL: Mixed-Centric Loss for Collaborative Filtering (WWW‘22)
How to solve the problem of the error reported by the Flink SQL client when connecting to MySQL?
GPT plus money (OpenAI CLIP,DALL-E)
技术管理杂谈
Fiddler抓包APP
Analysis of TCP packet capturing using Wireshark
【AI4Code】《CodeBERT: A Pre-Trained Model for Programming and Natural Languages》 EMNLP 2020
【AI4Code最终章】AlphaCode:《Competition-Level Code Generation with AlphaCode》(DeepMind)
NLP knowledge - pytorch, back propagation, some small pieces of notes for predictive tasks
How to access DMS database remotely? What is the IP address? What is the user name?
Figure neural network for recommending system problems (imp-gcn, lr-gcn)
[dark horse morning post] eBay announced its shutdown after 23 years of operation; Wei Lai throws an olive branch to Volkswagen CEO; Huawei's talented youth once gave up their annual salary of 3.6 mil
[multimodal] transferrec: learning transferable recommendation from texture of modality feedback arXiv '22
客户端开放下载, 欢迎尝鲜
919. Complete binary tree inserter: simple BFS application problem
Location analysis of recording an online deadlock
selenium使用———安装、测试
【GCN-RS】Learning Explicit User Interest Boundary for Recommendation (WWW‘22)