当前位置:网站首页>Robomaster visual tutorial (1) camera
Robomaster visual tutorial (1) camera
2022-07-07 23:54:00 【Raring_ Ringtail】
RoboMaster Visual tutorial (1) camera
Camera parameters
Camera should be the most important part of machine vision , Choosing a stable and reliable camera with good imaging quality can greatly reduce the difficulty of recognition algorithm design . Mainstream cameras are divided into CMOS Cameras and CCD camera . generally speaking CCD The camera has large volume, high cost and high precision , and CMOS The cost of camera is far lower than CCD camera , meanwhile CMOS The volume and power consumption of the camera are also better than CCD camera . This paper mainly summarizes CMOS Camera selection ( Because I haven't played CCD camera ).
Roller shutter exposure and global exposure
Usually the cameras we buy online are roller shutter exposure cameras , It is difficult to see the difference between these two cameras in daily use , But in the field of high speed requirements, the advantages and disadvantages of these two exposure methods are obvious , Especially for cheap cameras, the jelly effect of roller shutter exposure is more obvious .
For the difference between roller shutter exposure and global exposure, see : Talk about shutter : Rolling curtains / Global shutter and jelly effect
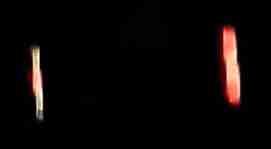
In addition to the jelly effect , The camera with global exposure has higher color saturation under the condition of low exposure time , In the actual test and comparison, it is found that the exposure value is also adjusted to the minimum , When shooting the red light bar of the referee system ,KS2A17(200 Ten thousand pixel roller shutter exposure camera ) And KS1A552(100 Megapixel global exposure camera ) The contrast is obvious ,KS2A17 The light bar photographed is dark and gray , And it will flash , and KS1A552 colorful . Pictured 1 chart 2 Shown :( Because there is no competition now , Take the video screenshot taken before as an example )
 |  |
|---|---|
| chart 1 KS2A17 Low exposure shooting armor plate | chart 2 KS1A552 Low exposure shooting energy mechanism |
Through the comparison of the above two figures , In terms of color, the global exposure camera explodes the roller shutter exposure camera .
Exposure
In armor recognition , Exposure is the key factor to determine whether the armor plate can be successfully identified . When I was a sophomore in the competition , Since I started from scratch, I didn't know that there are so many parameters of the camera that can be adjusted , At that time, I thought that a camera with high resolution and realistic colors was a good camera , So I bought a Microsoft LifeCam Studio, This camera should be the most failed camera I have ever bought , It's expensive and difficult to use . The first time I knew the power of adjusting exposure was after reading the official open source code , The feeling at that time was that of sudden enlightenment . The method used when you don't know the exposure is YOLO, This algorithm is awesome , But very slowly , Even running on the computer is stuck, let alone a wonderful calculation . I was running YOLO The frame rate is on the computer 28fps, Wonderful calculation 8fps. The following is a direct comparison between the normal exposure and low exposure of the camera .
 |  |
|---|---|
| chart 3 Pictures taken under normal exposure | chart 4 Pictures taken under low exposure |
So when we shoot objects that can glow autonomously , Reducing the exposure time can reduce the influence of ambient light . At this time, the binary graph obtained by threshold processing can be further processed .
Gamma correct
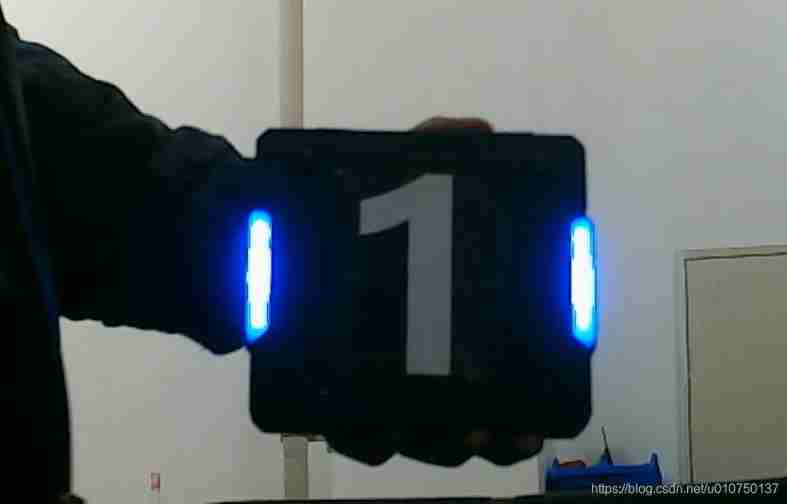
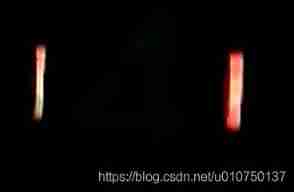
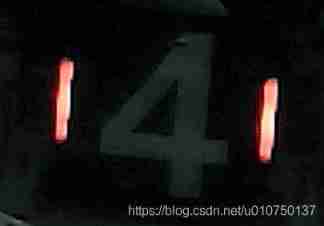
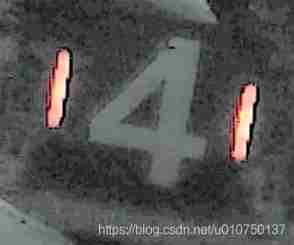
In the process of reducing the false recognition rate of armor plate , We can filter mismatches through various constraints , The smarter way is to recognize the number in the middle of the armor plate . But when we set the exposure of the camera to very low, the number is invisible ( Pictured 5), What do you do then ? One method that is not easy to think of is to improve the camera Gamma value . When Gamma When it is increased, the brightness of the area with low brightness in the image will be increased . Pictured 5~ chart 7 Shown :
 |  |  |
|---|---|---|
| chart 5 No improvement Gamma | chart 6 Improve Gamma | chart 7 Further improve Gamma |
chart 5 You can hardly see the middle number in , While improving Gamma Then you can see the numbers in the middle , When further improved Gamma The last number can be clearly recognized . Some people may have questions , Since the brightness of the dark area has increased , That's the same as before reducing the exposure . Not the same. , Improve Gamma In the rear image, the part with increased brightness is gray, while the light bar in the red part has no obvious change . Pictured 8, The parts of the picture that are increased in brightness are basically gray , Because of the gray rgb Same value , So as long as the two channels of the picture are subtracted, the interference of the background can be removed . Pictured 9, To recognize red, you only need to subtract the blue channel from the red channel , What remains is what is needed . After finding the light bar, frame the number area to be recognized by the recognition function .
 | 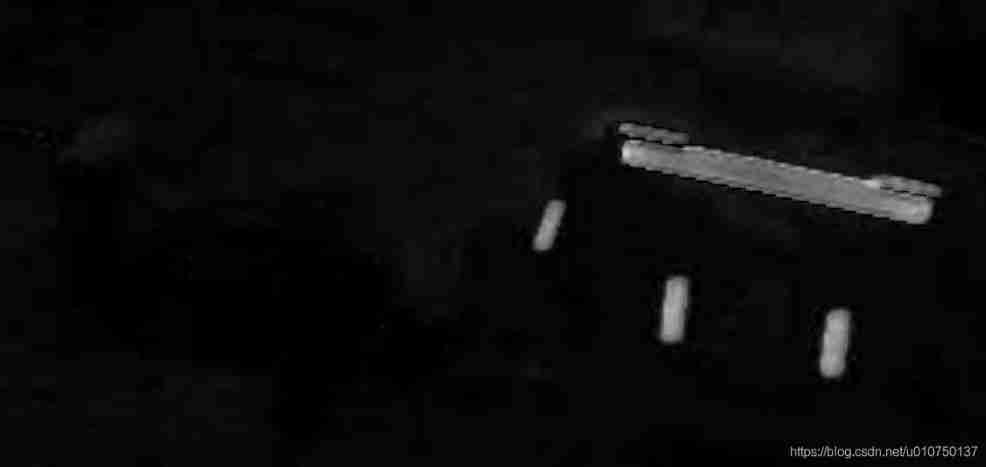 |
|---|---|
| chart 8 Gamma Correction results | chart 9 Red and blue channels subtract |
The camera Gamma What did correction do ? In fact, the thing to do is very simple , That is, each pixel of the image is converted through a power function , The reciprocal of the exponent of a power function is what is usually called gamma value , The image of this function is shown in Figure 10 Shown :
 |
|---|
| chart 10 Gamma Correction function curve |
It can be seen from the curve that when the input value is small, the ratio of output to input is large , Thus, the brightness of the dark part of the image can be improved .
About exposure and Gamma You can see This blog post
Frame rate and camera selection
about RoboMaster In terms of competition , The faster the recognition, the better , So the higher the camera frame rate, the better . Due to the limitation of bandwidth, frame rate and resolution usually restrict each other , If you want a high frame rate, the resolution will be low . The following table is the resolution and frame rate of the camera I have used :
| model | The resolution of the | Frame rate |
|---|---|---|
| KS2A17 Color roller shutter | 640*480 | 120 |
| 1280*720 | 60 | |
| 1920*1080 | 30 | |
| KS1A293 Black and white | 640*480 | 240 |
| 1280*800 | 120 | |
| KS1A552 Color overall | 640*480 | 60 |
| 1280*800 | 60 | |
| WX605 Color roller shutter | 640*320 | 330 |
| 1280*720 | 120 | |
| 1920*1080 | 60 |
It can be seen that the maximum frame rate can usually be reached when the resolution is the lowest , In fact, for the wonderful calculation (TK1) In general, it can only process with a resolution of 640*480 Left and right pictures , No matter how high the resolution is, you can't run , choose WX605 Can achieve the fastest single picture 6ms About the processing speed, that is to say, the best calculation can run as fast as 150 frame , Therefore, considering the actual use, the filter is selected KS1A293 Both image quality and speed are taken into account .
to update : During the resurrection game, I asked my classmates on wechat how their vision was doing , They told me not to use black and white cameras , Black and white cannot filter the interference of white light , And then finally WX605.
The lens
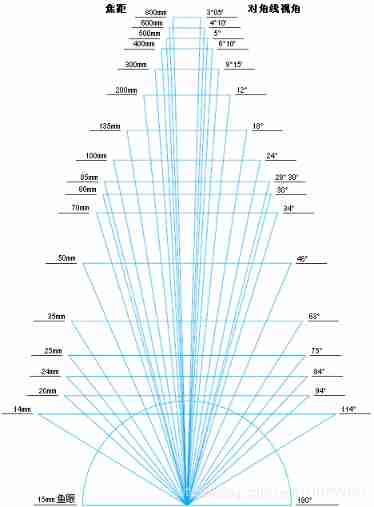
I think the lens is the most easily overlooked point , Because I usually don't think about changing the lens when I buy a camera . Lenses with different focal lengths present different perspectives , The larger the focal length, the narrower the viewing angle .
Limited by hardware and money , The image quality can be improved by selecting a suitable lens , It is used on the gun barrel of the combat vehicle in the actual measurement 6mm or 8mm The left and right lenses are more suitable , At this focal length 3m The left and right armor plates are clearly photographed . Use 1280*720 The resolution of the 8m The energy mechanism of can also be photographed clearly .
The relationship between the lens and the shooting angle is roughly shown in the figure below , Because the figure is for digital cameras, the data is not suitable for our scene , But the relationship between focal length and angle of view can still be seen and compared .
 |
|---|
| chart 11 Lens focal length and angle of view |
Filter
Because the armor plate is only red and blue , So when identifying, we only need to filter out these two kinds of light , In fact, it's OK not to use filters , By changing the picture from BGR The switch to HSV Identifying colors or subtracting red and blue channels can achieve the purpose of filtering colors .
Filters are mainly used in conjunction with black-and-white cameras . When analyzing various cameras before, it was said that the final model selection is KS1A293 Global exposure black and white camera , It can be well combined by using filters 240fps The advantages of frame rate and global exposure
Linux Camera drive
Linux The camera driver under is V4L2, There's nothing to say . Here I mainly want to talk about OpenCV Call the method of the camera , And some camera related tools .
Camera debugging tool
The best tool to use is qv4l2 了 , With this tool, you can easily adjust the parameters of the camera . If you want to adjust the camera exposure while the program is running , Just open this tool , You can directly modify the exposure of the camera 、Gamma Equal parameter , Very easy to use .
 |
|---|
| chart 12 qv4l2 Software screenshot |
You can see that the software lists almost all the parameters of the camera , It is very convenient to adjust parameters .
Installation method :sudo apt install qv4l2
There is also a set of command line tools
sudo apt install v4l-utils
It can be used after installation v4l2-ctl To control the camera .
Use RMVideoCapture Class calls the camera
DJI stay 2017 Open source a set of visual code , It contains a very useful camera driver RMVideoCapture. adopt RMVideoCapture, To bypass OpenCV Self contained VideoCapture To call the camera , Then realize various settings of the camera, including exposure 、 The resolution of the 、 Frame rate 、 Image format, etc , For specific calling methods, please refer to 2018 Southeast University open source code .
Use OpenCV Of VideoCapture To call the camera
It says DJI Made a RMVideoCapture, So is it to say VideoCapture It's really not easy to use ? No, it isn't , The probability is that the parameters are not set correctly or compiled OpenCV Compilation was not selected when V4L2.
Here's how to use it correctly VideoCapture.
First, you must compile OpenCV When you choose V4L2( I usually use CMake GUI To compile the OpenCV Of )
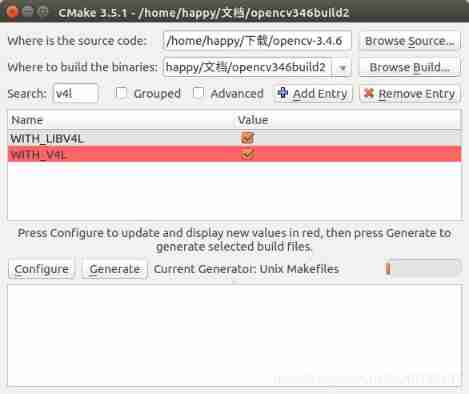 |
|---|
| chart 13 CMake add to V4L2 |
After compilation, it can be used normally VideoCapture To change camera parameters .
Before OpenCV Change is not supported BufferSize Of , But in 2018 year 3 month 9 Added changes to after BUFFERSIZE Support for
see OpenCV The corresponding code You can see
12th patch: March 9, 2018, Taylor Lanclos <[email protected].com>
 added support for CV_CAP_PROP_BUFFERSIZE

    case cv::CAP_PROP_BUFFERSIZE:
        if (bufferSize == value)
            return true;

        if (value > MAX_V4L_BUFFERS || value < 1) {

            fprintf(stderr, "V4L: Bad buffer size %d, buffer size must be from 1 to %d\n", value, MAX_V4L_BUFFERS);
            return false;
        }
        bufferSize = value;
        return v4l2_reset();
That is to say, just before using the latest Library RMVideoCapture The problems solved can be used VideoCapture To solve .
For convenience, I use python Explain how to use correctly .
# Show OpenCV Compile information for , You can check whether it contains V4L2 Support , If there is no need to recompile
print(cv2.getBuildInformation())
# Turn on the camera
cap = cv2.VideoCapture(1)
# Displays the number of caches , The default is 4 The maximum is 10
print(cap.get(cv2.CAP_PROP_BUFFERSIZE))
# Set the cache frame to 2
cap.set(cv2.CAP_PROP_BUFFERSIZE,2)
print(cap.get(cv2.CAP_PROP_BUFFERSIZE))
# Adjust the camera resolution
cap.set(cv2.CAP_PROP_FRAME_HEIGHT, 800)
cap.set(cv2.CAP_PROP_FRAME_WIDTH, 1280)
# Set the image to MJPG Format , In most cases, only this format can achieve the maximum frame rate
print('setform', cap.set(cv2.CAP_PROP_FOURCC, cv2.VideoWriter.fourcc('M', 'J', 'P', 'G')))
# Set up FPS
print('setfps', cap.set(cv2.CAP_PROP_FPS, 60))
# The above two sentences print out whether the setting is successful , The successful words are True It is False
gamm = 100
expo = 1
# Set up Gamma
cap.set(cv2.CAP_PROP_GAMMA, gamm)
# Set to manual exposure
cap.set(cv2.CAP_PROP_AUTO_EXPOSURE, 1)
# Set the exposure
cap.set(cv2.CAP_PROP_EXPOSURE, expo)
# Set to auto exposure
 cap.set(cv2.CAP_PROP_AUTO_EXPOSURE,2.6)
The parameters that need to be set are probably the above . Here I want to emphasize the following CAP_PROP_AUTO_EXPOSURE Set up , The range of this parameter is OpenCV When written in the source code 0 To 4, That is to say, the parameter of setting whether to automatically expose is not 0 perhaps 1. Through experiments, it is found that KS1A552 When the camera [0,2.6) The range is to turn off auto exposure ,[2.6,4] To turn on auto exposure .
OpenCV Description of parameter range in source code
    if (normalizePropRange) {

        switch(property_id)
        {

        case CAP_PROP_WB_TEMPERATURE:
        case CAP_PROP_AUTO_WB:
        case CAP_PROP_AUTOFOCUS:
            range = Range(0, 1); // do not convert
            break;
        case CAP_PROP_AUTO_EXPOSURE:
            range = Range(0, 4);
        default:
            break;
        }
    }
Recently applied for a wechat official account , Name is Notes on Jiangda . It is convenient for me to help others by summarizing my own learning and research experience . Interested friends can pay attention to .
Copyright notice : This article is an original blog article , No reprint without the permission of the blogger . https://blog.csdn.net/u010750137/article/details/90698203
边栏推荐
- Basic learning of SQL Server -- creating databases and tables with code
- Seven years' experience of a test engineer -- to you who walk alone all the way (don't give up)
- [path planning] use the vertical distance limit method and Bessel to optimize the path of a star
- Kubectl's handy command line tool: Oh my Zsh tips and tricks
- 95. (cesium chapter) cesium dynamic monomer-3d building (building)
- Take you hand in hand to build Eureka client with idea
- 【推荐系统基础】正负样本采样和构造
- 一键免费翻译300多页的pdf文档
- Kubectl 好用的命令行工具:oh-my-zsh 技巧和窍门
- 保证接口数据安全的10种方案
猜你喜欢
ping报错:未知的名称或服务
Connect diodes in series to improve voltage withstand

Basic learning of SQL Server -- creating databases and tables with the mouse

第四期SFO销毁,Starfish OS如何对SFO价值赋能?
Benchmarking Detection Transfer Learning with Vision Transformers(2021-11)
Rectification characteristics of fast recovery diode

Opengl3.3 mouse picking up objects
![Arbre binaire équilibré [Arbre AVL] - Insérer et supprimer](/img/1f/cd38b7c6f00f2b3e85d4560181a9d2.png)
Arbre binaire équilibré [Arbre AVL] - Insérer et supprimer
激光slam学习(2D/3D、偏实践)
QT and OpenGL: load 3D models using the open asset import library (assimp)
随机推荐
二叉排序树【BST】——创建、查找、删除、输出
Introduction to programming hardware
激光slam学习(2D/3D、偏实践)
Possible SQL for Oracle table lookup information
Basic learning of SQL Server -- creating databases and tables with code
串联二极管,提高耐压
如何衡量产品是否“刚需、高频、痛点”
SQL connection problem after downloading (2)
Reverse output three digit and arithmetic sequence
QT creator add custom new file / Project Template Wizard
Automated testing: robot framework is a practical skill that 90% of people want to know
Oracle statistics by time
postgis学习
P1055 [noip2008 popularization group] ISBN number
【路径规划】使用垂距限值法与贝塞尔优化A星路径
QT creator add JSON based Wizard
May day C - most
507 field D - extraterrestrial relics
自动化测试:Robot FrameWork框架90%的人都想知道的实用技巧
About the difference between ch32 library function and STM32 library function