当前位置:网站首页>Django database (SQLite) basic introductory tutorial
Django database (SQLite) basic introductory tutorial
2022-07-07 02:44:00 【1024 questions】
1: Create a project
2: establish blog application
3: Database operation
4. stay blog_demo Add data to table :
summary
1: Create a projectdjango-admin startproject mysiteAfter creation , The structure of the project catalogue is as follows :

manage.py ----- Django Tools in the project , It allows you to call django shell And database, etc .
settings.py ---- Contains the default settings for the project , Include database information , Debug flags and other working variables .
urls.py ----- Responsible for the URL Schema mapping to application .
2: establish blog applicationpython manage.py startapp blogAfter completion , A... Will be generated in the project blog Folder

Initialize database :
python Bring their own SQLite database ,Django Support various mainstream databases , Here we first use SQLite.
If you use other databases, please use settings.py Set in file . The default configuration of the database is :
DATABASES = { 'default': { 'ENGINE': 'django.db.backends.sqlite3', 'NAME': os.path.join(BASE_DIR, 'db.sqlite3'), }}Use the default data configuration to initialize the database :
After command execution , Some data tables will be generated :

Django I have a WEB backstage , Create below WEB Background user name and password :
python manage.py createsuperuserBe careful ️: The password cannot be similar to the user name , Passwords cannot be pure numbers .

Next, let's use the account and password created above to log in to the background . To log in to the background , Must be in settings.py File will be created above APP That is to say blog added :
INSTALLED_APPS = [ 'django.contrib.admin', 'django.contrib.auth', 'django.contrib.contenttypes', 'django.contrib.sessions', 'django.contrib.messages', 'django.contrib.staticfiles', 'blog',]Note that there must be a comma after it !
start-up django Containers :
python manage.py runserverDefault WEB The address is http://127.0.0.1, Port is 8000, Use this address and port to access the home page :

Next visit django The background of :http://127.0.0.1/admin

Create a UseInfo surface , And create fields :
Now let's open up blog In the catalog models.py file , This is what we define blog Where data structures . open mysite/blog/models.py File modification :
from django.db import models# Create your models here.class Demo(models.Model): car_num = models.CharField(max_length=32) park_name = models.CharField(max_length=32) jinru_Date = models.CharField(max_length=32) chuqu_Date = models.CharField(max_length=32) time = models.CharField(max_length=32)Command line execution :
python manage.py makemigrationspython manage.py migrate
As can be seen from the above figure ,Django By default, the APP Named data table prefix , Take the class name as the data table name !
The fields created are shown in the following figure :

Django Is in views.py In file , By importing models.py Documents come Create data Of :
from django.shortcuts import render# Create your views here.from blog import models # Import blog modular from django.shortcuts import HttpResponsedef db_handle(request): # Add data models.Demo.objects.create(car_num=' shan E-BV886', park_name=' Hospital of traditional Chinese medicine ', jinru_Date='2022-02-05', chuqu_Date='2022-02-06', time='1') return HttpResponse('OK')Now let's configure the route , So that the browser can access views.py file :
from blog import viewsurlpatterns = [ path('admin/', admin.site.urls), path(r'db_handle', views.db_handle),]Let's visit http://127.0.0.1/db_handle

Check whether the database is created successfully :

Above is Create table data , You can also create table data in the format of a dictionary :
def db_handle(request): dic = {car_num=' shan E-BV886', park_name=' Hospital of traditional Chinese medicine ', jinru_Date='2022-02-05',chuqu_Date='2022-02-06', time='1'} models.Demo.objects.create(**dic) return HttpResponse('OK')Delete table data :
views.py The documents are as follows :
def db_handle(request): # Delete table data models.Demo.objects.filter(id=1).delete() return HttpResponse('OK')The operation method is the same as above , Execute it once in the browser , In the data id=1 The data of is deleted :

Modify table data :
def db_handle(request): # Modify table data models.Demo.objects.filter(id=2).update(time=18) return HttpResponse('OK')Data query :
In order to display the queried data more intuitively , Here we will use Django The template function of , Let the queried data in WEB Displayed in the browser
stay templates Create a new one in the directory t1.html The file of , The contents are as follows :
<!DOCTYPE html><html lang="en"><head> <meta charset="UTF-8"> <title>Django Operating the database </title> <link type="text/css" href="/static/base.css" rel="external nofollow" rel="external nofollow" rel="stylesheet" /></head><body> <table border="1"> <tr> <th> license plate number </th> <th> Parking lot name </th> <th> Admission time </th> <th> Playing time </th> <th> Parking Duration </th> </tr> {% for item in li %} <tr> <td>{{ item.car_num }}</td> <td>{{ item.park_name }}</td> <td>{{ item.jinru_Date }}</td> <td>{{ item.chuqu_Date }}</td> <td>{{ item.time }}</td> </tr> {% endfor %}</body></html>views.py File query data , And specify the template file to call , The contents are as follows :
def db_handle(request): user_list_obj = models.Demo.objects.all() return render(request, 't1.html', {'li': user_list_obj})Be careful : Because this is under the project templates The template created under the directory , Not in blog Templates created in the application , above views.py Invoked in file t1.html Templates , When it runs, it will appear that it cannot be found t1.html Template error , In order to find mysite/templates Under the template file , We still need to settings.py Path of file configuration template :
TEMPLATES = [ { 'BACKEND': 'django.template.backends.django.DjangoTemplates', 'DIRS': [os.path.join(BASE_DIR, 'templates')], # Configure template path 'APP_DIRS': True, 'OPTIONS': { 'context_processors': [ 'django.template.context_processors.debug', 'django.template.context_processors.request', 'django.contrib.auth.context_processors.auth', 'django.contrib.messages.context_processors.messages', ], }, },]Now you can view it in the browser :

introduce JS,CSS Etc. static files :
stay mysite Create a new one in the directory static Catalog , take JS,CSS Files are placed in this directory ! And in settings.py The document specifies static Catalog :

STATIC_URL = '/static/'STATICFILES_DIRS = ( os.path.join(BASE_DIR, 'static'),)Form submission data :
stay Django To be used in post Submit form by , Need to be in settings.py Comment out the following line in the configuration file :
# 'django.middleware.csrf.CsrfViewMiddleware',Submit Form ( It's still used here t1.html):
<!DOCTYPE html><html lang="en"><head> <meta charset="UTF-8"> <title>Django Operating the database </title> <link type="text/css" href="/static/base.css" rel="external nofollow" rel="external nofollow" rel="stylesheet" /></head><body> <table border="1"> <tr> <th> license plate number </th> <th> Parking lot name </th> <th> Admission time </th> <th> Playing time </th> <th> Parking Duration </th> </tr> {% for item in li %} <tr> <td>{{ item.car_num }}</td> <td>{{ item.park_name }}</td> <td>{{ item.jinru_Date }}</td> <td>{{ item.chuqu_Date }}</td> <td>{{ item.time }}</td> </tr> {% endfor %} </table> <form action="/db_handle" method="post"> <p><input name="car_num" /></p> <p><input name="park_name" /></p> <p><input name="jinru_Date" /></p> <p><input name="chuqu_Date" /></p> <p><input name="time" /></p> <p><input type="submit" value="submit" /></p> </form></body></html>Write to database (views.py):
def db_handle(request): if request.method == "POST": models.Demo.objects.create(car_num=request.POST['car_num'],park_name=request.POST['park_name'],jinru_Date=request.POST['jinru_Date'],chuqu_Date=request.POST['chuqu_Date'],time=request.POST['time']) user_list_obj = models.Demo.objects.all() return render(request, 't1.html', {'li': user_list_obj})After submitting the data , Here's the picture :


This is about Django database (SQlite) This is the article of the basic introductory tutorial , More about Django database SQlite Please search the previous articles of SDN or continue to browse the relevant articles below. I hope you can support SDN in the future !
边栏推荐
猜你喜欢

数字滚动增加效果

巴比特 | 元宇宙每日必读:IP授权是NFT的破圈之路吗?它的难点在哪里?Holder该如何选择合作平台?...
普通测试年薪15w,测试开发年薪30w+,二者差距在哪?
Summer Challenge database Xueba notes (Part 2)~
1 -- Xintang nuc980 nuc980 porting uboot, starting from external mx25l
Apifox,你的API接口文档卷成这样了吗?
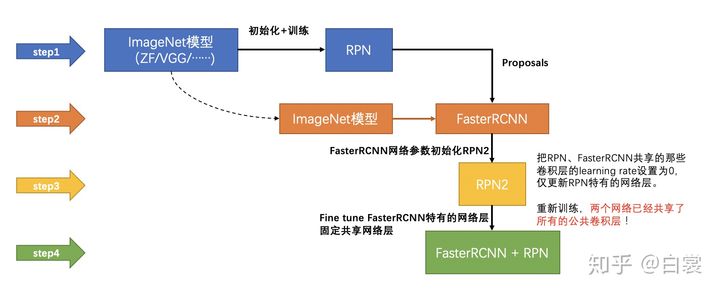
一文读懂Faster RCNN
3 -- Xintang nuc980 kernel supports JFFS2, JFFS2 file system production, kernel mount JFFS2, uboot network port settings, and uboot supports TFTP

Station B's June ranking list - feigua data up main growth ranking list (BiliBili platform) is released!
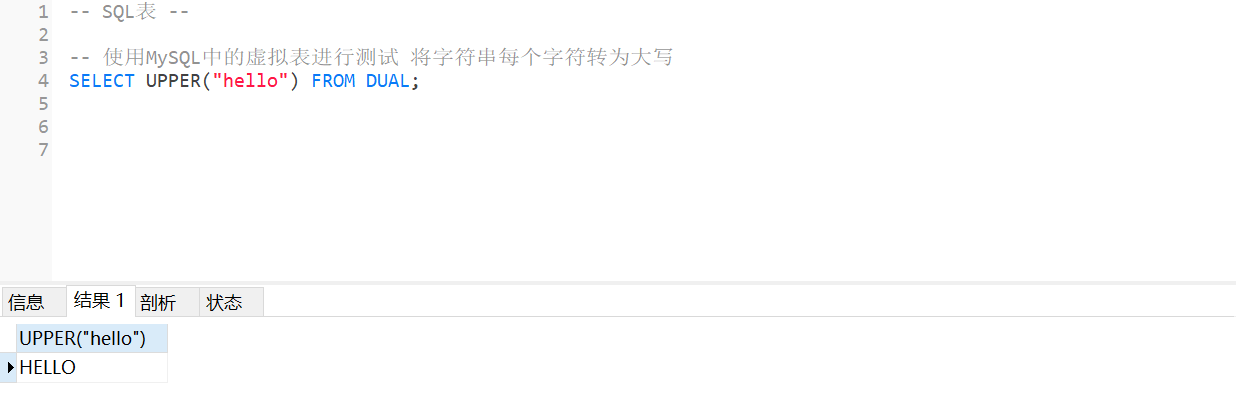
MySQL - common functions - string functions
随机推荐
数字滚动增加效果
服装企业部署MES管理系统的五个原因
6-6漏洞利用-SSH安全防御
Safety delivery engineer
HAVE FUN | “飞船计划”活动最新进展
Five reasons for clothing enterprises to deploy MES management system
The so-called consumer Internet only matches and connects industry information, and does not change the industry itself
Wireshark installation
What are the applications and benefits of MES management system
Hash table and full comments
CSDN 夏令营课程 项目分析
4 -- Xintang nuc980 mount initramfs NFS file system
MES管理系统的应用和好处有哪些
压缩 js 代码就用 terser
This week's hot open source project!
用全连接+softmax对图片的feature进行分类
普通测试年薪15w,测试开发年薪30w+,二者差距在哪?
代码调试core-踩内存
MySQL - common functions - string functions
C#/VB.NET 删除Word文档中的水印