当前位置:网站首页>Super detailed tutorial, an introduction to istio Architecture Principle and practical application
Super detailed tutorial, an introduction to istio Architecture Principle and practical application
2022-07-04 21:38:00 【Erudite Valley wild architect】
Istio brief introduction
2.1、istio framework
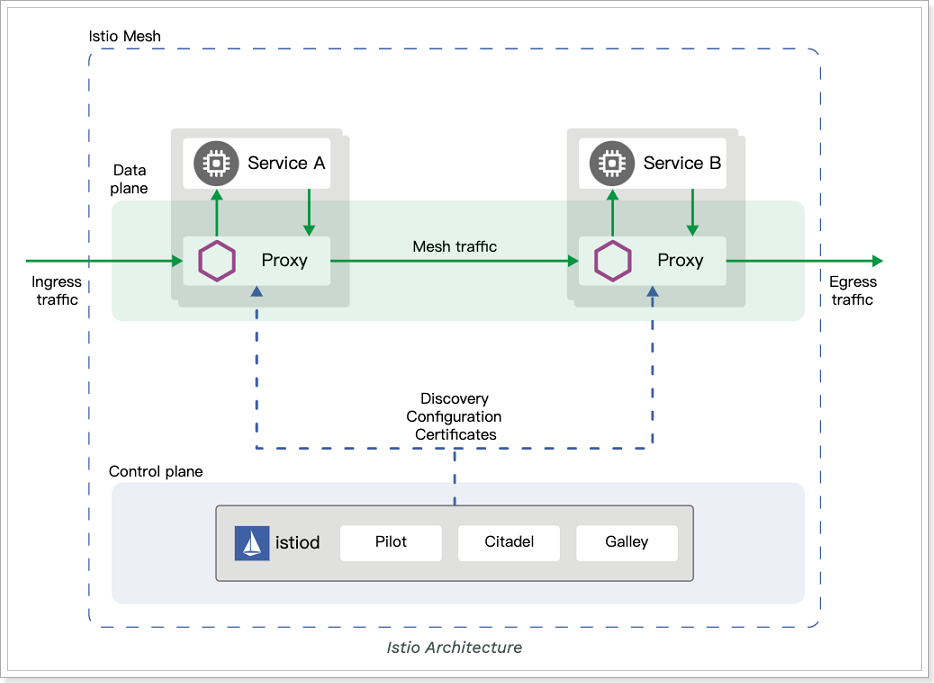
actually Istio Namely Service Mesh An implementation of Architecture , Communication between services ( Like here Service A visit Service B) It will be through an agent ( The default is Envoy) To carry out .
And the intermediate network protocol supports HTTP/1.1,HTTP/2,gRPC perhaps TCP, It covers the mainstream communication protocols . Agent level , Call it the data plane .
The control plane is further subdivided , Divided into Pilot、Citadel and Galley, Their respective functions are as follows :
- Pilot: by Envoy Provides service discovery , Traffic management and intelligent routing (AB test 、 Canary release, etc ), And error handling ( Overtime 、 retry 、 Fuse ) function .
- Citadel: Provide authentication and certificate management between services , The service can be automatically upgraded to TLS agreement .
- Galley:Galley yes Istio Configuration verification of 、 extract 、 Process and distribute components . It's responsible for the rest of Istio Components and from the underlying platform ( for example Kubernetes) Get the details of user configuration .
The data plane will communicate with the control plane , On the one hand, you can get the information between the services you need , On the other hand, you can also report the service invocation Metrics data .
2.1、 Why use Istio?
Through load balancing 、 Authentication between services 、 Monitoring and other methods ,Istio It's easy to create a network with services already deployed , The code of the service needs little or no change . By deploying a special sidecar The agent adds... To the service Istio Support for , The agent will intercept all network communication between microservices , Then use the functions of its control plane to configure and manage Istio, This includes :
by HTTP、gRPC、WebSocket and TCP Traffic automatic load balancing .
Through rich routing rules 、 retry 、 Fault transfer and fault injection control traffic behavior in a fine-grained way .
Pluggable policy layer and configuration API, Support access control 、 Rate limits and quotas .
Within cluster ( Including the entrance and exit of the cluster ) Automated measurement of all traffic 、 Log and track .
Secure inter service communication in a cluster with powerful authentication and Authorization .
Istio Designed for scalability , It can meet different deployment requirements .
2.2、 Core features
Istio It provides many key functions across service networks in a unified way .
2.2.1、 Traffic management
Istio Simple rule configuration and traffic routing allow you to control traffic and API Call the process .
Istio Simplified service level attributes ( Such as fuse 、 Timeout and retrying ) Configuration of , And make it easy to perform important tasks ( Such as A/B test 、 Canary releases and phased releases by percentage of traffic ).
With better traffic visibility and out of the box fault recovery features , You can capture problems before they occur , Whatever the situation, you can make the call more reliable , The network is more robust .
2.2.2、 Security
Istio The security features of freeing developers , So that it only needs to focus on application level security .
Istio Provides the underlying security communication channel , And manage authentication for large-scale service communication 、 Authorization and encryption . With Istio, Service communication is protected by default , Enables you to implement consistent policies across different protocols and runtimes —— And all of this requires little or no application modification .
Istio It's platform independent , It can be done with Kubernetes( Or infrastructure ) The network strategy is used together . But it's more powerful , Be able to protect at the network and application level pod To pod Or service to service communication .
2.2.3、 Observability
Istio Robust tracking 、 Monitoring and logging features give you an in-depth understanding of service grid deployment .
adopt Istio The ability to monitor , You can really understand how the performance of a service affects both upstream and downstream ; And its customization Dashboard Provides the ability to visualize the performance of all services , And let you see how it affects other processes .
Istio Of Mixer The component is responsible for policy control and telemetry data collection . It provides back-end abstraction and mediation , Part of Istio Isolated from the infrastructure implementation details of the back end , It also provides the operation and maintenance personnel with fine-grained control of the interaction between the grid and the back-end infrastructure implementation .
All of these features allow you to more effectively set up 、 Monitoring and strengthening service SLO. Of course , The bottom line is that you can detect and fix problems quickly and effectively .
2.3、 Platform support
Istio Platform independent , Designed to run in a variety of environments , Including cross cloud 、 Internal environment 、Kubernetes、Mesos wait . You can go to Kubernetes Or equipped with Consul Of Nomad Deploy on the environment Istio.Istio At present, we support :
Kubernetes Service deployment on
be based on Consul Service registration for
The service runs on a separate virtual machine
3、Istio Quick start
Next we will Istio Deploy and install , To experience its charm .
3.1、 build kubernetes colony
Istio Running on the kubernetes Platform is the best choice , So let's first build kubernetes Environmental Science .
Be careful : For beginners, please refer to the course materials
One click installation documentation
3.1.1、 Environmental preparation
Get ready 3 platform Centos7 virtual machine :
| name | IP | role | CPU | Memory | Hard disk |
|---|---|---|---|---|---|
| node1 | 192.168.31.106 | master | 2 nucleus | 4GB | 100GB |
| node2 | 192.168.31.107 | node | 2 nucleus | 4GB | 100GB |
| node3 | 192.168.31.108 | node | 2 nucleus | 4GB | 100GB |
3.1.2、 Front work
build K8S Before , It needs some preparatory work , Otherwise, the cluster cannot be built .yum If not , Then use yum -y install yum-utils perhaps curl -o /etc/yum.repos.d/CentOS-Base.repo http://mirrors.aliyun.com/repo/Centos-7.repo, And then use yum.
# Modify hostname hostnamectl set-hostname node2hostnamectl set-hostname node3# to update yum Source , And complete yum update operation mv /etc/yum.repos.d/CentOS-Base.repo /etc/yum.repos.d/CentOS-Base.repo.backupwget -O /etc/yum.repos.d/CentOS-Base.repo https://mirrors.aliyun.com/repo/Centos-7.repo# If wget Cannot use direct input yum install wget Can be installed yum makecacheyum -y update# install dockeryum install -y yum-utils device-mapper-persistent-data lvm2yum-config-manager --add-repo https://mirrors.aliyun.com/docker-ce/linux/centos/docker-ce.repoyum makecache fastyum -y install docker-ce# start-up docker service systemctl start docker.service# Boot from boot systemctl enable docker.service# add to docker Aliyun accelerator sudo mkdir -p /etc/dockersudo tee /etc/docker/daemon.json <<-'EOF'{ "registry-mirrors": ["https://c6n8vys4.mirror.aliyuncs.com"]}EOFsudo systemctl daemon-reloadsudo systemctl restart docker# Test it , Look at the download speed docker pull redisdocker rmi redis:latest# Turn off firewall systemctl stop firewalld.servicesystemctl disable firewalld.service# add to hosts mapping Skipping The purpose of setting here is to pass scp Transfer the files on one node to other nodes vim /etc/hosts192.168.31.106 node1192.168.31.107 node2192.168.31.108 node3scp /etc/hosts node2:/etc/scp /etc/hosts node3:/etc/# Set up node1 To node2、node3 No landing ssh-keygen # All the way to the next step ssh-copy-id node2ssh-copy-id node3# test ssh node2ssh node33.1.3、 Set up the cluster
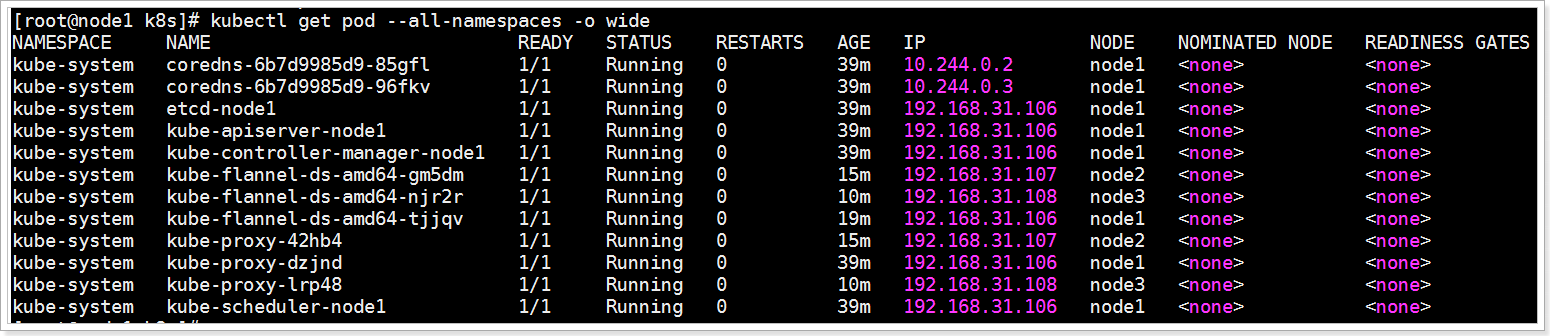
# Modify system parameters # take SELinux Set to permissive Pattern ( It's equivalent to disabling )setenforce 0sed -i 's/^SELINUX=enforcing$/SELINUX=permissive/' /etc/selinux/config# Ban swap file , edit /etc/fstab, Comment out references swap The line of vim /etc/fstabswapoff -a# Set the bridge parameters vim /etc/sysctl.confnet.bridge.bridge-nf-call-ip6tables = 1net.bridge.bridge-nf-call-iptables = 1net.ipv4.ip_forward = 1net.ipv4.tcp_tw_recycle = 0scp /etc/sysctl.conf node2:/etc/scp /etc/sysctl.conf node3:/etc/# Immediate effect sysctl -p# If appear /proc/sys/net/bridge/bridge-nf-call-ip6tables: No such file or directory# perform modprobe br_netfilter, Try again # install kubectlvim /etc/yum.repos.d/kubernetes.repo[kubernetes]name=Kubernetesbaseurl=https://mirrors.aliyun.com/kubernetes/yum/repos/kubernetes-el7-x86_64/enabled=1gpgcheck=0yum list kubectl –showduplicatesyum install -y kubectl.x86_64# Specify the version Be sure to specify the version # yum install -y kubectl-1.18.6# View version kubectl versionyum install -y kubelet kubeadm --disableexcludes=kubernetes# Specify the version Be sure to specify the version #yum install -y kubelet-1.18.6 kubeadm-1.18.6 --disableexcludes=kubernetes# If the installation is wrong , You can remove it with the following command #yum remove kubectl kubelet kubeadm# Pull the required image kubeadm config images pull --image-repository=registry.cn-hangzhou.aliyuncs.com/itcast --kubernetes-version=v1.18.6# If the pull fails , Try this :kubeadm config images pull --image-repository=lank8s.cn --kubernetes-version=v1.18.6# Start initializing , If you use lank8s.cn Pull the mirror , You need to specify the --image-repository=lank8s.cnkubeadm init --apiserver-advertise-address 192.168.31.106 --pod-network-cidr=10.244.0.0/16 --image-repository=registry.cn-hangzhou.aliyuncs.com/itcast --kubernetes-version=v1.18.6# When you see Your Kubernetes control-plane has initialized successfully! The initialization is successful !# Copy admin.conf To home Catalog , Otherwise mistakes :The connection to the server localhost:8080 was refused - did you specify the right host or port?mkdir -p $HOME/.kubesudo cp -i /etc/kubernetes/admin.conf $HOME/.kube/configsudo chown $(id -u):$(id -g) $HOME/.kube/config# Setting up network kube-flannel.yml The document is in the data kubectl apply -f kube-flannel.yml# test [root[@node1](https://my.oschina.net/u/4273199) k8s]# kubectl get nodesNAME STATUS ROLES AGE VERSIONnode1 Ready master 23m v1.18.6# take node2、node3 Join the cluster ,token Replace it with your own kubeadm join 192.168.31.106:6443 --token ekw4eu.cfi77sji1jyczhj6 --discovery-token-ca-cert-hash sha256:21de4177eaf76353dd060f2a783c9dafe17636437ade020bc40d60a8ab903483# test [root[@node1](https://my.oschina.net/u/4273199) k8s]# kubectl get nodesNAME STATUS ROLES AGE VERSIONnode1 Ready master 31m v1.18.6node2 Ready <none> 6m46s v1.18.6node3 Ready <none> 2m21s v1.18.6# The cluster component is successful # If you need to delete the cluster , perform kubeadm reset ,3 All machines need to perform # See what's going on podkubectl get pod --all-namespaces -o wideSee what's going on pod,kubectl get pod --all-namespaces -o wide
Be careful : If virtual machine restart causes k8s close , May adopt systemctl status kubelet Check the status , use systemctl start kubelet start-up k8s, Whether it is the master node or the work node , All need to be carried out .
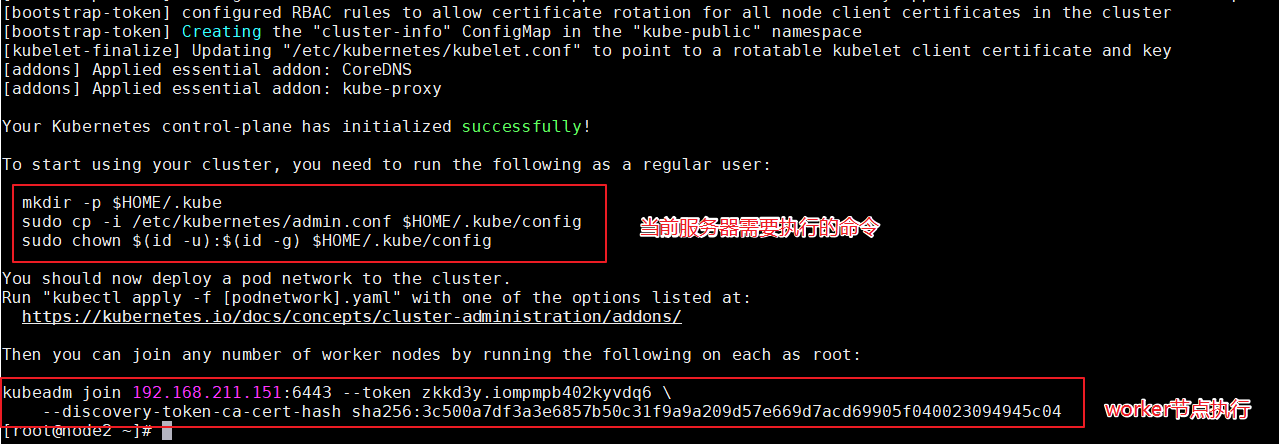
kubeadm join 192.168.211.151:6443 --token zkkd3y.iompmpb402kyvdq6 \ --discovery-token-ca-cert-hash sha256:3c500a7df3a3e6857b50c31f9a9a209d57e669d7acd69905f040023094945c04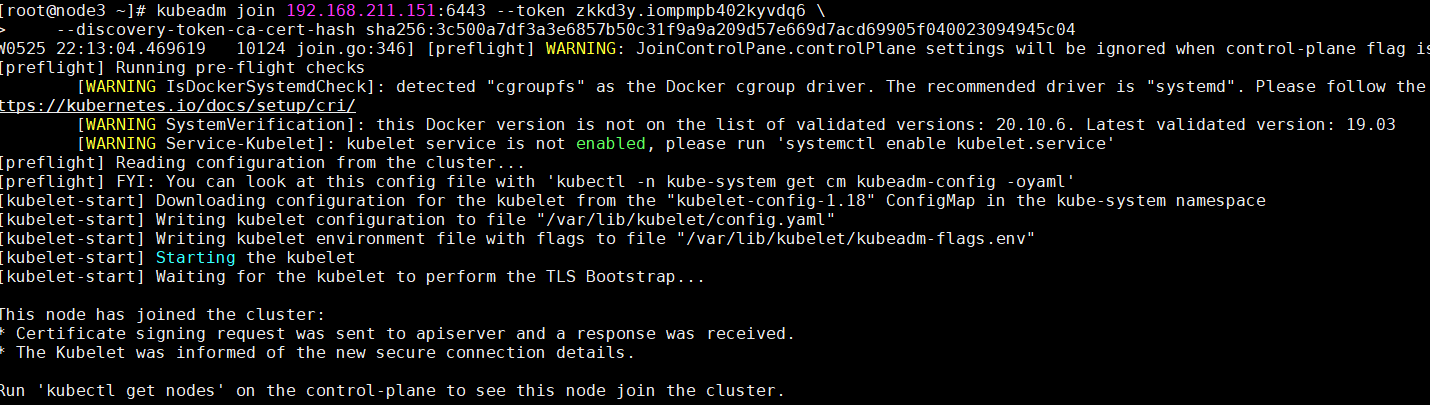
registry.cn-hangzhou.aliyuncs.com/itcast/kube-proxy v1.18.6registry.cn-hangzhou.aliyuncs.com/itcast/pause 3.2 registry.cn-hangzhou.aliyuncs.com/itcast/kube-proxy v1.18.6quay.io/coreos/flannel v0.12.0-amd64registry.cn-hangzhou.aliyuncs.com/itcast/pause 3.23.2、 build Istio Environmental Science
3.2.1、 download Istio
download Istio, The download will contain : The installation files 、 Examples and istioctl Command line tools .
visit Istio release Download the installation file corresponding to your operating system . stay macOS or Linux In the system , You can also download the latest version of Istio:
$ curl -L https://istio.io/downloadIstio | sh -The specified version is available :
$ curl -L https://istio.io/downloadIstio | ISTIO_VERSION=1.6.5 sh -Switch to Istio The package is in the directory . for example :Istio Package name is
istio-1.6.5, be :$ cd istio-1.6.5The installation directory contains the following contents :
samples/Under the table of contents , There are sample applicationsbin/Under the table of contents , containistioctlClient files for .istioctlThe tool is used for manual injection Envoy sidecar agent .
take
istioctlAdd client path to path In the environment variables ,macOS or Linux The system can be added as follows :$ export PATH=$PWD/bin:$PATH
install bash Automatically complete the file
If you use bash,istioctl The auto complete file is located in tools Catalog . By copying istioctl.bash File to your home Catalog , Then add the following content to your .bashrc File execution istioctl tab Complete document :
source ~/istio-1.6.5/tools/istioctl.bashIf istioctl The completion file has been installed correctly , Before you enter istioctl Command by pressing Tab key , It will return a set of recommended commands for you to choose :
$ istioctl proxy-<TAB>proxy-config proxy-status3.2.2、 install Istio
Please follow the steps below to use on the platform of your choice demo Configuration file installation Istio.
install
demoTo configure$ istioctl manifest apply --set profile=demoSelect the components to install in
istio-1.6.5/manifests/profilesin !To verify that the installation was successful , You need to make sure that Kubernetes Services are deployed correctly , And then verify that
jaeger-agentServices other than services , Are there all the rightCLUSTER-IP:[[email protected] ~]# kubectl get svc -n istio-systemNAME TYPE CLUSTER-IP EXTERNAL-IP PORT(S) AGEgrafana ClusterIP 10.1.88.100 <none> 3000/TCP 2m8sistio-egressgateway ClusterIP 10.1.62.15 <none> 80/TCP,443/TCP,15443/TCP 2m8sistio-ingressgateway LoadBalancer 10.1.37.204 <pending> 15020:32010/TCP,80:32672/TCP,443:32187/TCP,31400:32038/TCP,15443:32460/TCP 2m8sistiod ClusterIP 10.1.233.207 <none> 15010/TCP,15012/TCP,443/TCP,15014/TCP,853/TCP 2m12sjaeger-agent ClusterIP None <none> 5775/UDP,6831/UDP,6832/UDP 2m7sjaeger-collector ClusterIP 10.1.149.13 <none> 14267/TCP,14268/TCP,14250/TCP 2m7sjaeger-collector-headless ClusterIP None <none> 14250/TCP 2m7sjaeger-query ClusterIP 10.1.147.252 <none> 16686/TCP 2m7skiali ClusterIP 10.1.165.21 <none> 20001/TCP 2m7sprometheus ClusterIP 10.1.180.211 <none> 9090/TCP 2m7stracing ClusterIP 10.1.43.36 <none> 80/TCP 2m7szipkin ClusterIP 10.1.159.254 <none> 9411/TCP 2m7sIf the cluster is running in an environment that does not support external load balancers ( for example :minikube),
istio-ingressgatewayOfEXTERNAL-IPDisplay as<pending>state . Please use the serviceNodePortor Port forwarding to access the gateway .Please make sure that the associated Kubernetes pod Has been deployed , also
STATUSbyRunning:[[email protected] ~]# kubectl get pods -n istio-systemNAME READY STATUS RESTARTS AGEgrafana-b54bb57b9-lt4jn 1/1 Running 0 2m31sistio-egressgateway-7486cf8c97-4nxnm 1/1 Running 0 2m31sistio-ingressgateway-6bcb9d7bbf-pxnl5 1/1 Running 0 2m31sistio-tracing-9dd6c4f7c-zq2hh 1/1 Running 0 2m31sistiod-788f76c8fc-z8bqx 1/1 Running 0 2m35skiali-d45468dc4-v6w9p 1/1 Running 0 2m31sprometheus-6477cfb669-tn272 2/2 Running 0 2m31s
3.2.3、 uninstall Istio
istioctl manifest generate --set profile=demo | kubectl delete -f -3.3、Bookinfo Example
3.3.1、 Application instructions
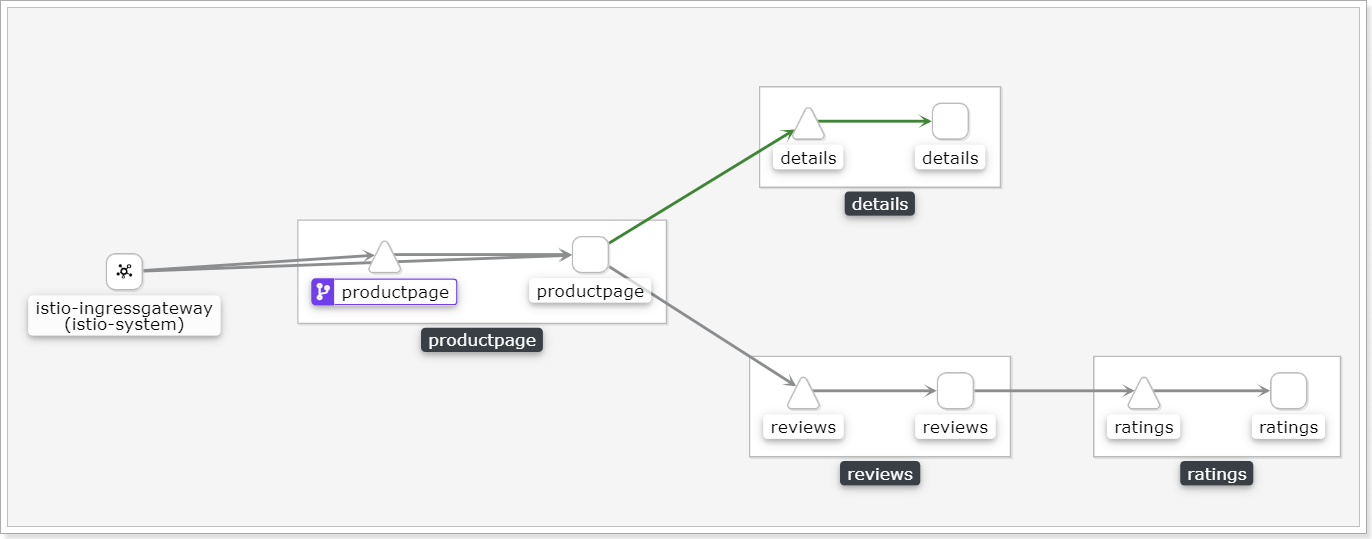
This example deploys a to demonstrate a variety of Istio Application of features , The application consists of four separate microservices . This application imitates a classification of online bookstores , Show information about a Book . The page will show a description of the book , The details of the book (ISBN、 Pages, etc ), And some comments on the book .
Bookinfo Applications are divided into four separate microservices :
productpage. This microservice will calldetailsandreviewsTwo microservices , Used to generate pages .details. This micro service contains information about books .reviews. This microservice includes book reviews . It also callsratingsMicroservices .ratings. This micro service contains rating information composed of book reviews .
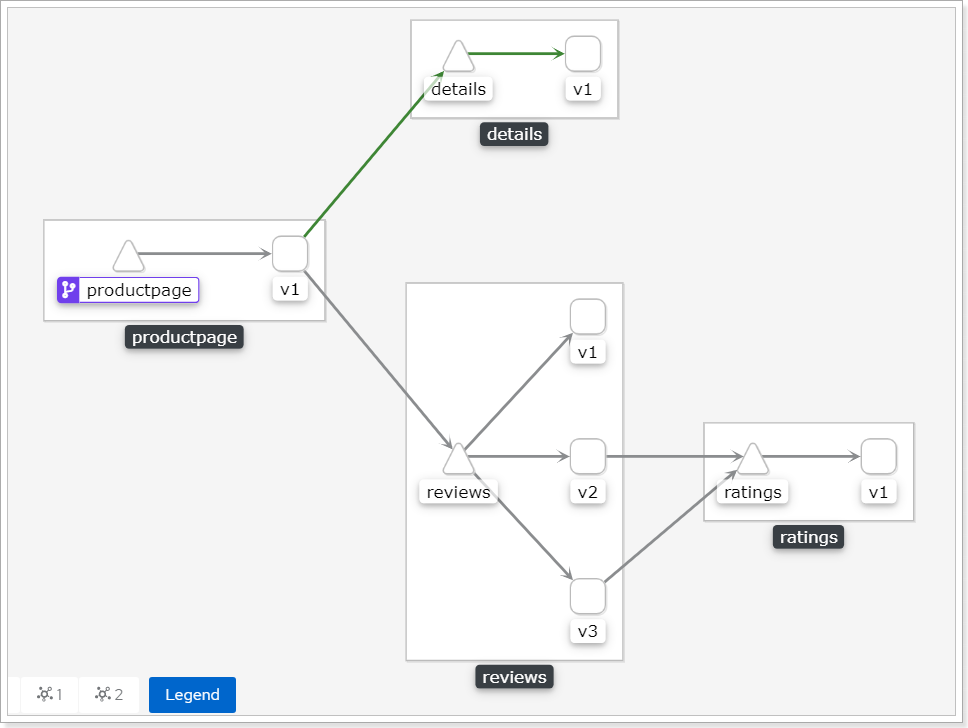
reviews Micro services include 3 A version :
- v1 Version will not call
ratingsservice . - v2 Version will call
ratingsservice , And use 1 To 5 A black star icon to show the rating information . - v3 Version will call
ratingsservice , And use 1 To 5 A red star icon to show the rating information .
The following figure shows the end-to-end architecture of this application .
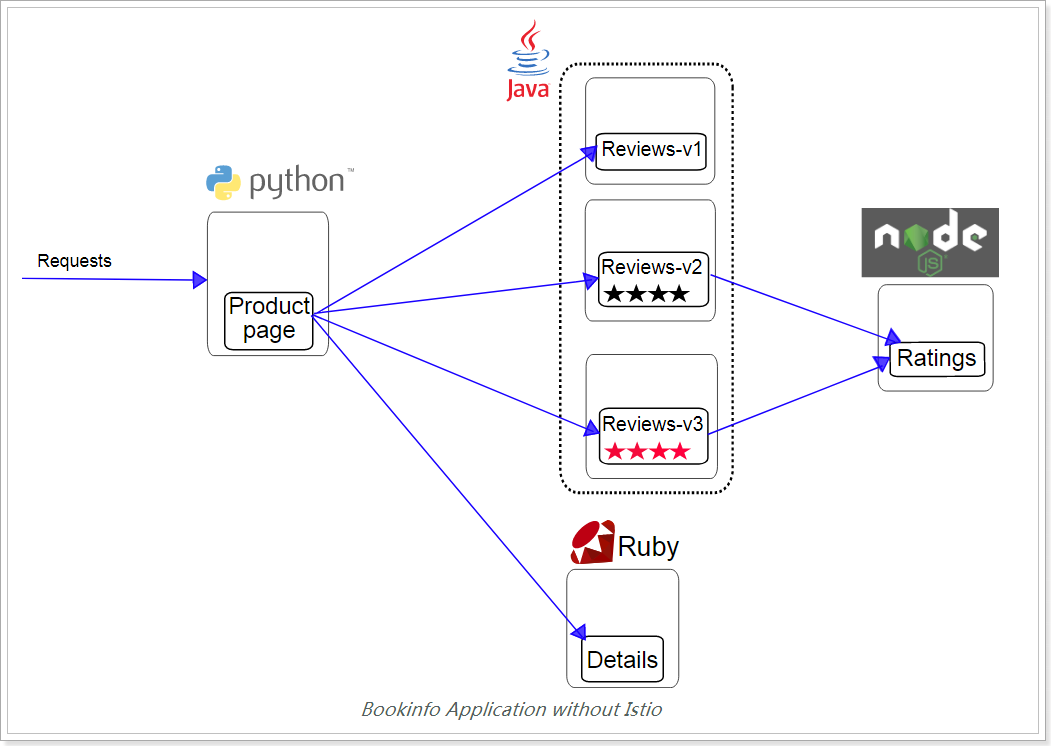
Bookinfo Several microservices in the application are written in different languages . These services are good for Istio No dependence , But it makes up a representative example of a service grid : It has multiple services 、 Multiple languages make up , also reviews Services have multiple versions .
3.3.2、 Deploy the application
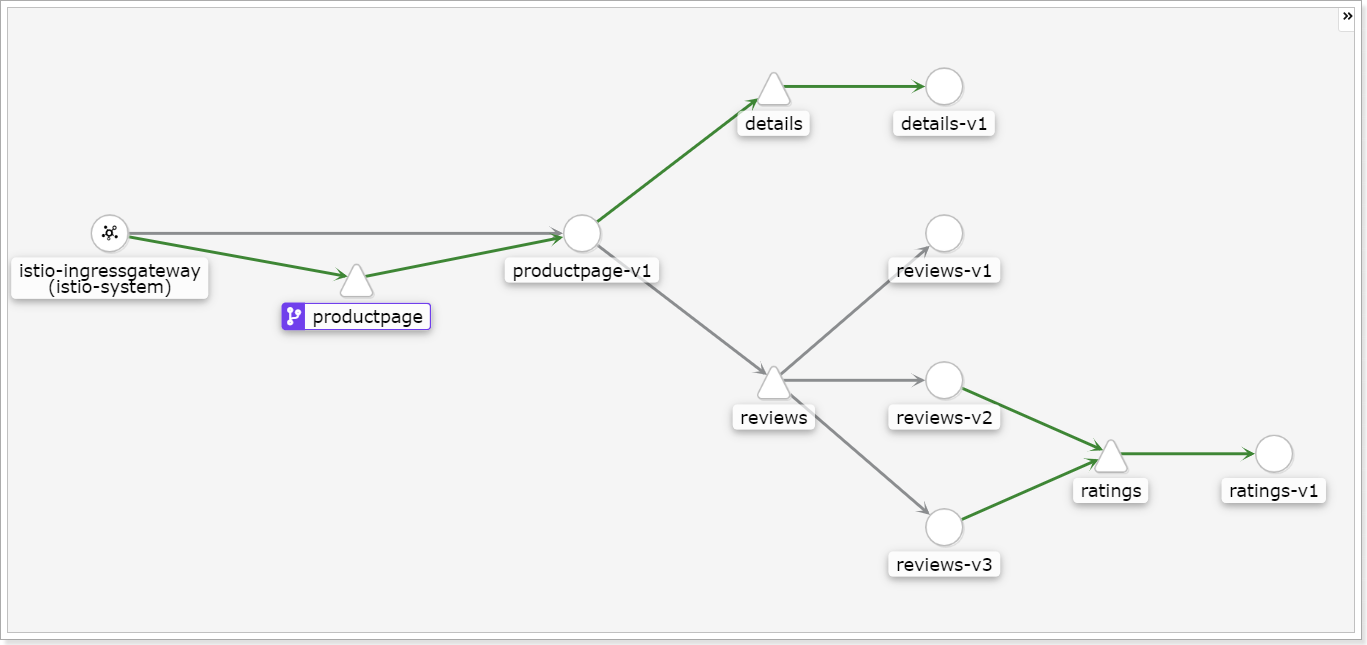
To be in Istio Running this application in , There is no need to make any changes to the application itself . You just need to be simple in Istio Configure and run services in the environment , To be more specific, it is to put Envoy sidecar Into every service . The final deployment result will be as shown in the figure below :
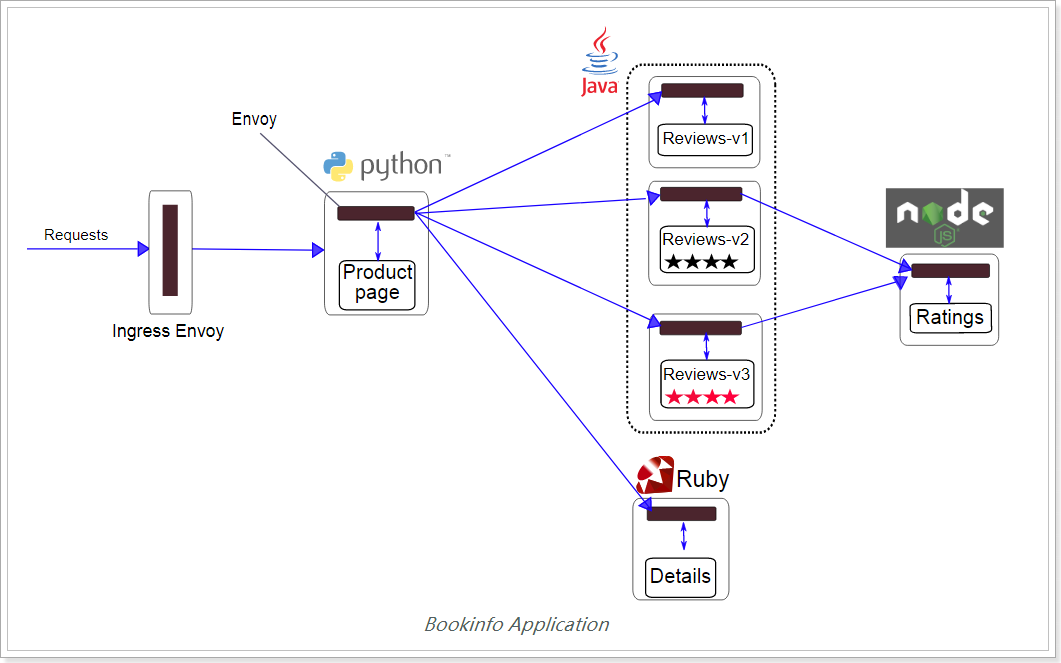
All microservices are connected with Envoy sidecar Integrate together , All the traffic in and out of the integrated services are sidecar Hijacked , In this way, the required... Is prepared for external control Hook, Then we can use Istio The control plane provides service routing for applications 、 Telemetry data collection and strategy implementation .
3.3.3、 Start application service
Get into Istio The installation directory .
Istio Default auto injection Sidecar. Please for
defaultTag the namespaceistio-injection=enabled:$ kubectl label namespace default istio-injection=enabledUse
kubectlDeploy the application :$ kubectl apply -f samples/bookinfo/platform/kube/bookinfo.yamlIf you disable Sidecar Select manual injection for automatic injection function Sidecar, Please use before deploying the application
istioctl kube-injectCommand to changebookinfo.yamlfile .$ kubectl apply -f <(istioctl kube-inject -f samples/bookinfo/platform/kube/bookinfo.yaml)The above command will start all four services , It also includes reviews Three versions of the service (v1、v2 as well as v3).
In actual deployment , The startup process of the microservice version needs to last for a period of time , Not at the same time .
Confirm all services and Pod Have been properly defined and started :
$ kubectl get servicesNAME CLUSTER-IP EXTERNAL-IP PORT(S) AGEdetails 10.0.0.31 <none> 9080/TCP 6mkubernetes 10.0.0.1 <none> 443/TCP 7dproductpage 10.0.0.120 <none> 9080/TCP 6mratings 10.0.0.15 <none> 9080/TCP 6mreviews 10.0.0.170 <none> 9080/TCP 6malso :
$ kubectl get podsNAME READY STATUS RESTARTS AGEdetails-v1-1520924117-48z17 2/2 Running 0 6mproductpage-v1-560495357-jk1lz 2/2 Running 0 6mratings-v1-734492171-rnr5l 2/2 Running 0 6mreviews-v1-874083890-f0qf0 2/2 Running 0 6mreviews-v2-1343845940-b34q5 2/2 Running 0 6mreviews-v3-1813607990-8ch52 2/2 Running 0 6m

To confirm Bookinfo Whether the application is running , Please put it in a Pod of use
curlCommand sends a request to the application , for exampleratings:$ kubectl exec -it $(kubectl get pod -l app=ratings -o jsonpath='{.items[0].metadata.name}') -c ratings -- curl productpage:9080/productpage | grep -o "<title>.*</title>"<title>Simple Bookstore App</title>
3.3.4、 determine Ingress Of IP
Now? Bookinfo The service is up and running , You need to make the application externally accessible Kubernetes colony , For example, using a browser . It can be used Istio Gateway To achieve this goal .
Define... For the application Ingress gateway :
$ kubectl apply -f samples/bookinfo/networking/bookinfo-gateway.yamlConfirm that the gateway is created :
$ kubectl get gatewayNAME AGEbookinfo-gateway 32sSet the access gateway
INGRESS_HOSTandINGRESS_PORTVariable . Confirm and set .# Set up ingress port export INGRESS_PORT=$(kubectl -n istio-system get service istio-ingressgateway -o jsonpath='{.spec.ports[?(@.name=="http2")].nodePort}')export SECURE_INGRESS_PORT=$(kubectl -n istio-system get service istio-ingressgateway -o jsonpath='{.spec.ports[?(@.name=="https")].nodePort}')# Set up ingress IPexport INGRESS_HOST=$(kubectl get po -l istio=ingressgateway -n istio-system -o jsonpath='{.items[0].status.hostIP}')Set up
GATEWAY_URL:export GATEWAY_URL=$INGRESS_HOST:$INGRESS_PORT
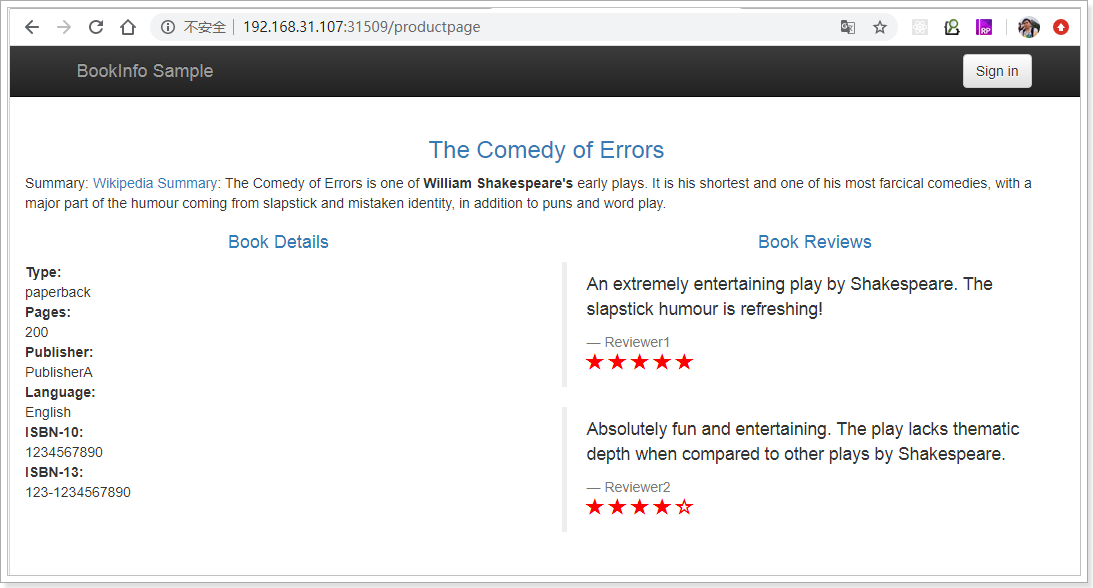
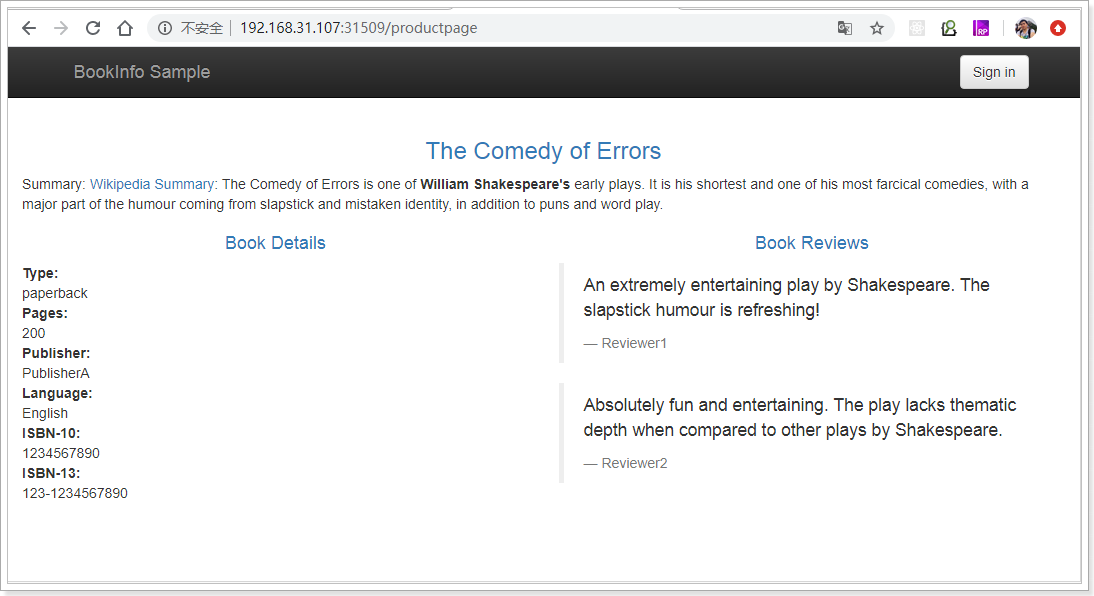
You can open the web address with a browser http://$GATEWAY_URL/productpage, To browse the application Web page . If you refresh the application page several times , You will see productpage The page will randomly display reviews The effect of different versions of the service ( Red 、 Black star or no display ).reviews This happens because we haven't used Istio To control version routing .
3.3.5、 Apply default target rules
Create for each service **DestinationRule**
In the use of Istio control Bookinfo Before version routing , You need to define the available versions in the target rules , Name it subsets .
# Set up kubectl apply -f samples/bookinfo/networking/destination-rule-all.yaml# Inquire about kubectl get destinationrules -o yamlthus ,Istio Complete all the takeover , The first example deployment is complete .
3.4、 Experience Istio
3.4.1、 Request routing
Route by version
at present reviews There are three versions , Access in a browser Bookinfo Application's /productpage And refresh several times . We find that sometimes the output of book reviews includes star ratings , Sometimes it does not include . This is because there is no clear default service version routing .
Now we have to make istio Take over routing , For example, route all traffic to each microservice v1 edition ,Istio The implementation is very simple , Just add virtual services (VirtualService) that will do .
Example : Route all traffic to each microservice v1 edition
#virtual-service-all-v1.yaml It is an official sample file kubectl apply -f samples/bookinfo/networking/virtual-service-all-v1.yamlIt reads as follows :
apiVersion: networking.istio.io/v1alpha3kind: VirtualServicemetadata: name: productpagespec: hosts: - productpage http: - route: - destination: host: productpage subset: v1---apiVersion: networking.istio.io/v1alpha3kind: VirtualServicemetadata: name: reviewsspec: hosts: - reviews http: - route: - destination: host: reviews subset: v1 # All are specified here http All requests are made through v1 complete , and v1 There are definitions in the default rules ---apiVersion: networking.istio.io/v1alpha3kind: VirtualServicemetadata: name: ratingsspec: hosts: - ratings http: - route: - destination: host: ratings subset: v1---apiVersion: networking.istio.io/v1alpha3kind: VirtualServicemetadata: name: detailsspec: hosts: - details http: - route: - destination: host: details subset: v1---After testing , Find out reviews No more switching styles .
Route according to different user identities
Next , You are about to change the routing configuration , In order to route all traffic from a specific user to a specific service version . Here , From a company named Jason All traffic of users will be routed to the service reviews:v2.
Please note that ,Istio There is no special built-in mechanism for user identity . in fact ,productpage Service in all to reviews Service HTTP A custom... Is added to the request end-user Request header , Thus, the effect of this example is achieved .
please remember ,reviews:v2 It is a version with star rating function .
Run the following command to enable user based routing :
$ kubectl apply -f samples/bookinfo/networking/virtual-service-reviews-test-v2.yamlConfirm that the rule has been created :
$ kubectl get virtualservice reviews -o yamlapiVersion: networking.istio.io/v1alpha3kind: VirtualServicemetadata: name: reviews ...spec: hosts: - reviews http: - match: - headers: end-user: exact: jason route: - destination: host: reviews subset: v2 - route: - destination: host: reviews subset: v1stay Bookinfo Application's
/productpageOn , To the userjasonIdentity login .Refresh the browser . What do you see ? The star rating is displayed next to each comment .
Log in as another user ( Choose any name you want ).
Refresh the browser . Now the stars are gone . This is because except Jason outside , All users' traffic is routed to
reviews:v1.
You have successfully configured Istio To route traffic based on user identity .
3.4.2、 Flow transfer
Can also be reviews Part of the flow is transferred to v3 edition , Based on this, gray publishing can be realized 、A/B Testing, etc :
# Route all traffic to each service v1 edition kubectl apply -f samples/bookinfo/networking/virtual-service-all-v1.yaml# take reviews service 50% Of traffic transferred to v3kubectl apply -f samples/bookinfo/networking/virtual-service-reviews-50-v3.yamlThe contents are as follows :
apiVersion: networking.istio.io/v1alpha3kind: VirtualServicemetadata: name: reviewsspec: hosts: - reviews http: - route: - destination: host: reviews subset: v1 weight: 50 - destination: host: reviews subset: v3 weight: 50Refresh... In your browser /productpage page , There are about 50% The probability of seeing a band in the page Red Star rating content . This is because v3 Version of reviews I visited... With star rating ratings service , but v1 The version doesn't .
If you think reviews:v3 Micro services have stabilized , You can apply this virtual service The rules will 100% The traffic is routed to reviews:v3:
# take reviews All traffic of the service is switched to v3 edition kubectl apply -f samples/bookinfo/networking/virtual-service-reviews-v3.yamlsuch , All the requests went to v3 了 .
If you need to delete the virtual network of all services , It can be executed :
kubectl delete -f samples/bookinfo/networking/virtual-service-all-v1.yaml
virtual-service-all-v1.yamlThe routing information of all services is configured in the configuration file , If deleted, all routing information will be deleted
3.4.3、 Timeout and retry
http The requested timeout can be used Routing rules Of timeout Field to specify . By default , Timeout is disabled
Here we come to experiment reviews The request for the service timed out , Route the request to reviews Service v2 edition , It will call ratings service , We started with ratings Artificial introduction of services 2s Delay of ( fault injection ), Right again reviews Service configuration timeout timeout
1、 stay istio-1.6.5/samples/bookinfo/networking Create configuration file in directory
# create profile vi virtual-service-reviews-v2-timeout.yamlapiVersion: networking.istio.io/v1alpha3kind: VirtualServicemetadata: name: ratingsspec: hosts: - ratings http: - fault: delay: percent: 100 fixedDelay: 2s route: - destination: host: ratings subset: v1---apiVersion: networking.istio.io/v1alpha3kind: VirtualServicemetadata: name: reviewsspec: hosts: - reviews http: - route: - destination: host: reviews subset: v2 #timeout: 0.5s stay ratings Service injection 2s Delay of ,
2、 Apply the routing configuration , Just execute under the current directory
kubectl apply -f virtual-service-reviews-v2-timeout.yaml3、 Visit this website , Now you can see Bookinfo The app is working properly ( Shows the star symbol of the rating ), But every time you refresh the page , There will be 2 Second delay .
4、 Re edit the file , Let go, right reviews The call of the service increases the request timeout by one and a half seconds ( Get rid of timeout Notes )
5、 Reapply the configuration , Or execute the first 2 Step command , Then check whether the configuration is updated by the following command
kubectl get virtualservice -o yaml6、 Refresh the page again
At this time, you should see 1 Seconds will return , Not before 2 Second , but reviews Is not available ( Page does not reviews The data of )
Even if the timeout is configured as half a second , The response still needs 1 second , Because
productpageHard coded retry in service , So it calls before returningreviewsService timeout twice ( retry ).
About retry : Direct reference document
https://istio.io/v1.6/zh/docs/reference/config/networking/virtual-service/#HTTPRoute
https://istio.io/v1.6/zh/docs/reference/config/networking/virtual-service/#HTTPRetry
3.4.4、 Fuse
The fuse is Istio Create for with Elastic microservice applications Provide a useful mechanism . In the fuse , Set a limit on individual host calls in the service , For example, the number of concurrent connections or the number of failed calls to the host . Once the limit is triggered , The fuse will “ trip ” And stop connecting to the host .
Using fuse mode can fail quickly without having to let the client try to connect to an overloaded or failed host .
Deploy httpbin
httpbin It's an open source project , Use Python+Flask To write , It can be used to test various HTTP Requests and responses . Official website :http://httpbin.org/
kubectl apply -f samples/httpbin/httpbin.yamlThe content of this configuration file is :
################################################################################################### httpbin service##################################################################################################apiVersion: v1kind: ServiceAccountmetadata: name: httpbin---apiVersion: v1kind: Servicemetadata: name: httpbin labels: app: httpbinspec: ports: - name: http port: 8000 targetPort: 80 selector: app: httpbin---apiVersion: apps/v1kind: Deploymentmetadata: name: httpbinspec: replicas: 1 selector: matchLabels: app: httpbin version: v1 template: metadata: labels: app: httpbin version: v1 spec: serviceAccountName: httpbin containers: - image: docker.io/kennethreitz/httpbin imagePullPolicy: IfNotPresent name: httpbin ports: - containerPort: 80Configure fuse
Create a target Fusing rules (DestinationRule), Calling httpbin Apply fusing settings during service :
kubectl apply -f - <<EOFapiVersion: networking.istio.io/v1alpha3kind: DestinationRulemetadata: name: httpbinspec: host: httpbin trafficPolicy: connectionPool: tcp: maxConnections: 1 # maximum connection http: http1MaxPendingRequests: 1 #http request pending The maximum number of requests for status maxRequestsPerConnection: 1 # Limit the maximum number of requests to the back-end service within a certain period of time outlierDetection: # Fuse setting consecutiveErrors: 1 # Reject connections from the connection pool , The number of failed connections , When passed HTTP During the interview , The return code is 502、503 or 504 It's a mistake . interval: 1s # The time interval between access denied scans , That is to say interval(1s) Occur continuously within the 1 individual consecutiveErrors error , Then trigger the service fuse , The format is 1h/1m/1s/1ms, But it must be greater than or equal to 1ms. That is, analyze whether the frequency needs to be eliminated , How often to analyze , Default 10 second . baseEjectionTime: 3m # Minimum access denial duration . At this time, the host will remain denied access , And if you refuse to visit for a certain number of times . Format :1h/1m/1s/1ms, But it must be greater than or equal to 1ms. After the instance is eliminated , At least how long should I not return to the load balancing pool , The default is 30 second . maxEjectionPercent: 100 # The service is denied access in the load balancing pool ( Removed ) Maximum percentage of , What is the maximum percentage of the load balancing pool to be eliminated , The default is 10%.EOFVerify that the target rule has been created correctly :
kubectl get destinationrule httpbin -o yamlapiVersion: networking.istio.io/v1alpha3kind: DestinationRulemetadata: name: httpbin ...spec: host: httpbin trafficPolicy: connectionPool: http: http1MaxPendingRequests: 1 maxRequestsPerConnection: 1 tcp: maxConnections: 1 outlierDetection: baseEjectionTime: 180.000s consecutiveErrors: 1 interval: 1.000s maxEjectionPercent: 100client
Create a client program to send traffic to httpbin service . This one is called Fortio Load test customer's , It can control the number of connections 、 Concurrency and sending HTTP The delay of the request . adopt Fortio Can effectively trigger the front stay DestinationRule Fusing strategy set in .
Inject Istio Sidecar agent , In order to Istio Manage their network interactions :
$ kubectl apply -f <(istioctl kube-inject -f samples/httpbin/sample-client/fortio-deploy.yaml)Wait a moment in the middle , Let the client deploy successfully !!!
Login client Pod And use Fortio Tool call
httpbinservice .-curlThe parameter indicates that a call is sent :$ FORTIO_POD=$(kubectl get pod | grep fortio | awk '{ print $1 }')$ kubectl exec -it $FORTIO_POD -c fortio -- /usr/bin/fortio load -curl http://httpbin:8000/getHTTP/1.1 200 OKserver: envoydate: Tue, 16 Jan 2018 23:47:00 GMTcontent-type: application/jsonaccess-control-allow-origin: *access-control-allow-credentials: truecontent-length: 445x-envoy-upstream-service-time: 36{ "args": {}, "headers": { "Content-Length": "0", "Host": "httpbin:8000", "User-Agent": "istio/fortio-0.6.2", "X-B3-Sampled": "1", "X-B3-Spanid": "824fbd828d809bf4", "X-B3-Traceid": "824fbd828d809bf4", "X-Ot-Span-Context": "824fbd828d809bf4;824fbd828d809bf4;0000000000000000", "X-Request-Id": "1ad2de20-806e-9622-949a-bd1d9735a3f4" }, "origin": "127.0.0.1", "url": "http://httpbin:8000/get"}
You can see that the request to call the back-end service has been successful ! Next , It can be tested for fusing .
Trigger fuse
stay DestinationRule Configuration in progress , Defined maxConnections: 1 and http1MaxPendingRequests: 1. These rules mean , If the number of concurrent connections and requests exceeds one , stay istio-proxy When making further requests and connections , Subsequent requests or The connection will be blocked .
The number of concurrent messages sent is 2 The connection of (
-c 2), request 20 Time (-n 20):[[email protected] istio-1.6.5]# kubectl exec -it $FORTIO_POD -c fortio -- /usr/bin/fortio load -c 2 -qps 0 -n 20 -loglevel Warning http://httpbin:8000/get03:59:25 I logger.go:97> Log level is now 3 Warning (was 2 Info)Fortio 1.3.1 running at 0 queries per second, 2->2 procs, for 20 calls: http://httpbin:8000/getStarting at max qps with 2 thread(s) [gomax 2] for exactly 20 calls (10 per thread + 0)03:59:25 W http_client.go:679> Parsed non ok code 503 (HTTP/1.1 503)03:59:25 W http_client.go:679> Parsed non ok code 503 (HTTP/1.1 503)03:59:25 W http_client.go:679> Parsed non ok code 503 (HTTP/1.1 503)03:59:25 W http_client.go:679> Parsed non ok code 503 (HTTP/1.1 503)03:59:25 W http_client.go:679> Parsed non ok code 503 (HTTP/1.1 503)03:59:25 W http_client.go:679> Parsed non ok code 503 (HTTP/1.1 503)Ended after 79.166124ms : 20 calls. qps=252.63Aggregated Function Time : count 20 avg 0.0064311497 +/- 0.007472 min 0.000340298 max 0.032824602 sum 0.128622994# range, mid point, percentile, count>= 0.000340298 <= 0.001 , 0.000670149 , 10.00, 2> 0.001 <= 0.002 , 0.0015 , 20.00, 2> 0.002 <= 0.003 , 0.0025 , 40.00, 4> 0.003 <= 0.004 , 0.0035 , 60.00, 4> 0.004 <= 0.005 , 0.0045 , 65.00, 1> 0.006 <= 0.007 , 0.0065 , 80.00, 3> 0.012 <= 0.014 , 0.013 , 85.00, 1> 0.014 <= 0.016 , 0.015 , 90.00, 1> 0.016 <= 0.018 , 0.017 , 95.00, 1> 0.03 <= 0.0328246 , 0.0314123 , 100.00, 1# target 50% 0.0035# target 75% 0.00666667# target 90% 0.016# target 99% 0.0322597# target 99.9% 0.0327681Sockets used: 8 (for perfect keepalive, would be 2)Code 200 : 14 (70.0 %)Code 503 : 6 (30.0 %)Response Header Sizes : count 20 avg 161.15 +/- 105.5 min 0 max 231 sum 3223Response Body/Total Sizes : count 20 avg 668.15 +/- 279.6 min 241 max 852 sum 13363All done 20 calls (plus 0 warmup) 6.431 ms avg, 252.6 qpsresult :
Code 200 : 14 (70.0 %)Code 503 : 6 (30.0 %)Increase the number of concurrent connections to 3 individual :
[[email protected] istio-1.6.5]# kubectl exec -it $FORTIO_POD -c fortio -- /usr/bin/fortio load -c 3 -qps 0 -n 30 -loglevel Warning http://httpbin:8000/get04:01:42 I logger.go:97> Log level is now 3 Warning (was 2 Info)Fortio 1.3.1 running at 0 queries per second, 2->2 procs, for 30 calls: http://httpbin:8000/getStarting at max qps with 3 thread(s) [gomax 2] for exactly 30 calls (10 per thread + 0)04:01:42 W http_client.go:679> Parsed non ok code 503 (HTTP/1.1 503)04:01:42 W http_client.go:679> Parsed non ok code 503 (HTTP/1.1 503)04:01:42 W http_client.go:679> Parsed non ok code 503 (HTTP/1.1 503)04:01:42 W http_client.go:679> Parsed non ok code 503 (HTTP/1.1 503)04:01:42 W http_client.go:679> Parsed non ok code 503 (HTTP/1.1 503)04:01:42 W http_client.go:679> Parsed non ok code 503 (HTTP/1.1 503)04:01:42 W http_client.go:679> Parsed non ok code 503 (HTTP/1.1 503)04:01:42 W http_client.go:679> Parsed non ok code 503 (HTTP/1.1 503)04:01:42 W http_client.go:679> Parsed non ok code 503 (HTTP/1.1 503)04:01:42 W http_client.go:679> Parsed non ok code 503 (HTTP/1.1 503)04:01:42 W http_client.go:679> Parsed non ok code 503 (HTTP/1.1 503)04:01:42 W http_client.go:679> Parsed non ok code 503 (HTTP/1.1 503)04:01:42 W http_client.go:679> Parsed non ok code 503 (HTTP/1.1 503)04:01:42 W http_client.go:679> Parsed non ok code 503 (HTTP/1.1 503)04:01:42 W http_client.go:679> Parsed non ok code 503 (HTTP/1.1 503)04:01:42 W http_client.go:679> Parsed non ok code 503 (HTTP/1.1 503)04:01:42 W http_client.go:679> Parsed non ok code 503 (HTTP/1.1 503)04:01:42 W http_client.go:679> Parsed non ok code 503 (HTTP/1.1 503)04:01:42 W http_client.go:679> Parsed non ok code 503 (HTTP/1.1 503)Ended after 32.153704ms : 30 calls. qps=933.02Aggregated Function Time : count 30 avg 0.0019156712 +/- 0.001801 min 0.000270969 max 0.006581956 sum 0.057470135# range, mid point, percentile, count>= 0.000270969 <= 0.001 , 0.000635485 , 56.67, 17> 0.002 <= 0.003 , 0.0025 , 70.00, 4> 0.003 <= 0.004 , 0.0035 , 86.67, 5> 0.004 <= 0.005 , 0.0045 , 93.33, 2> 0.005 <= 0.006 , 0.0055 , 96.67, 1> 0.006 <= 0.00658196 , 0.00629098 , 100.00, 1# target 50% 0.000908871# target 75% 0.0033# target 90% 0.0045# target 99% 0.00640737# target 99.9% 0.0065645Sockets used: 20 (for perfect keepalive, would be 3)Code 200 : 11 (36.7 %)Code 503 : 19 (63.3 %)Response Header Sizes : count 30 avg 84.333333 +/- 110.8 min 0 max 230 sum 2530Response Body/Total Sizes : count 30 avg 464.66667 +/- 294 min 241 max 851 sum 13940All done 30 calls (plus 0 warmup) 1.916 ms avg, 933.0 qpsYou can see , Only 36.7% 's request succeeded , The rest are blocked by fuses :
Code 200 : 11 (36.7 %)Code 503 : 19 (63.3 %)Inquire about
istio-proxyStatus to learn more about fusing details :[[email protected] istio-1.6.5]# kubectl exec $FORTIO_POD -c istio-proxy -- pilot-agent request GET stats | grep httpbin | grep pendingcluster.outbound|8000||httpbin.default.svc.cluster.local.circuit_breakers.default.rq_pending_open: 0cluster.outbound|8000||httpbin.default.svc.cluster.local.circuit_breakers.high.rq_pending_open: 0cluster.outbound|8000||httpbin.default.svc.cluster.local.upstream_rq_pending_active: 0cluster.outbound|8000||httpbin.default.svc.cluster.local.upstream_rq_pending_failure_eject: 0cluster.outbound|8000||httpbin.default.svc.cluster.local.upstream_rq_pending_overflow: 72cluster.outbound|8000||httpbin.default.svc.cluster.local.upstream_rq_pending_total: 59You can see
upstream_rq_pending_overflowvalue59, It means , So far 59 Calls are marked as blown .
clear
Clean up rules :
$ kubectl delete destinationrule httpbinOffline httpbin Services and clients :
$ kubectl delete deploy httpbin fortio-deploy$ kubectl delete svc httpbin
3.4.5、 Observability
istio The observability of is embodied in : Metrics , journal , Distributed tracking , Grid Visualization Other aspects
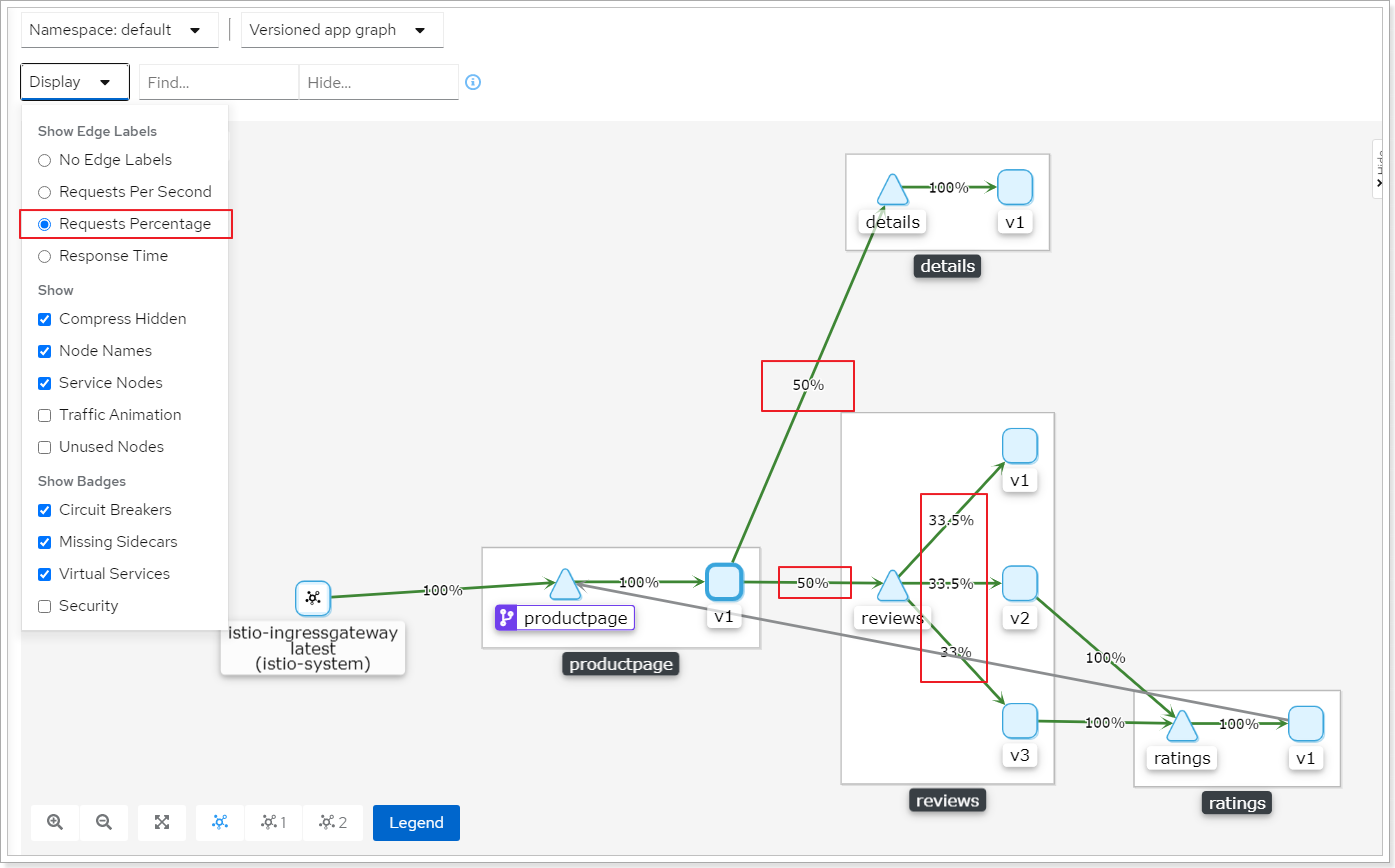
Grid Visualization
We can istio The grid is presented visually , be based on Web Graphical user interface to view grids and Istio Configure the service diagram of the object , Make our operation more convenient ( Get rid of the trouble of orders !!!)
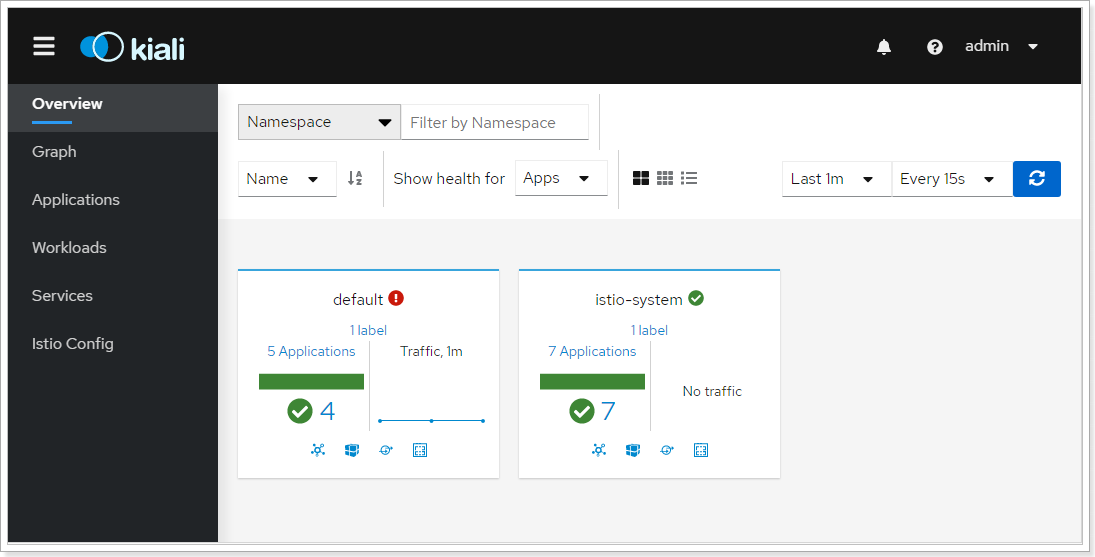
stay Istio Can be used in Kiali Manage the service grid visually .Kiali Official website :https://www.kiali.io/
Kiali Installation : stay demo The environment has been installed by default kiali, We can check it by the following command
kubectl -n istio-system get serviceskubectl -n istio-system get podkubectl -n istio-system get svc kiali
1、 To open Kiali UI, Please wait on your Kubernetes Execute the following command in the environment :
[[email protected] ~]# istioctl dashboard kiali --address 192.168.200.200http://localhost:38022/kialiFailed to open browser; open http://localhost:38022/kiali in your browser.Send traffic to the grid , There are three options :
Access in a browser
http://$GATEWAY_URL/productpageUse the following command multiple times :
$ curl http://$GATEWAY_URL/productpage
- If you installed
watchcommand , Please send the request continuously in the following way , The time interval is 1 second :$ watch -n 1 curl -o /dev/null -s -w %{http_code} $GATEWAY_URL/productpage
Use this address to open , Pay attention to replacement localhost by address Address , Login username and password are both admin
Chart
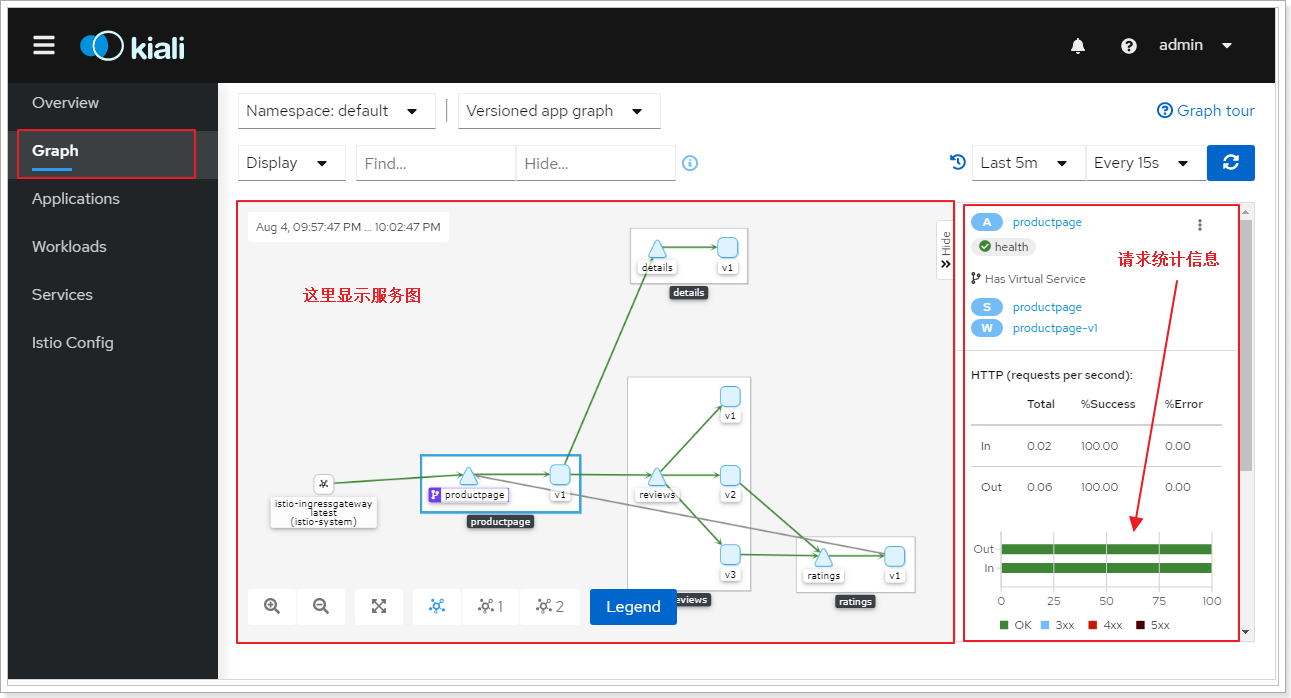
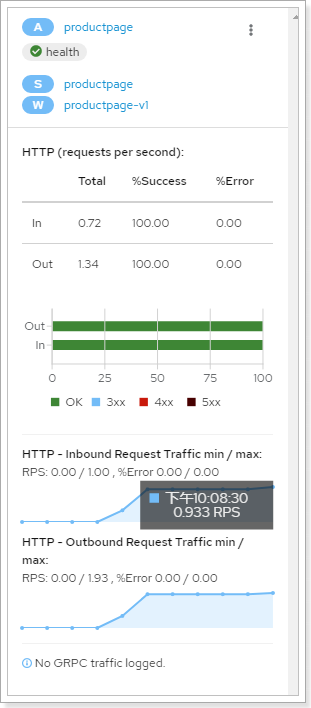
View the percentage of traffic allocation :
Request statistics ,RPS data ( Minimum / The maximum ratio )
Show different chart types , There are four types :
- App
- Graph types aggregate all versions of an application into a graph node .
- Graph types aggregate all versions of an application into a graph node .
- Versioned App
- The graph type shows the nodes for each application version , But all versions of a particular application are grouped together .
- The graph type shows the nodes for each application version , But all versions of a particular application are grouped together .
- Workload
- The graph type shows the nodes of each workload in the service grid .
- The graph type shows the nodes of each workload in the service grid .
- Service
- The graph type shows the nodes of each service in the grid .
- The graph type shows the nodes of each service in the grid .
Route weighting
The default routing rule will evenly browse to each available node , adopt kiali It can be adjusted visually :
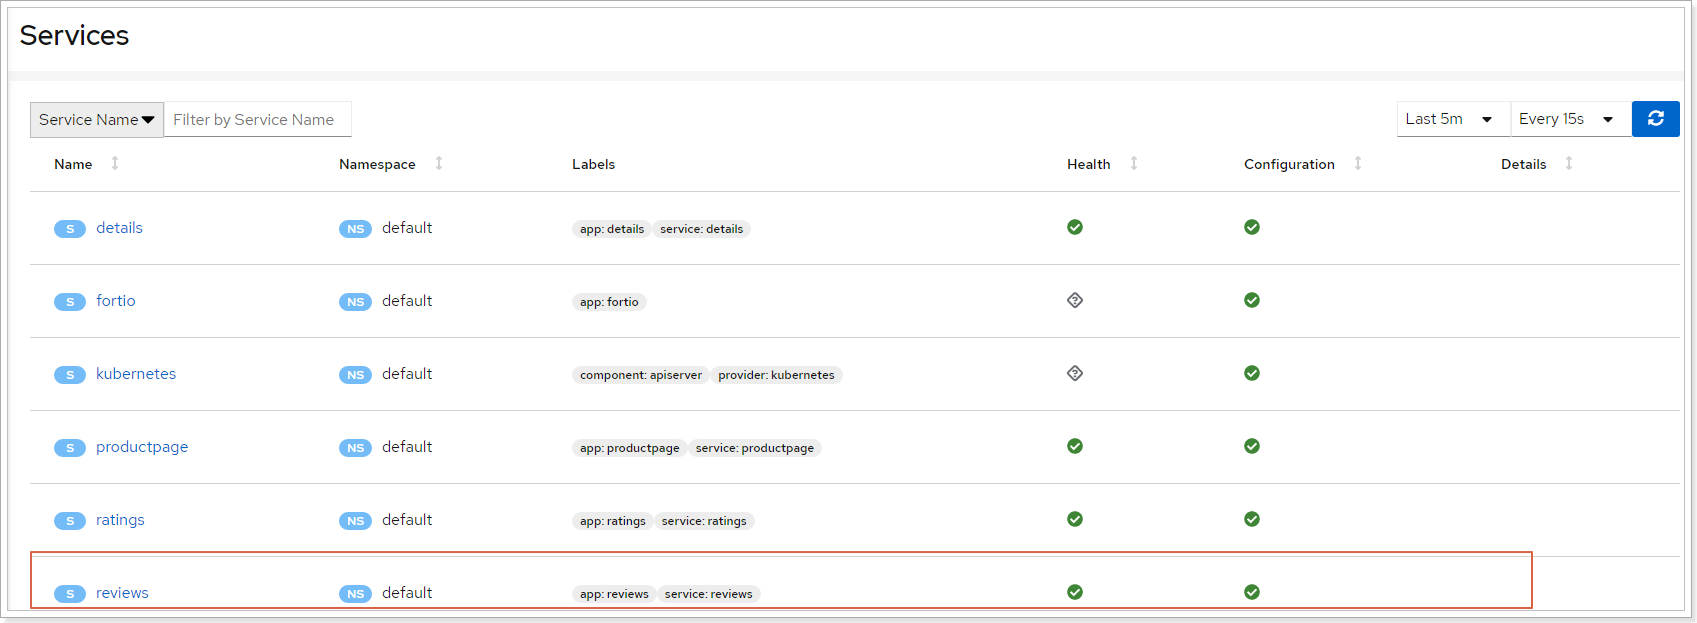
First step , see servers list :
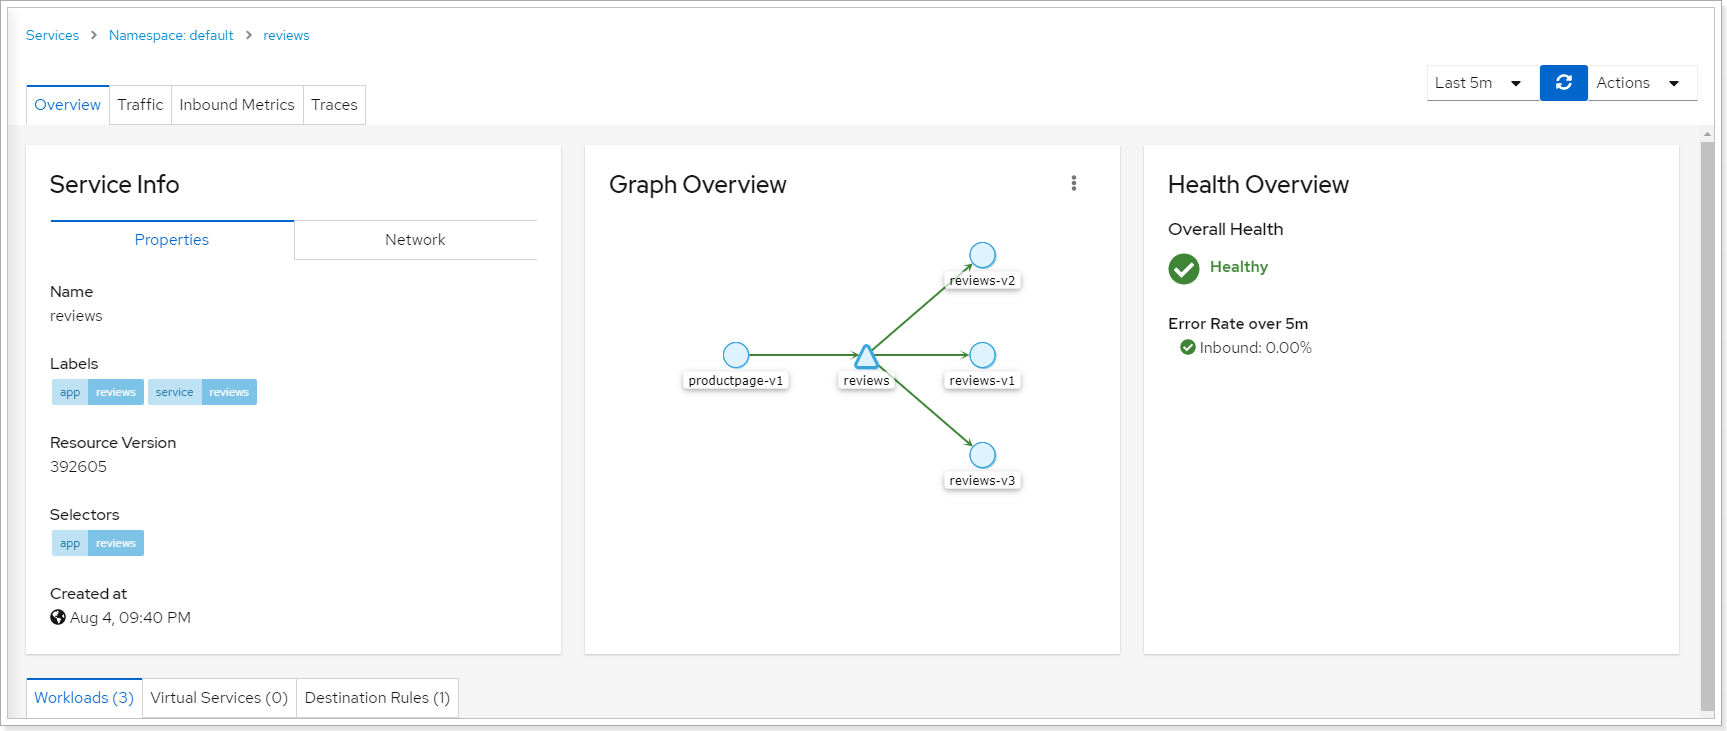
The second step , Get into reviews service :
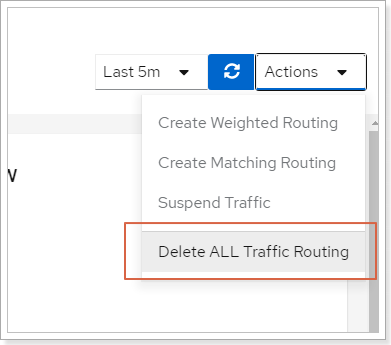
The third step , Delete the original routing rule :
Step four , Rules for creating weights :
By default :
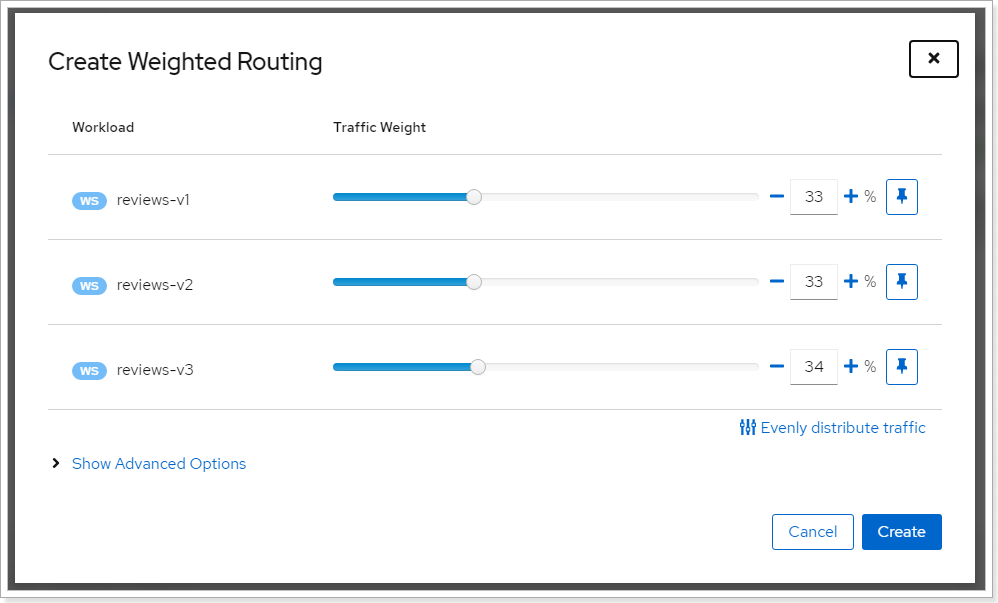
Adjustment :
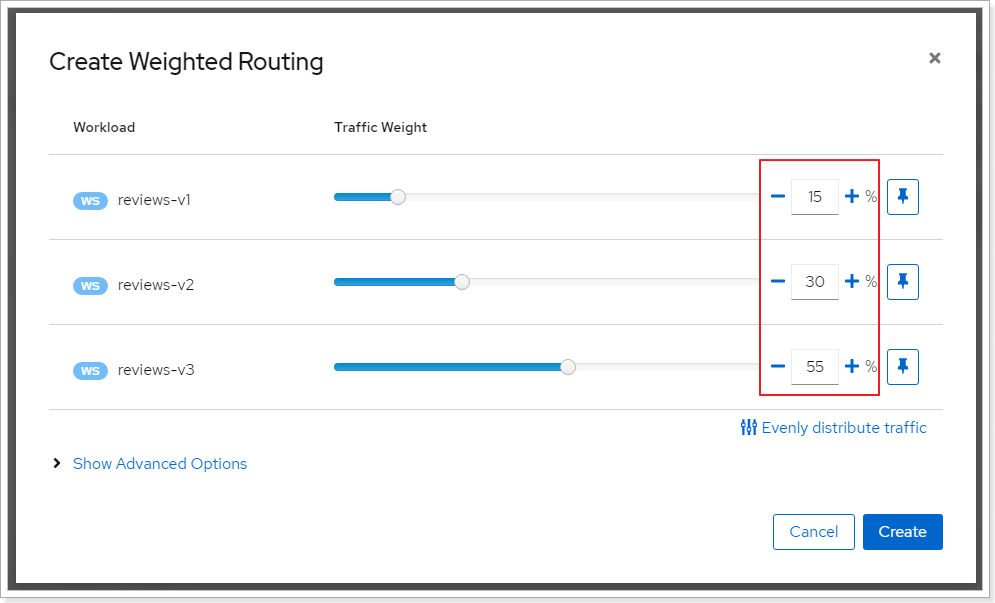
Save operation .
Step five , adopt watch Perform for a period of time , Observe the effect :
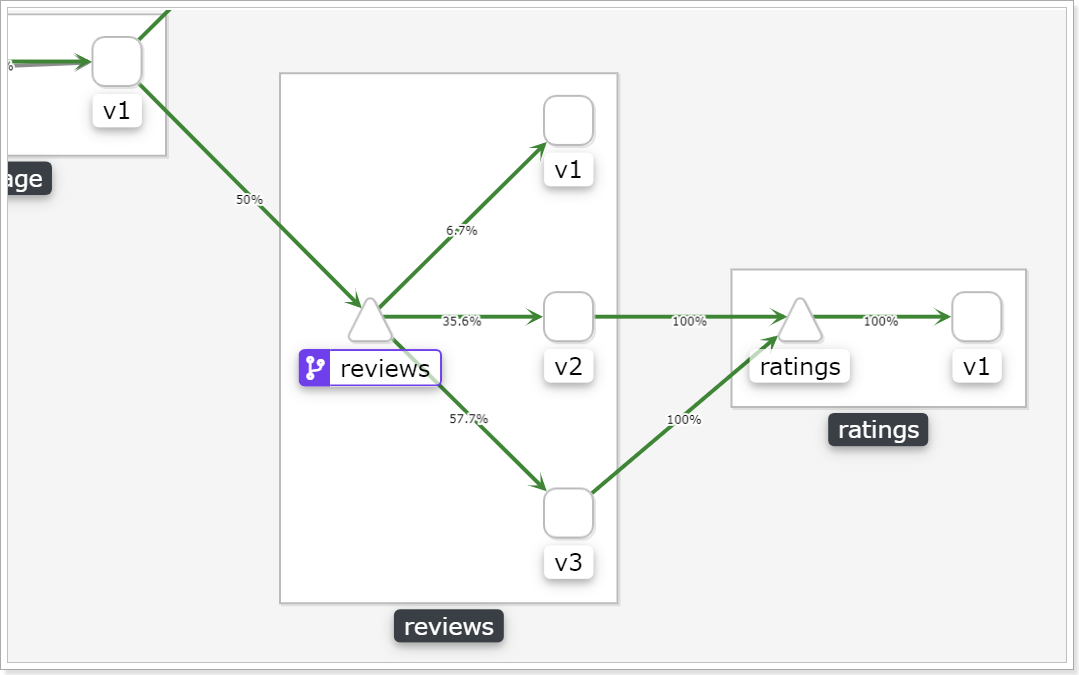
You can see , Assigned to reviews Of v1、v2、v3 The percentage of has changed .
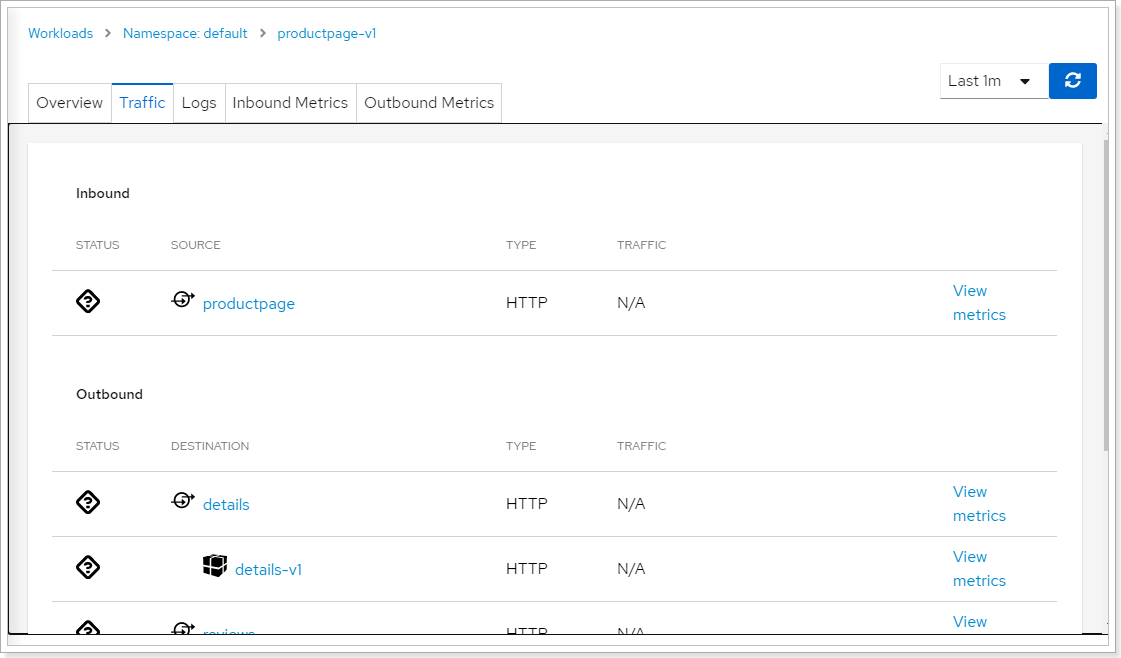
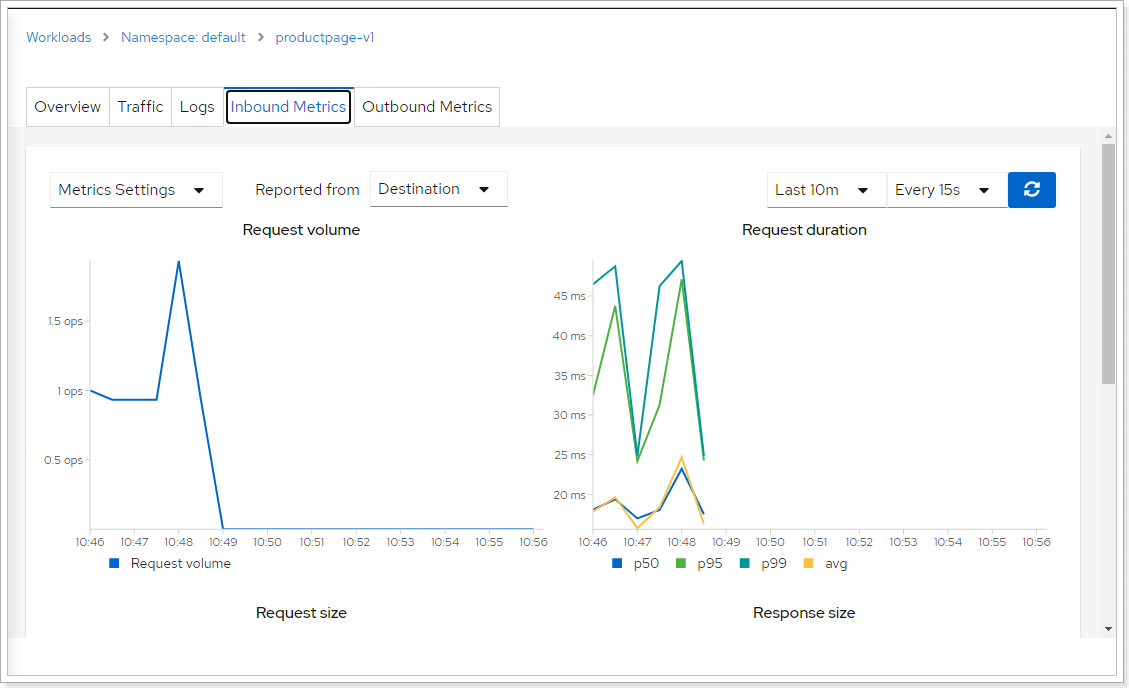
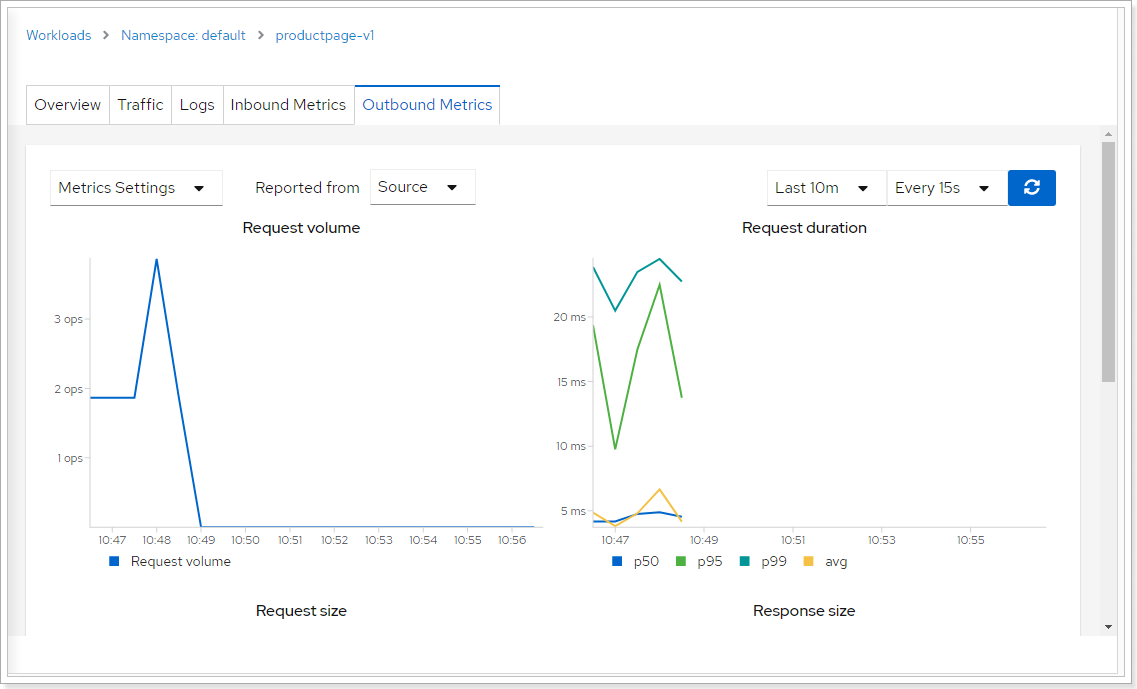
View workload
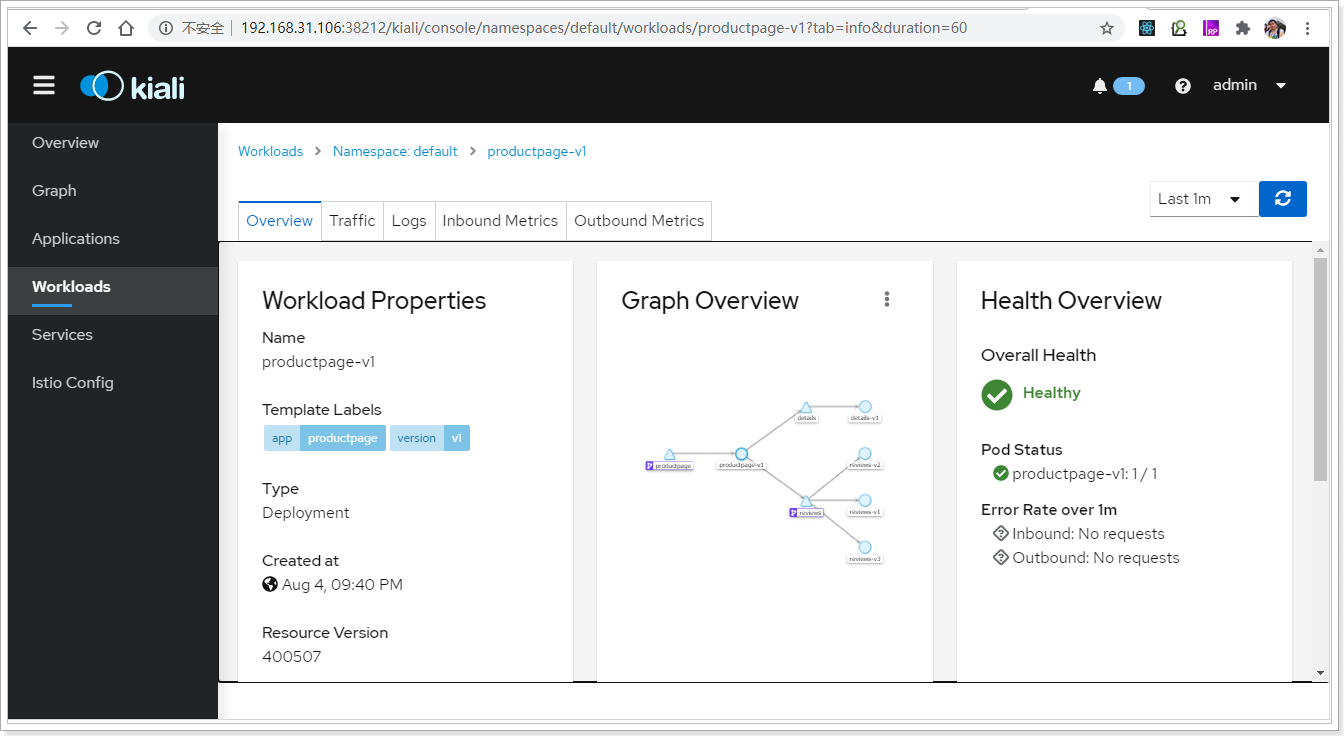
Inbound 、 Outbound information :
Log information :
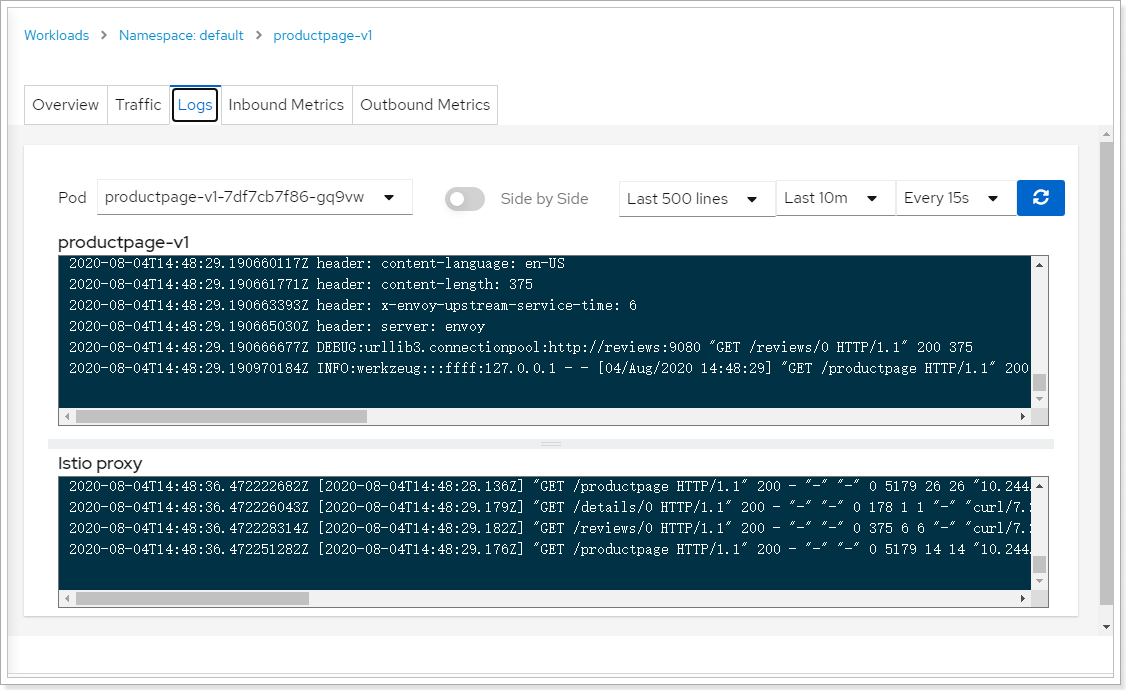
Inbound indicator information :
Outbound indicator information :
3.5、istio actual combat
0、 Find items from the materials itcast-service-mesh2.zip, Import ide, Make movie.tar
1、 take movie.tar Upload them to k8-node1(201 host ) and k8-master(200 host ), Then unzip
2、 stay k8-node1 On a host , perform build-images.sh Script , First build the image ( Pay attention to it node Node )
3、 stay k8-master On a host , stay movie/movie-istio Deploy under the directory first
kubectl apply -f movie.yamlWaiting to start
kubectl get service -o wide# Wait for all pod All become running kubectl get podkubectl get pod -o wide4、 Sign in neo4j Import initialization data , visit :http://192.168.200.201:31001/browser/ ( The address of the visit is node Node ip)
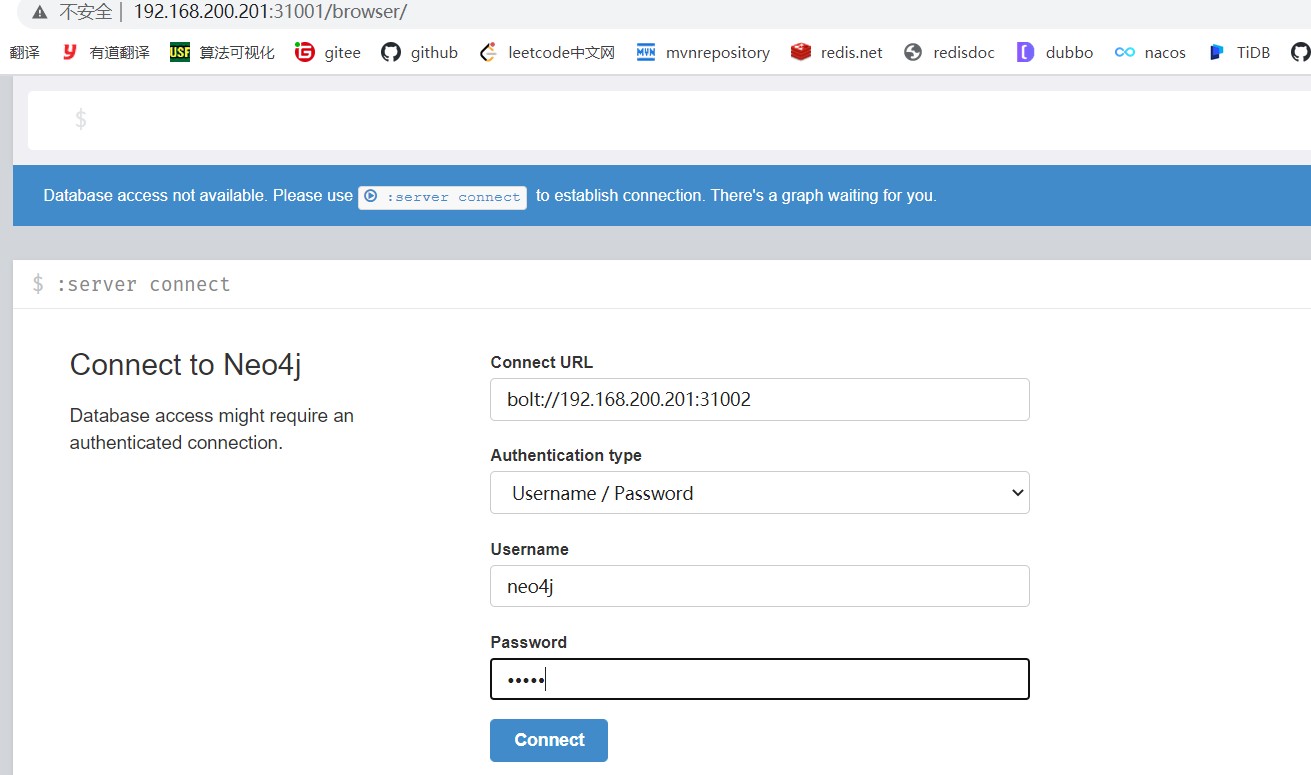
use :neo4j,neo4j Sign in , After the first login, change the password to :neo4j123, Bear in mind , Bear in mind , Bear in mind !
5、 Import initial data , Find out from the data Movie data .txt, stay neo4j In the implementation of , Query after execution
match (n) return n
6、 Create the initial Target rule , Execute the following command
kubectl apply -f destination-rule-all.yaml7、 Create a gateway , Execute the following command
kubectl apply -f movie-gateway.yaml8、 Get the gateway access address , Complete with the following command
export INGRESS_PORT=$(kubectl -n istio-system get service istio-ingressgateway -o jsonpath='{.spec.ports[?(@.name=="http2")].nodePort}')export SECURE_INGRESS_PORT=$(kubectl -n istio-system get service istio-ingressgateway -o jsonpath='{.spec.ports[?(@.name=="https")].nodePort}')export INGRESS_HOST=$(kubectl get po -l istio=ingressgateway -n istio-system -o jsonpath='{.items[0].status.hostIP}')export GATEWAY_URL=$INGRESS_HOST:$INGRESS_PORTecho $GATEWAY_URL9、 Access according to the output address , such as :http://192.168.200.201:31557/index

To test , Refresh several times , You can see the scoring section , red / black Switch .
10、 All traffic will be directed to scoring v2 edition , Only red scores are displayed , Then you can execute the following rule
kubectl apply -f virtual-service-rating-v2.yamlCheck the scoring display of the web page again !!!
This article is written by the wisdom education valley - The teaching and research team of wild architects released Reprint please indicate the source !
边栏推荐
- Test case (TC)
- 华为模拟器ensp的路由配置以及连通测试
- Maidong Internet won the bid of Beijing life insurance
- 超详细教程,一文入门Istio架构原理及实战应用
- Difference between ApplicationContext and beanfactory (MS)
- Flutter WebView示例
- [weekly translation go] how to code in go series articles are online!!
- 杰理之AD 系列 MIDI 功能说明【篇】
- Roast B station charges, is it because it has no money?
- IIC (STM32)
猜你喜欢
案例分享|金融业数据运营运维一体化建设
Detailed explanation of multi-mode input event distribution mechanism
y56.第三章 Kubernetes从入门到精通 -- 业务镜像版本升级及回滚(二九)
Y56. Chapter III kubernetes from entry to proficiency -- business image version upgrade and rollback (29)

Stealing others' vulnerability reports and selling them into sidelines, and the vulnerability reward platform gives rise to "insiders"

MP3是如何诞生的?
超详细教程,一文入门Istio架构原理及实战应用

How was MP3 born?

Interpreting the development of various intelligent organizations in maker Education
Maya lamp modeling
随机推荐
Jerry's ad series MIDI function description [chapter]
redis事务
How to remove the black dot in front of the title in word document
minidom 模塊寫入和解析 XML
超详细教程,一文入门Istio架构原理及实战应用
Compréhension approfondie du symbole [langue C]
【公开课预告】:视频质量评价基础与实践
TCP三次握手,四次挥手,你真的了解吗?
华为模拟器ensp的路由配置以及连通测试
股票开户佣金最低多少,炒股开户佣金最低网上开户安全吗
ArcGIS 10.2.2 | solution to the failure of ArcGIS license server to start
华为ensp模拟器 给路由器配置DHCP
开源之夏专访|Apache IoTDB社区 新晋Committer谢其骏
Drop down selection of Ehlib database records
redis管道
Delphi SOAP WebService 服务器端多个 SoapDataModule 实现相同的接口方法,接口继承
Shutter textfield example
华为ensp模拟器 实现多个路由器的设备可以相互访问
Routing configuration and connectivity test of Huawei simulator ENSP
Methods of improving machine vision system