当前位置:网站首页>使用BiSeNet实现自己的数据集
使用BiSeNet实现自己的数据集
2022-07-07 05:19:00 【我是一个小稻米】
数据集准备
数据集:遥感房屋影像分割,分先后两个时间,主要是实现建筑物面积随时间的面积变化情况。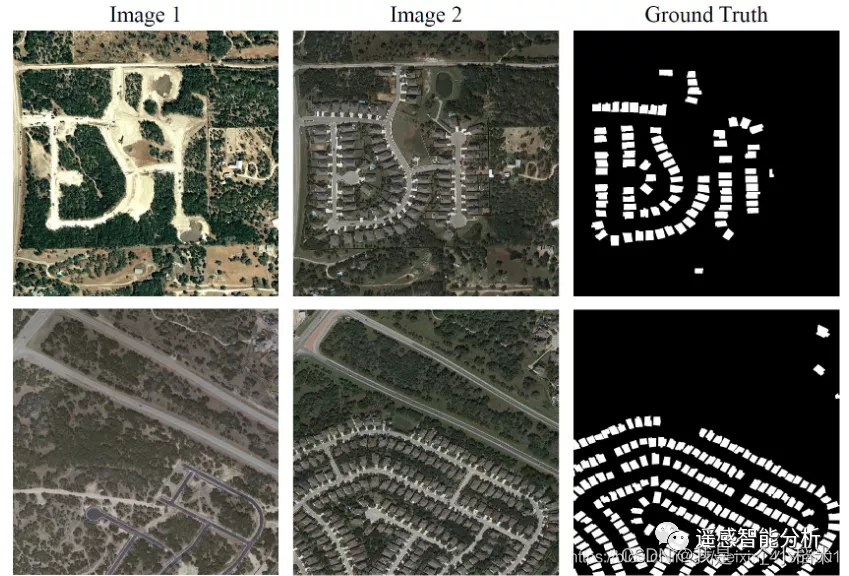
百度云:https://pan.baidu.com/s/1HlnKWToc00986jiTxhq_CA
提取码:RSAI
数据处理
1. 数据集
数据集存放在根目录下的datasets文件夹下,与coco和city数据集并列,如果你的数据集的标签已经是0,1,那么可以不用管label_255,如果标签没有经过255-->1的转化,可以先将标签文件放在label_255下。
—BiSeNet
---------datasets
-----------------coco
-----------------cityscapes
-----------------time
-----------------------train
------------------------------image
------------------------------label_255
------------------------------label
-----------------------val
------------------------------image
------------------------------label_255
------------------------------label
2. 在datasets/times/文件夹下创建one.py
目的是将0,255的标签转化为0,1,如果是多类的,那么标签就是0,1,2,3,...n
代码中只转化了train中的文件,要转化val中的文件,修改train为val即可
import os
import cv2 as cv
labels_path = './train/label_255'
labels_save_path = './train/label'
lab_names = os.listdir(labels_path)
for s in lab_names:
    label_path = os.path.join(labels_path, s)
    label_save_path = os.path.join(labels_save_path, s)
    label = cv.imread(label_path, 0)
    label[label!=0]=1
    cv.imwrite(label_save_path, label)
2. 在datasets/times/文件夹下创建util.py文件
目的是生成train.txt文件和val.txt文件,要转化val.txt文件,只需要将下面代码中的所有train换成val即可(有三处)
import os
image_path = './train/image'
label_path = './train/label'
image_names = os.listdir(image_path)
for s in image_names:
    image = os.path.join(image_path, s)
    label = os.path.join(label_path, s)
    with open('train.txt', 'a') as fin:
        fin.write(image[2:] +","+ label[2:] +"\n")
        fin.close()
网络模型地址
模型修改
1. 修改configs/bisenet_customer.py文件
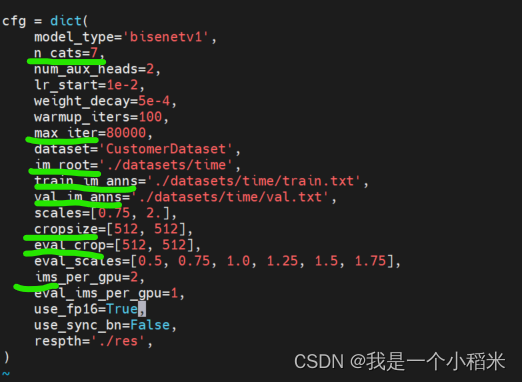
n_cats:包括背景在内的类别数,这里类别是2max_iter:训练次数im_root:数据路径train_im_anns:刚才生成的train.txt路径val_im_anns:刚才生成的val.txt路径cropsize:改成图像尺寸eval_crop:改成图像尺寸(不知道作用)ims_per_gpu:gpu数量
2. 修改类别
这个数据集类别是2
如果configs/bisenet_customer.py中的model_type='bisenetv2'修改lib/models/bisenetv2.py文件中的n_classes=2

如果configs/bisenet_customer.py中的model_type='bisenetv1'修改lib/models/bisenetv1.py文件中的BiSeNetV1(2)
运行命令
--nproc_per_node不知道什么意思,这里的2是gpu的数量
CUDA_VISIBLE_DEVICES=0,1 torchrun --nproc_per_node=2 tools/train_amp.py --config configs/bisenet_customer.py
就可以正常运行啦!!
边栏推荐
- 运放电路的反馈电阻上并联一个电容是什么作用
- opencv学习笔记三——图像平滑/去噪处理
- The reified keyword in kotlin is used for generics
- Application of slip ring of shipborne radar antenna
- ROS Bridge 笔记(05)— carla_ackermann_control 功能包(将Ackermann messages 转化为 CarlaEgoVehicleControl 消息)
- The element with setfieldsvalue set is obtained as undefined with GetFieldValue
- game攻防世界逆向
- The simple problem of leetcode is to judge whether the number count of a number is equal to the value of the number
- opencv学习笔记四——膨胀/腐蚀/开运算/闭运算
- Myabtis_Plus
猜你喜欢
![[step on the pit series] H5 cross domain problem of uniapp](/img/53/bd836a5c5545f51be929d8d123b961.png)
[step on the pit series] H5 cross domain problem of uniapp

机器人教育在动手实践中的真理
Rainbond 5.7.1 支持对接多家公有云和集群异常报警
Register of assembly language by Wang Shuang

LeetCode简单题之找到一个数字的 K 美丽值
opencv学习笔记五——梯度计算/边缘检测
漏洞复现-Fastjson 反序列化

CCTV is so warm-hearted that it teaches you to write HR's favorite resume hand in hand

Niu Mei's mathematical problem --- combinatorial number

buureservewp(2)
随机推荐
柯基数据通过Rainbond完成云原生改造,实现离线持续交付客户
机器人教育在动手实践中的真理
Vulnerability recurrence easy_ tornado
通俗易懂单点登录SSO
Rainbond结合NeuVector实践容器安全管理
运放电路的反馈电阻上并联一个电容是什么作用
Qinglong panel -- finishing usable scripts
The reified keyword in kotlin is used for generics
基于Pytorch 框架手动完成线性回归
Use of out covariance and in inversion in kotlin
【踩坑系列】uniapp之h5 跨域的问题
雅思考试自己的复习进度以及方法使用【日更版】
发挥创客教育空间的广泛实用性
Understanding of out covariance, in inversion and invariance in kotlin
The zblog plug-in supports the plug-in pushed by Baidu Sogou 360
互动送书-《Oracle DBA工作笔记》签名版
Niu Mei's mathematical problem --- combinatorial number
Merging binary trees by recursion
力扣(LeetCode)187. 重复的DNA序列(2022.07.06)
Zsh shell adds automatic completion and syntax highlighting