当前位置:网站首页>VTK环境配置
VTK环境配置
2022-07-31 05:15:00 【龙虾在剥我的壳】
一、问题描述
   当我们安装好VTK,运行vtk-install目录下的VTK.sln解决方案中的Cone项目,运行方式在Cone上点击右键并选择“设为启动项目”。接着会看到一个圆锥一闪而过,这是正常的。
   但是当我们新建一个项目的时候,把之前的代码拷贝过来,同样的代码却不能运行,这是为什么呢?
二、解答思路
一闪而过的那个项目的环境是是系统自带、配好了的,接下来新建的项目,需要我们重新配置环境。
三、解决方案
配置环境主要有以下四个步骤,接下来会逐一进行讲解:
1.配置头文件
2.配置二进制库
3.配置动态链接库
4.配置宏,初始化
开始之前我们要回忆一下,一个叫做vtk-prefix的目录,现在打开vtk-prefix目录,里面就会有有以下4个目录。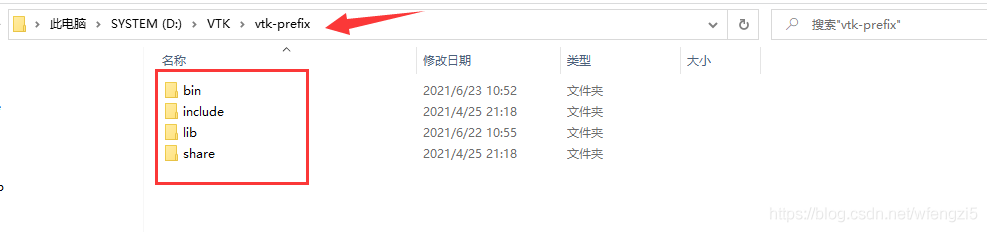
其中有三个目录是非常重要的,分别是bin、include、lib。
bin中存放的是编译VTK源码后生成的动态链接库,这里面的东西在程序运行时需要。
lib目录中存放的是编译时需要的二进制库。
include目录存放的是C++编写的头文件,包含了VTK允许用户使用的类和方法。
1.配置头文件
让项目依赖vtk-prefix中的include目录即可,具体操作方法如下:
我们新建的项目取名demo02(新建项目方法: 文件->新建->项目->改名为demo02)
在项目demo02上点击右键选择“属性”。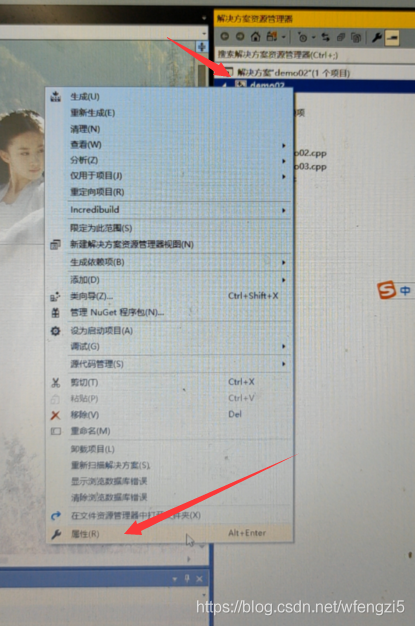 在弹出的对话框中,找到并修改成以下内容,注意图中标红的方框中的内容,平台选项中Win32就是x86。修改的时候点击输入框中右边的下拉箭头会弹出相应编辑提示。这里可以看到修改的内容其实就是vtk-prefix目录的include目录,前面说过,这里面放的就是头文件。
2.配置二进制库
vtk-prefix目录下lib目录放的是编译时需要的二进制库。所以,在这里还需要告诉demo02项目lib放在了哪里,具体操作,在弹出的对话框找到以下内容。
然后编辑附加依赖项里的内容,如果你的安装目录和我不一致,请自行修改,务必是你电脑中的vtk-prefix目录下的lib目录中的全部lib文件。(注意格式:···\*.lib)
3.配置动态链接库
vtk-prefix目录下的bin目录里面存放的是运行时需要的动态链接库,
就是把dll文件拷贝到项目所在的目录,怎么找到项目所在的目录呢?很简单,在菜单栏下面右键点击得demo02.cpp,选择打开所在的文件夹。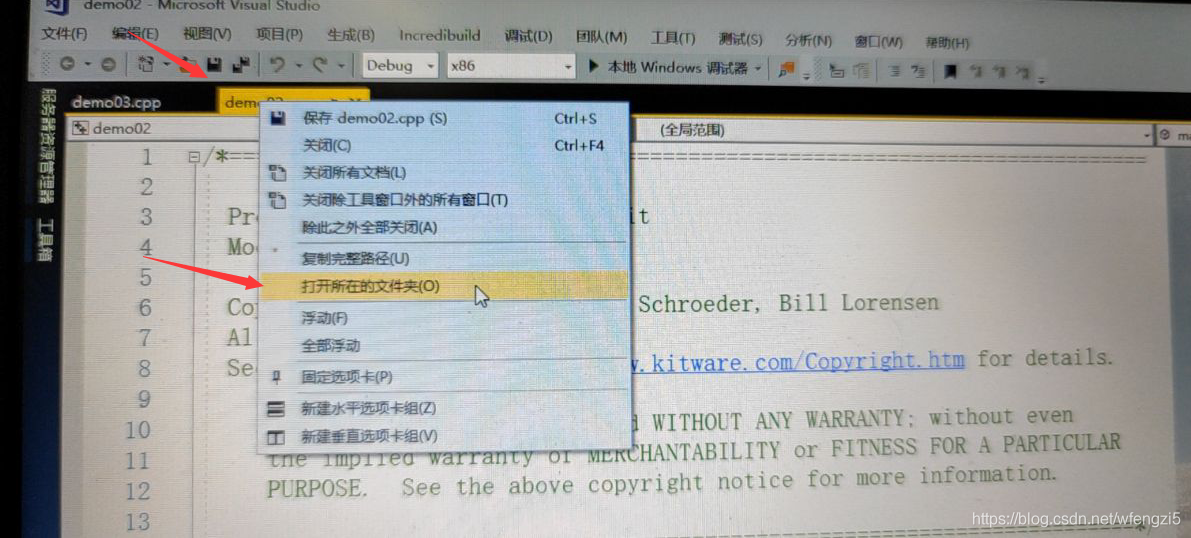
然后在弹出的文件夹中将vtk-prefix目录下bin目录中所有的dll文件拷贝过去,注意是所有的dll文件,不是bin目录,实际上这里用不到这么多dll文件,只需要拷贝一部分,只不过这样排查起来比较麻烦,索性就一次性全部拷贝过去就行了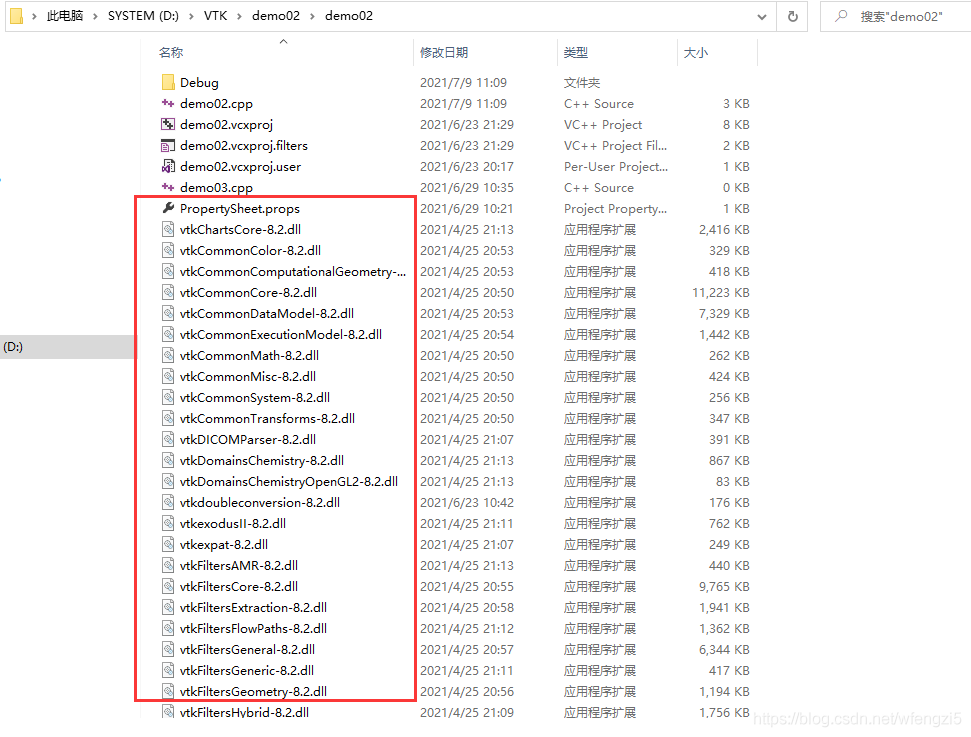
4.配置宏,初始化
把以下代码放到头文件之后,主函数之前
#include "vtkAutoInit.h"
VTK_MODULE_INIT(vtkRenderingOpenGL2);
VTK_MODULE_INIT(vtkInteractionStyle);
VTK_MODULE_INIT(vtkRenderingVolumeOpenGL2);
#define vtkRenderingCore_AUTOINIT 4(vtkInteractionStyle,vtkRenderingFreeType,vtkRenderingFreeTypeOpenGL2,vtkRenderingOpenGL2)
#define vtkRenderingVolume_AUTOINIT 1(vtkRenderingVolumeOpenGL2)
最后,运行项目domo02,成功运行
四、成果展示
右键domo02->设为启动项目->本地Windows调试器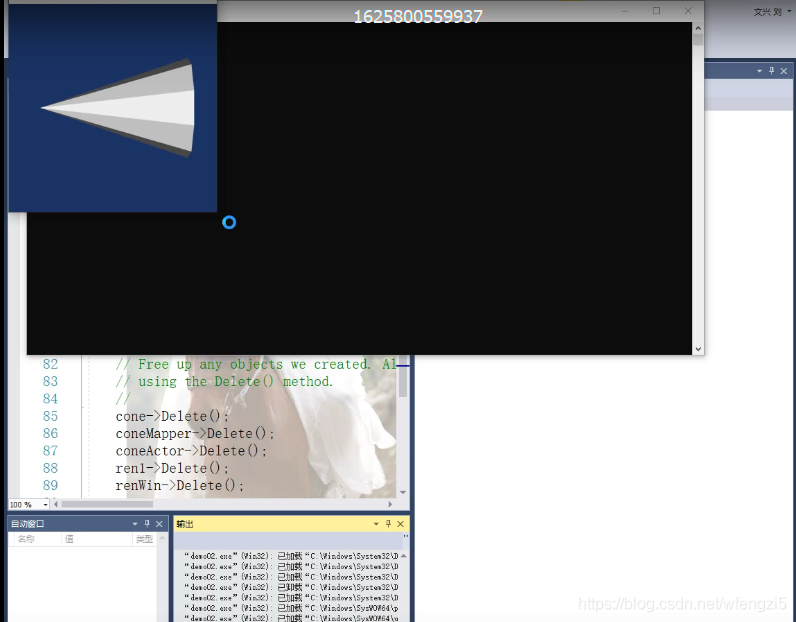
完整代码分享:
#include "vtkConeSource.h"
#include "vtkPolyDataMapper.h"
#include "vtkRenderWindow.h"
#include "vtkCamera.h"
#include "vtkActor.h"
#include "vtkRenderer.h"

#include "vtkAutoInit.h"
VTK_MODULE_INIT(vtkRenderingOpenGL2);
VTK_MODULE_INIT(vtkInteractionStyle);
VTK_MODULE_INIT(vtkRenderingVolumeOpenGL2);

#define vtkRenderingCore_AUTOINIT 4(vtkInteractionStyle,vtkRenderingFreeType,vtkRenderingFreeTypeOpenGL2,vtkRenderingOpenGL2)
#define vtkRenderingVolume_AUTOINIT 1(vtkRenderingVolumeOpenGL2)


int main()
{

	// Next we create an instance of vtkConeSource and set some of its
	// properties. The instance of vtkConeSource "cone" is part of a
	// visualization pipeline (it is a source process object); it produces data
	// (output type is vtkPolyData) which other filters may process.
	vtkConeSource *cone = vtkConeSource::New();
	cone->SetHeight(3.0);
	cone->SetRadius(1.0);
	cone->SetResolution(10);
	// In this example we terminate the pipeline with a mapper process object.
	// (Intermediate filters such as vtkShrinkPolyData could be inserted in
	// between the source and the mapper.) We create an instance of
	// vtkPolyDataMapper to map the polygonal data into graphics primitives. We
	// connect the output of the cone source to the input of this mapper.
	//
	vtkPolyDataMapper *coneMapper = vtkPolyDataMapper::New();
	coneMapper->SetInputConnection(cone->GetOutputPort());
	//
	// Create an actor to represent the cone. The actor orchestrates rendering
	// of the mapper's graphics primitives. An actor also refers to properties
	// via a vtkProperty instance, and includes an internal transformation
	// matrix. We set this actor's mapper to be coneMapper which we created
	// above.
	//
	vtkActor *coneActor = vtkActor::New();
	coneActor->SetMapper(coneMapper);
	//
	// Create the Renderer and assign actors to it. A renderer is like a
	// viewport. It is part or all of a window on the screen and it is
	// responsible for drawing the actors it has. We also set the background
	// color here.
	//
	vtkRenderer *ren1 = vtkRenderer::New();
	ren1->AddActor(coneActor);
	ren1->SetBackground(0.1, 0.2, 0.4);
	//
	// Finally we create the render window which will show up on the screen.
	// We put our renderer into the render window using AddRenderer. We also
	// set the size to be 300 pixels by 300.
	//
	vtkRenderWindow *renWin = vtkRenderWindow::New();
	renWin->AddRenderer(ren1);
	renWin->SetSize(300, 300);
	//
	// Now we loop over 360 degrees and render the cone each time.
	//
	int i;
	for (i = 0; i < 3600; ++i)
	{

		// render the image
		renWin->Render();
		// rotate the active camera by one degree
		ren1->GetActiveCamera()->Azimuth(1);
	}
	//
	// Free up any objects we created. All instances in VTK are deleted by
	// using the Delete() method.
	//
	cone->Delete();
	coneMapper->Delete();
	coneActor->Delete();
	ren1->Delete();
	renWin->Delete();
	return 0;
}
边栏推荐
- Common JVM interview questions and answers
- Several forms of Attribute Changer
- 2021 Mianjing - Embrace Change
- cocos2d-x 实现跨平台的目录遍历
- Error: Cannot find module 'D:\Application\nodejs\node_modules\npm\bin\npm-cli.js'
- Year-end summary - the years are quiet~
- MySql to create data tables
- unicloud 发布后小程序提示连接本地调试服务失败,请检查客户端是否和主机在同一局域网下
- Markdown 帮助文档
- 安装Multisim出现 No software will be installed or removed解决方法
猜你喜欢

What is the difference between NFT and digital collection?

MySQL compressed package installation, fool teaching

this指向问题
Chinese garbled solution in UTF-8 environment in Powershell

Yuan prospect and four track of the universe

Eternal blue bug reappears

著名网站msdn.itellyou.cn原理分析

On the side of Ali, tell me what are the application scenarios of message middleware you know?
The feign call fails, JSON parse error Illegal character ((CTRL-CHAR, code 31)) only regular white space (r
Getting to know regular expressions

随机推荐
The latest MySql installation teaching, very detailed
Gradle sync failed: Uninitialized object exists on backward branch 142
Using IIS10 to build an asp website in win11
MySQL高级学习笔记
【云原生】微服务Nacos的简单介绍与使用
jenkins +miniprogram-ci 一键上传微信小程序
js中的this指向与原型对象
Android软件安全与逆向分析阅读笔记
this指向问题
MySQL压缩包方式安装,傻瓜式教学
360 hardening file path not exists.
cocos2d-x-3.2图片灰化效果
quick-3.5 lua调用c++
【uiautomation】微信好友列表获取(存储到txt中)
quick-3.5 ActionTimeline的setLastFrameCallFunc调用会崩溃问题
break and continue exit in js
SSH automatic reconnection script
flutter 混合开发 module 依赖
安装Multisim出现 No software will be installed or removed解决方法
DeFi Token in the project management