当前位置:网站首页>Jetson TX2配置Tensorflow、Pytorch等常用库
Jetson TX2配置Tensorflow、Pytorch等常用库
2022-07-04 12:33:00 【竹叶青lvye】
之前在PC Ubuntu或者树莓派上都配置过,方法不变,所以此篇博客会简单记录下过程,详细的一些方法思路可以去参考博主之前的系列博客(虽然硬件平台不一样,但方法大体一致的。硬件平台主流的有树莓派,NVIDIA Jetson,Google的Coral Dev Board等。授人以鱼不如授人以渔,我们重点的是学方法,以不变应万变。前面系列博客里从常用库的配置,深度学习的推断,如何交叉编译都做了一些详细的实验和阐述,这些思路和习惯都可以沿用到新的嵌入式平台上)
https://blog.csdn.net/jiugeshao/category_11391557.html?spm=1001.2014.3001.5482
https://blog.csdn.net/jiugeshao/category_11447160.html?spm=1001.2014.3001.5482
对于Jetson TX2的初始环境配置可见此前三篇博客
NVIDIA Jetson TX2简介_竹叶青lvye的博客-CSDN博客_nvidiatx2
NVIDIA Jetson官网资料整理_竹叶青lvye的博客-CSDN博客
NVIDIA Jetson TX2安装JetPack_竹叶青lvye的博客-CSDN博客
一.配置指定的python版本
这里选择python3.7,方法参考博主之前博客
树莓派4B上多版本python切换(一)_竹叶青lvye的博客-CSDN博客_树莓派python版本更换
注:
(1)软链接的删除可参考Ubuntu下的基本知识点(一)_竹叶青lvye的博客-CSDN博客_ubuntu基础知识
(2)这里pip3的链接目标要切换为如下(结合自己的路径)
![]()
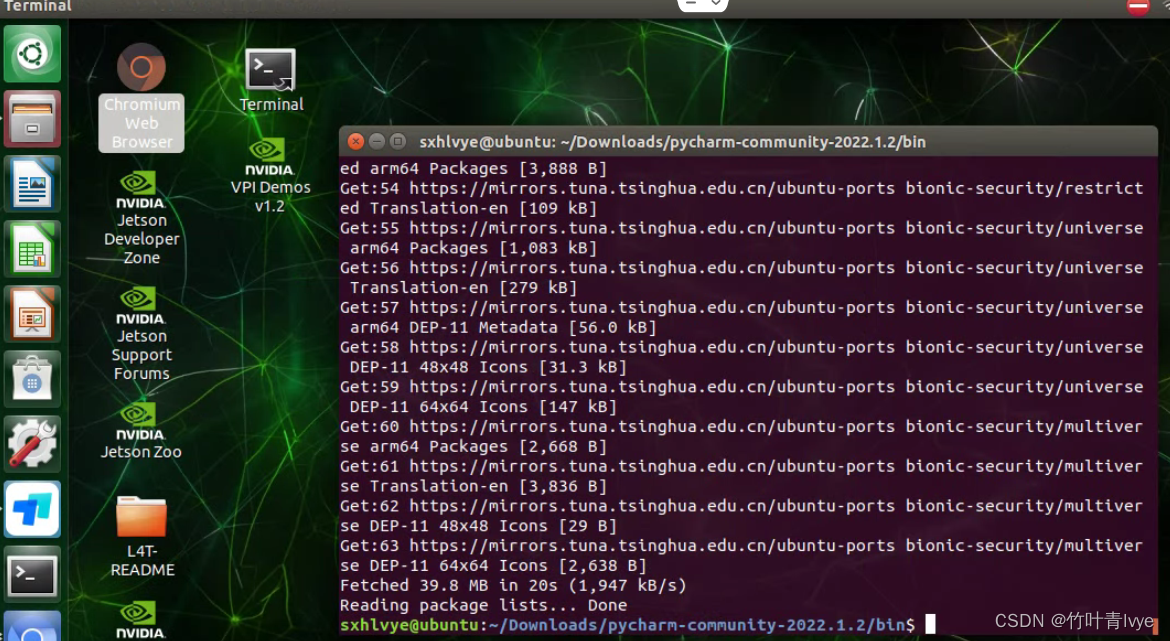
完毕后,终端输入python3和pip3 -V
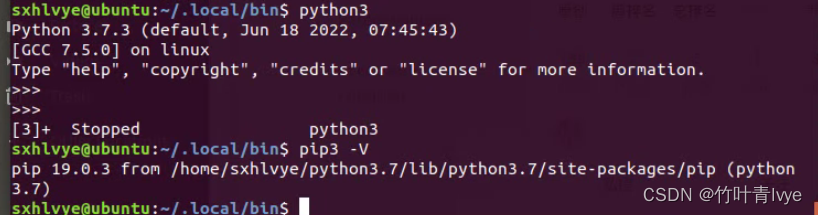
可以看到已经切换到python3.7了,而不是系统自带的python3.6。
注:
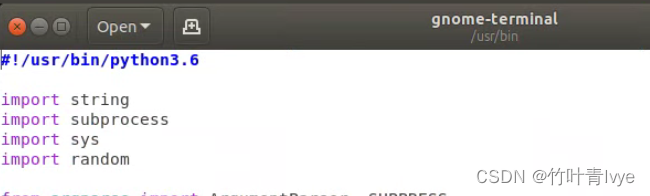
若发现在桌面点击终端没有反应,terminal打不开,可以打开任意文件夹,空白处右击打开终端。编辑如下路径下的文件

最顶部改为当前系统默认的python3.6,原先的是python3。(因为前面建立软链接时,python3已经链接到python3.7版本了,所以这边捅破窗户,直接告诉系统,你要用的就是python3.6)。完毕后,桌面上点击终端就能打开了。
二.配置CUDNN
博主前面重新安装过JetPack
NVIDIA Jetson TX2重装系统_竹叶青lvye的博客-CSDN博客
这里要看默认的cuda和cudnn系统可以如下命令语句查看
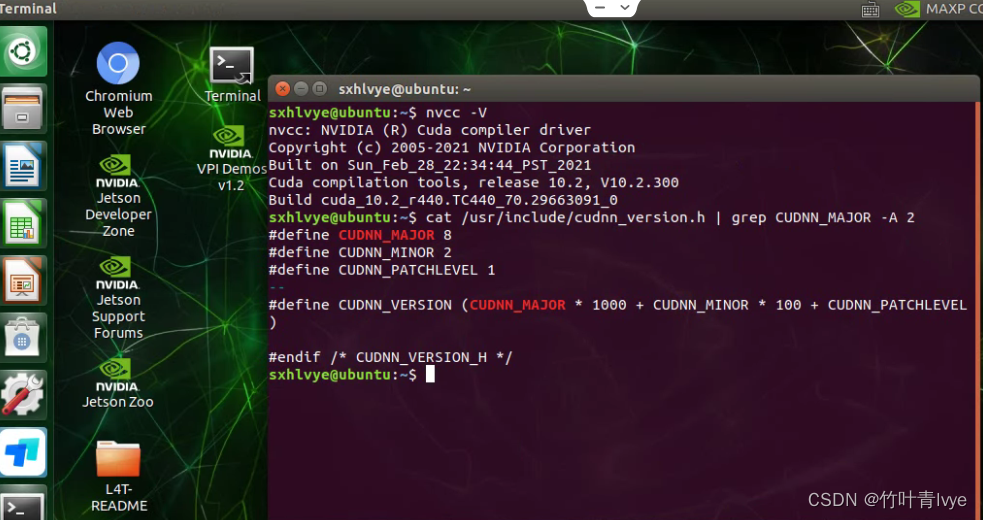
cd到如下目录
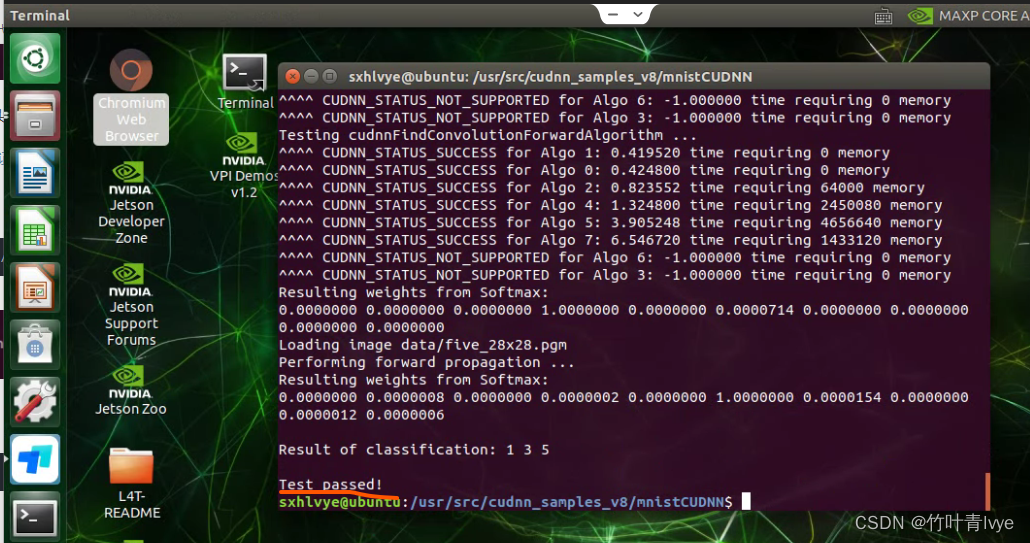
/usr/src/cudnn_samples_v8/mnistCUDNN执行sudo make,完毕后再执行./mnistCUDNN,显示测试通过。
类似博主之前博客,我们需要将cudnn的一些头文件和lib库拷贝到cuda下面去
TensorRT安装及验证_竹叶青lvye的博客-CSDN博客_验证tensorrt
对于当前TX2的配置,执行如下的命令语句
sudo cp /usr/lib/aarch64-linux-gnu/libcudnn* /usr/local/cuda-10.2/lib64
三.安装Tensorflow
主要参考博主之前博客里的方法
树莓派4B安装Tensorflow2.4.0_竹叶青lvye的博客-CSDN博客_树莓派安装tensorflow
这里选择如下版本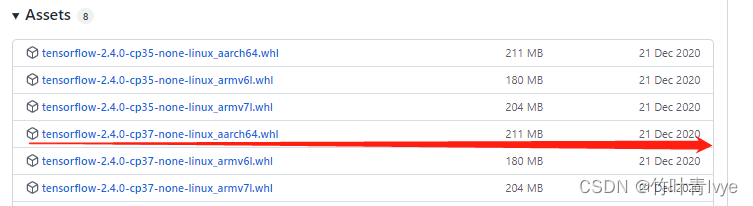
下载下来后使用如下命令进行安装
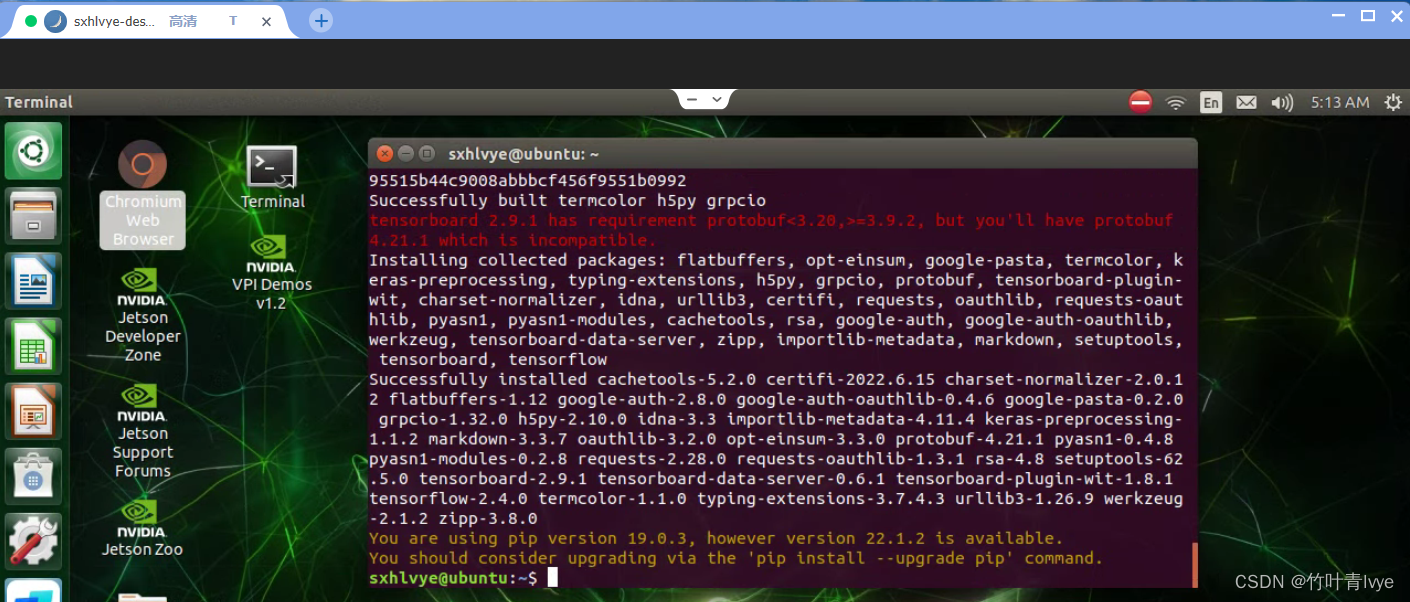
pip install tensorflow-2.4.0-cp37-none-linux_aarch64.whl --user安装过程中若出现如下错误信息:
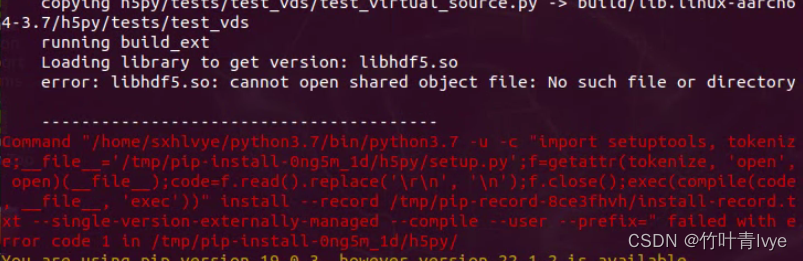
可以手动去源码编译下hdf5, 可从网址Download HDF5下载,博主这里选用的是hdf5-1.10.6
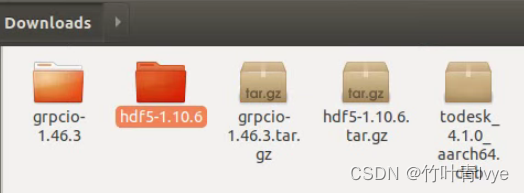
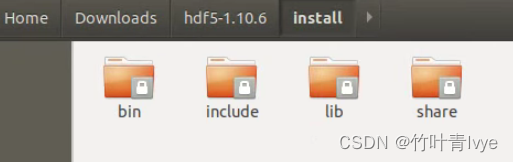
完毕后,在hdf5-1.10.6文件夹中新建一个install文件夹,然后执行如下命令行语句进行编译
./configure --prefix=/home/sxhlvye/Downloads/hdf5-1.10.6/install
sudo make -j4
sudo make install
完毕后,在install文件夹中就能看到安装好的库
注:别忘了在~/.bashrc中配置下环境变量哦,如下:

完毕后,可以继续执行如下两条安装语句:
sudo apt-get install libhdf5-serial-dev
sudo apt-get install libhdf5-dev
完毕后再重新执行如下命令语句
pip install tensorflow-2.4.0-cp37-none-linux_aarch64.whl --user这次安装成功,如下图:
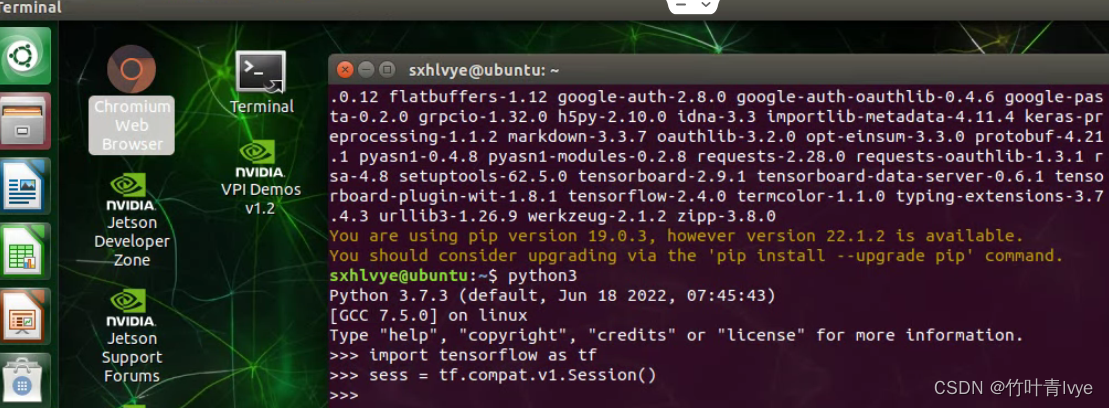
测试:如下import库没有报错
四.安装pycharm
参考博客下载和安装(这里选择的是社区版,无需激活)Ubuntu20.04 C++程序的简单编译及QT和Pycharm的配置_竹叶青lvye的博客-CSDN博客
在执行./pycharm.sh的时候,出现报错:No JRE found.Please make sure $PYCHARM_JDK,$JDK_HOME,or $JAVA_HHOME point to valid JRE installation

需要配置下jdk。
1.使用apt-cache search openjdk来看当前TX2环境下所支持的jdk版本
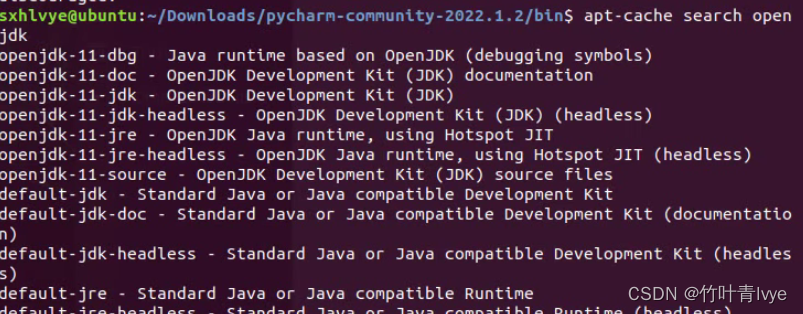
这边配置jdk11
2.如下命令行语句即可安装
sudu apt-get install openjdk-11-jdk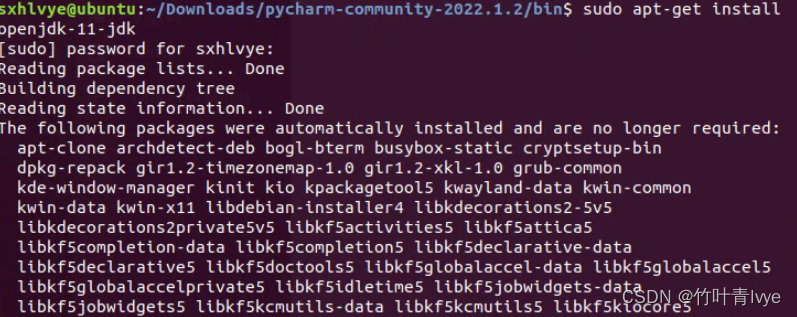
安装完毕后,可执行语句查看openjdk的安装路径
dpkg -L openjdk-11-jdk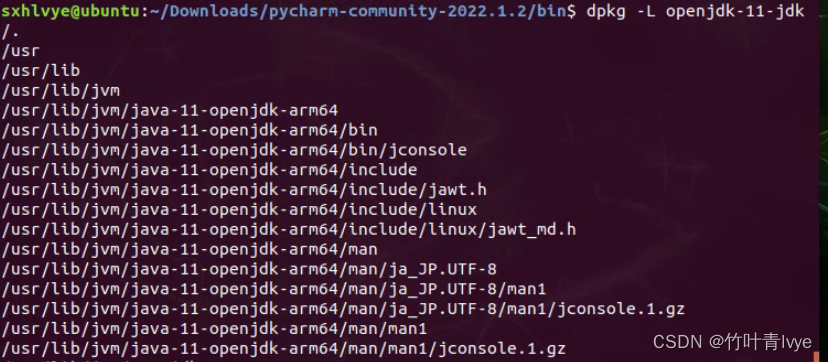
如下命令可以查看jdk的版本
java -version
3.再次执行./pycharm.sh, pycharm能正常加载
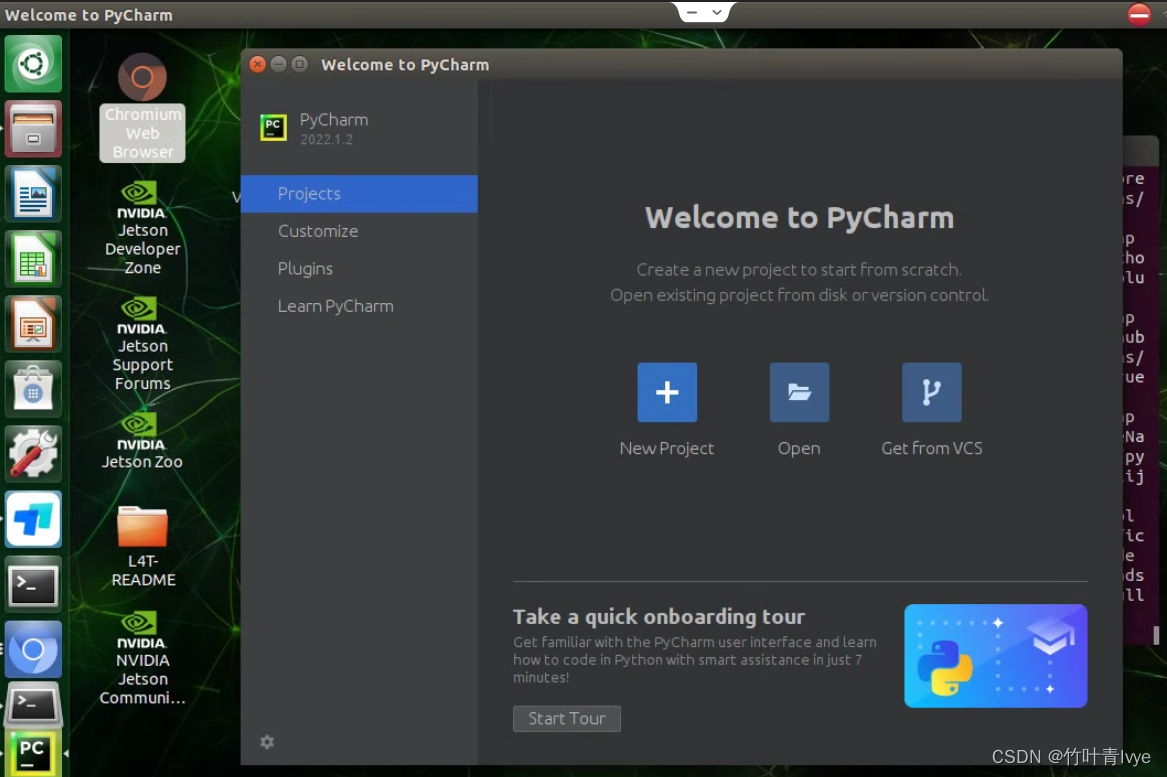
但看到报错信息:Failed to load moudle "canberra-gtk-moudle"

等会下面来解决它。
五.更新源
可以参考博主之前博客更新源
VMware Ubuntu20.04下挂载磁盘、更新源等常用配置_竹叶青lvye的博客-CSDN博客_ubuntu vmware 挂载硬盘
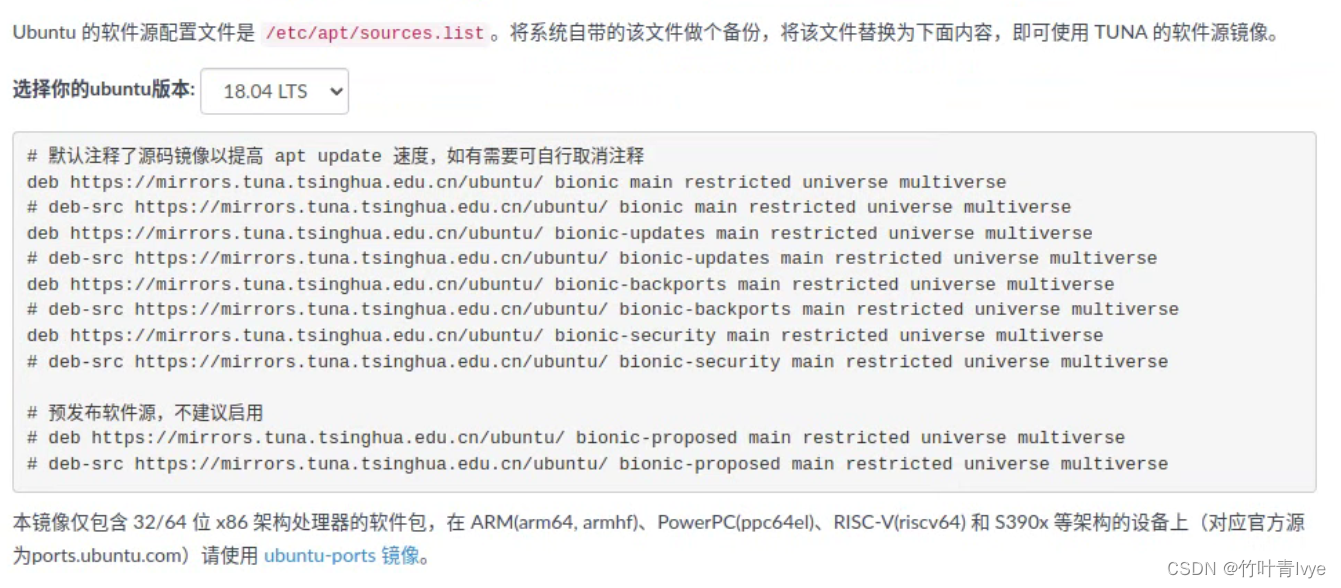
这里选择如上的源,但记得要将里面的ubuntu改为ubuntu-ports
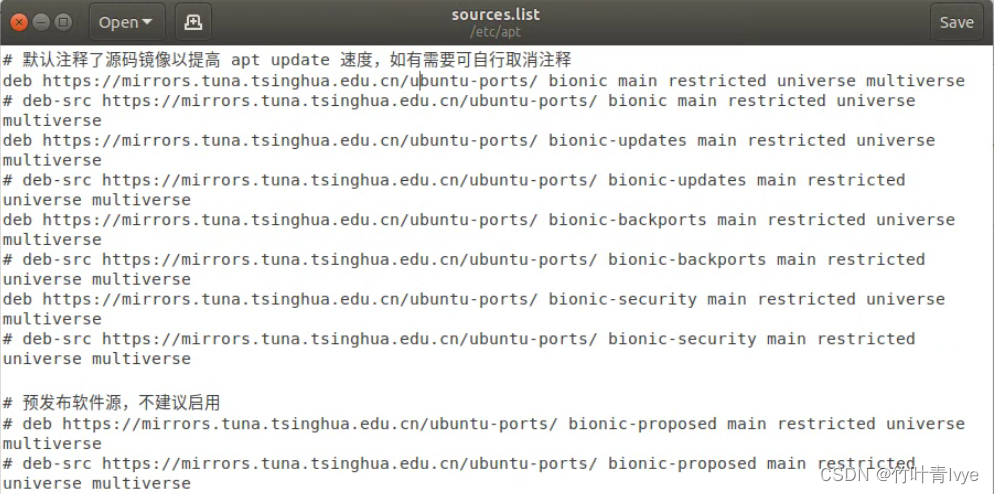
完毕后,别忘了执行语句sudo apt-get update
更新完毕,尝试安装下如下语句
sudo apt-get install libcanberra-gtk-module
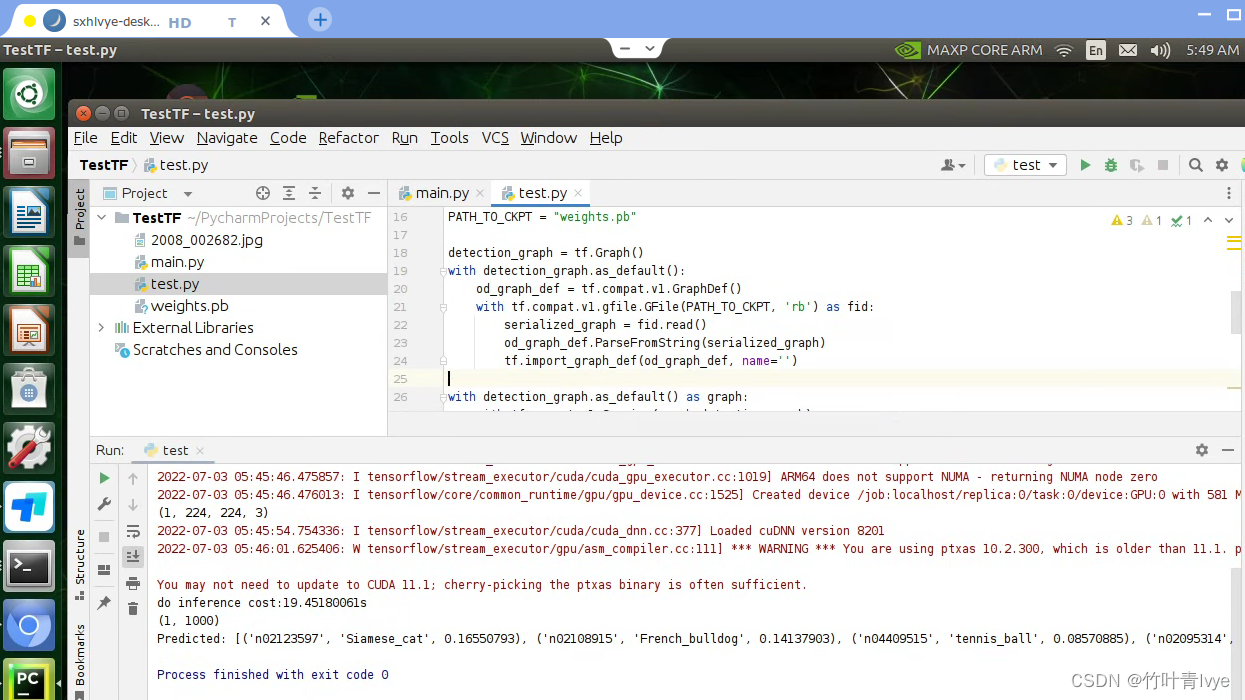
以解决上面第三部分中提到的报错。此时再打开pycharm,后台就不会出现报错信息了。在pycharm中来测试下前面配置的tensorflow的信息
pycharm的使用可以参考博主之前的博客,从上图中可以看出,第二部分所装的tensorflow版本不是GPU版本的,所以接下来通过虚拟环境,在python3.7版本的虚拟环境下配置下tensorflow-gpu
六. 配置Tensorflow-GPU
python3下虚拟环境的配置可以参考博主之前的博客
树莓派4B上多版本python切换(二)_竹叶青lvye的博客-CSDN博客_树莓派切换python2
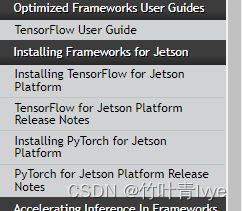
安装过程,主要参考官网DOCS这一栏
NVIDIA Documentation Center | NVIDIA Developer
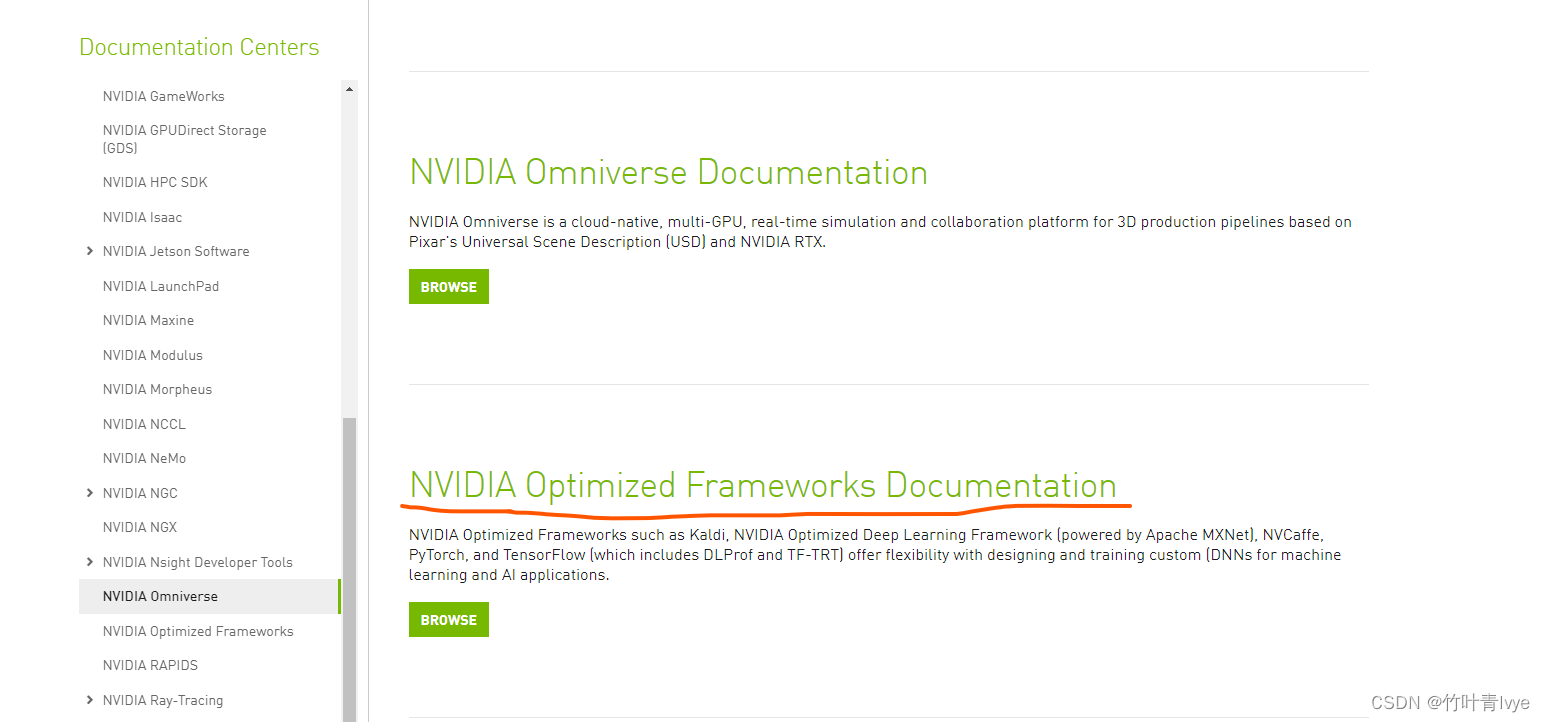
点进去后,便可以看到安装说明
Installing TensorFlow for Jetson Platform :: NVIDIA Deep Learning Frameworks Documentation
博主这边就不复述了,按照文档操纵即可,还是很详细的。博主所用的TX2的配置可见之前博客
NVIDIA Jetson TX2重装系统_竹叶青lvye的博客-CSDN博客
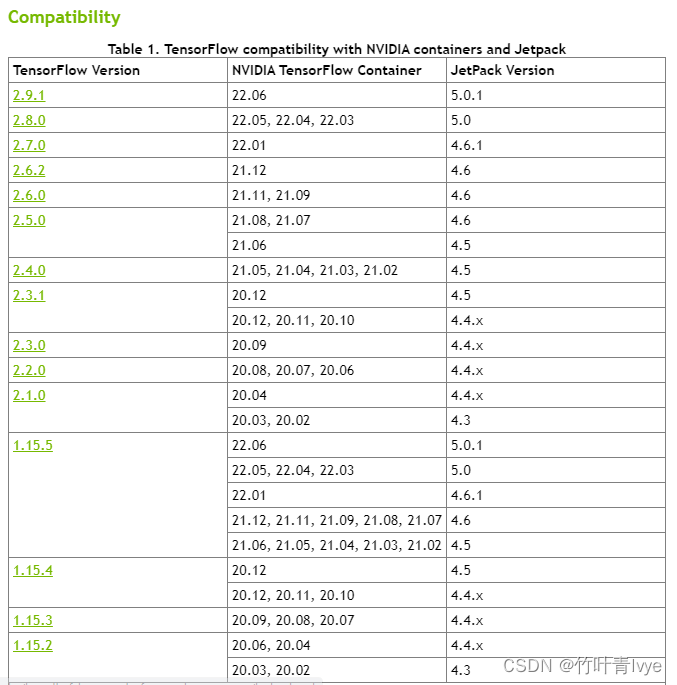
链接里也例句了官方tensorflow的一些信息
TensorFlow for Jetson Platform Release Notes :: NVIDIA Deep Learning Frameworks Documentation
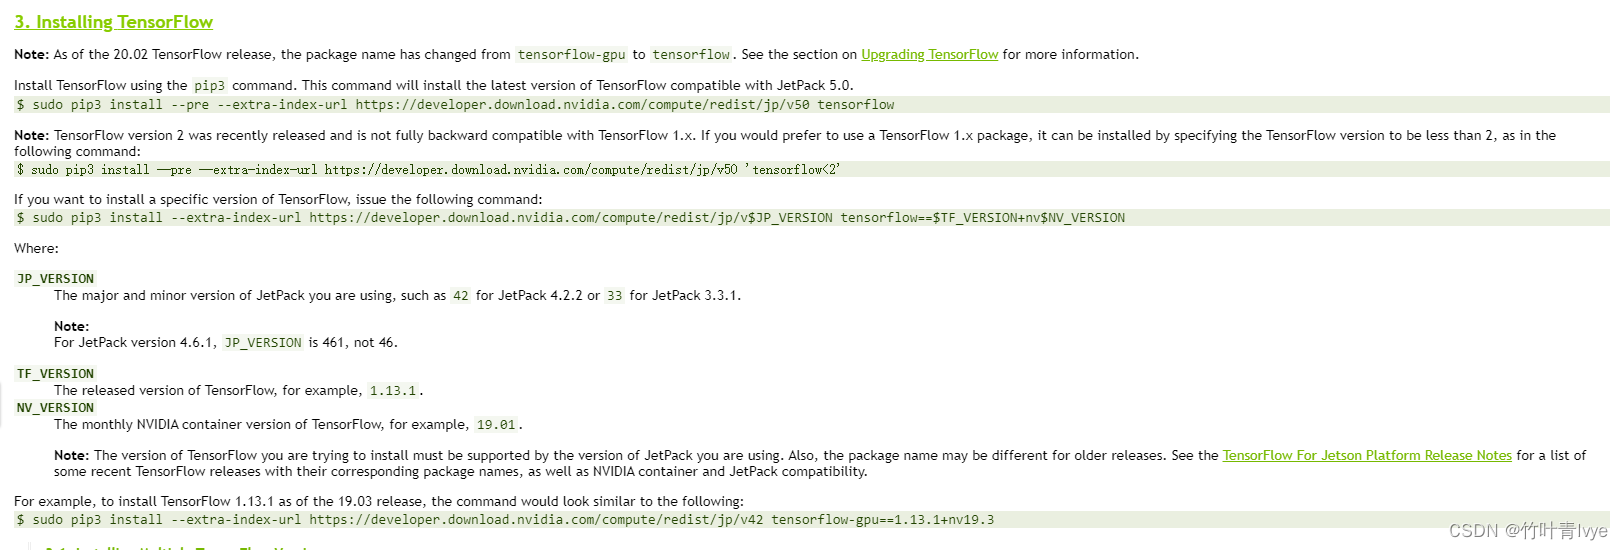
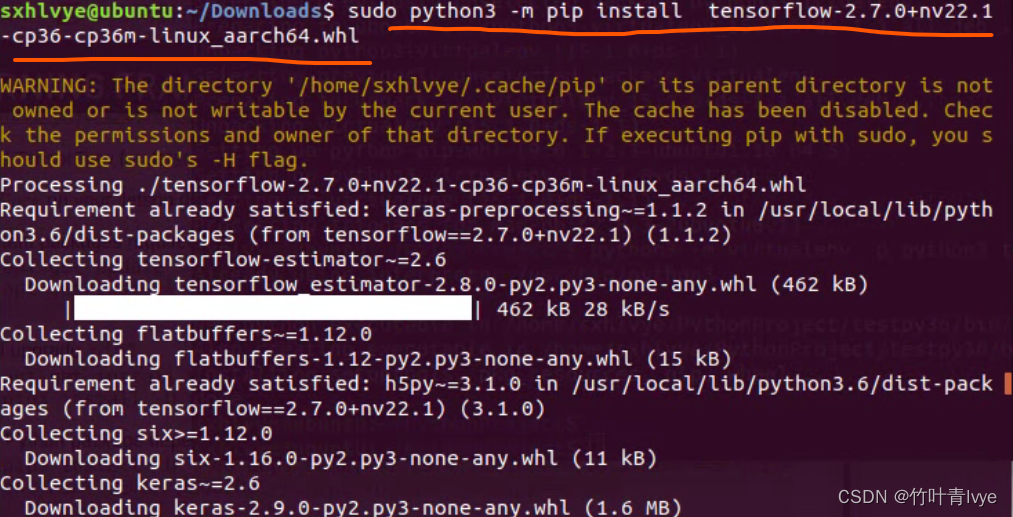
博主这边安装Tensorflow 2.7版本(博主所使用的python3环境还是安装Jetpack后系统默认的python3.6环境,并没有在前面所配置的python3.7环境下安装tensorflow2.7)。
博主这边是先下载下来,再进行的安装,下载地址如下
Index of /compute/redist/jp/v461/tensorflow

下载下来后,再pip安装下,即可
验证:
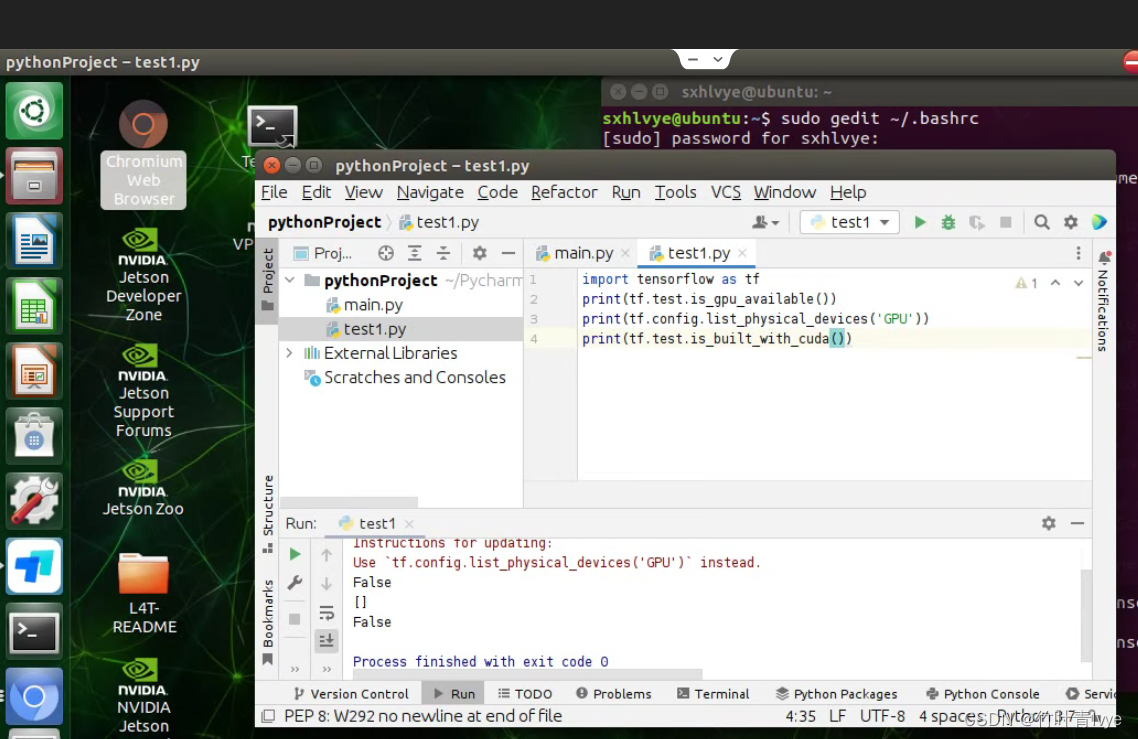
在pycharm测试如下代码:
import tensorflow as tf
print(tf.test.is_gpu_available())
print(tf.config.list_physical_devices('GPU'))
print(tf.test.is_built_with_cuda())
执行结果如下:
/usr/bin/python3 /home/sxhlvye/PycharmProjects/pythonProject/test1.py
WARNING:tensorflow:From /home/sxhlvye/PycharmProjects/pythonProject/test1.py:2: is_gpu_available (from tensorflow.python.framework.test_util) is deprecated and will be removed in a future version.
Instructions for updating:
Use `tf.config.list_physical_devices('GPU')` instead.
2022-06-25 07:03:13.240374: I tensorflow/stream_executor/cuda/cuda_gpu_executor.cc:1019] ARM64 does not support NUMA - returning NUMA node zero
2022-06-25 07:03:13.465336: I tensorflow/stream_executor/cuda/cuda_gpu_executor.cc:1019] ARM64 does not support NUMA - returning NUMA node zero
2022-06-25 07:03:13.465659: I tensorflow/stream_executor/cuda/cuda_gpu_executor.cc:1019] ARM64 does not support NUMA - returning NUMA node zero
2022-06-25 07:03:17.279189: I tensorflow/stream_executor/cuda/cuda_gpu_executor.cc:1019] ARM64 does not support NUMA - returning NUMA node zero
2022-06-25 07:03:17.279540: I tensorflow/stream_executor/cuda/cuda_gpu_executor.cc:1019] ARM64 does not support NUMA - returning NUMA node zero
2022-06-25 07:03:17.279799: I tensorflow/stream_executor/cuda/cuda_gpu_executor.cc:1019] ARM64 does not support NUMA - returning NUMA node zero
2022-06-25 07:03:17.280005: I tensorflow/core/common_runtime/gpu/gpu_device.cc:1525] Created device /device:GPU:0 with 638 MB memory:  -> device: 0, name: NVIDIA Tegra X2, pci bus id: 0000:00:00.0, compute capability: 6.2
True
[PhysicalDevice(name='/physical_device:GPU:0', device_type='GPU')]
True
2022-06-25 07:03:17.291743: I tensorflow/stream_executor/cuda/cuda_gpu_executor.cc:1019] ARM64 does not support NUMA - returning NUMA node zero
2022-06-25 07:03:17.293825: I tensorflow/stream_executor/cuda/cuda_gpu_executor.cc:1019] ARM64 does not support NUMA - returning NUMA node zero
2022-06-25 07:03:17.295500: I tensorflow/stream_executor/cuda/cuda_gpu_executor.cc:1019] ARM64 does not support NUMA - returning NUMA node zero

Process finished with exit code 0
上面可看到已经成功安装,能够跑在GPU上。
这边也跑下之前博客(在树莓派上运行)中的代码
树莓派4B安装Tensorflow2.4.0_竹叶青lvye的博客-CSDN博客_树莓派安装tensorflow
运行结果如下,ct需要19s:
七. 配置Pytorch
参考官方文档
Installing PyTorch for Jetson Platform :: NVIDIA Deep Learning Frameworks Documentation
博主这边还是先下载好安装包,再pip install安装 (安装之前先按照官网配置下预配置环境)
Index of /compute/redist/jp/v461/pytorch

安装完毕后,如下测试,没有报错,torch成功安装

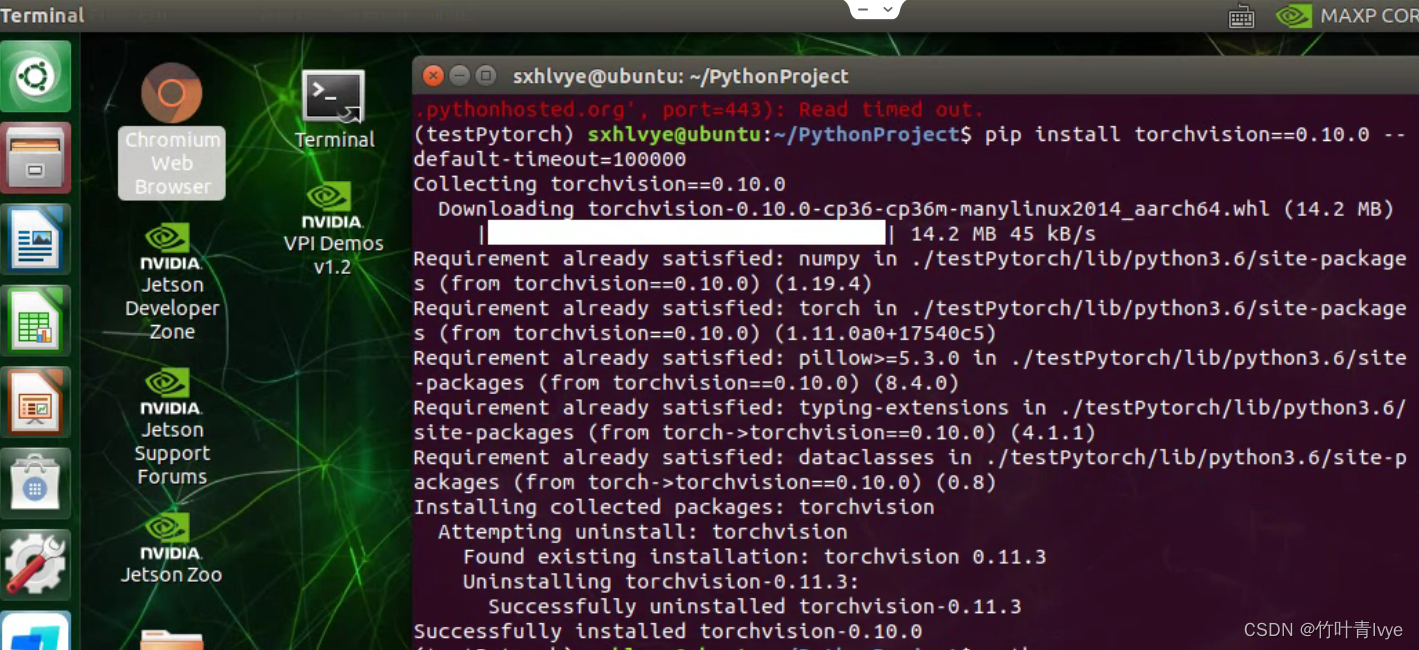
再继续安装下torchvision库,如下命令行语句即可,torch、torchvision、torchaudio的对应关系可从官网去查看
https://pytorch.org/get-started/locally/
pip install torchvision==0.10.0 --default-timeout=100000
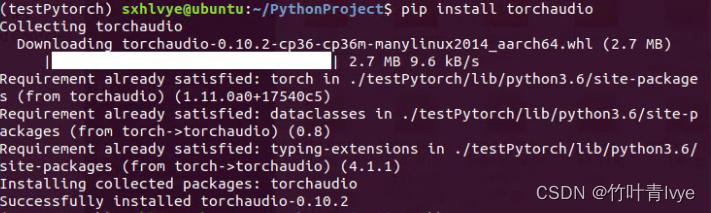
pip install torchaudio
完毕后,在pycharm中进行如下的代码测试:
import torch
import torchvision
from torchvision import transforms
import torchvision.models as models

print("over")
print(torch.cuda.is_available())
print(torch.__version__)
print(torch.backends.cudnn.version())
运行结果如下:
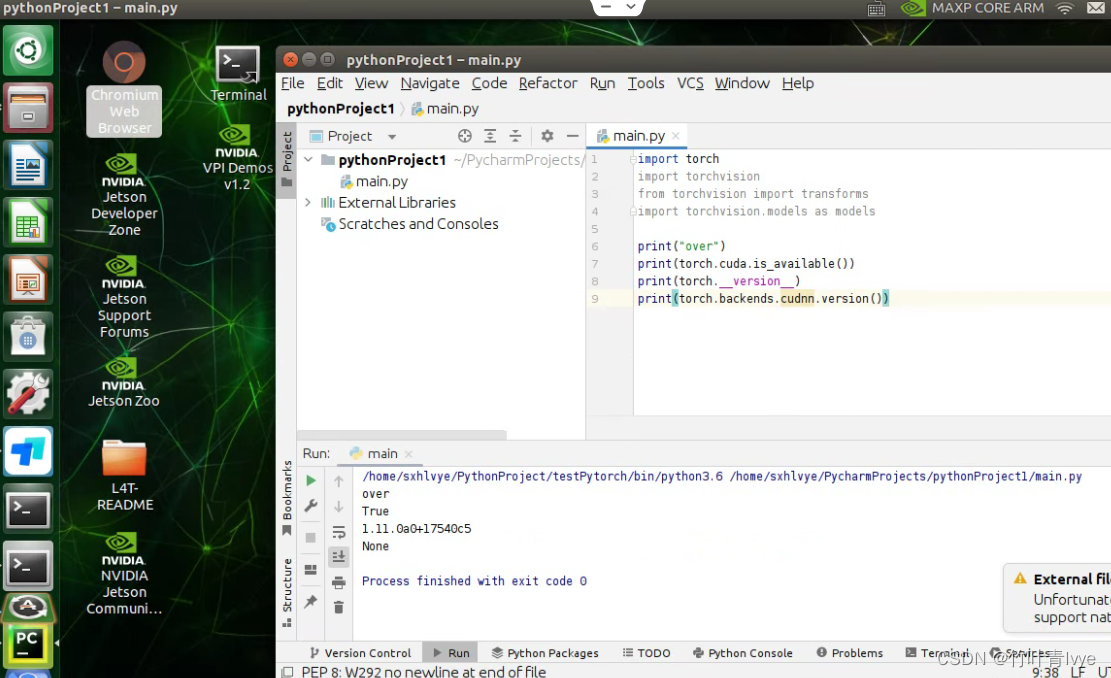
可看到pytorch已经配置成功。跑下博主之前博客(在树莓派上)中的测试代码
树莓派4B安装pytorch_竹叶青lvye的博客-CSDN博客_树莓派4b安装pytorch
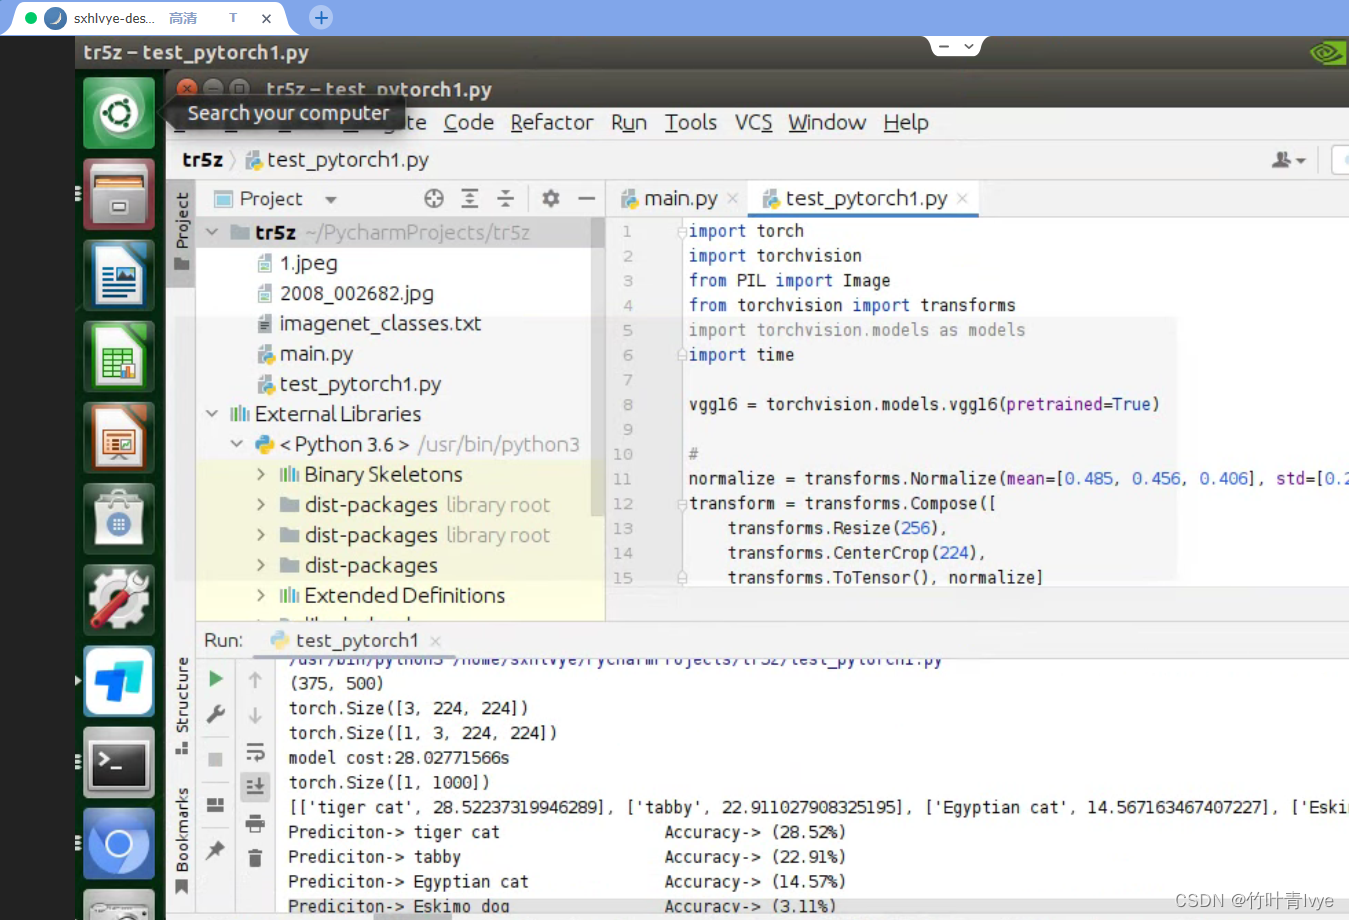
可看到在TX2上跑的时间,需要28s。
八.配置TensorRT
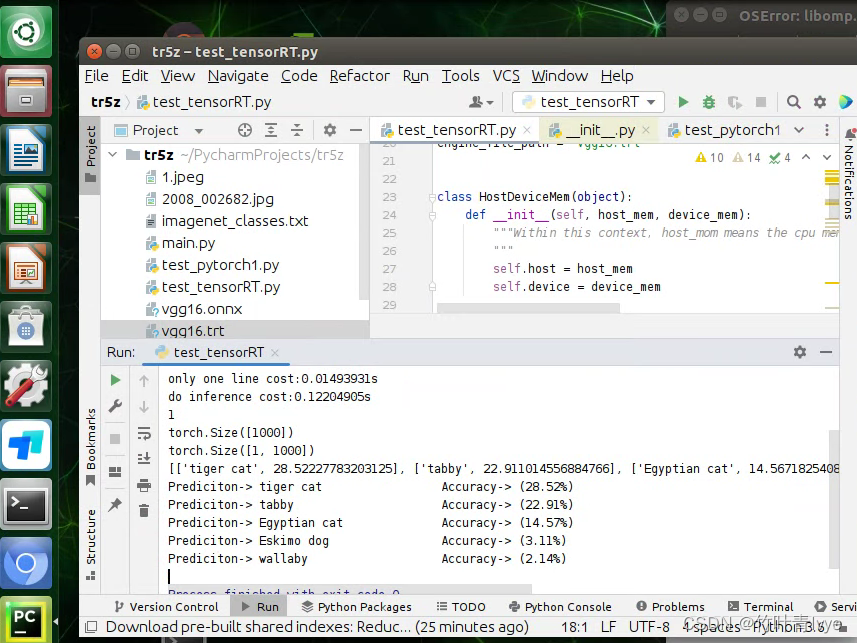
前面重装系统后,默认的python3.6环境下已经有了tensorrt的库,这边直接贴上加速效果图,具体方法参考博主之前博客。
TensorRT加速方法介绍(python pytorch模型)_竹叶青lvye的博客-CSDN博客_tensorrt加速
需要pip3 install pycuda,安装过程中若出现如下错误
In file included from src/cpp/cuda.cpp:4:0:
src/cpp/cuda.hpp:14:10: fatal error: cuda.h: No such file or directory
#include <cuda.h>
^~~~~~~~
compilation terminated.
error: command 'aarch64-linux-gnu-gcc' failed with exit status 1
可以在环境变量中添加相关变量
export CPATH=$CPATH:/usr/local/cuda/include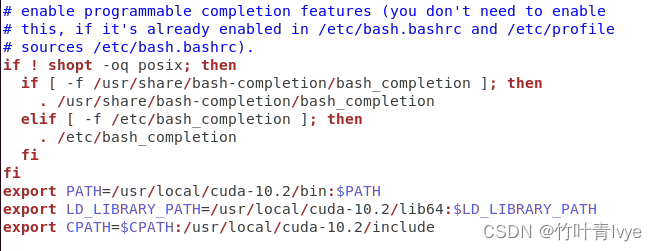
在执行import torch时,若报:OSError: libomp.so找不到问题,可添加如下环境变量
![]()
在TX2上的运行信息如下,ct时间大大加快:
精力有限,只记录上面几个常用库的配置,可以到其过程和在其它硬件平台上的ubuntu系统环境下差距不大。
边栏推荐
- 0x15 string
- [Yunju entrepreneurial foundation notes] Chapter II entrepreneur test 11
- JD home programmers delete databases and run away. Talk about binlog, the killer of MySQL data backup
- [Android reverse] function interception instance (③ refresh CPU cache | ④ process interception function | ⑤ return specific results)
- Mongodb vs mysql, which is more efficient
- Global and Chinese market of cardiac monitoring 2022-2028: Research Report on technology, participants, trends, market size and share
- Clockwise rotation method of event arrangement -- PHP implementation
- 17. Memory partition and paging
- 记一次 Showing Recent Errors Only Command /bin/sh failed with exit code 1 问题
- Wechat video Number launches "creator traffic package"
猜你喜欢

Star leap plan | new projects are continuously being recruited! MSR Asia MSR Redmond joint research program invites you to apply!
![[Yunju entrepreneurial foundation notes] Chapter II entrepreneur test 22](/img/e0/21367eeaeca10c0a2f2aab3a4fa1fb.jpg)
[Yunju entrepreneurial foundation notes] Chapter II entrepreneur test 22
The frost peel off the purple dragon scale, and the xiariba people will talk about database SQL optimization and the principle of indexing (primary / secondary / clustered / non clustered)
The detailed installation process of Ninja security penetration system (Ninjitsu OS V3). Both old and new VM versions can be installed through personal testing, with download sources
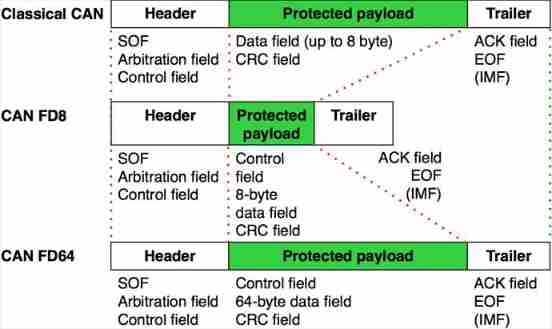
Communication tutorial | overview of the first, second and third generation can bus
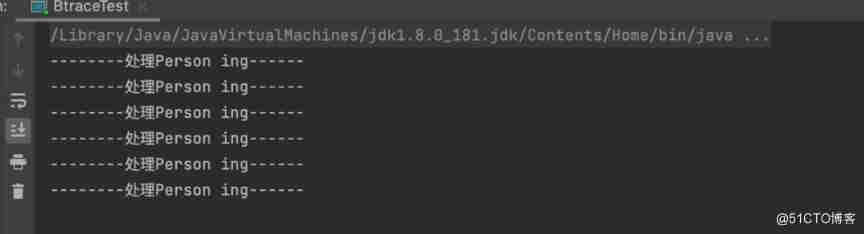
Btrace tells you how to debug online without restarting the JVM
![[notes] in depth explanation of assets, resources and assetbundles](/img/e9/ae401b45743ea65986ae01b54e3593.jpg)
[notes] in depth explanation of assets, resources and assetbundles
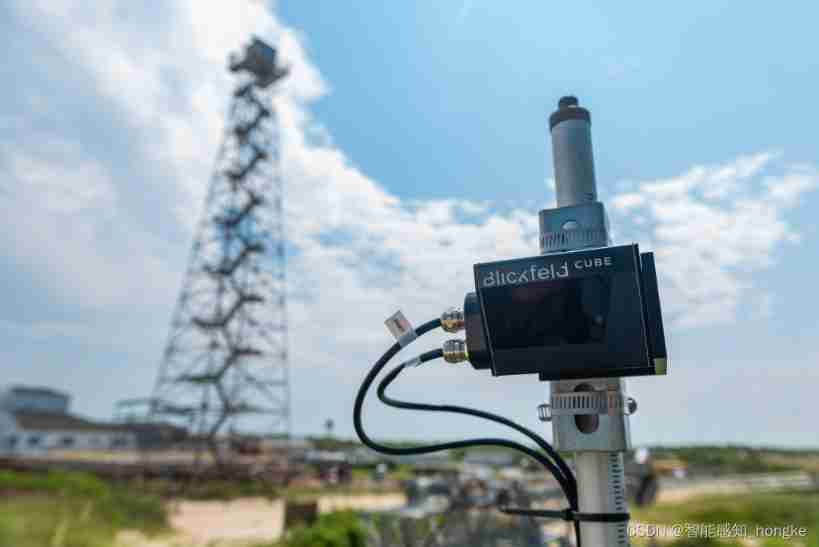
Hongke case study on storm impact in coastal areas of North Carolina using lidar
MySQL advanced review
Paper notes ACL 2020 improving event detection via open domain trigger knowledge
随机推荐
CSDN documentation specification
Xshell's ssh server rejected the password, failed to skip publickey authentication, and did not register with the server
MySQL advanced (Advanced) SQL statement
[Yunju entrepreneurial foundation notes] Chapter II entrepreneur test 17
C语言:围圈报号排序问题
It's hard to hear C language? Why don't you take a look at this (V) pointer
. Does net 4 have a built-in JSON serializer / deserializer- Does . NET 4 have a built-in JSON serializer/deserializer?
MySQL advanced review
Hongke case study on storm impact in coastal areas of North Carolina using lidar
[Yunju entrepreneurial foundation notes] Chapter II entrepreneur test 16
JD home programmers delete databases and run away. Talk about binlog, the killer of MySQL data backup
Langue C: trouver le nombre de palindromes dont 100 - 999 est un multiple de 7
Unity performance optimization reading notes - Introduction (1)
OSI seven layer model & unit
First knowledge of spark - 7000 words +15 diagrams, and learn the basic knowledge of spark
0x15 string
How to use "bottom logic" to see the cards in the world?
《天天数学》连载57:二月二十六日
Global and Chinese market of cardiac monitoring 2022-2028: Research Report on technology, participants, trends, market size and share
Complementary knowledge of auto encoder