当前位置:网站首页>Opencv learning notes high dynamic range (HDR) imaging
Opencv learning notes high dynamic range (HDR) imaging
2022-07-07 20:10:00 【Sit and watch the clouds rise】
One 、 What is high dynamic range (HDR) imaging
The process of combining different images of the same scene obtained under different exposure settings is called high dynamic range (HDR) imaging .
Most digital cameras and displays capture or display color images as 24 Bit matrix . Each color channel has 8 position , Therefore, the pixel value of each channel is in 0 – 255 Within the scope of . let me put it another way , An ordinary camera or display has a limited dynamic range .
However , The world around us has a very large dynamic range . When the lights are turned off in the garage, it will Become dark , If you look directly at the sun , It will become very bright . Even without considering these extremes , In everyday situations ,8 Bit is barely enough to capture the scene . therefore , The camera will try to estimate the light and automatically set the exposure , So that the most interesting part of the image has a good dynamic range , And cut the parts that are too dark and too bright into 0 and 255.
In the following illustration , The image on the left is normally exposed . Please note that , The sky in the background is completely washed away , Because the camera decides to use the correct setting of the subject , But the bright sky was washed away . The picture on the right is iPhone To make the HDR Images .

iPhone How to capture HDR Images ? It was actually shot under three different exposures 3 Zhang image . Images are taken continuously and quickly , So there is almost no movement between the three photos . Then combine these three images to generate HDR Images . We will see details in the next section .
Two 、 High dynamic range (HDR) How imaging works ?
Here we will introduce the use of OpenCV establish HDR Image steps .
The first 1 Step : Capture multiple images with different exposures
When we take pictures with a camera , We only have 8 Bit to represent the dynamic range of the scene ( Brightness range ). But we can shoot multiple scene images under different exposures by changing the shutter speed . Most SLR cameras have one called auto surround exposure (AEB) The function of , Just press the button , We can take multiple photos under different exposures . If you are using iPhone, You can use this AutoBracket HDR Applications , If you are android user , You can try A Better Camera Applications .
Use the camera AEB Or auto bracketing apps on your phone , We can take multiple photos quickly one by one , So the scene won't change . When we're in iPhone Use in HDR Mode time , It takes three pictures .
1、 Underexposed images : This image is darker than the correctly exposed image . The goal is to capture very bright parts of the image .
2、 Correctly exposed images : This is a conventional image taken by the camera according to its estimated illumination .
3、 Overexposed image : This image is brighter than the correctly exposed image . The goal is to capture the very dark part of the image .
however , If the dynamic range of the scene is very large , We can take more than three pictures to synthesize HDR Images . In this tutorial , We will use 4 The exposure time is 1/30、0.25、2.5 and 15 Second image . The thumbnail is shown below .

Information about exposure time and other settings used by SLR cameras or mobile phones is usually stored in JPEG Of documents EXIF In metadata . View this link to view the information stored in Windows and Mac Medium JPEG In the document EXIF Metadata . perhaps , You can use my favorite EXIF Command line utility EXIFTOOL.
Let's start with reading the image , Allocate exposure time
C++
void readImagesAndTimes(vector<Mat> &images, vector<float> ×)
{
int numImages = 4;
// List of exposure times
static const float timesArray[] = {1/30.0f,0.25,2.5,15.0};
times.assign(timesArray, timesArray + numImages);
// List of image filenames
static const char* filenames[] = {"img_0.033.jpg", "img_0.25.jpg", "img_2.5.jpg", "img_15.jpg"};
for(int i=0; i < numImages; i++)
{
Mat im = imread(filenames[i]);
images.push_back(im);
}
}Python
def readImagesAndTimes():
  # List of exposure times
  times = np.array([ 1/30.0, 0.25, 2.5, 15.0 ], dtype=np.float32)

  # List of image filenames
  filenames = ["img_0.033.jpg", "img_0.25.jpg", "img_2.5.jpg", "img_15.jpg"]
  images = []
  for filename in filenames:
    im = cv2.imread(filename)
    images.append(im)

  return images, times
The first 2 Step : Align image
For composition HDR Misaligned images of images can cause serious artifacts . In the following illustration , The image on the left is synthesized using an unaligned image HDR Images , The image on the right is a composite image using aligned images . By magnifying a part of the image , Use a red circle to show , We see serious ghosting artifacts in the image on the left .

Of course , Used in shooting to create HDR Pictures of images , Professional photographers will mount the camera on a tripod . They also use a function called mirror locking to reduce additional vibration . Even so , Images may also not be perfectly aligned , Because there is no guarantee of a vibration free environment . When taking images with a handheld camera or mobile phone , Alignment problems can get worse .
Fortunately, ,OpenCV Provides a way to use AlignMTB. The algorithm converts all images into median threshold bitmap (MTB). Graphic MTB By setting the value 1 Assigned to pixels brighter than the median brightness , Otherwise 0 Calculated .MTB The exposure time is constant . therefore ,MTB You can align , Without having to specify the exposure time .
Use the following lines of code to perform the execution based on MTB Alignment of .
C++
// Align input images
Ptr<AlignMTB> alignMTB = createAlignMTB();
alignMTB->process(images, images);
Python
# Align input images
alignMTB = cv2.createAlignMTB()
alignMTB.process(images, images)
The third step : Restore camera response function
The response of a typical camera is not linear to the brightness of the scene . What does that mean? ? hypothesis , Two objects were photographed by the camera , One of them is twice as bright in the real world as the other . When you measure the pixel intensity of two objects in a photo , The pixel value of brighter objects will not be twice that of darker objects ! If the camera response function is not estimated (CRF), We will not be able to merge images into one HDR Images .
Combine multiple exposure images into HDR What does image mean ?
Only consider a certain position of the image (x,y) A pixel of . If CRF Is linear , The pixel value will be proportional to the exposure time , Unless the pixel is too dark in a particular image ( Close to 0) Or too bright ( Close to 255). We can filter out these bad pixels ( Too dark or too bright ), And by dividing the pixel value by the exposure time
// Obtain Camera Response Function (CRF)
Mat responseDebevec;
Ptr<CalibrateDebevec> calibrateDebevec = createCalibrateDebevec();
calibrateDebevec->process(images, responseDebevec, times);
To estimate the brightness at the pixel , Then the pixels are good ( Too dark or too dark ) The average brightness value in all images of is too bright ). We can do this for all pixels and get a single image , All pixels are averaged “ good ” Pixels obtained .
however CRF Not linear , We need to linearize the image intensity first , Then we can first estimate CRF To merge / Average them .
The good news is , If we know the exposure time of each image , It can be estimated from the image CRF. Like many problems in computer vision , seek CRF The problem of is set as an optimization problem , Its goal is to minimize the objective function composed of data items and smooth items . These problems are usually reduced to linear least squares problems , Using singular value decomposition (SVD) To solve ,SVD Is part of all linear algebra packages .CRF The details of the recovery algorithm are entitled Recovering High Dynamic Range Radiance Maps from Photos Papers .
Just use OpenCV Two lines of code in , Use CalibrateDebevec Or you can find CRF CalibrateRobertson. In this tutorial , We will use CalibrateDebevec.
C++
// Obtain Camera Response Function (CRF)
Mat responseDebevec;
Ptr<CalibrateDebevec> calibrateDebevec = createCalibrateDebevec();
calibrateDebevec->process(images, responseDebevec, times);
Python
# Obtain Camera Response Function (CRF)
calibrateDebevec = cv2.createCalibrateDebevec()
responseDebevec = calibrateDebevec.process(images, times)
The following figure shows the use of red 、 The images of green and blue channels are restored CRF.

The first 4 Step : Merge images
It is estimated that CRF after , We can use MergeDebevec. C++ and Python The code is as follows .
C++
// Merge images into an HDR linear image
Mat hdrDebevec;
Ptr<MergeDebevec> mergeDebevec = createMergeDebevec();
mergeDebevec->process(images, hdrDebevec, times, responseDebevec);
// Save HDR image.
imwrite("hdrDebevec.hdr", hdrDebevec);
Python
# Merge images into an HDR linear image
mergeDebevec = cv2.createMergeDebevec()
hdrDebevec = mergeDebevec.process(images, times, responseDebevec)
# Save HDR image.
cv2.imwrite("hdrDebevec.hdr", hdrDebevec)
It's stored on it HDR Images can be in Photoshop Loading and tone mapping in . An example is as follows .

The first 5 Step : Tone mapping
High dynamic range (HDR) Image conversion per channel 8 The process of preserving as much detail as possible in a bit image is called tone mapping .
Now we have combined the exposed images into one HDR Images . Can you guess the minimum and maximum pixel values of this picture ? For dark conditions , The minimum value is obviously 0. What is the theoretical maximum ? infinite ! In practice , The maximum value is different in different cases . If the scene contains very bright lights , We will see a very large maximum .
Although we have used multiple images to restore the relative brightness information , But now we are faced with saving this information as 24 Bit image for display challenge .
There are several tone mapping algorithms .OpenCV Implemented four of them . Remember that , There is no right way to do tone mapping . Usually , We hope to see more details in the tone mapped image than in any exposed image . Sometimes the goal of tone mapping is to produce realistic images , And usually the goal is to produce surreal images .OpenCV Algorithms implemented in tend to produce real results , So it's not very eye-catching .
Let's look at the various options . Some common parameters of different tone mapping algorithms are listed below .
1、gamma: This parameter applies gamma Correction to compress the dynamic range . When gamma be equal to 1 when , No correction should be applied . Less than 1 Of gamma Will darken the image , But more than 1 Of gamma Will brighten the image .
2、 saturation : This parameter is used to increase or decrease saturation . When the saturation is high , More colors 、 Stronger . The saturation value is closer to zero , Make the color fade into grayscale .
3、contrast: Controls the contrast of the output image ( namely log (maxPixelValue/minPixelValue) ).
Let's explore OpenCV Four tone mapping algorithms available in .
Drago Tonemap
Drago Tonemap The parameters of are as follows
createTonemapDrago
(
float 	gamma = 1.0f,
float 	saturation = 1.0f,
float 	bias = 0.85f
)
here ,bias Is the offset function at [0, 1] Values in range .0.7 To 0.9 Values between usually give the best results . The default value is 0.85.
C++ and Python The code is as follows . Parameters are obtained through repeated experiments . The final output is multiplied by 3 Just because it gives the most satisfactory result .
C++
// Tonemap using Drago's method to obtain 24-bit color image
Mat ldrDrago;
Ptr<TonemapDrago> tonemapDrago = createTonemapDrago(1.0, 0.7);
tonemapDrago->process(hdrDebevec, ldrDrago);
ldrDrago = 3 * ldrDrago;
imwrite("ldr-Drago.jpg", ldrDrago * 255);
Python
# Tonemap using Drago's method to obtain 24-bit color image
tonemapDrago = cv2.createTonemapDrago(1.0, 0.7)
ldrDrago = tonemapDrago.process(hdrDebevec)
ldrDrago = 3 * ldrDrago
cv2.imwrite("ldr-Drago.jpg", ldrDrago * 255)
result

Durand Tonemap
Durand Tonemap The parameters of are as follows .
createTonemapDurand
(
  float 	gamma = 1.0f,
  float 	contrast = 4.0f,
  float 	saturation = 1.0f,
  float 	sigma_space = 2.0f,
  float 	sigma_color = 2.0f
);
The algorithm is based on decomposing the image into base layer and detail layer . The base layer is obtained by using an edge preserving filter called a bilateral filter .sigma_space and sigma_color Is the parameter of bilateral filter , Control the amount of smoothing in the space and color fields respectively .
C++
// Tonemap using Durand's method obtain 24-bit color image
Mat ldrDurand;
Ptr<TonemapDurand> tonemapDurand = createTonemapDurand(1.5,4,1.0,1,1);
tonemapDurand->process(hdrDebevec, ldrDurand);
ldrDurand = 3 * ldrDurand;
imwrite("ldr-Durand.jpg", ldrDurand * 255);
Python
# Tonemap using Durand's method obtain 24-bit color image
tonemapDurand = cv2.createTonemapDurand(1.5,4,1.0,1,1)
ldrDurand = tonemapDurand.process(hdrDebevec)
ldrDurand = 3 * ldrDurand
cv2.imwrite("ldr-Durand.jpg", ldrDurand * 255)
result

Reinhard's tonal chart
createTonemapReinhard
(
float 	gamma = 1.0f,
float 	intensity = 0.0f,
float 	light_adapt = 1.0f,
float 	color_adapt = 0.0f
)
The parameter strength should be [-8, 8] Within the scope of . Higher intensity values produce brighter results .light_adapt Control light adaptation , stay [0, 1] Within the scope of . value 1 Represents an adaptation based only on pixel values , value 0 Indicates global adaptation . The intermediate value can be used for a weighted combination of the two . Parameters color_adapt Control chromaticity adaptation , stay [0, 1] Within the scope of . If the value is set to 1, Then the channel is processed independently , If the value is set to 0, Then the adaptation level of each channel is the same . The intermediate value can be used for a weighted combination of the two .
C++
// Tonemap using Reinhard's method to obtain 24-bit color image
Mat ldrReinhard;
Ptr<TonemapReinhard> tonemapReinhard = createTonemapReinhard(1.5, 0,0,0);
tonemapReinhard->process(hdrDebevec, ldrReinhard);
imwrite("ldr-Reinhard.jpg", ldrReinhard * 255);
Python
# Tonemap using Reinhard's method to obtain 24-bit color image
tonemapReinhard = cv2.createTonemapReinhard(1.5, 0,0,0)
ldrReinhard = tonemapReinhard.process(hdrDebevec)
cv2.imwrite("ldr-Reinhard.jpg", ldrReinhard * 255)
result

Mandic tone chart
createTonemapMantiuk
(
float 	gamma = 1.0f,
float 	scale = 0.7f,
float 	saturation = 1.0f
)
Parameters scale Is the contrast scale factor . from 0.6 To 0.9 The value of produces the best result .
C++
// Tonemap using Mantiuk's method to obtain 24-bit color image
Mat ldrMantiuk;
Ptr<TonemapMantiuk> tonemapMantiuk = createTonemapMantiuk(2.2,0.85, 1.2);
tonemapMantiuk->process(hdrDebevec, ldrMantiuk);
ldrMantiuk = 3 * ldrMantiuk;
imwrite("ldr-Mantiuk.jpg", ldrMantiuk * 255);
Python
# Tonemap using Mantiuk's method to obtain 24-bit color image
tonemapMantiuk = cv2.createTonemapMantiuk(2.2,0.85, 1.2)
ldrMantiuk = tonemapMantiuk.process(hdrDebevec)
ldrMantiuk = 3 * ldrMantiuk
cv2.imwrite("ldr-Mantiuk.jpg", ldrMantiuk * 255)
result

3、 ... and 、 picture source
Source the four exposure images used in this article are in CC BY-SA 3.0 Licensed under , And from Wikipedia Of HDR page Download the . They are by Kevin · McCoy shot .
边栏推荐
猜你喜欢

Chapter 9 Yunji datacanvas company won the highest honor of the "fifth digital finance innovation competition"!
Flink并行度和Slot详解
模拟实现string类
力扣 599. 两个列表的最小索引总和
Sword finger offer II 013 Sum of two-dimensional submatrix
九章云极DataCanvas公司摘获「第五届数字金融创新大赛」最高荣誉!

干货分享|DevExpress v22.1原版帮助文档下载集合

Automatic classification of defective photovoltaic module cells in electroluminescence images-论文阅读笔记
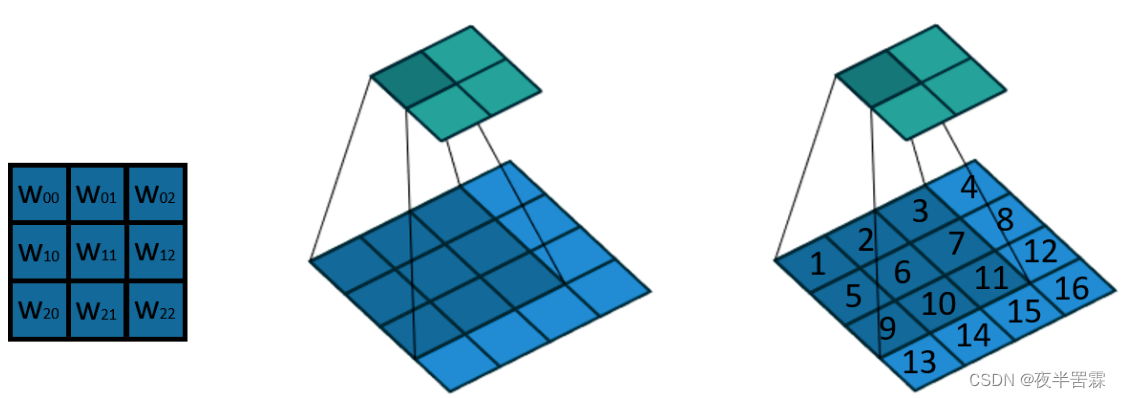
Interpretation of transpose convolution theory (input-output size analysis)
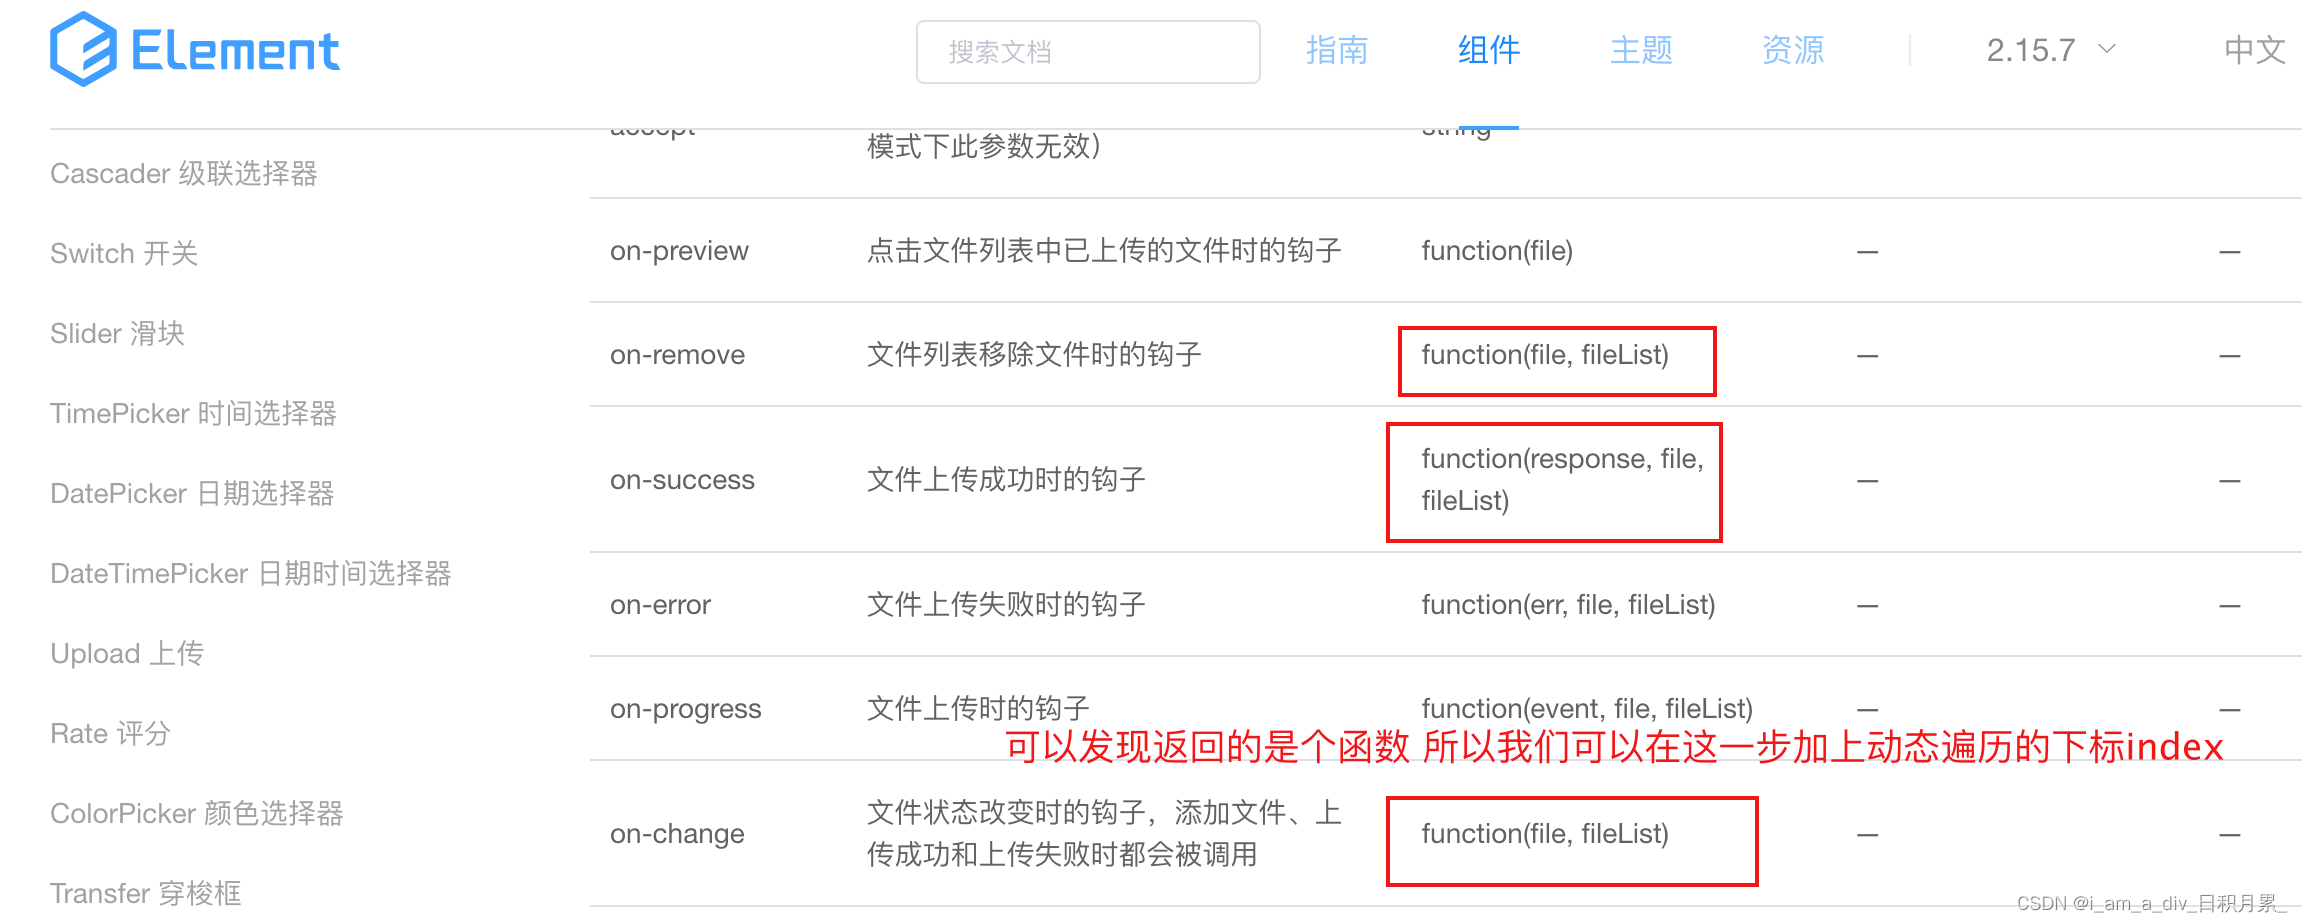
Dynamic addition of El upload upload component; El upload dynamically uploads files; El upload distinguishes which component uploads the file.
随机推荐
Tp6 realize Commission ranking
Force buckle 459 Duplicate substring
Flink并行度和Slot详解
R language uses ggplot2 function to visualize the histogram distribution of counting target variables that need to build Poisson regression model, and analyzes the feasibility of building Poisson regr
Ways to improve the utilization of openeuler resources 01: Introduction
力扣 912.排序数组
Force buckle 2319 Judge whether the matrix is an X matrix
Kubernetes——kubectl命令行工具用法详解
Vulnhub tre1
mock.js从对象数组中任选数据返回一个数组
力扣 599. 两个列表的最小索引总和
841. 字符串哈希
Cuda版本不一致,编译apex报错
Visual Studio 插件之CodeMaid自动整理代码
Equals method
Cloud component development and upgrading
力扣 88.合并两个有序数组
华南X99平台打鸡血教程
IP tools
The state cyberspace Office released the measures for data exit security assessment: 100000 information provided overseas needs to be declared