当前位置:网站首页>Apifix installation
Apifix installation
2022-07-03 06:09:00 【vincentwc】
Introduction to the environment
- centos7 virtual machine
The detailed steps
install etcd, As follows :
#  install  etcd
wget https://github.com/etcd-io/etcd/releases/download/v3.4.13/etcd-v3.4.13-linux-amd64.tar.gz
tar -xvf etcd-v3.4.13-linux-amd64.tar.gz && \
    cd etcd-v3.4.13-linux-amd64 && \
    sudo cp -a etcd etcdctl /usr/bin/

#  add to  OpenResty  Source
sudo yum install yum-utils
sudo yum-config-manager --add-repo https://openresty.org/package/centos/openresty.repo

#  install  OpenResty  and   Compiler tools
sudo yum install -y openresty curl git gcc openresty-openssl111-devel unzip

#  install  LuaRocks
curl https://raw.githubusercontent.com/apache/apisix/master/utils/linux-install-luarocks.sh -sL | bash -

#  Turn on  etcd server
nohup etcd &
# Restart the machine and start etcd cd /usr/local/etcd-v3.4.13-linux-amd64 nohup etcd &install apisix
# Solve the dependency problem in advance # install epel Source , luarocks Need to be used . wget http://dl.fedoraproject.org/pub/epel/epel-release-latest-7.noarch.rpm rpm -ivh epel-release-latest-7.noarch.rpm # add to OpenResty Mirror source for yum install yum-utils yum-config-manager --add-repo https://openresty.org/package/centos/openresty.repo # install OpenResty, etcd And some dependent tools 【 Because the previous step has been installed etcd 了 , So I won't install it here , ok , Actually, it is installed here etcd Outdated Version ,apisix I won't support it , So reinstall 】 # yum install -y etcd openresty curl git gcc luarocks lua-devel yum install -y openresty curl git gcc luarocks lua-devel # Firewall OFF systemctl stop firewalld.service systemctl disable firewalld.service # close selinux setenforce 0 sed -i 's/SELINUX=enforcing/SELINUX=disabled/' /etc/selinux/config # install apisix yum install -y https://github.com/apache/apisix/releases/download/2.5/apisix-2.5-0.x86_64.rpm # start-up apisix apisix start # If you are using tar.gz If the package is installed , It is used under the unzipped directory make run command , Details can be found at apisix Official documents # see apisix Related commands apisix --help # Check whether the service is started # View the process or listen to the port 9080 ps aux|grep apisix netstat -lntp|grep 9080 # thus ,apisix It has been installed successfullyinstall apisix-dashboard
# Install dependency first # node、npm wget https://nodejs.org/dist/v12.16.1/node-v12.16.1-linux-x64.tar.xz # Decompression deployment tar xvf node-v12.16.1-linux-x64.tar.xz mv node-v12.16.1-linux-x64 /usr/local/node # Configure environment variables echo 'PATH=/usr/local/node/bin/:$PATH' >> /etc/profile source /etc/profile # Test environment node --version npm --version[ Failed to transfer the external chain picture , The origin station may have anti-theft chain mechanism , It is suggested to save the pictures and upload them directly (img-pizF0BEY-1621424373105)(C:\Users\vince\AppData\Roaming\Typora\typora-user-images\image-20210516121453752.png)]
# install yarn wget https://github.com/yarnpkg/yarn/releases/download/v1.22.4/yarn-v1.22.4.tar.gz # Decompression deployment tar xvf yarn-v1.22.4.tar.gz mv yarn-v1.22.4 /usr/local/yarn # Configure environment variables echo 'PATH=/usr/local/yarn/bin/:$PATH' >> /etc/profile source /etc/profile # Test environment yarn --version[ Failed to transfer the external chain picture , The origin station may have anti-theft chain mechanism , It is suggested to save the pictures and upload them directly (img-4ojdUAOa-1621424373107)(C:\Users\vince\AppData\Roaming\Typora\typora-user-images\image-20210516121718137.png)]
# install go ...# hold rpm Download the package locally Update the version number as required , And then upload rpm package https://github.com/apache/apisix-dashboard/releases/download/v2.6/apisix-dashboard-2.6-0.x86_64.rpm # install yum localinstall apisix-dashboard-2.6-0.x86_64.rpm # function dashboard sudo nohup manager-api -p /usr/local/apisix/dashboard/ &
Machine restart
etcd
# Restart the machine and start etcd cd /usr/local/etcd-v3.4.13-linux-amd64 nohup etcd &apisxi
apisix startapisix-dashboard
sudo nohup manager-api -p /usr/local/apisix/dashboard/ &
边栏推荐
- Kubernetes notes (VI) kubernetes storage
- There is no one of the necessary magic skills PXE for old drivers to install!!!
- Complete set of C language file operation functions (super detailed)
- MySQL带二进制的库表导出导入
- Cesium 点击获三维坐标(经纬度高程)
- 深入解析kubernetes controller-runtime
- Kubernetes notes (III) controller
- JDBC connection database steps
- [teacher Zhao Yuqiang] RDB persistence of redis
- Cesium 点击获取模型表面经纬度高程坐标(三维坐标)
猜你喜欢
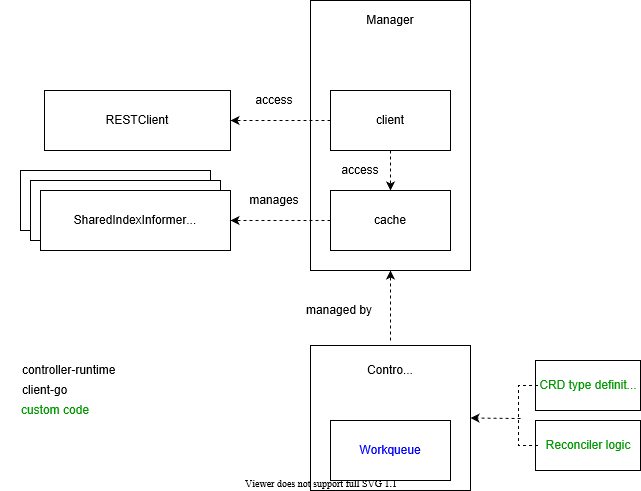
深入解析kubernetes controller-runtime

pytorch DataLoader实现miniBatch(未完成)

Project summary --2 (basic use of jsup)
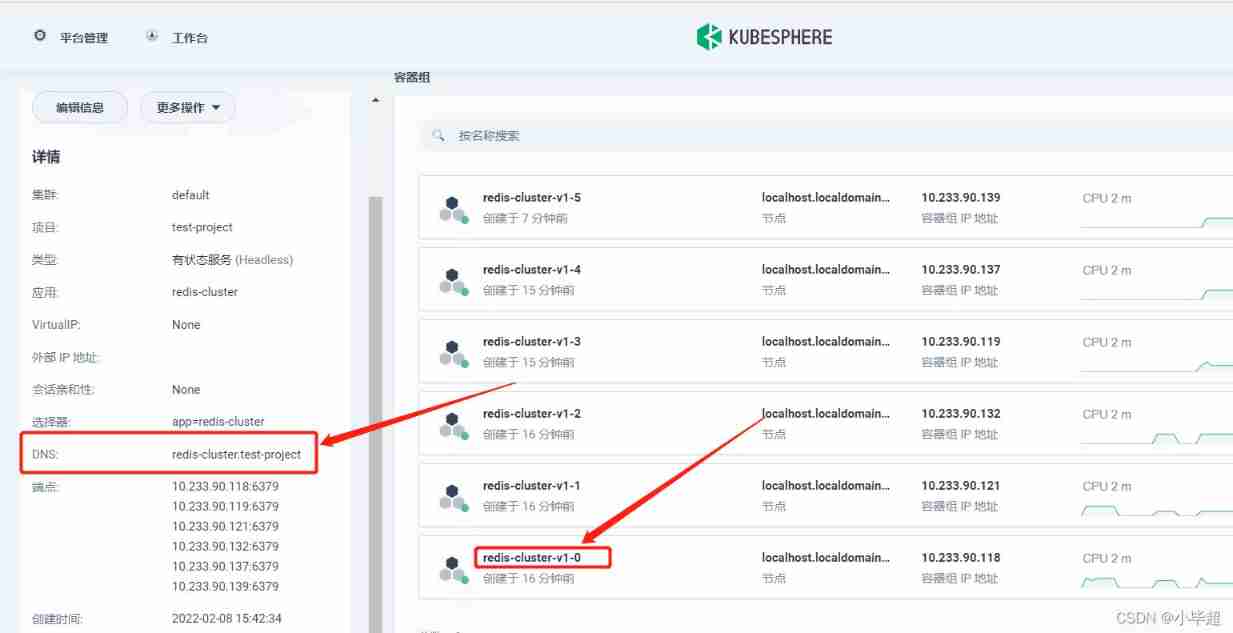
Kubesphere - set up redis cluster

Core principles and source code analysis of disruptor
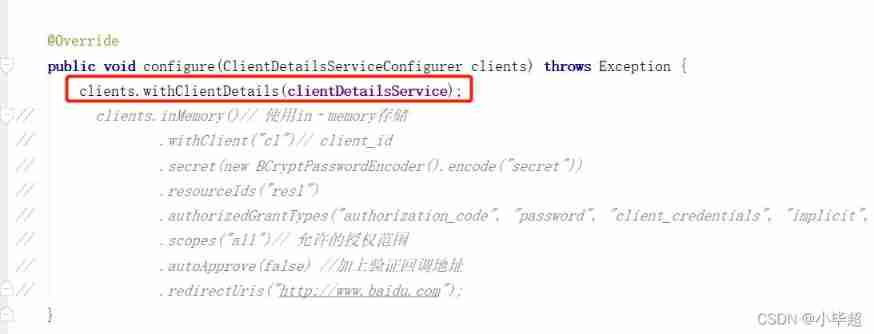
Oauth2.0 - use database to store client information and authorization code
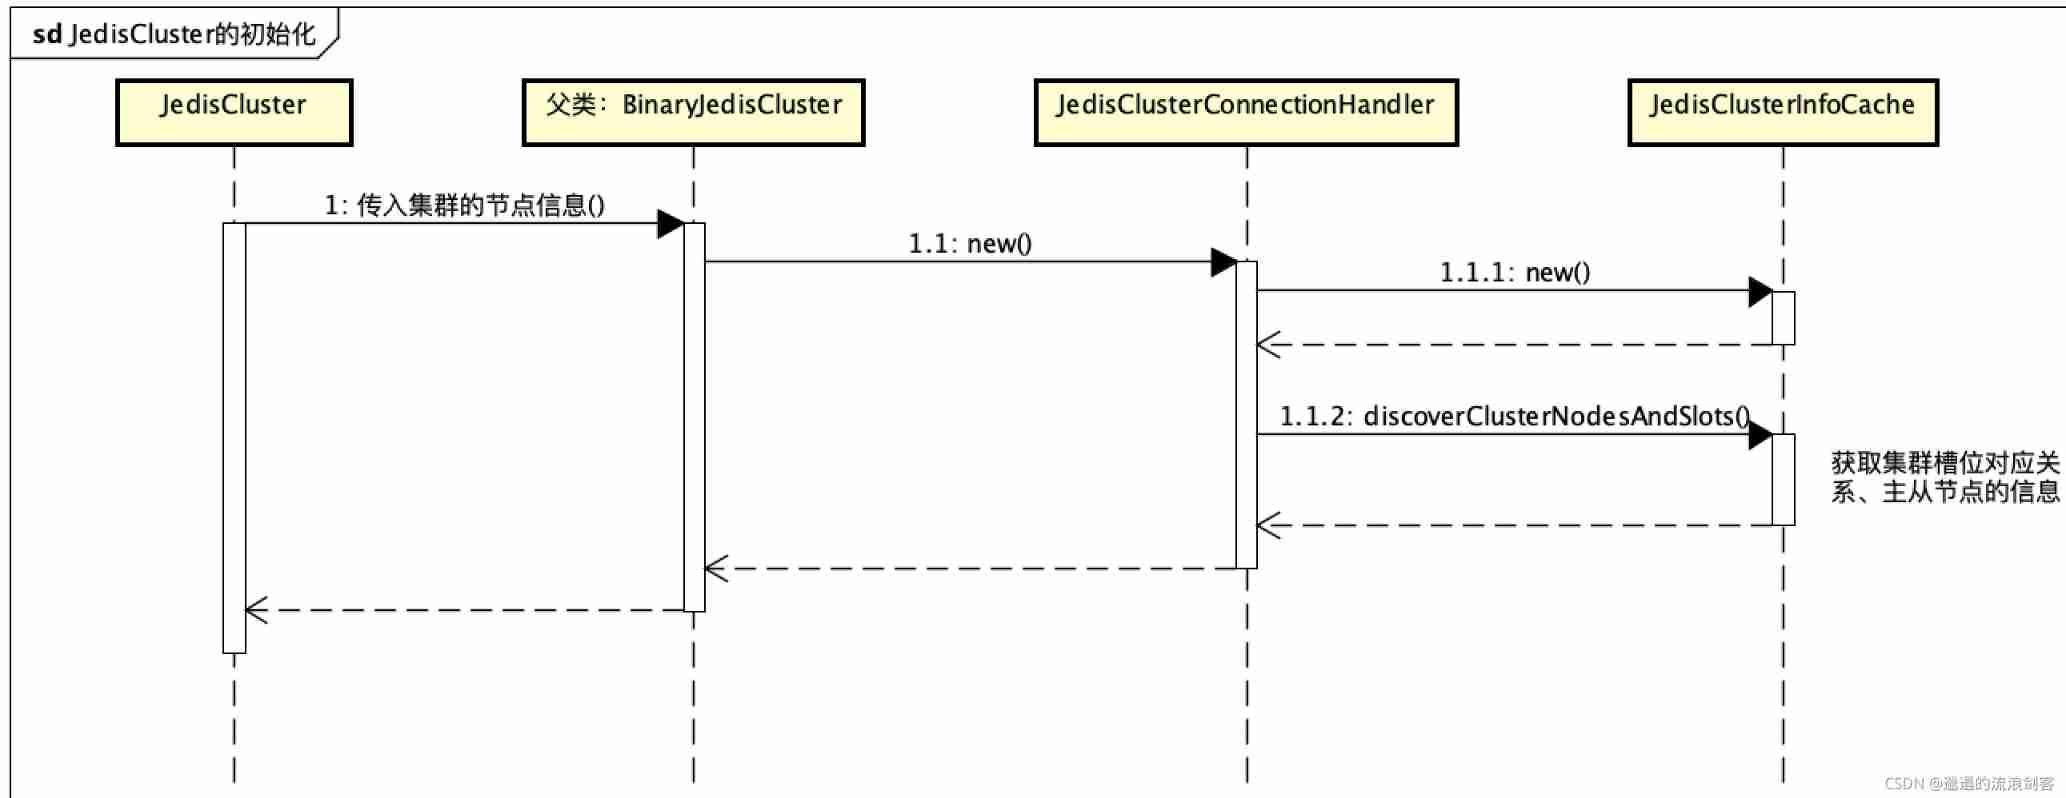
Jedis source code analysis (II): jediscluster module source code analysis
Kubernetes notes (VII) kuberetes scheduling
Merge and migrate data from small data volume, sub database and sub table Mysql to tidb

Redhat7 system root user password cracking
随机推荐
Kubernetes cluster environment construction & Deployment dashboard
Clickhouse learning notes (2): execution plan, table creation optimization, syntax optimization rules, query optimization, data consistency
[teacher Zhao Yuqiang] MySQL high availability architecture: MHA
pytorch 搭建神经网络最简版
How to create your own repository for software packages on Debian
Skywalking8.7 source code analysis (I): agent startup process, agent configuration loading process, custom class loader agentclassloader, plug-in definition system, plug-in loading
Kubernetes notes (IX) kubernetes application encapsulation and expansion
Zhiniu stock -- 03
Project summary --01 (addition, deletion, modification and query of interfaces; use of multithreading)
88. 合并两个有序数组
MySQL帶二進制的庫錶導出導入
[teacher Zhao Yuqiang] Cassandra foundation of NoSQL database
深度学习,从一维特性输入到多维特征输入引发的思考
Common exceptions when Jenkins is released (continuous update...)
MySQL带二进制的库表导出导入
Pytorch builds the simplest version of neural network
Btrfs and ext4 - features, strengths and weaknesses
Leetcode problem solving summary, constantly updating!
Detailed explanation of iptables (1): iptables concept
Alibaba cloud OOS file upload