当前位置:网站首页>Window管理深入了解WindowManagerService
Window管理深入了解WindowManagerService
2022-06-11 10:27:00 【丶笑看退场】
前文已经介绍过WindowManage(全方面来认识WindowManager),今天就让我们来认识下WindowManager的管理者WMS,在Android系统中,对系统中的所有窗口进行管理是窗口管理服务WindowManagerService的职责。
可以知道App从启动到主窗口显示出来,主要需要App、ActivityManagerService、WindowManagerService和SurfaceFlinger等这几个模块相互合作。
在这几个中App主要负责业务逻辑,绘制视图,AMS负责管理组件和进程信息以及堆栈信息,WMS负责管理Activity的窗口以及子窗口和系统窗口,SF则是在用于管理图形缓冲区,进行屏幕渲染。本文分析就基于Android 10.0上。
一、WMS的诞生
正如AMS一样,WMS也是在SystemServer的main()中诞生:
public static void main(String[] args) {

        new SystemServer().run();
    }

private void run() {

  ......
  // 开启服务.
        try {

            traceBeginAndSlog("StartServices");
            startBootstrapServices();
            startCoreServices();
            startOtherServices();
            SystemServerInitThreadPool.shutdown();
        } catch (Throwable ex) {

            Slog.e("System", "******************************************");
            Slog.e("System", "************ Failure starting system services", ex);
            throw ex;
        } finally {

            traceEnd();
        }
  ......
}
从上面可以看出,创建了个SystemServer对象后就会调用run方法。在方法里会开启三种类型的系统服务,分别是引导服务,核心服务和其他服务,而WMS是其他服务的一种。
接着我们来看下WMS在startOtherService中是如何产生的:
private void startOtherServices() {

 ......
  //代码1
  wm = WindowManagerService.main(context, inputManager, !mFirstBoot, mOnlyCore,
                    new PhoneWindowManager(), mActivityManagerService.mActivityTaskManager);
  ServiceManager.addService(Context.WINDOW_SERVICE, wm, /* allowIsolated= */ false,
                    DUMP_FLAG_PRIORITY_CRITICAL | DUMP_FLAG_PROTO);
  ServiceManager.addService(Context.INPUT_SERVICE, inputManager,
                    /* allowIsolated= */ false, DUMP_FLAG_PRIORITY_CRITICAL);
    traceEnd();

    traceBeginAndSlog("SetWindowManagerService");
  //代码2
    mActivityManagerService.setWindowManager(wm);
    traceEnd();

    traceBeginAndSlog("WindowManagerServiceOnInitReady");
  //代码3
            wm.onInitReady();
  ......
    //代码4
    try {

            wm.displayReady();
        } catch (Throwable e) {

            reportWtf("making display ready", e);
        }
  ......
    //代码5
    try {

            wm.systemReady();
        } catch (Throwable e) {

            reportWtf("making Window Manager Service ready", e);
        }
}
在代码1处,调用WindowManagerServiice.main()创建wms对象,并将该对象加入到ServiceManager中,代码2处,为AMS设置了wms,之后在代码3和代码4中初始化显示信息,在代码5处红藕你过来痛殴感知wms,系统的初始化已经完成,内部会调用mPolicy.systemReady方法。
从上面可以看到当调用了wms的main方法的时候,会创建wms实例出来:
public static WindowManagerService main(final Context context, final InputManagerService im,
            final boolean showBootMsgs, final boolean onlyCore, WindowManagerPolicy policy,
            ActivityTaskManagerService atm) {

        return main(context, im, showBootMsgs, onlyCore, policy, atm,
                SurfaceControl.Transaction::new);
    }

 public static WindowManagerService main(final Context context, final InputManagerService im,
            final boolean showBootMsgs, final boolean onlyCore, WindowManagerPolicy policy,
            ActivityTaskManagerService atm, TransactionFactory transactionFactory) {

        DisplayThread.getHandler().runWithScissors(() ->
                sInstance = new WindowManagerService(context, im, showBootMsgs, onlyCore, policy,
                        atm, transactionFactory), 0);
        return sInstance;
    }
在main方法中,会用DisplayThread.getHandle的runWithSciissors方法,说明WMS的创建是运行在android.display线程中。
DisplayThread 线程是一个系统前台线程,用于执行一些延时要非常小的关于显示的操作
在Handle的runWithScissors方法中:
public final boolean runWithScissors(final Runnable r, long timeout) {

        ......

        if (Looper.myLooper() == mLooper) {

            r.run();
            return true;
        }

        BlockingRunnable br = new BlockingRunnable(r);
        return br.postAndWait(this, timeout);
    }
在这里会判断是否是当前的looper,这里的looper也是指是不是处在android.display中。当如果不是的时候,就会将runnable传入到BlockingRunnable,并执行postAndWait方法。
    private static final class BlockingRunnable implements Runnable {

        private final Runnable mTask;
        private boolean mDone;

        public BlockingRunnable(Runnable task) {

            mTask = task;
        }

        @Override
        public void run() {

            try {

                mTask.run();
            } finally {

                synchronized (this) {

                    mDone = true;
                    notifyAll();
                }
            }
        }

        public boolean postAndWait(Handler handler, long timeout) {

            if (!handler.post(this)) {

                return false;
            }

            synchronized (this) {

                if (timeout > 0) {

                    final long expirationTime = SystemClock.uptimeMillis() + timeout;
                    while (!mDone) {

                        long delay = expirationTime - SystemClock.uptimeMillis();
                        if (delay <= 0) {

                            return false; // timeout
                        }
                        try {

                            wait(delay);
                        } catch (InterruptedException ex) {

                        }
                    }
                } else {

                    while (!mDone) {

                        try {

                            wait();
                        } catch (InterruptedException ex) {

                        }
                    }
                }
            }
            return true;
        }
    }
}
在postAndWait方法里,在mDone没有设置为trrue时,一直会让线程处于等待状态,直到run方法被执行。在这个时候会设置爱mDone为true,并同时notifyAll唤醒线程。从这里也可以看出wms的创建的优先级会高点。
接着就会执行到wms的构造方法,构造方法很长我们就截取一些关键点:
private WindowManagerService(Context context, InputManagerService inputManager,
            boolean showBootMsgs, boolean onlyCore, WindowManagerPolicy policy,
            ActivityTaskManagerService atm, TransactionFactory transactionFactory) {

  			......
        //代码1
  			mPolicy = policy;

  			//代码2
        mAnimator = new WindowAnimator(this);
        mRoot = new RootWindowContainer(this);

        mWindowPlacerLocked = new WindowSurfacePlacer(this);
        mTaskSnapshotController = new TaskSnapshotController(this);

        mWindowTracing = WindowTracing.createDefaultAndStartLooper(this,
                Choreographer.getInstance());

        LocalServices.addService(WindowManagerPolicy.class, mPolicy);

  			......
  			//代码3
  		  mActivityManager = ActivityManager.getService();
        mActivityTaskManager = ActivityTaskManager.getService();


}
在代码1处,mPolicy对象在wms中占有了很重要的作用,是一个接口,WMS中的操作都是wmp所处理。而它真正的实现类是PhoneWindowManager,PhoneWindowManager处理线程是在ui线程中。
二、WMS重要成员
| 名字 | 含义 |
|---|---|
| mPolicy: WiindoowMangerPolicy | 是窗口管理策略的接口类,用来定义一个窗口所要遵循的通用规范 |
| mSessions: ArraySet | 主要用于进程间通信,其他的应用程序进程需要和WMS进程通信就需要经过Session,每个应用进程都会对应一个Session,保存它就是用来记录所有向WMS提出窗口管理服务的客户端。 |
| mWindowMap:WindowHashMap | key对应的值是IBinder,value对应的值是WindowState。Window则是在窗口管理中的一个窗口 |
| mAnimator:WindowAnimator | windowAnimatoor类型的变量,用于管理窗口的动画以及特效动画 |
| mH:H | 系统的Handler,用于将任务加入到主线程的消息队列中 |
三、WMS的添加过程
从上文ViewRootImpl在调用setView方法时会执行addToDisplay方法,内部又会调用了WMS的addWindow方法并将自身也就是Session传入了进去,我们直接来看下WindowManagerService的addWindow方法:
 public int addWindow(Session session, IWindow client, int seq,
            LayoutParams attrs, int viewVisibility, int displayId, Rect outFrame,
            Rect outContentInsets, Rect outStableInsets, Rect outOutsets,
            DisplayCutout.ParcelableWrapper outDisplayCutout, InputChannel outInputChannel,
            InsetsState outInsetsState) {

       ......

         synchronized (mGlobalLock) {

         //WindowToken转换为专门针对应用程序窗口的AppWindowToken
            AppWindowToken atoken = null;
         //对子窗口使用现有的父窗口令牌,因为它们与父窗口具有相同的令牌,因此我们可以对它们应用相同的策略
         		WindowToken token = displayContent.getWindowToken(
                    hasParent ? parentWindow.mAttrs.token : attrs.token);

         //如果不存在token
         if (token == null) {

           //如果是Appliation类型的窗口, 不允许WindowToken为null
           if (rootType >= FIRST_APPLICATION_WINDOW && rootType <= LAST_APPLICATION_WINDOW) {

                    Slog.w(TAG_WM, "Attempted to add application window with unknown token "
                          + attrs.token + ". Aborting.");
                    return WindowManagerGlobal.ADD_BAD_APP_TOKEN;
                }
           .......
         }

         //创建WindowState
          final WindowState win = new WindowState(this, session, client, token, parentWindow,
                    appOp[0], seq, attrs, viewVisibility, session.mUid,
                    session.mCanAddInternalSystemWindow);

         //创建InputChanel,用来Input信息的接收和传递
         final boolean openInputChannels = (outInputChannel != null
                    && (attrs.inputFeatures & INPUT_FEATURE_NO_INPUT_CHANNEL) == 0);
            if  (openInputChannels) {

                win.openInputChannel(outInputChannel);
            }

         //将WindowState加入到windowMap中
         		win.attach();
            mWindowMap.put(client.asBinder(), win);

            win.initAppOpsState();
         //将WindowState对象添加到WindowToken中,WindowToken将作为WindowState的父容器
         win.mToken.addWindow(win);
        .....
          //创建窗口动画
           final WindowStateAnimator winAnimator = win.mWinAnimator;
            winAnimator.mEnterAnimationPending = true;
            winAnimator.mEnteringAnimation = true;

         //如果能获取到焦点,则更新焦点窗口
         		boolean focusChanged = false;
            if (win.canReceiveKeys()) {

                focusChanged = updateFocusedWindowLocked(UPDATE_FOCUS_WILL_ASSIGN_LAYERS,
                        false /*updateInputWindows*/);
                if (focusChanged) {

                    imMayMove = false;
                }
            }

         //更新输入 Window
         if (focusChanged) {

                displayContent.getInputMonitor().setInputFocusLw(displayContent.mCurrentFocus,
                        false /*updateInputWindows*/);
            }

            displayContent.getInputMonitor().updateInputWindowsLw(false /*force*/);

            ......

					//如果方向有更新,则更新全局配置
            if (win.isVisibleOrAdding() && displayContent.updateOrientationFromAppTokens()) {

                reportNewConfig = true;
            }
         ......
       }

 }
在addWindow中做了大量的检查,主要做了如下工作:
- 对所有窗口类型进行检查,不满足就不会去执行
- 对
windowToken迹进行处理,获取不到则会创建新的WindowToken - 创建
windowState对象,并将其与WindowToken相关联,让WindowToken成为WindowStae对象的父容器 - 更新焦点窗口以及更新
InputWindow
3.1 WindowToken创建
WindowToken在里面的作用是作为WindowState的父容器,负责管理一组Window。而它的构造方法如下:
WindowToken(WindowManagerService service, IBinder _token, int type, boolean persistOnEmpty,
            DisplayContent dc, boolean ownerCanManageAppTokens, boolean roundedCornerOverlay) {

        super(service);
  //赋值IBinder对象
        token = _token;
  //窗口类型
        windowType = type;
  //是否是显式添加的WindowToken
        mPersistOnEmpty = persistOnEmpty;
        mOwnerCanManageAppTokens = ownerCanManageAppTokens;
        mRoundedCornerOverlay = roundedCornerOverlay;
        onDisplayChanged(dc);
    }

void onDisplayChanged(DisplayContent dc) {

  //将该对象添加到DisplayContent中
        dc.reParentWindowToken(this);
        super.onDisplayChanged(dc);
    }
做了些属性初始化工作后,将WindowToken传递给了DisplayContent,最终把token保存到了DisplayContent#mToken中。
//DisplayContent.java
void reParentWindowToken(WindowToken token) {

        final DisplayContent prevDc = token.getDisplayContent();
        if (prevDc == this) {

            return;
        }
        ......

        addWindowToken(token.token, token);
    }

private void addWindowToken(IBinder binder, WindowToken token) {

  // 如果该WindowToken已经关联有DisplayContent对象,则不能再关联其他DisplayContent对象
        final DisplayContent dc = mWmService.mRoot.getWindowTokenDisplay(token);
        if (dc != null) {

            // We currently don't support adding a window token to the display if the display
            // already has the binder mapped to another token. If there is a use case for supporting
            // this moving forward we will either need to merge the WindowTokens some how or have
            // the binder map to a list of window tokens.
            throw new IllegalArgumentException("Can't map token=" + token + " to display="
                    + getName() + " already mapped to display=" + dc + " tokens=" + dc.mTokenMap);
        }
        if (binder == null) {

            throw new IllegalArgumentException("Can't map token=" + token + " to display="
                    + getName() + " binder is null");
        }
        if (token == null) {

            throw new IllegalArgumentException("Can't map null token to display="
                    + getName() + " binder=" + binder);
        }

  //将WindowToken添加到哦DisplayContent的TokenMap中
        mTokenMap.put(binder, token);

  //对于不是Activity类型的窗口,会根据Window类型添加到对应三个container中国
        if (token.asAppWindowToken() == null) {

            switch (token.windowType) {

                case TYPE_WALLPAPER:
                    mBelowAppWindowsContainers.addChild(token);
                    break;
                case TYPE_INPUT_METHOD:
                case TYPE_INPUT_METHOD_DIALOG:
                    mImeWindowsContainers.addChild(token);
                    break;
                default:
                    mAboveAppWindowsContainers.addChild(token);
                    break;
            }
        }
    }
到这里WindowToken对象就创建完毕了。
3.2 WindowState创建
WindowToken管理着windowState,每个WindowState代表了一个具体的Window,每次添加个Window就会创建出对应的一个windowState,其构造方法如下:
//WindowStae
WindowState(WindowManagerService service, Session s, IWindow c, WindowToken token,
            WindowState parentWindow, int appOp, int seq, WindowManager.LayoutParams a,
            int viewVisibility, int ownerId, boolean ownerCanAddInternalSystemWindow,
            PowerManagerWrapper powerManagerWrapper) {

        super(service);
        mSession = s;
        mClient = c;
        mAppOp = appOp;
        mToken = token;
        mAppToken = mToken.asAppWindowToken();
       ......

        mWinAnimator = new WindowStateAnimator(this);
        mWinAnimator.mAlpha = a.alpha;

        mRequestedWidth = 0;
        mRequestedHeight = 0;
        mLastRequestedWidth = 0;
        mLastRequestedHeight = 0;
        mLayer = 0;
        mInputWindowHandle = new InputWindowHandle(
                mAppToken != null ? mAppToken.mInputApplicationHandle : null, c,
                    getDisplayId());
    }
其中创建了WindowStateAnimator,其实用来为WindowState对象进行动画和Surface的转变相关操作,在绘制过程中,动画的状态和surface的状态都会由该对象进行记录。
从addWindow方法我们得知WMS有3个重要的类分别是WindowToken、WindowState和DisplayContent
四、小结
在WMS中,WindowState代表着一个窗口,WIndowToken作为WIndowState的父容器,管理着一组窗口。在通过wms的addWindow方法后,就创建出了相对于system_server的窗口管理对象。
参考
边栏推荐
猜你喜欢

安装MySQL ,出现由于找不到 MSVCR120.dll,无法继续执行代码解决方法”

远程监控项目离线日志说明书

Wuenda machine learning course - week 7
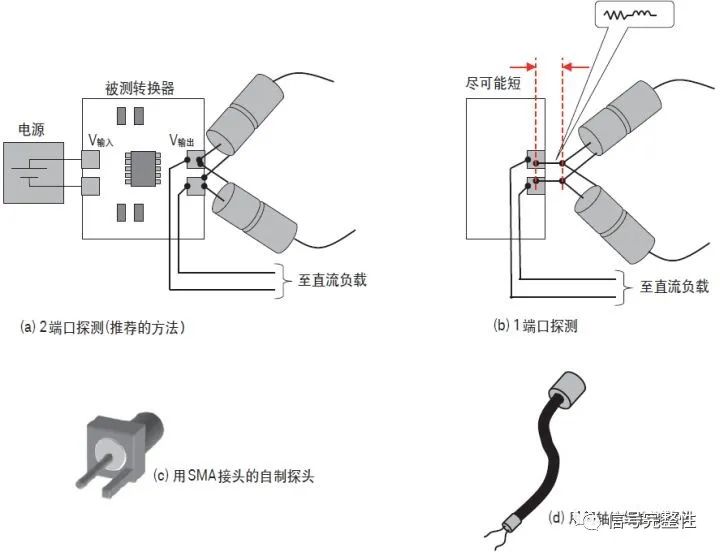
Detail measurement of DC-DC and PDN with network analyzer

EMC rectification cases of electronic equipment radiation
![[machine learning theory] true positive, true negative, false positive, false negative concept](/img/59/8264d6cbd96480b59e5b8ff96320be.png)
[machine learning theory] true positive, true negative, false positive, false negative concept
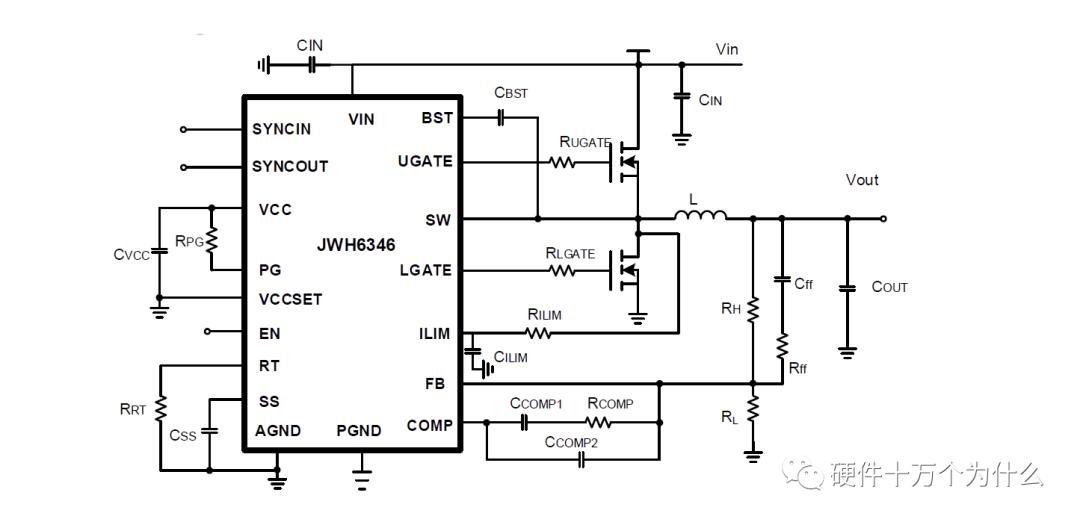
选择DC-DC开关电源控制器的实战过程

动态渲染数据和轮播图
Practical process of selecting DC-DC switching power supply controller

【Objective-C】‘NSAutoreleasePool‘ is unavailable: not available in automatic reference counting mode
随机推荐
C语言校园导游咨询系统
【Objective-C】‘NSAutoreleasePool‘ is unavailable: not available in automatic reference counting mode
Correct opening method of RPC | understand go native net/rpc package
Bcgcontrolbar Library Professional Edition, fully documented MFC extension class
数字藏品app系统源码
Mysql--事务
新西兰是道路安全做的最好的国家之一
FPGA infrastructure [reference ug998]
金仓数据库KingbaseES UDP监控工具的使用
With determination to forge ahead, JASMINER continues to deepen its brand strength
MySQL基础篇常用约束总结下篇
Waiting event enq: Ko - some feasible processing methods for fast object checkpoint
DataGrip 2022,DataGrip 功能
Mouse click coordinate transformation generation
RSA signature issues
Wechat applet ordering system with source code
What is the SOA or ASO of MOSFET?
[high concurrency] the interviewer of ant financial asked me about thread pool!!
Introduction to ZigBee module wireless transmission star topology networking structure
利用PHP开发的一款万能、表白墙系统部分代码片段