当前位置:网站首页>潘多拉 IOT 开发板学习(RT-Thread)—— 实验2 RGB LED 实验(学习笔记)
潘多拉 IOT 开发板学习(RT-Thread)—— 实验2 RGB LED 实验(学习笔记)
2022-07-02 12:40:00 【小辉_Super】
本文代码参考 RT-Thread 官方 BSP
实验功能
例程源码:(main.c)
该实验实现了 RGB 灯 8 种状态的切换,切换间隔为 500 ms。
/* * Copyright (c) 2006-2018, RT-Thread Development Team * * SPDX-License-Identifier: Apache-2.0 * * Change Logs: * Date Author Notes * 2018-08-22 balanceTWK first implementation */

#include <rtthread.h>
#include <rtdevice.h>
#include <board.h>

#define DBG_TAG "main"
#define DBG_LVL DBG_LOG
#include <rtdbg.h>

/* 定义 LED 亮灭电平 */
#define LED_ON (0)
#define LED_OFF (1)

/* 定义 8 组 LED 闪灯表,其顺序为 R G B */
static const rt_uint8_t _blink_tab[][3] =
{

    {
    LED_ON, LED_ON, LED_ON},
    {
    LED_OFF, LED_ON, LED_ON},
    {
    LED_ON, LED_OFF, LED_ON},
    {
    LED_ON, LED_ON, LED_OFF},
    {
    LED_OFF, LED_OFF, LED_ON},
    {
    LED_ON, LED_OFF, LED_OFF},
    {
    LED_OFF, LED_ON, LED_OFF},
    {
    LED_OFF, LED_OFF, LED_OFF},
};

int main(void)
{

    unsigned int count = 1;
    unsigned int group_num = sizeof(_blink_tab)/sizeof(_blink_tab[0]);
    unsigned int group_current;

    /* 设置 RGB 灯引脚为输出模式 */
    rt_pin_mode(PIN_LED_R, PIN_MODE_OUTPUT);
    rt_pin_mode(PIN_LED_G, PIN_MODE_OUTPUT);
    rt_pin_mode(PIN_LED_B, PIN_MODE_OUTPUT);

    while (count > 0)
    {

        /* 获得组编号 */
        group_current = count % group_num;

        /* 控制 RGB 灯 */
        rt_pin_write(PIN_LED_R, _blink_tab[group_current][0]);
        rt_pin_write(PIN_LED_G, _blink_tab[group_current][1]);
        rt_pin_write(PIN_LED_B, _blink_tab[group_current][2]);

        /* 输出 LOG 信息 */
        LOG_D("group: %d | red led [%-3.3s] | green led [%-3.3s] | blue led [%-3.3s]",
            group_current,
            _blink_tab[group_current][0] == LED_ON ? "ON" : "OFF",
            _blink_tab[group_current][1] == LED_ON ? "ON" : "OFF",
            _blink_tab[group_current][2] == LED_ON ? "ON" : "OFF");

        /* 延时一段时间 */
        rt_thread_mdelay(500);
        count++;
    }
    return 0;
}
代码剖析
rt_pin_mode()
该函数的作用是 GPIO Pin 的初始化,定义为
/* RT-Thread Hardware PIN APIs */
void rt_pin_mode(rt_base_t pin, rt_base_t mode)
{

    RT_ASSERT(_hw_pin.ops != RT_NULL);
    _hw_pin.ops->pin_mode(&_hw_pin.parent, pin, mode);
}
参数 pin 是一个 rt_base_t 变量(long),下面的 GET_PIN() 是 STM32 的 pin 值宏定义,第一个参数填大写字母,第二个参数填数字。
#define GET_PIN(PORTx,PIN) (rt_base_t)((16 * ( ((rt_base_t)__STM32_PORT(PORTx) - (rt_base_t)GPIOA)/(0x0400UL) )) + PIN)

#define __STM32_PORT(port) GPIO##port // ## 是字符连接符,假如 port 为 A,则表示 GPIOA
例如实验中的
#define PIN_LED_R GET_PIN(E, 7),表示 GPIOE GPIO_Pin7
目前 RT-Thread 支持的引脚工作模式包括:
#define PIN_MODE_OUTPUT 0x00 /* 输出 */
#define PIN_MODE_INPUT 0x01 /* 输入 */
#define PIN_MODE_INPUT_PULLUP 0x02 /* 上拉输入 */
#define PIN_MODE_INPUT_PULLDOWN 0x03 /* 下拉输入 */
#define PIN_MODE_OUTPUT_OD 0x04 /* 开漏输出 */
在 bsp 的 drv_gpio.c 文件中,有底层 GPIO 驱动,下面是 STM32 的 GPIO 模式设置的驱动函数(大家应该很熟悉,就是用 HAL 库写的 GPIO 初始化代码)
static void stm32_pin_mode(rt_device_t dev, rt_base_t pin, rt_base_t mode)
{

    const struct pin_index *index;
    GPIO_InitTypeDef GPIO_InitStruct;

    index = get_pin(pin);
    if (index == RT_NULL)
    {

        return;
    }

    /* Configure GPIO_InitStructure */
    GPIO_InitStruct.Pin = index->pin;
    GPIO_InitStruct.Mode = GPIO_MODE_OUTPUT_PP;
    GPIO_InitStruct.Pull = GPIO_NOPULL;
    GPIO_InitStruct.Speed = GPIO_SPEED_FREQ_HIGH;

    if (mode == PIN_MODE_OUTPUT)
    {

        /* output setting */
        GPIO_InitStruct.Mode = GPIO_MODE_OUTPUT_PP;
        GPIO_InitStruct.Pull = GPIO_NOPULL;
    }
    else if (mode == PIN_MODE_INPUT)
    {

        /* input setting: not pull. */
        GPIO_InitStruct.Mode = GPIO_MODE_INPUT;
        GPIO_InitStruct.Pull = GPIO_NOPULL;
    }
    else if (mode == PIN_MODE_INPUT_PULLUP)
    {

        /* input setting: pull up. */
        GPIO_InitStruct.Mode = GPIO_MODE_INPUT;
        GPIO_InitStruct.Pull = GPIO_PULLUP;
    }
    else if (mode == PIN_MODE_INPUT_PULLDOWN)
    {

        /* input setting: pull down. */
        GPIO_InitStruct.Mode = GPIO_MODE_INPUT;
        GPIO_InitStruct.Pull = GPIO_PULLDOWN;
    }
    else if (mode == PIN_MODE_OUTPUT_OD)
    {

        /* output setting: od. */
        GPIO_InitStruct.Mode = GPIO_MODE_OUTPUT_OD;
        GPIO_InitStruct.Pull = GPIO_NOPULL;
    }

    HAL_GPIO_Init(index->gpio, &GPIO_InitStruct);
}
rt_pin_write()
GPIO 写函数,下面是函数的定义,
void rt_pin_write(rt_base_t pin, rt_base_t value)
{

    RT_ASSERT(_hw_pin.ops != RT_NULL);
    _hw_pin.ops->pin_write(&_hw_pin.parent, pin, value);
}
和 GPIO 模式配置函数类似,它其实也会调用底层驱动里对应的函数,该底层函数是通过 HAL_GPIO_WritePin() 来完成 GPIO Pin 的修改。
static void stm32_pin_write(rt_device_t dev, rt_base_t pin, rt_base_t value)
{

    const struct pin_index *index;

    index = get_pin(pin);
    if (index == RT_NULL)
    {

        return;
    }

    HAL_GPIO_WritePin(index->gpio, index->pin, (GPIO_PinState)value);
}
LOG_D()
本实验中,我们可以将 LOG_D() 视为 rt_kprintf(),
#define dbg_log_line(lvl, color_n, fmt, ...) \ do \ {
       \ _DBG_LOG_HDR(lvl, color_n); \ rt_kprintf(fmt, ##__VA_ARGS__); \ _DBG_LOG_X_END; \ } \ while (0)
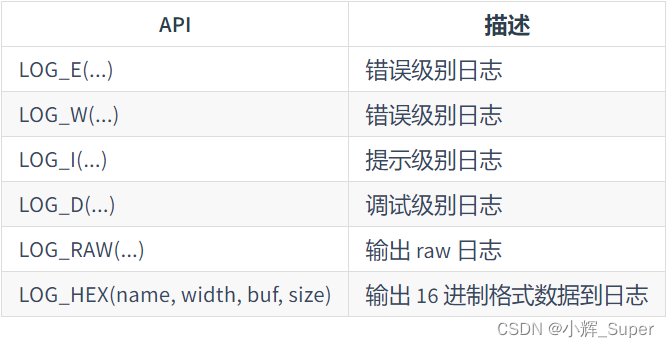
LOG_D 是 RT-Thread 内核里的一个日志打印函数,详情可见:《RT-Thread 文档中心——ulog 日志》
RT-Thread 的日志 API 包括:
rt_thread_mdelay()
这是 RT-Thread 的毫秒级延时函数,定义如下:
rt_err_t rt_thread_mdelay(rt_int32_t ms)
{

    rt_tick_t tick;

	// 获取需要的时钟节拍
    tick = rt_tick_from_millisecond(ms);

	// 阻塞相应的节拍时间
    return rt_thread_sleep(tick);
}
rt_tick_from_millisecond()
/** * 算出 ms 对应的时钟节拍数 * * * @param ms the specified millisecond * - Negative Number wait forever * - Zero not wait * - Max 0x7fffffff * * @return the calculated tick */
rt_tick_t rt_tick_from_millisecond(rt_int32_t ms)
{

    rt_tick_t tick;

    if (ms < 0)
    {

        tick = (rt_tick_t)RT_WAITING_FOREVER;  // -1
    }
    else
    {

    	// 将“每秒节拍数” / 1000 * ms,算出对应的秒节拍数
        tick = RT_TICK_PER_SECOND * (ms / 1000);

		// 加上小于 1000ms 部分的节拍数
        tick += (RT_TICK_PER_SECOND * (ms % 1000) + 999) / 1000;
    }

    /* return the calculated tick */
    return tick;
}
rt_thread_sleep()
线程睡眠(挂起)函数,参数是系统节拍数:
/** * 该函数能让当前线程挂起一段时间(由 tick 决定) * * @param tick the sleep ticks * * @return RT_EOK */
rt_err_t rt_thread_sleep(rt_tick_t tick)
{

    register rt_base_t temp;
    struct rt_thread *thread;

    /* set to current thread */
    thread = rt_thread_self();
    RT_ASSERT(thread != RT_NULL);
    RT_ASSERT(rt_object_get_type((rt_object_t)thread) == RT_Object_Class_Thread);

    /* disable interrupt */
    temp = rt_hw_interrupt_disable();

    /* suspend thread */
    rt_thread_suspend(thread);

    /* reset the timeout of thread timer and start it */
    rt_timer_control(&(thread->thread_timer), RT_TIMER_CTRL_SET_TIME, &tick);
    rt_timer_start(&(thread->thread_timer));

    /* enable interrupt */
    rt_hw_interrupt_enable(temp);

    rt_schedule();

    /* clear error number of this thread to RT_EOK */
    if (thread->error == -RT_ETIMEOUT)
        thread->error = RT_EOK;

    return RT_EOK;
}
边栏推荐
- 解决** WARNING ** : Your ApplicationContext is unlikely to start due to a @ComponentScan of the defau
- Boot connection to impala database
- 去除router-link中的下划线
- Group by的用法
- Digital collection system development (program development) - Digital Collection 3D modeling economic model system development source code
- Armv8-a programming guide MMU (4)
- Write your own CPU Chapter 11 - learning notes
- The outline dimension function application of small motherboard
- [2. Basics of Delphi grammar] 3 Object Pascal constants and variables
- Processing gzip: stdin: not in gzip format: child returned status 1tar: error is not recoverable: exitin
猜你喜欢
![[5g NR] RRC connection release](/img/f3/a03f5124493b1c03e7336c55871330.png)
[5g NR] RRC connection release
Recommended practice sharing of Zhilian recruitment based on Nebula graph

处理gzip: stdin: not in gzip formattar: Child returned status 1tar: Error is not recoverable: exitin

基于 Nebula Graph 构建百亿关系知识图谱实践

可视化技术在 Nebula Graph 中的应用

Teach you how to build virtual machines locally and deploy microservices

Maui学习之路(三)--Winui3深入探讨
Pattern matching extraction of specific subgraphs in graphx graph Computing Practice
Application of visualization technology in Nebula graph
Add user-defined formula (time sharing t+0) to mobile app access as an example
随机推荐
fastjson List转JSONArray以及JSONArray转List「建议收藏」
SQL修改语句
Data Lake (11): Iceberg table data organization and query
纪念成为首个 DAYU200 三方 demo 贡献者
Armv8-a programming guide MMU (4)
Idea jar package conflict troubleshooting
【5G NR】RRC连接释放
Solve the problem of base64encoder error
Xpt2046 four wire resistive touch screen
AWS云主机扩容
如何实现十亿级离线 CSV 导入 Nebula Graph
win10系统升级一段时间后,内存占用过高
Traversal before, during and after binary tree
使用FFmpeg命令行进行UDP、RTP推流(H264、TS),ffplay接收
Introduction to database system Chapter 1 short answer questions - how was the final exam?
Boot connection to impala database
Compress words (kmp/ string hash, double hash)
Add user-defined formula (time sharing t+0) to mobile app access as an example
HMS core machine learning service helps zaful users to shop conveniently
QVariant与Json的各种纠葛——Qt