当前位置:网站首页>Pytorch模型训练实用教程学习笔记:二、模型的构建
Pytorch模型训练实用教程学习笔记:二、模型的构建
2022-08-01 19:16:00 【zstar-_】
前言
最近在重温Pytorch基础,然而Pytorch官方文档的各种API是根据字母排列的,并不适合学习阅读。
于是在gayhub上找到了这样一份教程《Pytorch模型训练实用教程》,写得不错,特此根据它来再学习一下Pytorch。
仓库地址:https://github.com/TingsongYu/PyTorch_Tutorial
复杂模型构建解析
模型搭建比较容易,但是复杂模型通常是使用多个重复结构,下面以ResNet34为例:
from torch import nn
from torch.nn import functional as F


class ResidualBlock(nn.Module):
    ''' 实现子module: Residual Block '''

    def __init__(self, inchannel, outchannel, stride=1, shortcut=None):
        super(ResidualBlock, self).__init__()
        self.left = nn.Sequential(
            nn.Conv2d(inchannel, outchannel, 3, stride, 1, bias=False),
            nn.BatchNorm2d(outchannel),
            nn.ReLU(inplace=True),
            nn.Conv2d(outchannel, outchannel, 3, 1, 1, bias=False),
            nn.BatchNorm2d(outchannel))
        self.right = shortcut

    def forward(self, x):
        out = self.left(x)
        residual = x if self.right is None else self.right(x)
        out += residual
        return F.relu(out)


class ResNet34(BasicModule):
    ''' 实现主module:ResNet34 ResNet34包含多个layer,每个layer又包含多个Residual block 用子module来实现Residual block,用_make_layer函数来实现layer '''

    def __init__(self, num_classes=2):
        super(ResNet34, self).__init__()
        self.model_name = 'resnet34'

        # 前几层: 图像转换
        self.pre = nn.Sequential(
            nn.Conv2d(3, 64, 7, 2, 3, bias=False),
            nn.BatchNorm2d(64),
            nn.ReLU(inplace=True),
            nn.MaxPool2d(3, 2, 1))

        # 重复的layer,分别有3,4,6,3个residual block
        self.layer1 = self._make_layer(64, 128, 3)
        self.layer2 = self._make_layer(128, 256, 4, stride=2)
        self.layer3 = self._make_layer(256, 512, 6, stride=2)
        self.layer4 = self._make_layer(512, 512, 3, stride=2)

        # 分类用的全连接
        self.fc = nn.Linear(512, num_classes)

    def _make_layer(self, inchannel, outchannel, block_num, stride=1):
        ''' 构建layer,包含多个residual block '''
        shortcut = nn.Sequential(
            nn.Conv2d(inchannel, outchannel, 1, stride, bias=False),
            nn.BatchNorm2d(outchannel))

        layers = []
        layers.append(ResidualBlock(inchannel, outchannel, stride, shortcut))

        for i in range(1, block_num):
            layers.append(ResidualBlock(outchannel, outchannel))
        return nn.Sequential(*layers)

    def forward(self, x):
        x = self.pre(x)

        x = self.layer1(x)
        x = self.layer2(x)
        x = self.layer3(x)
        x = self.layer4(x)

        x = F.avg_pool2d(x, 7)
        x = x.view(x.size(0), -1)
        return self.fc(x)
残差网络有很多重复的网络结构层,在这些重复的层中,又会有多个相同结构的残差块ResidualBlock。
上面这段代码用_make_layer来调用重复层,同时用ResidualBlock来封装重复结构的残差块。
权值初始化
在以往复现网络时,权重初始化其实一直没注意过,下面这段代码展现如何进行权值初始化。
class Net(nn.Module):
    def __init__(self):
        super(Net, self).__init__()
        self.conv1 = nn.Conv2d(3, 6, 5)
        self.pool1 = nn.MaxPool2d(2, 2)
        self.conv2 = nn.Conv2d(6, 16, 5)
        self.pool2 = nn.MaxPool2d(2, 2)
        self.fc1 = nn.Linear(16 * 5 * 5, 120)
        self.fc2 = nn.Linear(120, 84)
        self.fc3 = nn.Linear(84, 10)

    def forward(self, x):
        x = self.pool1(F.relu(self.conv1(x)))
        x = self.pool2(F.relu(self.conv2(x)))
        x = x.view(-1, 16 * 5 * 5)
        x = F.relu(self.fc1(x))
        x = F.relu(self.fc2(x))
        x = self.fc3(x)
        return x

    # 定义权值初始化
    def initialize_weights(self):
        for m in self.modules():
            if isinstance(m, nn.Conv2d):
                torch.nn.init.xavier_normal_(m.weight.data)
                if m.bias is not None:
                    m.bias.data.zero_()
            elif isinstance(m, nn.BatchNorm2d):
                m.weight.data.fill_(1)
                m.bias.data.zero_()
            elif isinstance(m, nn.Linear):
                torch.nn.init.normal_(m.weight.data, 0, 0.01)
                m.bias.data.zero_()


net = Net()     # 创建一个网络
net.initialize_weights()    # 初始化权值
这段代码对网路的卷积层,BN层和全连接层分别初始化了不同的权值和偏置。
默认不初始化权值的情况下,默认采用的随机权值满足均匀分布、
Pytorch中,各种初始化方法如下:
Xavier 均匀分布
torch.nn.init.xavier_uniform_(tensor, gain=1)
Xavier 正态分布
torch.nn.init.xavier_normal_(tensor, gain=1)
kaiming 均匀分布
torch.nn.init.kaiming_uniform_(tensor, a=0, mode=‘fan_in’, nonlinearity=‘leaky_relu’)
kaiming 正态分布
torch.nn.init.kaiming_normal_(tensor, a=0, mode=‘fan_in’, nonlinearity=‘leaky_relu’)
均匀分布初始化
torch.nn.init.uniform_(tensor, a=0, b=1)
使值服从均匀分布 U(a,b)
正态分布初始化
torch.nn.init.normal_(tensor, mean=0, std=1)
使值服从正态分布 N(mean, std),默认值为 0,1
常数初始化
torch.nn.init.constant_(tensor, val)
使值为常数 val nn.init.constant_(w, 0.3)
单位矩阵初始化
torch.nn.init.eye_(tensor)
将二维 tensor 初始化为单位矩阵(the identity matrix)
正交初始化
torch.nn.init.orthogonal_(tensor, gain=1)
稀疏初始化
torch.nn.init.sparse_(tensor, sparsity, std=0.01)
模型参数保存和加载
在我之前的博文深度学习基础:7.模型的保存与加载/学习率调度中提到过模型的保存和加载,摘过来放到这里。
模型保存:
torch.save(net.state_dict(), 'net_params.pt')
模型加载:
model.load_state_dict('net_params.pt')
在这个教程中,使用的是.pkl这个后缀
torch.save(net.state_dict(), 'net_params.pkl')
相关API均相同,唯一的区别在于文件后缀。
查阅相关资料,pt,pth,pkl均可作为模型参数后缀,不必细究。
边栏推荐
- LeetCode 0151. Reverse a string of words
- Hardware Bear Original Collection (Updated 2022/07)
- 基于flowable的upp(统一流程平台)运行性能优化
- Flowable-based upp (unified process platform) running performance optimization
- 文库网站建设源码分享
- The solution to the vtk volume rendering code error (the code can run in vtk7, 8, 9), and the VTK dataset website
- 【周赛复盘】LeetCode第304场单周赛
- How to install voice pack in Win11?Win11 Voice Pack Installation Tutorial
- Library website construction source code sharing
- Website construction process
猜你喜欢

硬件大熊原创合集(2022/07更新)
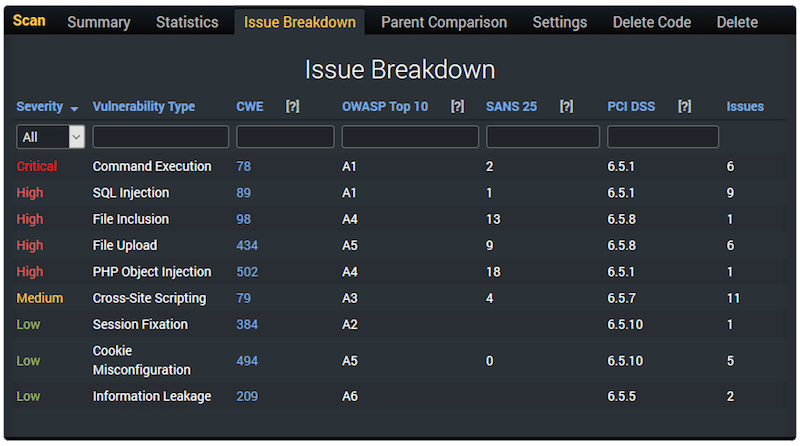
10 个 PHP 代码安全漏洞扫描程序
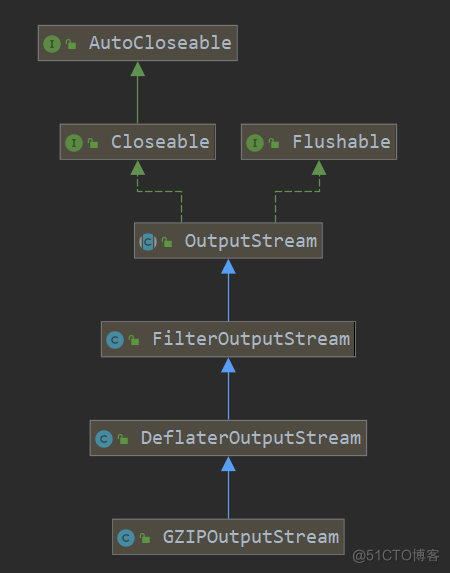
GZIPOutputStream 类源码分析

The XML configuration

Keras deep learning practice - traffic sign recognition

#yyds dry goods inventory# Interview must brush TOP101: the last k nodes in the linked list
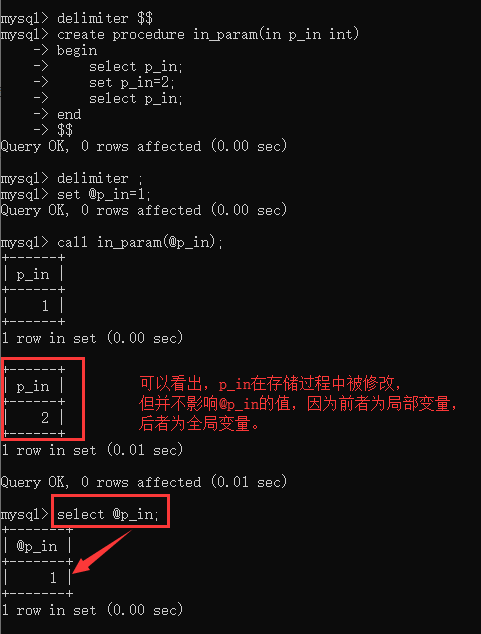
MySQL开发技巧——存储过程
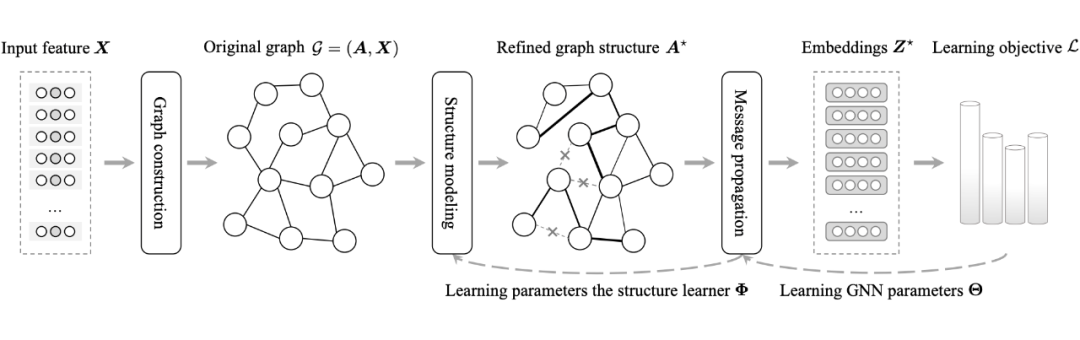
【综述专栏】IJCAI 2022 | 图结构学习最新综述:研究进展与未来展望

文库网站建设源码分享

The life cycle and scope
随机推荐
MySQL数据库————流程控制
kubernetes-部署nfs存储类
From ordinary advanced to excellent test/development programmer, all the way through
金鱼哥RHCA回忆录:CL210管理OPENSTACK网络--网络配置选项
Try compiling QT test on Allwinner V853 development board
Keras deep learning practice - traffic sign recognition
首篇 NLP 领域图神经网络综述:127 页,从图构建到实际应用面面观
[pyqt5] Custom controls to achieve scaling sub-controls that maintain the aspect ratio
数值矩阵的图形表示
工作5年,测试用例都设计不好?来看看大神的用例设计总结
LeetCode 0152. Product Maximum Subarray: dp + Roll in Place
modbus bus module DAM-8082
odoo 编码规范(编程规范、编码指南)
安装win32gui失败,解决问题
Every calculation, & say what mean
MySQL开发技巧——并发控制
What should I do if the Win11 campus network cannot be connected?Win11 can't connect to campus network solution
To drive efficient upstream and downstream collaboration, how can cross-border B2B e-commerce platforms release the core value of the LED industry supply chain?
cf:D. Magical Array【数学直觉 + 前缀和的和】
In the background of the GBase 8c database, what command is used to perform the master-slave switchover operation for the gtm and dn nodes?