当前位置:网站首页>7-1 LVS+NAT 负载均衡群集,NAT模式部署
7-1 LVS+NAT 负载均衡群集,NAT模式部署
2022-08-04 03:56:00 【是个笨小孩】
文章目录
一,案例部署环境,所需机器配置信息
- LVS调度器作为Web服务器池的网关,LVS两块网卡,分别连接内外网,使用轮询(rr)调度算法 (图片只是例子根据自己ip地址配置)
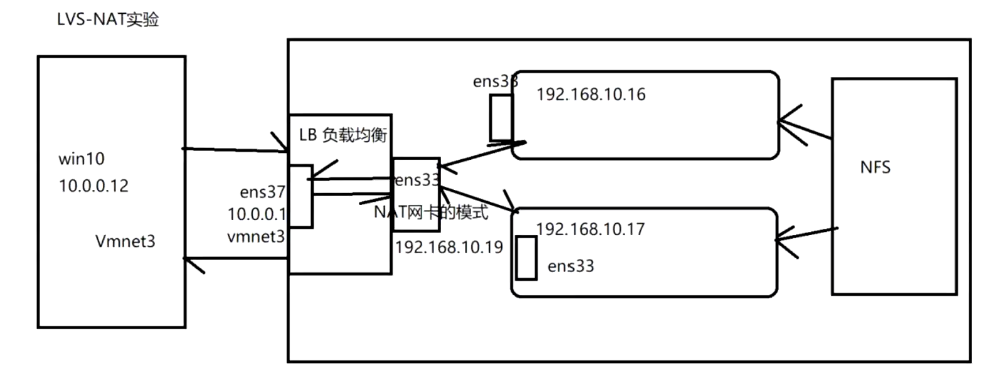
LVS负载均衡调节器: ens33:192.168.113.125 (Vment 8 NAT模式)
ens36:12.0.0.1(Vmnet 2 仅主机模式)
Web1 节点服务器:192.168.113.128 网关:192.168.113.125
Web2 节点服务器:192.168.113.129 网关:192.168.113.125
NFS服务器:192.168.113.113.126
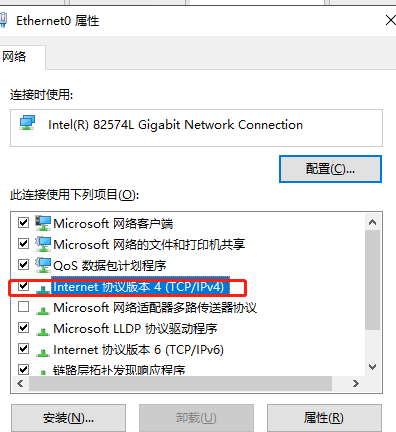
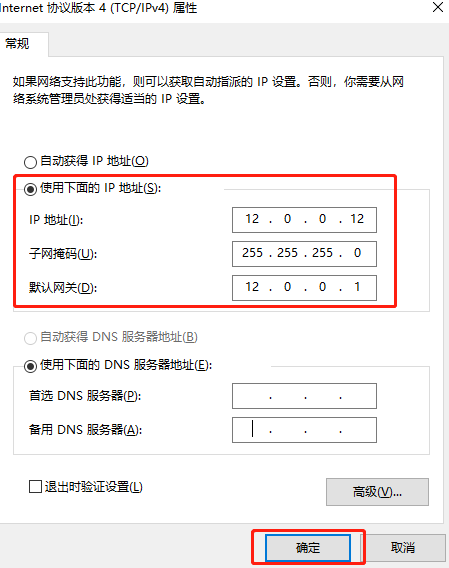
客户端 win10:12.0.0.12 网关:12.0.0.1 (Vmnet 2 仅主机模式)
注:干净环境下配置
一.部署LVS负载均衡调节器(192.168.113.125)
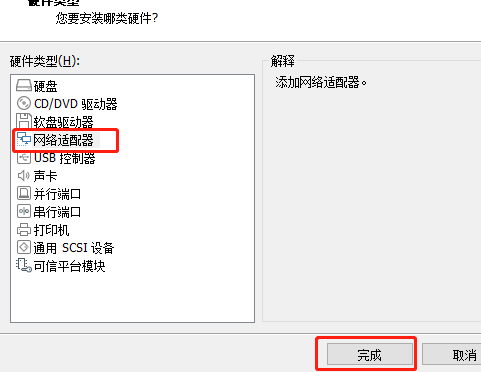
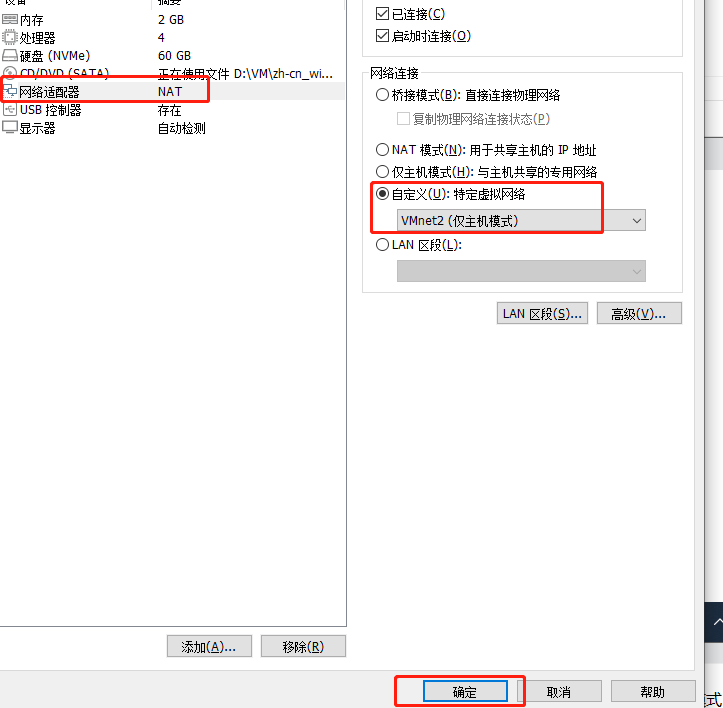
1.添加双网卡
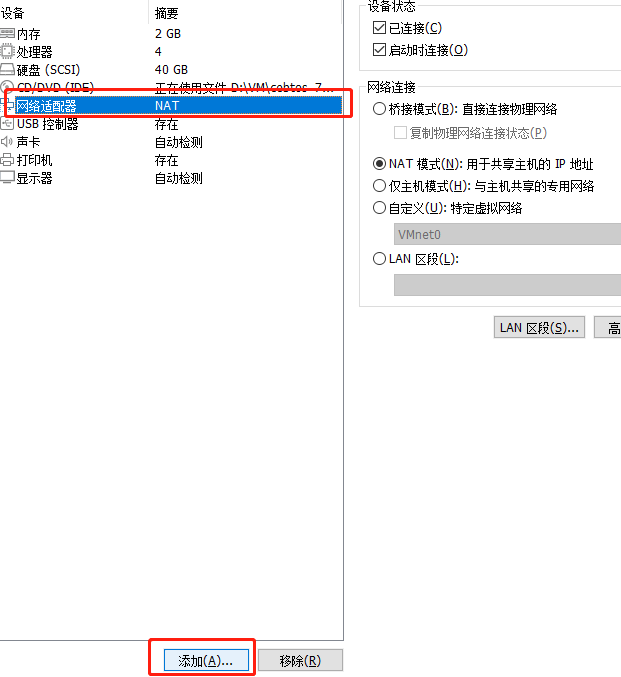

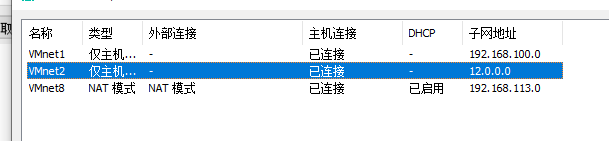
- 确认自己的VM2的IP地址
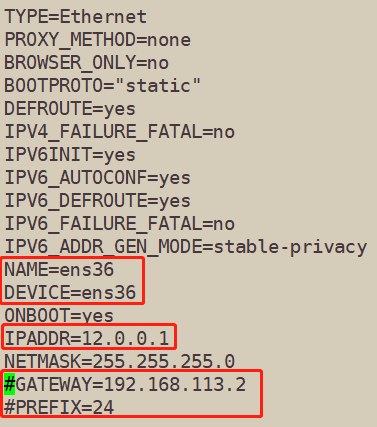
2.编辑ens36内容
[[email protected] ~]# cd /etc/sysconfig/network-scripts/
[[email protected] network-scripts]# cp ifcfg-ens33 ifcfg-ens36
[[email protected] network-scripts]# vim ifcfg-ens36
- 去掉UUID,更改网卡名字,配置网关跟VM2一致,不需要的可以注释或删除,更改后图如下
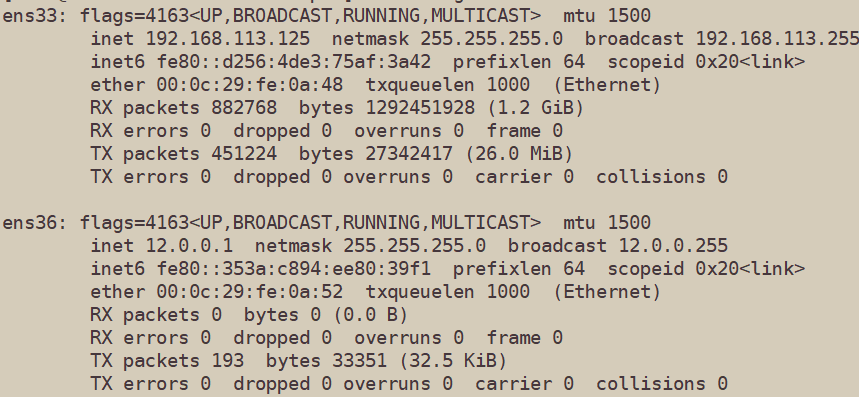
3.重启网卡,查看是否更改
[[email protected] network-scripts]# systemctl restart network
[[email protected] network-scripts]# ifconfig
二,部署共享存储(NFS 服务器 192.168.113.126)
1.关闭防火墙和开机自启,关闭核心防护
[[email protected] ~]# systemctl stop firewalld
[[email protected] ~]# systemctl disable firewalld
[[email protected] ~]# setenforce 0
2.安装共享环境,另外俩也要安装,为了共享(切记关闭防火墙,核心防护)
##192.168.113.113.126安装
[[email protected] ~]# yum install -y nfs-utils rpcbind

##Web1 节点服务器:192.168.113.128
[[email protected] ~]# systemctl stop firewalld
[[email protected] ~]# systemctl disable firewalld
[[email protected] ~]# setenforce 0
[[email protected] ~]# yum install -y nfs-utils rpcbind


##Web2 节点服务器:192.168.113.129
[[email protected] ~]# systemctl stop firewalld
[[email protected] ~]# systemctl disable firewalld
[[email protected] ~]# setenforce 0
[[email protected] ~]# yum install -y nfs-utils rpcbind
3.开启并开机自启动共享服务
##注先启动rpcbind,在启动nfs,不让容易出错
##192.168.113.113.126
[[email protected] ~]# systemctl start rpcbind
[[email protected] ~]# systemctl enable rpcbind
[[email protected] ~]# systemctl start nfs
[[email protected] ~]# systemctl enable nfs


##Web1 节点服务器:192.168.113.128
[[email protected] ~]# systemctl start rpcbind
[[email protected] ~]# systemctl enable rpcbind
[[email protected] ~]# systemctl start nfs
[[email protected] ~]# systemctl enable nfs


##Web2 节点服务器:192.168.113.129
[[email protected] ~]# systemctl start rpcbind
[[email protected] ~]# systemctl enable rpcbind
[[email protected] ~]# systemctl start nfs
[[email protected] ~]# systemctl enable nfs
4.创建共享目录,并赋权
##NFS 服务器 192.168.113.126
[[email protected] ~]# mkdir /opt/dxj /opt/xtj
[[email protected] ~]# chmod 777 /opt/dxj /opt/xtj
[[email protected] ~]# ll /opt
总用量 0
drwxrwxrwx. 2 root root 6 7月  31 18:35 dxj
drwxr-xr-x. 2 root root 6 9月   7 2017 rh
drwxrwxrwx. 2 root root 6 7月  31 18:35 xtj

##添加给予共享的目录和网段地址,和权限
[[email protected] ~]# vim /etc/exports
/opt/dxj 192.168.113.0/24(rw,sync)
/opt/xtj 192.168.113.0/24(rw,sync)

##发布共享
[[email protected] ~]# exportfs -rv
exporting 192.168.113.0/24:/opt/xtj
exporting 192.168.113.0/24:/opt/dxj
##查看共享列表是否发布
[[email protected] ~]# showmount -e
Export list for localhost.localdomain:
/opt/xtj 192.168.113.0/24
/opt/dxj 192.168.113.0/24
5.挂载共享目录
##测试是否能共享
##Web1 节点服务器:192.168.113.128
[[email protected] ~]# showmount -e 192.168.113.126
Export list for 192.168.113.126:
/opt/xtj 192.168.113.0/24
/opt/dxj 192.168.113.0/24
##Web2 节点服务器:192.168.113.129
[[email protected] ~]# showmount -e 192.168.113.126
Export list for 192.168.113.126:
/opt/xtj 192.168.113.0/24
/opt/dxj 192.168.113.0/24
##Web1 节点服务器:192.168.113.128
##安装httpd
[[email protected] ~]# yum install -y httpd
##Web2 节点服务器:192.168.113.129
##安装httpd
[[email protected] ~]# yum install -y httpd
##挂载共享目录
##Web1 节点服务器:192.168.113.128
[[email protected] ~]# mount.nfs 192.168.113.126:/opt/xtj /var/www/html
##查看挂载
[[email protected] ~]# df -h
192.168.113.126:/opt/xtj 47G 4.1G 43G 9% /var/www/html
##设置个页面在共享目录下,测试是否共享
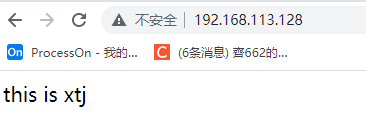
[[email protected] ~]# echo 'this is xtj' > /var/www/html/index.html
[[email protected] ~]# ls /var/www/html/
index.html
##挂载共享目录
##Web2 节点服务器:192.168.113.129
[[email protected] ~]# mount.nfs 192.168.113.126:/opt/dxj /var/www/html
##查看挂载
[[email protected] ~]# df -h
192.168.113.126:/opt/dxj 47G 4.1G 43G 9% /var/www/html
##设置个页面在共享目录下
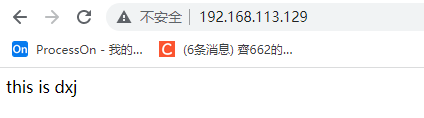
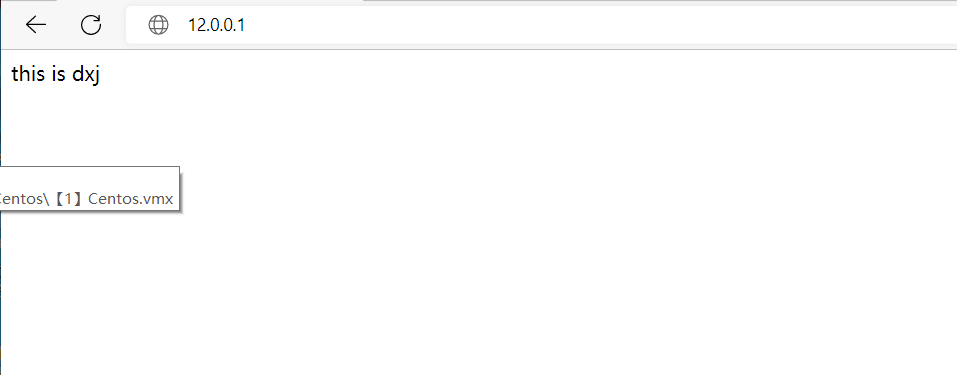
[[email protected] ~]# echo 'this is dxj' > /var/www/html/index.html
[[email protected] ~]# ls /var/www/html/
index.html
##NFS 服务器 192.168.113.126查看
[[email protected] ~]# ls /opt/xtj
index.html
[[email protected] ~]# ls /opt/dxj
index.html
6.重启服务浏览器访问测试
##Web1 节点服务器:192.168.113.128
[[email protected] ~]# systemctl start httpd

##Web2 节点服务器:192.168.113.129
[[email protected] ~]# systemctl start httpd
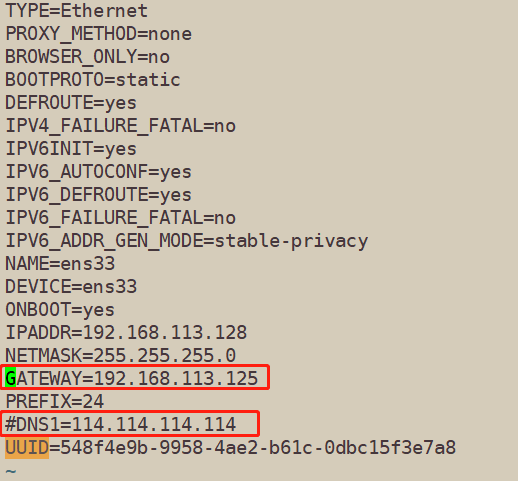
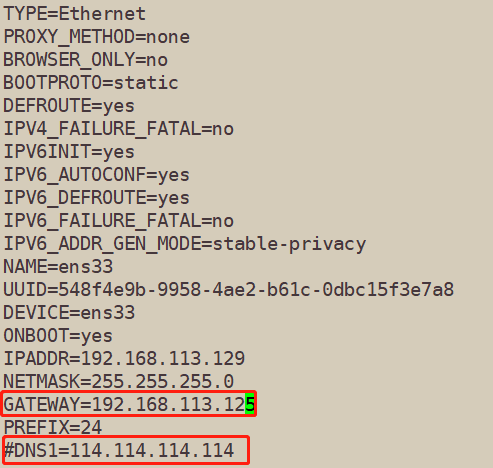
7.配置更改web1 web2 的网关
##Web1 节点服务器:192.168.113.128
[[email protected] ~]# vim /etc/sysconfig/network-scripts/ifcfg-ens33
[[email protected] ~]# systemctl restart network

##Web2 节点服务器:192.168.113.129
[[email protected] ~]# vim /etc/sysconfig/network-scripts/ifcfg-ens33
[[email protected] ~]# systemctl restart network
注:网关指向的是调度器IP
- Web1 节点服务器:192.168.113.128配置图片如下
- Web2 节点服务器:192.168.113.129配置图片如下
三,配置SNAT转发规则
1.进入配置文件添加规则
- 192.168.113.125 机器配置
##行尾添加
[[email protected] network-scripts]# vim /etc/sysctl.conf
net.ipv4.ip_forward=1
##查看
[[email protected] network-scripts]# sysctl -p
net.ipv4.ip_forward = 1

2.安装iptables,并添加规则
[[email protected] network-scripts]# yum install -y iptables*
[[email protected] network-scripts]# systemctl start iptables.service

[[email protected] network-scripts]# iptables -F ##清空所有规则
[[email protected] network-scripts]# iptables -t nat -vnL ##查看

##添加规则
[[email protected] network-scripts]# iptables -t nat -A POSTROUTING -s 192.168.113.0/24 -o ens36 -j SNAT --to-source 12.0.0.1
[[email protected] network-scripts]# iptables -t nat -vnL
Chain POSTROUTING (policy ACCEPT 0 packets, 0 bytes)
 pkts bytes target     prot opt in     out     source               destination
    0     0 SNAT       all  --  *      ens36   192.168.113.0/24     0.0.0.0/0            to:12.0.0.1
- 添加内容解析
nat表:修改数据包中的源、日标IP地址或湍口
POSTROUTING:在进行路由判断之"后"所要进行的规则(SNAT/MASQUERADE)
PREROUTING:在进行路由判断之"前"所要进行的规则(DNAT/REDIRECT)
-A: 在规则链的末尾加入新规则
-s: 匹配来源地址IP/MASK.
-o:K网卡名称匹配从这块网卡流出的数据
-i:网卡名称匹配从这块网卡流入的数据
-j:控制类型
3.加载LVS内核模块
##手动加载ip_vs模块
[[email protected] network-scripts]# modprobe ip_vs

##查看ip_vs版本信息
[[email protected] network-scripts]# cat /proc/net/ip_vs
IP Virtual Server version 1.2.1 (size=4096)
Prot LocalAddress:Port Scheduler Flags
  -> RemoteAddress:Port Forward Weight ActiveConn InActConn

4.安装ipvsadm管理工具
[[email protected] network-scripts]# yum install -y ipvsadm

##注:启动服务前必须保存负载分配策略,否则将会报错
ipvsadm-save > /etc/sysconfig/ipvsadm
或者
ipvsadm --save > /etc/sysconfig/ipvsadm
或者
touch /etc/sysconfig/ipvsadm
[[email protected] network-scripts]# ipvsadm-save > /etc/sysconfig/ipvsadm

##启动服务
[[email protected] network-scripts]# systemctl start ipvsadm.service
5.配置负载分配策略
- NAT模式只要在负载均衡服务器(调度器)上配置,节点服务器不需要特殊配置
##清空原有策略
[[email protected] network-scripts]# ipvsadm -C

##添加新策略
[[email protected] network-scripts]# ipvsadm -A -t 12.0.0.1:80 -s rr
[[email protected] network-scripts]# ipvsadm -a -t 12.0.0.1:80 -r 192.168.113.128:80 -m -w 1
[[email protected] network-scripts]# ipvsadm -a -t 12.0.0.1:80 -r 192.168.113.129:80 -m -w 1

##启动服务
[[email protected] network-scripts]# ipvsadm
IP Virtual Server version 1.2.1 (size=4096)
Prot LocalAddress:Port Scheduler Flags
  -> RemoteAddress:Port           Forward Weight ActiveConn InActConn
TCP  localhost.localdomain:http rr
  -> 192.168.113.128:http         Masq    1      0          0
  -> 192.168.113.129:http         Masq    1      0          0

##保存负载分配策略,防止重启机器策略丢失
[[email protected] network-scripts]# ipvsadm-save > /etc/sysconfig/ipvsadm
- 添加选项说明
-A 添加虚拟服务器
-S 指定负载调度算法(轮询:rr、加权轮询:wrr、最少连接:1c、加权最少连接:w1c)
-a 表示添加真实服务器(后端节点服务器)
-t 指定VIP地址及TCP端口
-m 表示使用NAT群集模式
-W 设置权重(权重为0时表示暂停节点)
四,浏览器访问测试
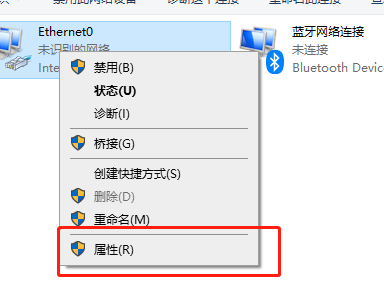
注:虚拟的win10,VM2地址不要和本机的VM2地址冲突,否则会访问不到
1.更改win10网卡

- 看到由真实服务器提供的网页内容,如果各节点的网页不同,则不同客户机看到的网页可能也不同(可多次刷新查看效果)


边栏推荐
猜你喜欢

Deep learning -- CNN clothing image classification, for example, discussed how to evaluate neural network model
MySQL query optimization and tuning

帮助企业实现数字化转型成功的八项指导原则
复现20字符短域名绕过

Hey, I had another fight with HR in the small group!
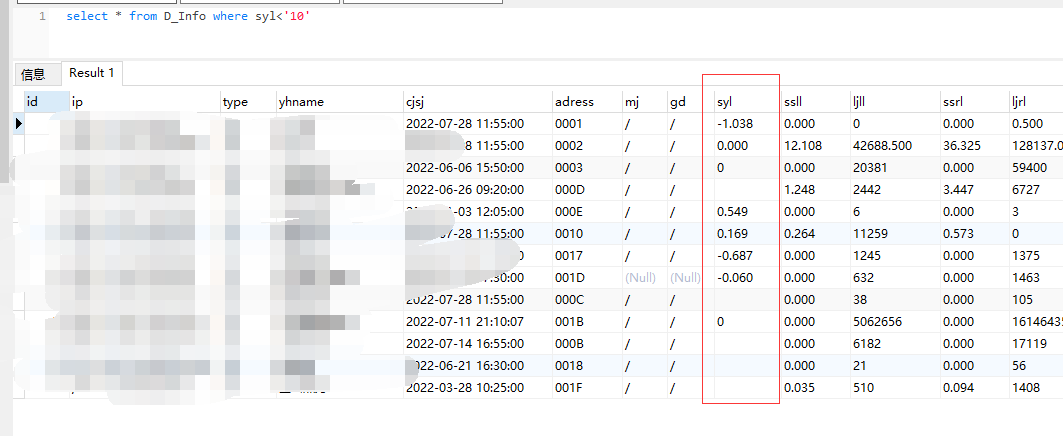
SQL query String field less than 10 how to check

三分建设,七分管理!产品、系统、组织三管齐下节能降耗

打造一份优雅的简历
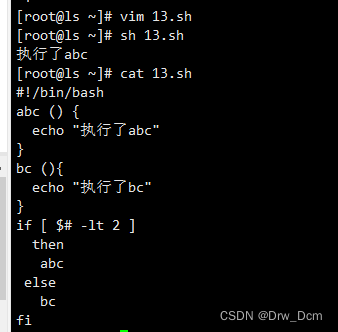
Shell 函数

数据安全峰会2022 | 美创DSM获颁“数据安全产品能力验证计划”评测证书
随机推荐
怎样提高网络数据安全性
typescript type 和 interface 的区别
new Date将字符串转化成日期格式 兼容IE,ie8如何通过new Date将字符串转化成日期格式,js中如何进行字符串替换, replace() 方法详解
如何动态添加script依赖的脚本
【医保科普】维护医保基金安全,我们可以这样做
高效IO模型
Significant differences between Oracle and Postgresql in PLSQL transaction rollback
帮助企业实现数字化转型成功的八项指导原则
docker+bridge+redis master-slave+sentry mode
目标检测-中篇
本周四晚19:00知识赋能第4期直播丨OpenHarmony智能家居项目之设备控制实现
【 observe 】 super fusion: the first mention of "calculate net nine order" evaluation model, build open prosperity of power network
从图文展示到以云为核,第五代验证码独有的策略情报能力
Use serve to build a local server
Learn iframes and use them to solve cross-domain problems
[Medical Insurance Science] To maintain the safety of medical insurance funds, we can do this
元宇宙“吹鼓手”Unity:疯狂扩局,悬念犹存
Based on the statistical QDirStat Qt directory
汇编语言之栈
类如何只能静态分配和只能动态分配