当前位置:网站首页>"Introduction to nlp + actual combat: Chapter 8: Using Pytorch to realize handwritten digit recognition"
"Introduction to nlp + actual combat: Chapter 8: Using Pytorch to realize handwritten digit recognition"
2022-08-04 03:07:00 【ZNineSun】
上一篇: 《nlp入门+实战:第七章:pytorchMedium dataset loading and use of own datasets》
本章代码链接:
1.思路和流程分析
流程:
- 1.准备数据,这些需要准备DataLoader
- 2.构建模型,这里可以使用torch构造一个深层的神经网络
- 3.模型的训练
- 4.Horizontal storage,保存模型,后续持续使用
- 5.模型的评估.使用测试集,观察模型的好坏
2.准备训练集和测试集
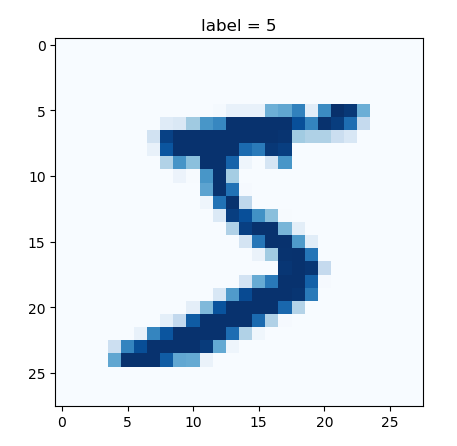
准备数据集的方法前面已经讲过,但是通过前面的内容可知.调用MNIST返回的结果中图形数据是一个ImageThe object needs to process it.
为了进行数据的处理,接下来学习torchvision.transfroms的方法
2.1 torchvision.transforms的图形数据处理方法
2.1.1 torchvision.transforms.ToTensor
把一个取值范围是[0,255]的PIL.Image或者shape为 (H,w,c)的numpy.ndarray,转换成形状为[C,H,W],取值范围是[0,1.0]的torch.FloatTensor
其中(H,w,c)意思为(高.宽,通道数).黑白图片的通道数只有1,其中每个像素点的取值为[0,255],彩色图片的通道数为(R,G.B),每个通道的每个像素点的取值为[0,255],三个通道的颜色相互叠加.形成了各种颜色
示例如下:
from torchvision import transforms
import numpy as np
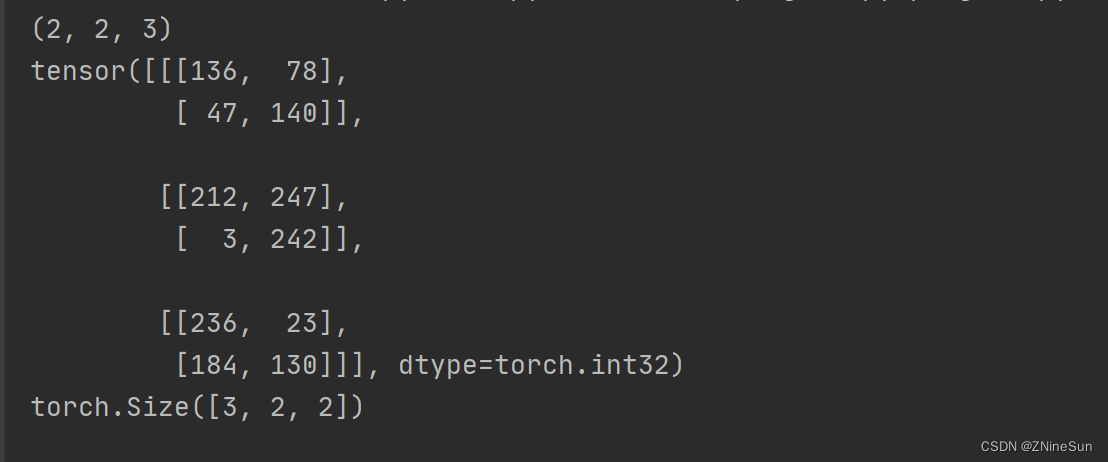
data = np.random.randint(0, 255, size=12)
img = data.reshape(2, 2, 3)
print(img.shape)
img_tensor = transforms.ToTensor()(img) # 转换成tensor类型
print(img_tensor)
print(img_tensor.shape)
注意:
transforms.ToTensor对象中有__call_方法,所以可以对其示例能够传入数据获取结果
from torchvision.datasets import MNIST

mninst = MNIST(root='./data', train=True, download=True)
print(mninst[0])
ret = transforms.ToTensor()(mninst[0][0])
print(ret.size())

We can also see from the running results of the above figure,transforms.ToTensor会将shape为 (H,w,c)的numpy.ndarray,转换成形状为[C,H,W],其中1表示通道数,Indicates that the image is a grayscale image
2.1.2 torchvision.transforms.Normalize(mean,std)
给定均值: mean,shape和图片的通道数相同(指的是每个通道的均值),方差: std,和图片的通道数相同(指的是每个通道的方差),将会把Tensor规范化处理.
即:Normalized_image=(image-mean)/std.
例如:
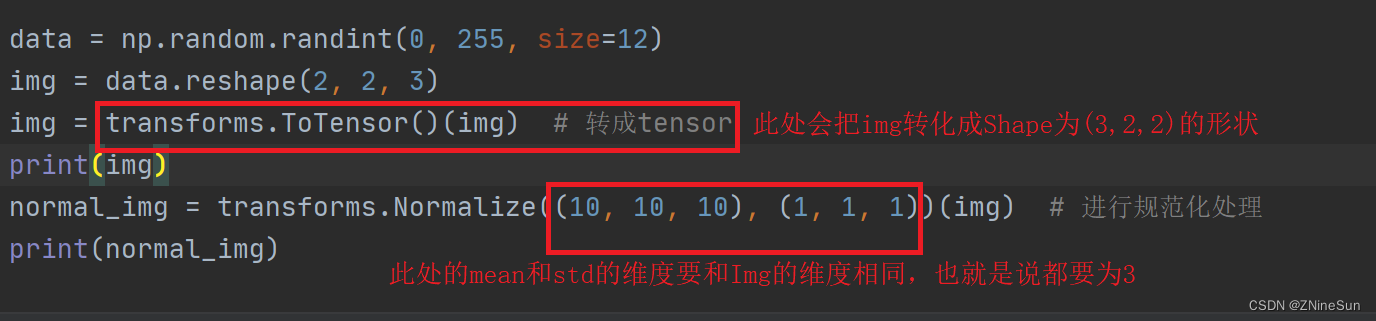
data = np.random.randint(0, 255, size=12)
img = data.reshape(2, 2, 3)
img = transforms.ToTensor()(img)  # 转成tensor
img = img.float()
print(img)
normal_img = transforms.Normalize((10, 10, 10), (1, 1, 1))(img)  # 进行规范化处理
print(normal_img)
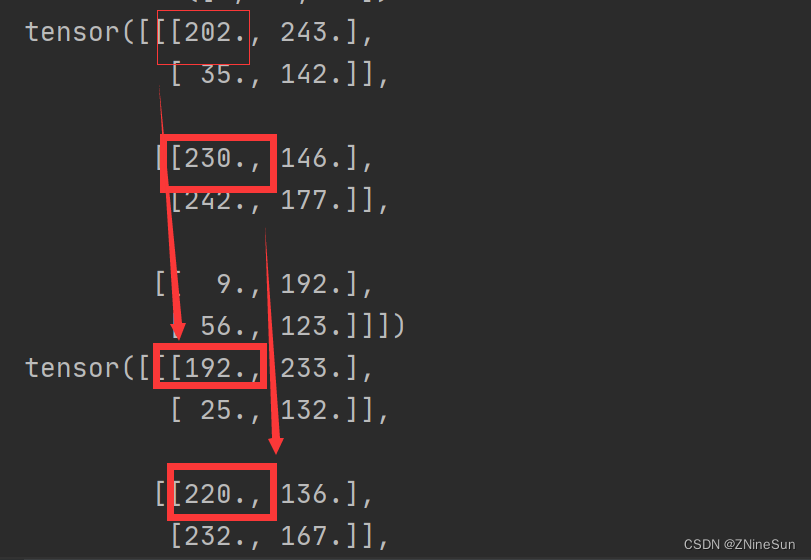
202->192是怎么来的呢?
由于202in the first dimension,所以就用202减去(10,10,10)中的第一个10,然后除以方差(1,1,1)中的第一个1,即(202-10)/1=192
同理230->220也是如此,He is in the second dimension,所以用230减去(10,10,10)中的第二个10,divided by the variance(1,1,1)中的第一个1,即(230-10)/1=220
2.1.3 torchvision.transforms.compose(transforms)
将多个transform组合起来使用.
例如
transforms.Compose(
    [
        torchvision.transforms.ToTensor(),  # 先转化为tensor
        torchvision.transforms.Normalize(mean, std)  # 在进行正则化
    ]
)
2.2 准备MNIST数据集的Dataset和DataLoader
import numpy as np
from torchvision.datasets import MNIST
from torchvision.transforms import Compose, ToTensor, Normalize
import torch
import torchvision
from torch.utils.data import DataLoader


# 准备数据集,其中0.1307,0.3081为MNIST数据的均值和标准差,这样操作能够对其进行标准化
transform_fn = Compose([
    ToTensor(),
    Normalize(mean=(0.1307,), std=(0.3081,))  # mean和std的形状相同
])
dataset = MNIST(root='/data', train=True, transform=transform_fn, download=True)
data_loader = DataLoader(dataset, batch_size=2, shuffle=True)
3 构建模型
补充:全连接层:当前一层的神经元和前一层的神经元相互链接,其核心操作就是y = wx,That is, the well-behaved method of the matrix,实现对前一层的数据的变换.
The model was constructed using a four-layer neural network,其中包括两个全连接层和一个输出层,The first fully connected layer will go through激活函数的处理,将处理后的结果交给下一个全连接层,进行变换后输出结果
那么在这个模型中有两个地方需要注意:
- 1.激活函数如何使用
- 2.每一层数据的形状
- 3.模型的损失函数
3.1激活函数的使用
前面介绍了激活函数的作用,常用的激活函数为Relu激活函数,他的使用非常简单
Relu激活函数由import torch.nn.functional as F提供
F.relu(x)即可对x进行处理,例如:
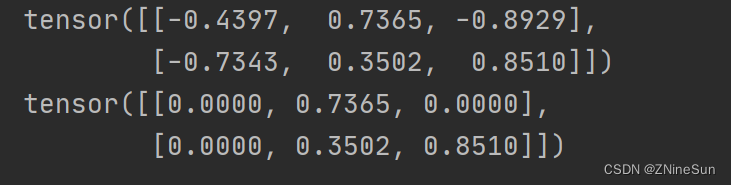
import torch
import torch.nn.functional as F
b = torch.randn(2, 3)
print(b)
b = F.relu(b)
print(b)
3.2模型中数据的形状(【添加形状变化图形】)
1.原始输入数据为的形状:[batch_size, 28,28]
2.进行形状的修改:[batch_size,28*28],(全连接层是在进行矩阵的乘法操作)
3.第一个全连接层的输出形状:[batch_size,28],这里的28是个人设定的,你也可以设置为别的
4.激活函数不会修改数据的形状
5.第二个全连接层的输出形状:[batch_size,10],因为手写数字有10个类别
构建模型的代码如下:
import torch
import torch.nn.functional as F
from torch import nn
# 构建模型
class MnistModel(nn.Module):
    def __init__(self):
        super(MnistModel, self).__init__()
        self.fc1 = nn.Linear(1 * 28 * 28, 28)
        self.fc2 = nn.Linear(28, 10)

    def forward(self, input):  # input的形状为:[batch_size,1,28,28]
        # 1.形状的修改
        x = input.view([-1, 1 * 28 * 28])
        # 2.进行全连接操作
        x = self.fc1(x)
        # 3.进行激活函数的处理
        x = F.relu(x)  # processed by the activation function,形状不会发生变化
        # 4.输出层
        out = self.fc2(x)
        return out
3.3 模型的损失函数
首先,我们需要明确,The current problem of our handwriting recognition is a multi-classification problem,所谓多分类对比的是之前学习的2分类
回顾之前的课程,我们在逻辑回归中,我们使用sigmoid进行计算对数似然损失,来定义我们的2分类的损失.
- 在2分类中我们有正类和负类,正类的概率为 P ( x ) = 1 1 + e − x = e x 1 + e x P(x)=\frac{1}{1+e^{-x}}=\frac{e^x}{1+e^x} P(x)=1+e−x1=1+exex,那么负类的概率为1-P(x)
- 将这个结果进行计算对数似然损失 − ∑ y l o g ( P ( x ) ) -\sum ylog(P(x)) −∑ylog(P(x))就可以得到最终的损失
那么在多分类的过程中我们应该怎么做呢?
- 多分类和2分类中唯一的区别是我们不能够再使用sigmoid函数来计算当前样本属于某个类别的概率,而应该使用softmax函数.
- softmax和sigmoid的区别在于我们需要去计算样本属于每个类别的概率,需要计算多次,而sigmoid只需要计算一次
softmax的公式如下:
例如下图: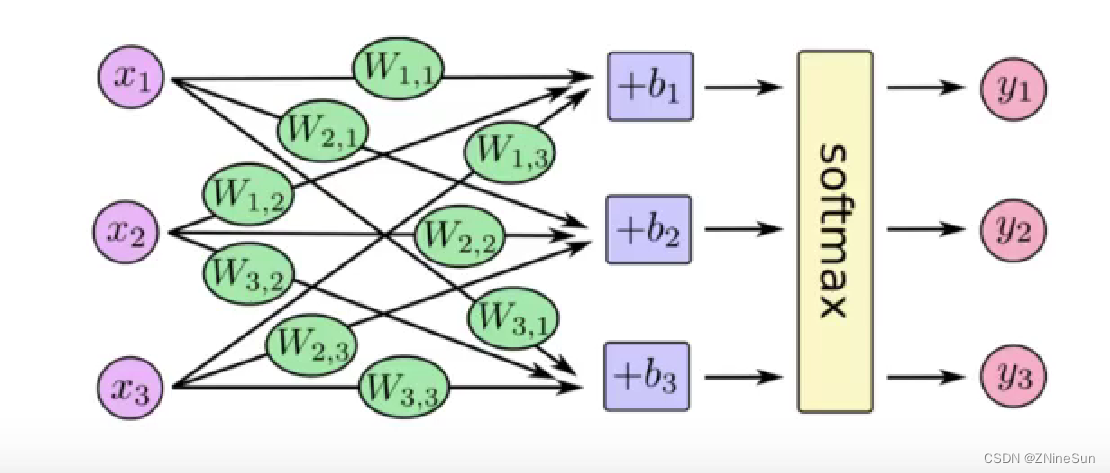
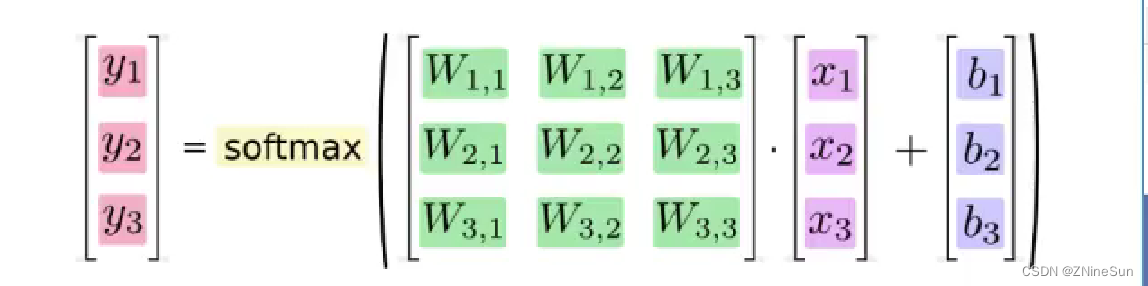
假如softmax之前的输出结果是2.3,4.1,5.6,那么经过softmax之后的结果是多少呢?
对于这个softmax输出的结果.是在[0.1]区间,我们可以把它当做概率
和前面2分类的损失一样,The loss of multi-classification only needs to calculate the log-likelihood loss of this result:
最后.会计算每个样本的损失,即上式的平均值
我们把softmaxThe number of losses obtained by probabilistic incoming log-likelihood loss is called 交叉嫡损失
在pytorchThere are two ways to implement the cross-discipline loss
credition=nn.CrossEntropyLoss()
loss=credition(input,target)
# 对输出值计算ssoftmax和取对数
output=F.log_softmax(x,dim=1)
# 使用torchweighted loss in
loss=F.nll_loss(output,target)
带权损失定义为: l n = − ∑ w i x i l_n=-\sum w_ix_i ln=−∑wixi.其实就是把log§作为 x i x_i xi,把真实值Y作为权重
So our model return value can not be returnedoutInstead it returns its loss value
class MnistModel(nn.Module):
    def __init__(self):
        super(MnistModel, self).__init__()
        self.fc1 = nn.Linear(1 * 28 * 28, 28)
        self.fc2 = nn.Linear(28, 10)

    def forward(self, input):  # input的形状为:[batch_size,1,28,28]
        # 1.形状的修改
        x = input.view([-1, 1 * 28 * 28])
        # 2.进行全连接操作
        x = self.fc1(x)
        # 3.进行激活函数的处理
        x = F.relu(x)  # processed by the activation function,形状不会发生变化
        # 4.输出层
        out = self.fc2(x)
        return F.log_softmax(out)
4.模型的训练
训练的流程:
- 1.实例化模型,设置模型为训练模式
- 2.实例化优化器类,实例化损失函数
- 3.获取,遍历dataloader
- 4.梯度置为0
- 5.进行向前计算
- 6.计算损失
- 7.反向传播
- 8.更新参数
model = MnistModel()
optimizer = Adam(model.parameters(), lr=0.001)


# 模型的训练
def train(epoch):
    data_loader = get_dataloader()
    for index, (input, target) in enumerate(data_loader):
        output = model(input)  # 调用模型得到预测值
        loss = F.nll_loss(output, target)  # 得到损失函数
        optimizer.zero_grad()  # 将梯度置为0
        loss.backward()  # 反向传播
        optimizer.step()  # 梯度的更新
        if index % 100 == 0:
            print(epoch, index, loss.item())


if __name__ == '__main__':
    for i in range(3):
        train(i)
5.模型的保存和加载
5.1 模型的保存
torch.save(model.state_dict(), "model/mnistModel.pt")  # 保存模型参数
torch.save(optimizer.state_dict(), "results/mnist_optimizer.pt")  # 保存优化器
So in our training function, we can set the model to be saved every time a specific number of times is trained
def train(epoch):
data_loader = get_dataloader()
for index, (input, target) in enumerate(data_loader):
output = model(input) # 调用模型得到预测值
loss = F.nll_loss(output, target) # 得到损失函数
optimizer.zero_grad() # 将梯度置为0
loss.backward() # 反向传播
optimizer.step() # 梯度的更新
if index % 100 == 0:
print(epoch, index, loss.item())
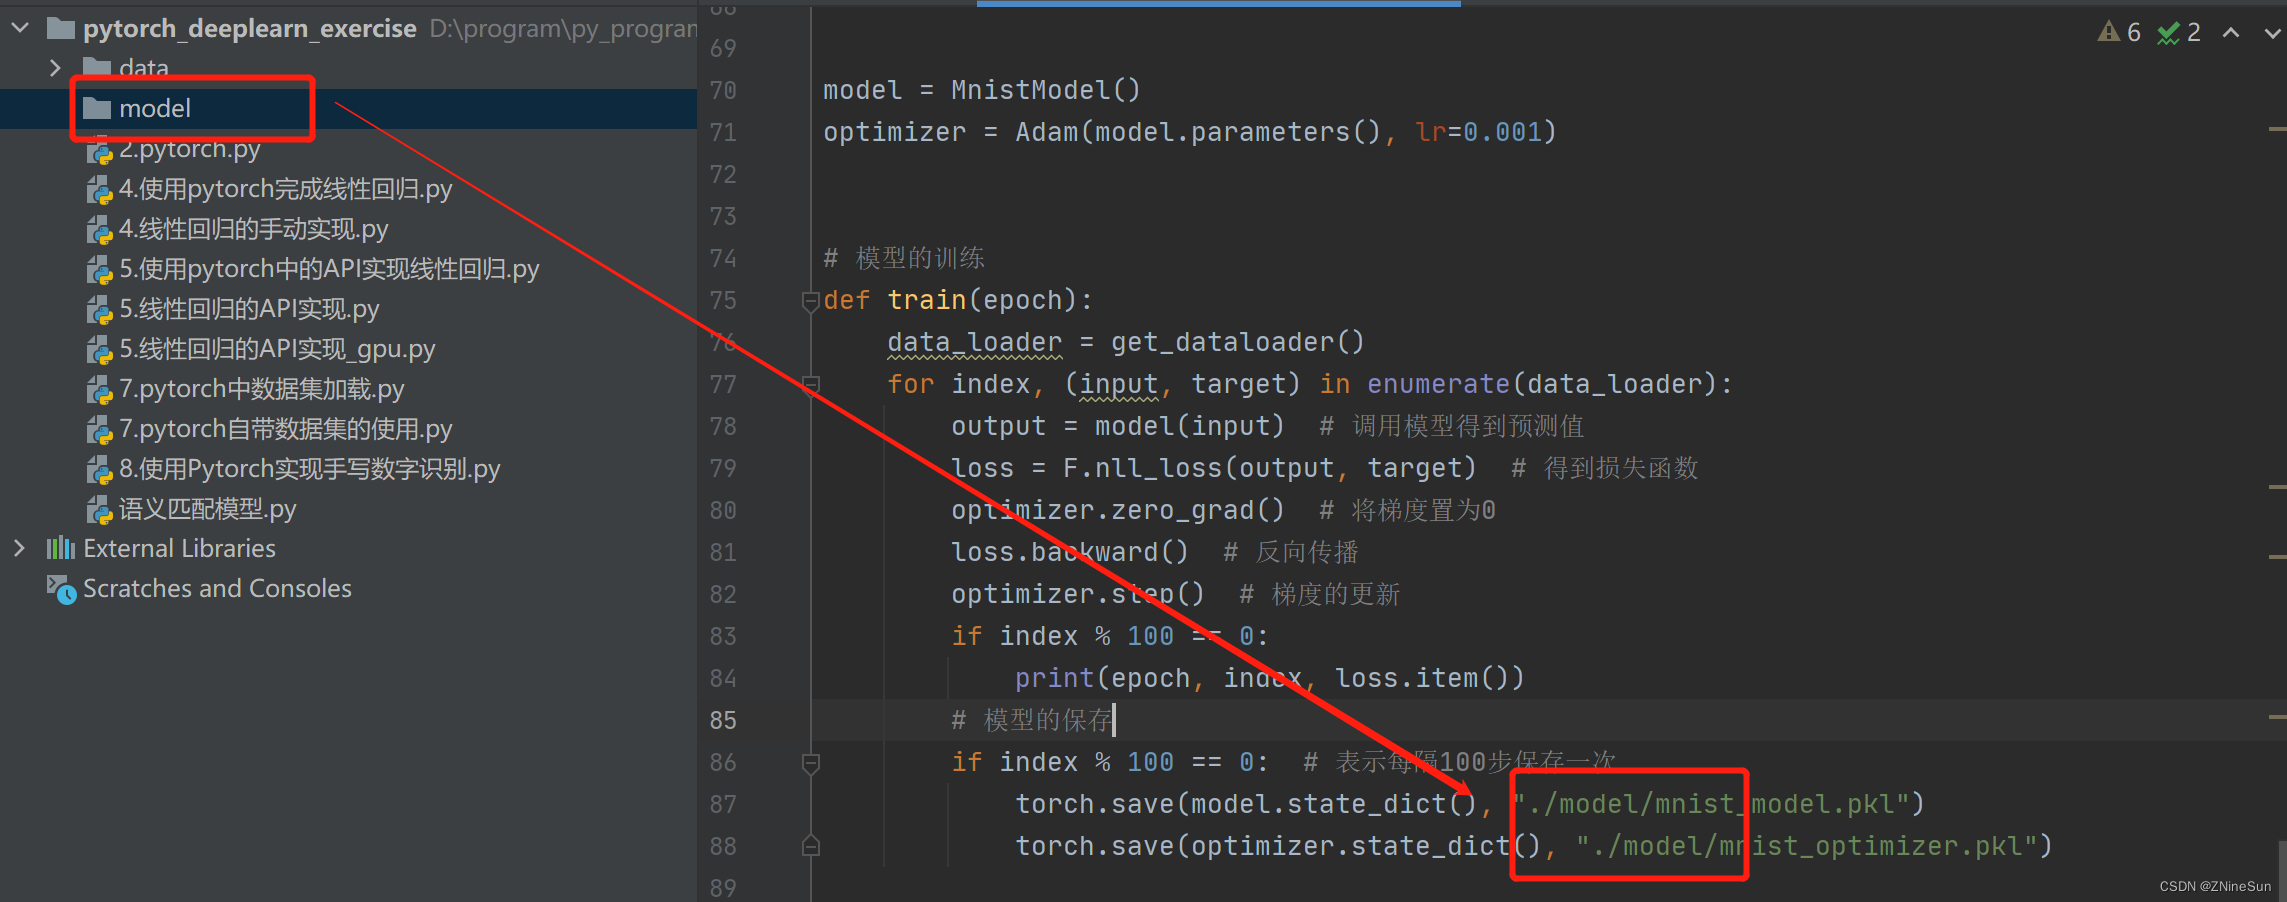
# 模型的保存
if index % 100 == 0: # 表示每隔100步保存一次
torch.save(model.state_dict(), "./model/mnist_model.pkl")
torch.save(optimizer.state_dict(), "./model/mnist_optimizer.pkl")
5.2 模型的加载
model.load_state_dict(torch.load("model/mnistModel.pkl"))
optimizer.load_state_dict(torch.load("results/mnist_optimizer.pkl"))
在我们实际使用时:
if os.path.exists("./model/mnist_model.pkl"):
    model.load_state_dict(torch.load("./model/mnist_model.pkl"))
optimizer = Adam(model.parameters(), lr=0.001)
if os.path.exists("./model/mnist_optimizer.pkl"):
    optimizer.load_state_dict(torch.load("./model/mnist_optimizer.pkl"))
The complete code after the above modification is as follows:
import numpy as np
from torchvision.datasets import MNIST
from torchvision.transforms import Compose, ToTensor, Normalize
import torchvision
from torch.utils.data import DataLoader
import torch
import torch.nn.functional as F
from torch import nn
from torch.optim import Adam
import os
# Start to realize the recognition of handwritten digits

Batch_Size = 128


# 准备数据集,其中0.1307,0.3081为MNIST数据的均值和标准差,这样操作能够对其进行标准化
def get_dataloader(train=True):
    transform_fn = Compose([
        ToTensor(),
        Normalize(mean=(0.1307,), std=(0.3081,))  # mean和std的形状相同
    ])
    dataset = MNIST(root='/data', train=train, transform=transform_fn, download=True)
    data_loader = DataLoader(dataset, batch_size=Batch_Size, shuffle=True)
    return data_loader


data_loader = get_dataloader()


# 构建模型
class MnistModel(nn.Module):
    def __init__(self):
        super(MnistModel, self).__init__()
        self.fc1 = nn.Linear(1 * 28 * 28, 28)
        self.fc2 = nn.Linear(28, 10)

    def forward(self, input):  # input的形状为:[batch_size,1,28,28]
        # 1.形状的修改
        x = input.view([-1, 1 * 28 * 28])
        # 2.进行全连接操作
        x = self.fc1(x)
        # 3.进行激活函数的处理
        x = F.relu(x)  # processed by the activation function,形状不会发生变化
        # 4.输出层
        out = self.fc2(x)
        return F.log_softmax(out, dim=-1)


model = MnistModel()
if os.path.exists("./model/mnist_model.pkl"):
    model.load_state_dict(torch.load("./model/mnist_model.pkl"))
optimizer = Adam(model.parameters(), lr=0.001)
if os.path.exists("./model/mnist_optimizer.pkl"):
    optimizer.load_state_dict(torch.load("./model/mnist_optimizer.pkl"))


# 模型的训练
def train(epoch):
    data_loader = get_dataloader()
    for index, (input, target) in enumerate(data_loader):
        output = model(input)  # 调用模型得到预测值
        loss = F.nll_loss(output, target)  # 得到损失函数
        optimizer.zero_grad()  # 将梯度置为0
        loss.backward()  # 反向传播
        optimizer.step()  # 梯度的更新
        if index % 100 == 0:
            print(epoch, index, loss.item())
        # 模型的保存
        if index % 100 == 0:  # 表示每隔100步保存一次
            torch.save(model.state_dict(), "./model/mnist_model.pkl")
            torch.save(optimizer.state_dict(), "./model/mnist_optimizer.pkl")


if __name__ == '__main__':
    for i in range(3):
        train(i)
After the run is over, we will see the model目录下保存的数据
6.模型的评估
评估的过程和训练的过程相似,但是:
- 1.不需要计算梯度
- 2.需要收集损失和准确率,用来计算平均损失和平均准确率
- 3.损失的计算和训练时候损失的计算方法相同
- 4.准确率的计算:
- 模型的输出为[batch_size,10]的形状
- 其中最大值的位置就是其预测的目标值(预测值进行过sotfmax后为概率,sotfmax中分母都是相同的,分子越大,概率越大)
- 最大值的位置获取的方法可以使用torch .max ,返回最大值和最大值的位置
- 返回最大值的位置后,和真实值([batch_size])进行对比,相同表示预测成功
def test():
    loss_list = []
    acc_list = []
    test_dataloader = get_dataloader(train=False)
    for index, (input, target) in enumerate(test_dataloader):
        '''为了防止跟踪历史记录(和使用内存),可以将代码块包装在with torch.no_grad():中. 在评估模型时特别有用,因为模型可能具有requires_grad = True的可训练的参数, 但是我们不需要在此过程中对他们进行梯度计算. '''
        with torch.no_grad():
            output = model(input)  # output形状:[batchsize,10]
            cur_loss = F.nll_loss(output, target)  # target形状:[batchsize]
            loss_list.append(cur_loss)
            # 计算准确率
            predict = output.max(dim=-1)[-1]
            cur_acc = predict.eq(target).float().mean()
            acc_list.append(cur_acc)
    print("平均准确率:{},平均损失:{}".format(np.mean(acc_list), np.mean(loss_list)))
边栏推荐
- 跨境电商看不到另一面:商家刷单、平台封号、黑灰产牟利
- 函数,递归以及dom简单操作
- Polygon zkEVM network node
- STM8S项目创建(STVD创建)---使用 COSMIC 创建 C 语言项目
- 创新互融|华秋赋能助力OpenHarmony生态硬件开发落地
- 逻辑漏洞----其他类型
- Why use Selenium for automated testing
- Detailed analysis of scaffolding content
- STM32-遥感数据处理
- How many ways do you know about communication between multiple threads?
猜你喜欢


随机推荐
web端动效 lottie-web 使用
Development of Taurus. MVC WebAPI introductory tutorial 1: download environment configuration and operation framework (including series directory).
Mini program + new retail, play the new way of playing in the industry!
力扣(LeetCode)215. 数组中的第K个最大元素(2022.08.03)
第08章 索引的创建与设计原则【2.索引及调优篇】【MySQL高级】
MCU C language -> usage, and meaning
如何在MySQL中的数据库下删除所有的表
Returns the maximum number of palindromes in a string
STM8S105k4t6c--------------点亮LED
在更一般意义上验算移位距离和假设
The general SQL injection flow (sample attached)
说说数据治理中常见的20个问题
In a more general sense, calculating the displacement distance and assumptions
脚手架内容详解分析
Pine Script | How to display and typeset a plot switch?
Y86. Chapter iv Prometheus giant monitoring system and the actual combat, Prometheus storage (17)
MySQL query optimization and tuning
复制带随机指针的链表
How to read the resources files in the directory path?
Brush esp8266-01 s firmware steps