当前位置:网站首页>Putty installation and use
Putty installation and use
2022-06-12 06:58:00 【ToLoveToFeel】
putty Installation and use
1 install
- putty Is a windows A handy gadget for connecting to a remote server . Download address : website . Go to the website , Find the following content to download :

You can also download the historical version : History version download .
You can also download and upload the installation file directly : website . Download after decompression , double-click
.msiJust install the file .All the way default during installation , Finally, there will be four more programs , Here's the picture :

- Where we can open these applications , The default location is :
C:\Program Files\PuTTY, This path has been added to the environment variable , Therefore, you can use the.exeAs command , The contents of this folder are as follows :

Here is a brief description of the next folder
6individual.exeRole of documents :putty.exe: Remote connection server , Most commonly used ;puttygen.exe: Generate public and private keys , Used for password free login to remote server ;psftp.exe: Used in Local 、 remote server Transfer files between ;pscp.exe: andpsftp.exeIt works the same , But the order is different , The command is similar tolinuxMediumscpcommand ;plink.exe: Commands for executing remote servers locally ;pageant.exe: Used to manage secret keys .
Here is how to use the five tools shown in the above picture .
2 Use
2.1 putty.exe
- This is a
puttyThe most common tools in the suite , The initial interface is as follows :

- Here, enter the name of the remote server
IPAddress , And the login port number (SSHThe default port number is22), Click onOpenafter , You can log in after entering your account and password in the pop-up interface . Here's the picture :

- Here is a demonstration of logging in to Alibaba cloud server , The user is called
wxx, The password you enter will be hidden ( That is, the password we enter will not display ).
- If you want to log in to multiple servers , We can save it as
session, Here's the picture , Saved twosession( named :aliyun、django):

- Input
IPAddress 、 port 、 And the session name , Save it at last , Here's the picture :

You can see that after logging in to the terminal , The font is very small , Therefore, it is necessary to set the font size in the terminal , It is likely that after the setting is completed , The next restart will fail , Here's how to avoid this problem .
I have three in all
session( Two self created , A defaultDefault Settings), Each needs to be set individually , It can be understood as eachsessionAll configurations are independent .Here to set
aliyunThissessionFor example , It mainly explains how to set the font size of the terminal , Steps are as follows :
(1) Click on aliyun, And then click Load Button , Here's the picture :

(2) Click... In the menu bar on the left Window->Appearance, And change the font size , Here's the picture :

(3) Click... In the menu bar on the left Session, Then click... On the right Save Button , Here's the picture :

Then restart in time
putty, aboutaliyunThissession, The settings are all effective . Other settings are similar , Just change the number (2) Step by step . For example, after2.2Section .Be careful : hinder
psftp、pscp、plinkCommands are directed atDefault SettingsThissessionoperational . This will be mentioned later .
2.2 puttygen.exe
Every time we log in to the remote server, we need to enter the user name and password , In particular, enter the password , Very troublesome , This tool is designed to solve this problem .
Click on
puttygen.exe, The default interface is as follows :

- Click on
GenerateButton , The mouse moves freely in the blank space , Generate public and private keys , The demonstration is as follows :

- The final generated interface here is as follows :

You can see that the encryption algorithm uses
RSAAlgorithm , For the explanation of the algorithm, please refer to :RSA Public key encryption algorithm . The algorithm generates Public key and Private key , The public key can be made public , The private key cannot be exposed .You need to upload the public key to the server , Save the private key locally . Click on the image above
Save private key, If a warning box pops up , Click Yes to , Then name the saved private key and save it . The following figure shows the private key to be saved , And public key ( Copy directly totxtThen you can ):

- The location of my public key and private key in the computer is as follows ( The private key is generated by clicking the button , The public key is new
txtfile , And then copy the content into ):

- Then you can configure password free login , First log in to the server with your user name and password , establish
.sshFolder , Create in folderauthorized_keysfile , This file is used to store the public key generated before ( You can store multiple public keys ), The order is as follows :
mkdir .ssh
cd .ssh
touch authorized_keys
Then copy the previously generated public key to the file
authorized_keysin .After that, you need to configure the password free login
session, Set only the (2) Step operation is different , Here's the picture :

Remember to save the settings later .
Then log in , You can find , Just enter the user name to log in to the remote server , Here's the picture :

2.3 psftp.exe
Used to transfer files between local and server , Can be in
cmdEnter the command directly in the windowpsftp, You need to enter a user name 、 Password to log in . If inputtyPassword free login is configured in , You only need to enter the user name .Be careful : The default remote server connected here is
puttyinDefault SettingsThe corresponding server in .The interface entered by using this command is as follows , Can pass
helpView the commands provided :

- Common commands :
pwd			#  Display the current directory in the remote server
cd			#  Switch directories on the remote server
ls			#  Show files in the remote server folder

lpwd		#  Display the current directory in the local
lcd			#  Switch directories locally
!dir		#  Show files in local folder

put			#  Upload local file to server
get			#  Download the server file to the local
- file 、 Transfer of folders :
(1) Upload local files to the server (D:\psftp\local_file.txt --> /home/wxx/):
put d:\psftp\local_file.txt
(2) Download files from the remote server to the local (/home/wxx/.bashrc --> D:\psftp\)
lcd d:\psftp		#  Local directory switching
get .bashrc
(3) Upload the local folder to the server (D:\psftp\local_test\ --> /home/wxx/):
put -r d:\psftp\local_test
(4) Download the folder on the remote server to the local (/home/wxx/.ssh/ --> D:\psftp\)
lcd d:\psftp		#  Local directory switching
get -r .ssh
2.4 pscp.exe
and
psftpThe functions are basically the same , For file transfer between local and remote .Another server is used here
djangodemonstration , This server is throughdockerBuilt , Set up inaliyunServer , Port mapping ,aliyunUpper20000The port is mapped todockerInside22port .If no port is specified , Then the port is
puttyinDefault SettingsThissessionCorresponding port .file 、 Transfer of folders ( Directly in
cmdEnter the following command in ):
(1) Upload local files to the server (D:\psftp\local_file.txt --> /home/acs/):
pscp -P 20000 d:\psftp\local_file.txt [email protected]:/home/acs/
(2) Download files from the remote server to the local (/home/acs/.bashrc --> D:\psftp\)
pscp -P 20000 [email protected]:/home/acs/.bashrc d:\psftp\
(3) Upload the local folder to the server (D:\psftp\local_test\ --> /home/acs/):
pscp -P 20000 -r d:\psftp\local_test [email protected]:/home/acs/
(4) Download the folder on the remote server to the local (/home/acs/.ssh/ --> D:\psftp\)
pscp -P 20000 -r [email protected]:/home/acs/.ssh d:\psftp\
2.5 plink.exe
Commands for executing remote servers locally , Directly in
cmdIt can be executed in .If no port is specified , Then the port is
puttyinDefault SettingsThissessionCorresponding port .Execute locally
aliyunCommand on :
plink -P 22 [email protected] "ls -al"
- Execute locally
djangoCommand on :
plink -P 20000 [email protected] "ls -al"
边栏推荐
猜你喜欢

How to build your own website (using the pagoda panel)
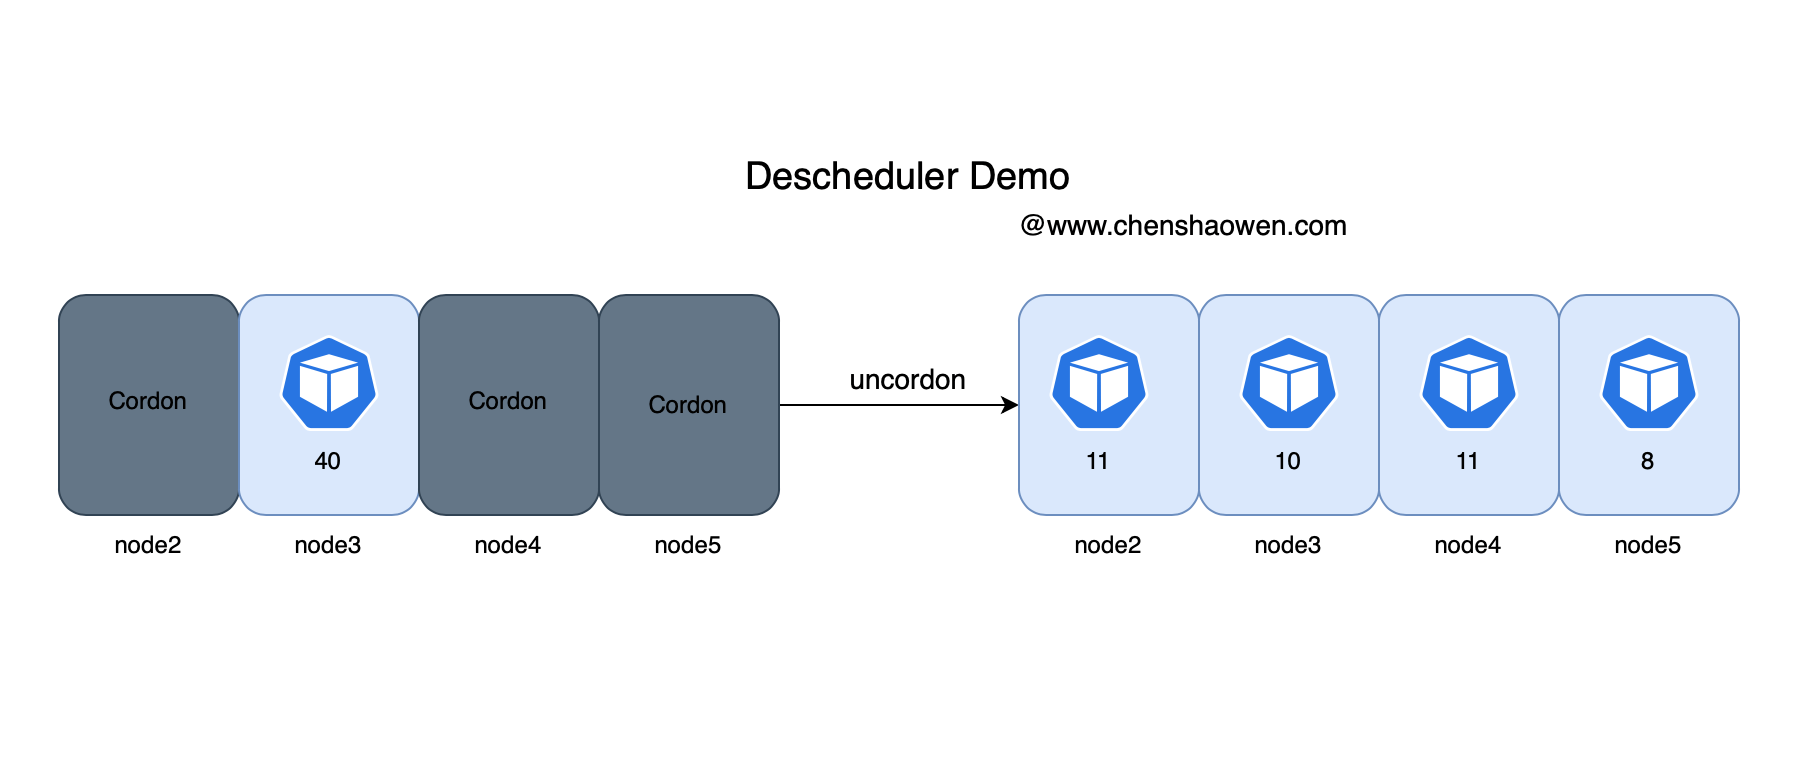
descheduler 二次调度让 Kubernetes 负载更均衡

Kali与编程:如何快速搭建OWASP网站安全实验靶场?

VSCode常用插件
Freshmen are worried about whether to get a low salary of more than 10000 yuan from Huawei or a high salary of more than 20000 yuan from the Internet

张驰咨询:流程是一剂万能良药吗?

libprint2
VSCode常用插件

It only takes 10 minutes to understand the underlying principle of NiO

Process when solving vagrant up_ builder. rb:43:in `join‘: incompatible character encodings: GBK and UTF-8
随机推荐
The first day of June training - array
初中学历,从不到3K,到月薪30K+,不设限的人生有多精彩
leetcode:890. Find and replace mode [two dict records set]
Vscode Common plug - in
d中的解耦
The second revolution of reporting tools
1. Foundation of MySQL database (1- installation and basic operation)
PHP read / write cookie
张驰课堂:2022年CAQ中质协六西格玛考试时间通知
d的扩大@nogc
Detailed explanation of convirt paper (medical pictures)
【数据聚类】本专栏中涉及数据集、可视化及注意事项
d的自动无垃集代码.
I met 15 people recently and found that I couldn't answer the basic question of this test
SQL injection - blind injection
platform driver
postman拼接替换参数循环调用接口
Descscheduler secondary scheduling makes kubernetes load more balanced
Can official account also bring goods?
丢掉丑陋的 toast,会动的 toast 更有趣