当前位置:网站首页>Draw some simple graphics with MFC
Draw some simple graphics with MFC
2022-07-03 17:32:00 【Domineering Xiao Ming】
Catalog
Two 、 Use the brush to draw a rectangle
One 、 Draw a straight line

Drawing a straight line requires a starting point and an ending point , When the mouse is pressed, it is recorded as the starting point coordinate , When the mouse pops up, it is recorded as the end coordinate .
First, add the left mouse button press event in the class wizard , And the left mouse button pop-up event
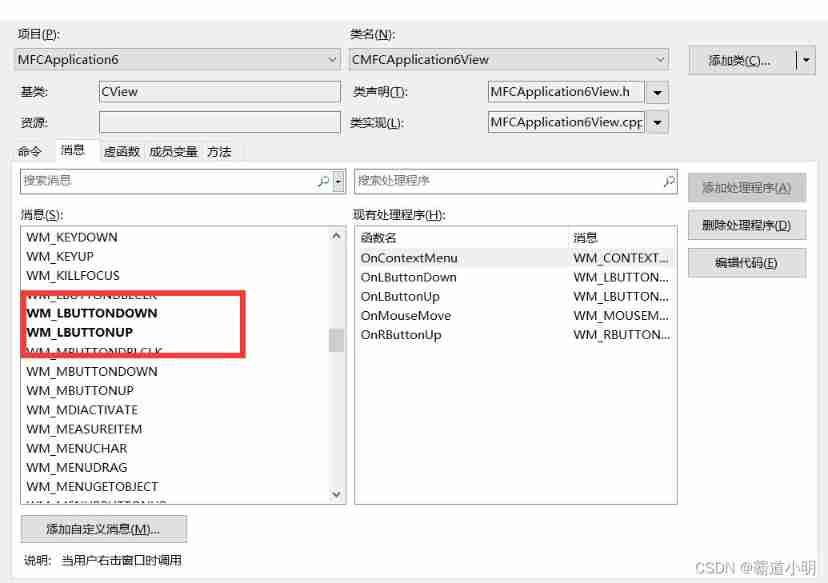
Add a through the class wizard CPoint The member variable of type is used to record the position when the left mouse button is pressed

Supplementary event code
void CMFCApplication6View::OnLButtonDown(UINT nFlags, CPoint point)
{
	m_pOrigin = point;
	CView::OnLButtonDown(nFlags, point);
}

void CMFCApplication6View::OnLButtonUp(UINT nFlags, CPoint point)
{
    // Get device context
    CDC* pDC = GetDC();
    // Move to the starting position
	pDC->MoveTo(m_pOrigin);
    // Draw a straight line from the place to the end
	pDC->LineTo(point);
	 Release the device context
	ReleaseDC(pDC);
	CView::OnLButtonUp(nFlags, point);
}
Change the brush style
stay MFC Through CPen Redefine a brush style
CPen pen( Pen shape , Line width , Color )
- Pen shape :PS_SOLID Solid line , PS_DASH Dotted line , PS_DOT Dotted line , PS_DOTDASH Point line
- Line width : Pixel for unit
- Color :RGB(RED,GREE,BLUR)
For example, I want to change the straight line drawn above to 5 Pixel width , green

At this time, you need to customize a brush , Replace the default brush of the device context . But be careful : When you stop using the custom brush, you need to replace the default brush of the device context
void CMFCApplication6View::OnLButtonDown(UINT nFlags, CPoint point)
{
	m_pOrigin = point;
	CView::OnLButtonDown(nFlags, point);
}


void CMFCApplication6View::OnLButtonUp(UINT nFlags, CPoint point)
{
	// Get device context
	CDC* pDC = GetDC();
	 Define the brush
	CPen pen(PS_SOLID, 5, RGB(0,255, 0));
	// Replace the device context default brush , And keep the original brush
	CPen* pOldPen = pDC->SelectObject(&pen);
	pDC->MoveTo(m_pOrigin);
	pDC->LineTo(point);
	// The device context reverts to the original brush
	pDC->SelectObject(pOldPen);
	 Release the device context
	ReleaseDC(pDC);
	CView::OnLButtonUp(nFlags, point);
}
Two 、 Use the brush to draw a rectangle
When drawing a rectangle with a brush , You need the coordinates of the upper left corner and the lower right corner of the rectangle , When the mouse is pressed, it is recorded as the coordinates of the upper left corner , When the mouse pops up, it is recorded as the coordinates of the lower right corner .
void CMFCApplication6View::OnLButtonDown(UINT nFlags, CPoint point)
{
	m_pOrigin = point;
	CView::OnLButtonDown(nFlags, point);
}

void CMFCApplication6View::OnLButtonUp(UINT nFlags, CPoint point)
{
	// A brush
	// Get device context , Compared with the above method, this method obtains the device context dc It's a local variable , Automatically release after the program ends , Manually release the device context out of order
	CClientDC dc(this);
	// Opaque brush
	dc.Rectangle(CRect(m_pOrigin,point));

	CView::OnLButtonUp(nFlags, point);
}
Transparent rectangle
If you want to draw a transparent rectangle , Get the transparent brush defined by the system , Replace the default brush of the device context , When the transparent brush is not used, you need to replace the original brush
void CMFCApplication6View::OnLButtonDown(UINT nFlags, CPoint point)
{
	m_pOrigin = point;
	CView::OnLButtonDown(nFlags, point);
}

void CMFCApplication6View::OnLButtonUp(UINT nFlags, CPoint point)
{
	// A brush
	// Get device context
	CClientDC dc(this);
	// Transparent brush
	// Get the system transparent brush
	CBrush* brush = CBrush::FromHandle((HBRUSH)GetStockObject(NULL_BRUSH));
	// Change the device context brush
	CBrush* oldBrush = dc.SelectObject(brush);
	dc.Rectangle(CRect(m_pOrigin, point));
	// Change the device context back to the original brush
	dc.SelectObject(oldBrush);

	CView::OnLButtonUp(nFlags, point);
}
Custom color fill rectangle
Want to customize the filling of the rectangle , Just pass in the custom brush color fill as a parameter when drawing the fill rectangle

void CMFCApplication6View::OnLButtonDown(UINT nFlags, CPoint point)
{
	m_pOrigin = point;
	CView::OnLButtonDown(nFlags, point);
}

void CMFCApplication6View::OnLButtonUp(UINT nFlags, CPoint point)
{
	// A brush
	// Get device context
	CClientDC dc(this);
	// Rectangle painted with fill color
	CBrush brush(RGB(255, 0, 0));
	dc.FillRect(CRect(m_pOrigin, point), &brush);

	CView::OnLButtonUp(nFlags, point);
}
Custom graphic fill rectangle
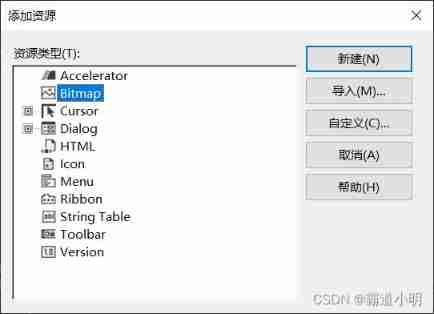
To draw a custom graphic fill, you first need to add a graphic you want to fill in the resource view , Here we use built-in resources Bitmap Draw a picture you want to fill .
First step : add to Bitmap resources
Right click “ project ”, choice “ add to ”, add to “ resources ”

choice Bitmap, Choose new
The second step : Draw custom graphics
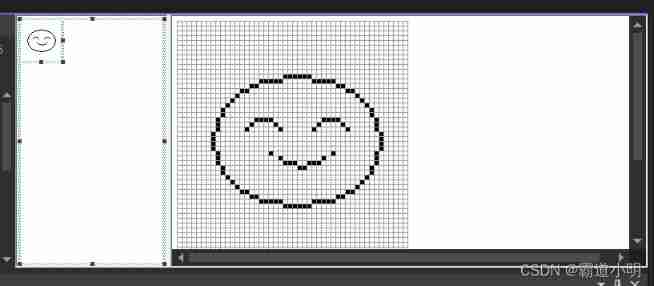
After the “ Resource view ” You can view the added resources in
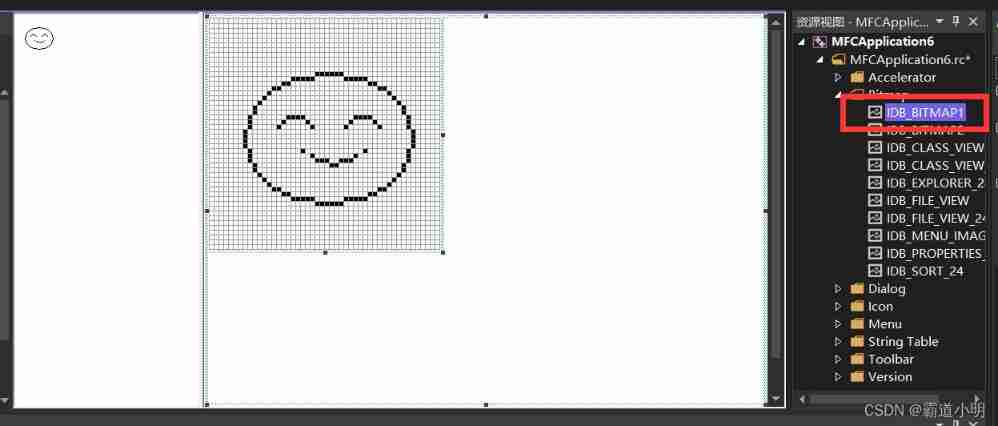
The third step : Load the drawn picture
Make a statement Bitmap, Load the picture just drawn from the resource view , Declared Bitmap Object as parameter , Declare a brush object
void CMFCApplication6View::OnLButtonDown(UINT nFlags, CPoint point)
{
	m_pOrigin = point;

}

void CMFCApplication6View::OnLButtonUp(UINT nFlags, CPoint point)
{
	// A brush
	// Get device context
	CClientDC dc(this);

	CBitmap bitmap;
	// Load pictures from resources into bitmap in
	bitmap.LoadBitmap(IDB_BITMAP1);
	// With bitmap Is the parameter , Generate brush objects
	CBrush brush(&bitmap);
	// Fill the rectangular area
	dc.FillRect(CRect(m_pOrigin, point), &brush);

	CView::OnLButtonUp(nFlags, point);
}
Four 、 Implement a brush
Pressing the left mouse button will start drawing as the mouse moves , Stop drawing when the left button pops up
Add a mouse movement event “OnMouseMove”, And a member parameter “m_bDraw(bool)” Record whether the left mouse button is pressed . When the mouse moves, first judge m_bDraw, If m_bDraw by true Then press the left key , Began to draw , Otherwise stop drawing
void CMFCApplication6View::OnLButtonDown(UINT nFlags, CPoint point)
{
	m_pOrigin = point;
    m_bDraw = TRUE;
	CView::OnLButtonDown(nFlags, point);
}


void CMFCApplication6View::OnLButtonUp(UINT nFlags, CPoint point)
{

	// Press the key up to set false
	m_bDraw = false;
	CView::OnLButtonUp(nFlags, point);
}


void CMFCApplication6View::OnMouseMove(UINT nFlags, CPoint point)
{
	CClientDC dc(this);
    // Draw a line after clicking the mouse
	if (m_bDraw) {
		dc.MoveTo(m_pOrigin);
		dc.LineTo(point);
		m_pOrigin = point;
	}
	CView::OnMouseMove(nFlags, point);
}
5、 ... and 、 Draw fan

The sector only needs to start every time when the left mouse button is pressed before the left mouse button pops up
void CMFCApplication6View::OnLButtonDown(UINT nFlags, CPoint point)
{
	m_pOrigin = point;
    m_bDraw = TRUE;
	CView::OnLButtonDown(nFlags, point);
}


void CMFCApplication6View::OnLButtonUp(UINT nFlags, CPoint point)
{

	// Press the key up to set false
	m_bDraw = false;
	CView::OnLButtonUp(nFlags, point);
}


void CMFCApplication6View::OnMouseMove(UINT nFlags, CPoint point)
{
	CClientDC dc(this);
	CPen pen(PS_DOT, 1, RGB(0, 255, 255));
	// Draw fan
	CPen* oldPen = dc.SelectObject(&pen);
	if (m_bDraw) {
		dc.MoveTo(m_pOrigin);
		dc.LineTo(point);
	}
	dc.SelectObject(oldPen);
	CView::OnMouseMove(nFlags, point);
}
6、 ... and 、 Drawing ellipse
Ellipse drawing mechanism is based on rectangle , Just call the draw ellipse function .
void CMFCApplication6View::OnLButtonDown(UINT nFlags, CPoint point)
{
	m_pOrigin = point;
	CView::OnLButtonDown(nFlags, point);
}


void CMFCApplication6View::OnLButtonUp(UINT nFlags, CPoint point)
{

	CClientDC dc(this);
	CPen pen(PS_SOLID, 5, RGB(0, 0, 255));
	CPen* oldpen = dc.SelectObject(&pen);
	// Drawing ellipse
	dc.Ellipse(CRect(m_pOrigin, point));

	CView::OnLButtonUp(nFlags, point);
}
7、 ... and 、 A circle

void CMFCApplication6View::OnLButtonDown(UINT nFlags, CPoint point)
{
	m_pOrigin = point;
	CView::OnLButtonDown(nFlags, point);
}


void CMFCApplication6View::OnLButtonUp(UINT nFlags, CPoint point)
{
	m_bDraw = false;
	CClientDC dc(this);
	CPen pen(PS_SOLID, 5, RGB(0, 0, 255));
	CPen* oldpen = dc.SelectObject(&pen);
	// A circle
	long len = point.x - m_pOrigin.x;
	dc.Ellipse(m_pOrigin.x, m_pOrigin.y, m_pOrigin.x + len, m_pOrigin.y + len);


	CView::OnLButtonUp(nFlags, point);
}
8、 ... and 、 The output text

void CMFCApplication6View::OnLButtonUp(UINT nFlags, CPoint point)
{
	m_bDraw = false;
	CClientDC dc(this);
	CString str(" Here comes Xiao Ming ");
	// Set the text color
	dc.SetTextColor(RGB(0, 255, 0));
	// Set text font
	CFont font;

	// Create dot matrix fonts
	// How many dot fonts are passed , Pass in 200, The font is 20
	font.CreatePointFont(200, " Chinese Xingkai ");
	// Output string
	dc.TextOut(point.x, point.y, str, str.GetLength());
	CView::OnLButtonUp(nFlags, point);
}边栏推荐
- PUT vs. POST for Uploading Files - RESTful API to be Built Using Zend Framework
- Deops入门
- Answer to the homework assessment of advanced English reading (II) of the course examination of Fuzhou Normal University in February 2022
- 数仓任务里面 跑SQL任务的时候用的数据库账号是在哪里配置的
- [RT thread] construction and use of --hwtimer of NXP rt10xx device driver framework
- [combinatorics] recursive equation (case where the non-homogeneous part is exponential | example where the non-homogeneous part is exponential)
- Kotlin learning quick start (7) -- wonderful use of expansion
- Stm32h7 Hal library SPI DMA transmission has been in busy solution
- c# .net 工具生态
- Analyse ArrayList 3: suppression d'éléments
猜你喜欢
Baiwen.com 7 days Internet of things smart home learning experience punch in the next day
QT adjust win screen brightness and sound size
kubernetes资源对象介绍及常用命令(三)
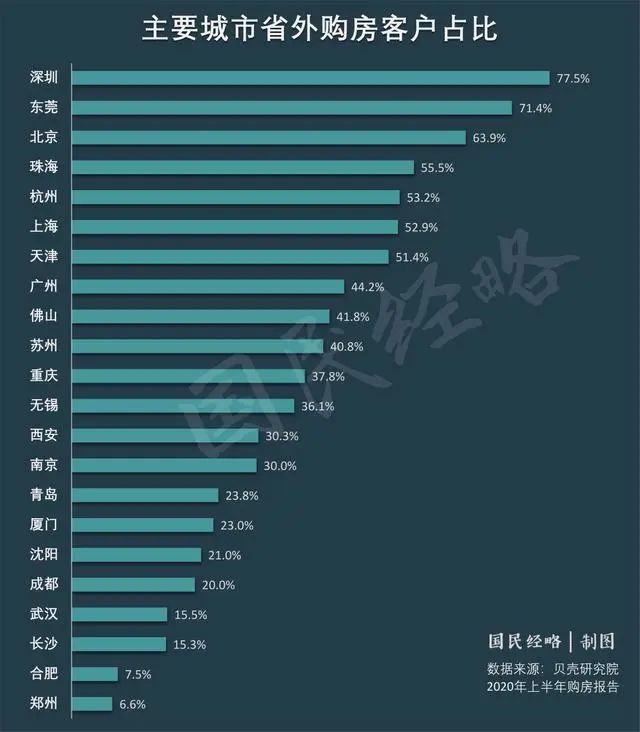
Great changes! National housing prices fell below the 10000 yuan mark

【RT-Thread】nxp rt10xx 设备驱动框架之--Audio搭建和使用
[RT thread] NXP rt10xx device driver framework -- Audio construction and use
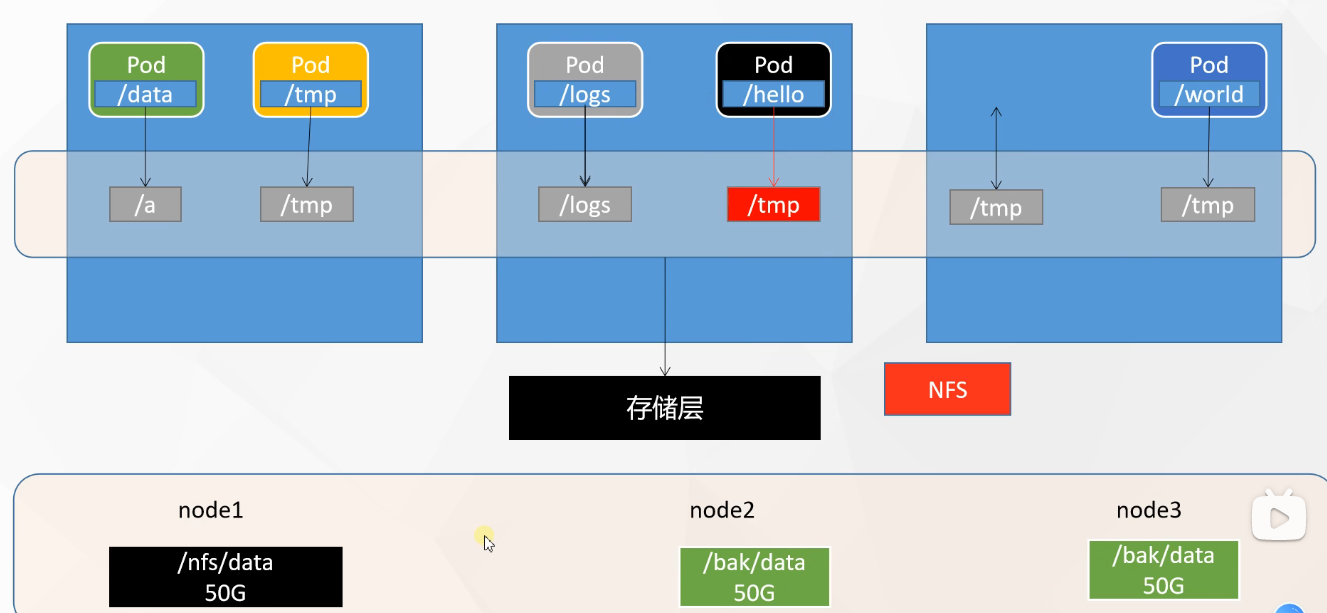
kubernetes资源对象介绍及常用命令(五)-(NFS&PV&PVC)
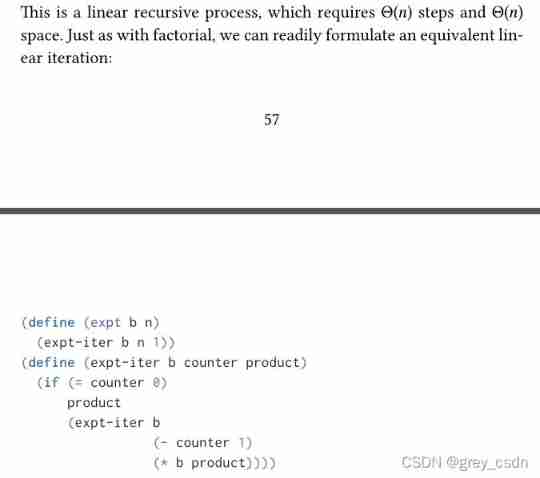
1146_ SiCp learning notes_ exponentiation
![[RT thread] NXP rt10xx device driver framework -- pin construction and use](/img/75/b4f034bfe49409f76e7fd92758804e.png)
[RT thread] NXP rt10xx device driver framework -- pin construction and use

Cloud primordial weekly | CNCF released the 2021 cloud primordial development status report, which was released on istio 1.13
随机推荐
Kubernetes resource object introduction and common commands (V) - (NFS & PV & PVC)
【RT-Thread】nxp rt10xx 设备驱动框架之--rtc搭建和使用
WEB-UI自动化测试-最全元素定位方法
September, 19, "cam principle and application" online assignment [Full Score answer]
AcWing 4489. 最长子序列
SQL injection database operation foundation
基于主机的入侵系统IDS
绝对定位时元素水平垂直居中
AcWing 4489. Longest subsequence
Notes on problems -- watching videos on edge will make the screen green
PUT vs. POST for Uploading Files - RESTful API to be Built Using Zend Framework
[mathematical logic] equivalent calculus and reasoning calculus of predicate logic (individual word | predicate | quantifier | predicate logic formula | two basic formulas | proposition symbolization
Is AI too slow to design pictures and draw illustrations? 3 sets of practical brushes to save you
Simple configuration of postfix server
New library online | cnopendata China bird watching record data
What is the difference between cloud server and cloud virtual machine
The difference between i++ and ++i: tell their differences easily
企业级自定义表单引擎解决方案(十一)--表单规则引擎1
毕业总结
Apache服务挂起Asynchronous AcceptEx failed.