当前位置:网站首页>Cesium learning notes (VI) particle system
Cesium learning notes (VI) particle system
2022-06-30 08:04:00 【Lafiteeee】
particle system
What is a particle system ?
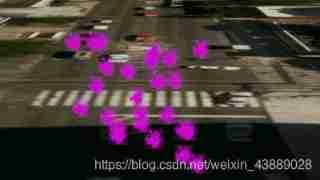
Particle system is a graphic technique to simulate complex physical effects . A particle system is a collection of small images , More complex when viewed together “ Fuzzy ” object , Like fire 、 smoke 、 Weather or fireworks . These complex effects are achieved by using the initial position 、 Attributes such as speed and lifespan specify the behavior of individual particles to control .
Particle system effects are common in movies and video games . for example , To show the damage of the aircraft , Technical artists can use particle systems to represent explosions on aircraft engines , Then render different particle systems to represent the smoke track when the plane crashed .
Particle System Basics
Take a look at the code of the elementary particle system :
var particleSystem = viewer.scene.primitives.add(new Cesium.ParticleSystem({

    image : '../../SampleData/smoke.png',
    imageSize : new Cesium.Cartesian2(20, 20),
    startScale : 1.0,	// Initial scaling
    endScale : 4.0,		// Final zoom
    particleLife : 1.0,	// Particle lifetime
    speed : 5.0,	// Movement speed
    emitter : new Cesium.CircleEmitter(0.5),	// A particle emitter , It emits particles from a circle . The particles will be positioned in a circle , The initial velocity follows z vector . The parameter is the radius of the circle
    emissionRate : 5.0,		// Launch rate
    modelMatrix : entity.computeModelMatrix(viewer.clock.startTime, new Cesium.Matrix4()),// A model matrix that computes the transformation of an entity at a specified time . If the direction or position is not defined , Then return to undefined.
    lifetime : 16.0
}));

The above code creates a ParticleSystem, A parameterized object , Used to control the appearance and behavior of a single particle object over time . Particles are generated by particle emitters , They have their own location and type , Live for a set time , And then die .
Some of these properties are dynamic . Be careful , The available monochrome properties are not used here scale, It USES startScale and endScale. These allow you to specify the transition between the particle size at the beginning and end of the particle life cycle .startColor and endColor It works in a similar way .
Other ways to affect visual output include the maximum and minimum attributes . For each variable with maximum and minimum inputs , The actual value of the variable on the particle will be randomly assigned between the maximum and minimum inputs , And keep the value static throughout the particle's life cycle . for example , The minimum and maximum velocities are used as the bounds for the velocity of each randomly selected particle . The attributes that allow this change include imageSize、speed、life and particleLife.
The emitter
When particles are born , Its initial position and velocity vector are controlled by the particle emitter . The emitter will produce several particles per second , Specified by the emission rate parameter , Initialize to a random speed depending on the emitter type .
Cesium There are many particle emitters :
BoxEmitter
BoxEmitter Initialize the particles at random sampling positions in the box , And guide them out of one of the six box faces . It accepts a Cartesian3 Parameters , Specify the width of the box 、 Height and depth dimensions .
That is, the random sampling position inside the box is used as the initial position of the particles , Particles can move along the six faces of the box , Get out of this box .
var particleSystem = scene.primitives.add(new Cesium.ParticleSystem({

    image : '../../SampleData/smoke.png',
    color: Cesium.Color.MAGENTA,
    emissionRate: 5.0,
    emitter: new Cesium.BoxEmitter(new Cesium.Cartesian3(5.0, 5.0, 5.0)),
    imageSize : new Cesium.Cartesian2(25.0, 25.0),
    modelMatrix : entity.computeModelMatrix(viewer.clock.startTime, new Cesium.Matrix4()),
    lifetime : 16.0
}));
CircleEmitter
CircleEmitter Initialize the particles at random sampling positions in a circle above the emitter . It takes a floating-point parameter to specify the radius of the circle .
It can be imagined as a smoke ring , The mouth is the transmitter , The smoke circle is the designated circle , In this circle, the random sampling position is taken as the initial position of the particle , Then move the particles up , Until the end of life .
var particleSystem = scene.primitives.add(new Cesium.ParticleSystem({

    image : '../../SampleData/smoke.png',
    color: Cesium.Color.MAGENTA,
    emissionRate: 5.0,
    emitter: new Cesium.CircleEmitter(5.0),
    imageSize : new Cesium.Cartesian2(25.0, 25.0),
    modelMatrix : entity.computeModelMatrix(viewer.clock.startTime, new Cesium.Matrix4()),
    lifetime : 16.0
}));

If no emitter is specified , By default circle The emitter .
ConeEmitter( Conical launcher )
ConeEmitter Initializing particles at the cone tip , And point them out of the cone at any angle . It accepts a floating-point parameter that specifies the cone angle . The cone is oriented along the upper axis of the emitter .
var particleSystem = scene.primitives.add(new Cesium.ParticleSystem({

    image : '../../SampleData/smoke.png',
    color: Cesium.Color.MAGENTA,
    emissionRate: 5.0,
    emitter: new Cesium.ConeEmitter(Cesium.Math.toRadians(30.0)),
    imageSize : new Cesium.Cartesian2(25.0, 25.0),
    modelMatrix : entity.computeModelMatrix(viewer.clock.startTime, new Cesium.Matrix4()),
    lifetime : 16.0
}));

SphereEmitter
SphereEmitter Initialize the particles at random sampling positions within the sphere , And point them out from the center of the sphere . It accepts a sphere with a specified radius float Parameters .
var particleSystem = scene.primitives.add(new Cesium.ParticleSystem({

    image : '../../SampleData/smoke.png',
    color: Cesium.Color.MAGENTA,
    emissionRate: 5.0,
    emitter: new Cesium.SphereEmitter(5.0),
    imageSize : new Cesium.Cartesian2(25.0, 25.0),
    modelMatrix : entity.computeModelMatrix(viewer.clock.startTime, new Cesium.Matrix4()),
    lifetime : 16.0
}));

Configure the particle system
Particle emission rate
emissionRate Controls how many particles are emitted per second , You can change the concentration of the particles .
To specify a burst An array of objects , A burst of particles emitted at a specified time . This increases the diversity and explosiveness of the particle system .
stay particleSystem Add the following code to :
bursts : [
    new Cesium.ParticleBurst({
    time : 5.0, minimum : 300, maximum : 500}),
    new Cesium.ParticleBurst({
    time : 10.0, minimum : 50, maximum : 100}),
    new Cesium.ParticleBurst({
    time : 15.0, minimum : 200, maximum : 300})
]
In this way, the particles emitted by the emitter will gradually change from the minimum to the maximum within a given time .
The lifetimes of particles and systems
By default , The particle system will run forever . To make the particle system run for a set duration , Please use lifetime Specify duration as seconds , And set the loop to false.
lifetime : 16.0,
loop: false
take particleLife Set to 5.0 For each particle in the system particleLife Set to the same value . To randomly set the lifespan of each particle , Using variables minimumParticleLife and maximumParticleLife.
minimumParticleLife: 5.0,
maximumParticleLife: 10.0
Stylized particles
Color
Particles use image and color assigned texture styles , It can change over the life of a particle , To create dynamic effects . The following code fades the smoke particles from green to white .
startColor : Cesium.Color.LIGHTSEAGREEN.withAlpha(0.7),
endColor : Cesium.Color.WHITE.withAlpha(0.0),
size
The particle size is determined by imageSize The control of the . To randomize the size , Use minimumImageSize.x and maximumImageSize.x Control pixel level width , Use minimumImageSize.y and maximumImageSize.y Control pixel level height .
The following code creates 30 To 60 Square particles between pixels :
minimumImageSize : new Cesium.Cartesian2(30.0, 30.0),
maximumImageSize : new Cesium.Cartesian2(60.0, 60.0)
The size of a particle can pass through its lifetime startScale and endScale Attribute to adjust , So that the particles will increase or decrease with the passage of time .
startScale: 1.0,
endScale: 4.0
Speed
Speed by speed or minimumSpeed and maximumSpeed Set controls .
minimumSpeed: 5.0,
maximumSpeed: 10.0
UpdateCallback
The particle system can be further customized by applying the update function . This works as an effect of manually updating each particle , Like gravity , wind , Or color change .
The particle system has a updateCallback, It modifies the properties of the particles during the simulation . This function requires a particle and a simulated time step . Most physics based effects will modify the velocity vector to change direction or velocity . This is an example of a particle reacting to gravity :
var gravityVector = new Cesium.Cartesian3();
var gravity = -(9.8 * 9.8);
function applyGravity(p, dt) {

    // Compute a local up vector for each particle in geocentric space.
    var position = p.position;

    Cesium.Cartesian3.normalize(position, gravityVector);
    Cesium.Cartesian3.multiplyByScalar(gravityVector, gravity * dt, gravityVector);

    p.velocity = Cesium.Cartesian3.add(p.velocity, gravityVector, p.velocity);
}
This function calculates a gravitational vector , And use the acceleration of gravity to change the velocity of the particles .
Set this gravity as the update function of the particle system :updateCallback : applyGravity
location
Particle systems use two Matrix4 Transformation matrix positioning :
modelMatrix: Convert the particle system from model coordinates to world coordinates .emitterModelMatrix: Convert the particle system emitter in the local coordinate system of the particle system
We can use only one of the transformation matrices , And leave the other as the identity matrix , But just for convenience , We also provide these two matrices . To practice creating matrices , Let's position the particle emitter relative to another entity .
Create a solid for our particle system to emphasize . Add the following code to add the milk truck model to the viewer :
var entity = viewer.entities.add({

    model : {

        uri : '../../SampleData/models/CesiumMilkTruck/CesiumMilkTruck-kmc.glb'
    },
    position : Cesium.Cartesian3.fromDegrees(-75.15787310614596, 39.97862668312678)
});
viewer.trackedEntity = entity;

We want to add a smoke effect from the rear of the truck . Create a model matrix , Will make the positioning and orientation of the particle system the same as the milk truck entity .
modelMatrix: entity.computeModelMatrix(time, new Cesium.Matrix4())
This puts the particle system in the center of the truck . To put it in the back of the truck , We can create a matrix with translation .
function computeEmitterModelMatrix() {

    hpr = Cesium.HeadingPitchRoll.fromDegrees(0.0, 0.0, 0.0, hpr);
    trs.translation = Cesium.Cartesian3.fromElements(-4.0, 0.0, 1.4, translation);
    trs.rotation = Cesium.Quaternion.fromHeadingPitchRoll(hpr, rotation);

    return Cesium.Matrix4.fromTranslationRotationScale(trs, emitterModelMatrix);
}
Now add the particle system .
var particleSystem = viewer.scene.primitives.add(new Cesium.ParticleSystem({

    image : '../../SampleData/smoke.png',

    startColor : Cesium.Color.LIGHTSEAGREEN.withAlpha(0.7),
    endColor : Cesium.Color.WHITE.withAlpha(0.0),

    startScale : 1.0,
    endScale : 4.0,

    particleLife : 1.0,

    minimumSpeed : 1.0,
    maximumSpeed : 4.0

    imageSize : new Cesium.Cartesian2(25, 25),
    emissionRate : 5.0,
    lifetime : 16.0,

    modelMatrix : entity.computeModelMatrix(viewer.clock.startTime, new Cesium.Matrix4())
    emitterModelMatrix : computeEmitterModelMatrix()
}));
Complete code :
var viewer = new Cesium.Viewer("cesiumContainer");

//Set the random number seed for consistent results.
Cesium.Math.setRandomNumberSeed(3);

//Set bounds of our simulation time
var start = Cesium.JulianDate.fromDate(new Date(2015, 2, 25, 16));
var stop = Cesium.JulianDate.addSeconds(
  start,
  120,
  new Cesium.JulianDate()
);

//Make sure viewer is at the desired time.
viewer.clock.startTime = start.clone();
viewer.clock.stopTime = stop.clone();
viewer.clock.currentTime = start.clone();
viewer.clock.clockRange = Cesium.ClockRange.LOOP_STOP; //Loop at the end
viewer.clock.multiplier = 1;
viewer.clock.shouldAnimate = true;

//Set timeline to simulation bounds
viewer.timeline.zoomTo(start, stop);

var viewModel = {

  emissionRate: 5.0,
  gravity: 0.0,
  minimumParticleLife: 1.2,
  maximumParticleLife: 1.2,
  minimumSpeed: 1.0,
  maximumSpeed: 4.0,
  startScale: 1.0,
  endScale: 5.0,
  particleSize: 25.0,
};

Cesium.knockout.track(viewModel);
var toolbar = document.getElementById("toolbar");
Cesium.knockout.applyBindings(viewModel, toolbar);

var entityPosition = new Cesium.Cartesian3();
var entityOrientation = new Cesium.Quaternion();
var rotationMatrix = new Cesium.Matrix3();
var modelMatrix = new Cesium.Matrix4();

function computeModelMatrix(entity, time) {

  return entity.computeModelMatrix(time, new Cesium.Matrix4());
}

var emitterModelMatrix = new Cesium.Matrix4();
var translation = new Cesium.Cartesian3();
var rotation = new Cesium.Quaternion();
var hpr = new Cesium.HeadingPitchRoll();
var trs = new Cesium.TranslationRotationScale();

function computeEmitterModelMatrix() {

  hpr = Cesium.HeadingPitchRoll.fromDegrees(0.0, 0.0, 0.0, hpr);
  trs.translation = Cesium.Cartesian3.fromElements(
    -4.0,
    0.0,
    1.4,
    translation
  );
  trs.rotation = Cesium.Quaternion.fromHeadingPitchRoll(hpr, rotation);

  return Cesium.Matrix4.fromTranslationRotationScale(
    trs,
    emitterModelMatrix
  );
}

var pos1 = Cesium.Cartesian3.fromDegrees(
  -75.15787310614596,
  39.97862668312678
);
var pos2 = Cesium.Cartesian3.fromDegrees(
  -75.1633691390455,
  39.95355089912078
);
var position = new Cesium.SampledPositionProperty();

position.addSample(start, pos1);
position.addSample(stop, pos2);

var entity = viewer.entities.add({

  availability: new Cesium.TimeIntervalCollection([
    new Cesium.TimeInterval({

      start: start,
      stop: stop,
    }),
  ]),
  model: {

    uri: "../SampleData/models/CesiumMilkTruck/CesiumMilkTruck.glb",
    minimumPixelSize: 64,
  },
  viewFrom: new Cesium.Cartesian3(-100.0, 0.0, 100.0),
  position: position,
  orientation: new Cesium.VelocityOrientationProperty(position),
});
viewer.trackedEntity = entity;

var scene = viewer.scene;
var particleSystem = scene.primitives.add(
  new Cesium.ParticleSystem({

    image: "../SampleData/smoke.png",

    startColor: Cesium.Color.LIGHTSEAGREEN.withAlpha(0.7),
    endColor: Cesium.Color.WHITE.withAlpha(0.0),

    startScale: viewModel.startScale,
    endScale: viewModel.endScale,

    minimumParticleLife: viewModel.minimumParticleLife,
    maximumParticleLife: viewModel.maximumParticleLife,

    minimumSpeed: viewModel.minimumSpeed,
    maximumSpeed: viewModel.maximumSpeed,

    imageSize: new Cesium.Cartesian2(
      viewModel.particleSize,
      viewModel.particleSize
    ),

    emissionRate: viewModel.emissionRate,

    bursts: [
      // these burst will occasionally sync to create a multicolored effect
      new Cesium.ParticleBurst({

        time: 5.0,
        minimum: 10,
        maximum: 100,
      }),
      new Cesium.ParticleBurst({

        time: 10.0,
        minimum: 50,
        maximum: 100,
      }),
      new Cesium.ParticleBurst({

        time: 15.0,
        minimum: 200,
        maximum: 300,
      }),
    ],

    lifetime: 16.0,

    emitter: new Cesium.CircleEmitter(2.0),

    emitterModelMatrix: computeEmitterModelMatrix(),

    updateCallback: applyGravity,
  })
);

var gravityScratch = new Cesium.Cartesian3();

function applyGravity(p, dt) {

  // We need to compute a local up vector for each particle in geocentric space.
  var position = p.position;

  Cesium.Cartesian3.normalize(position, gravityScratch);
  Cesium.Cartesian3.multiplyByScalar(
    gravityScratch,
    viewModel.gravity * dt,
    gravityScratch
  );

  p.velocity = Cesium.Cartesian3.add(
    p.velocity,
    gravityScratch,
    p.velocity
  );
}

viewer.scene.preUpdate.addEventListener(function (scene, time) {

  particleSystem.modelMatrix = computeModelMatrix(entity, time);

  // Account for any changes to the emitter model matrix.
  particleSystem.emitterModelMatrix = computeEmitterModelMatrix();

  // Spin the emitter if enabled.
  if (viewModel.spin) {

    viewModel.heading += 1.0;
    viewModel.pitch += 1.0;
    viewModel.roll += 1.0;
  }
});

Cesium.knockout
  .getObservable(viewModel, "emissionRate")
  .subscribe(function (newValue) {

    particleSystem.emissionRate = parseFloat(newValue);
  });

Cesium.knockout
  .getObservable(viewModel, "particleSize")
  .subscribe(function (newValue) {

    var particleSize = parseFloat(newValue);
    particleSystem.minimumImageSize.x = particleSize;
    particleSystem.minimumImageSize.y = particleSize;
    particleSystem.maximumImageSize.x = particleSize;
    particleSystem.maximumImageSize.y = particleSize;
  });

Cesium.knockout
  .getObservable(viewModel, "minimumParticleLife")
  .subscribe(function (newValue) {

    particleSystem.minimumParticleLife = parseFloat(newValue);
  });

Cesium.knockout
  .getObservable(viewModel, "maximumParticleLife")
  .subscribe(function (newValue) {

    particleSystem.maximumParticleLife = parseFloat(newValue);
  });

Cesium.knockout
  .getObservable(viewModel, "minimumSpeed")
  .subscribe(function (newValue) {

    particleSystem.minimumSpeed = parseFloat(newValue);
  });

Cesium.knockout
  .getObservable(viewModel, "maximumSpeed")
  .subscribe(function (newValue) {

    particleSystem.maximumSpeed = parseFloat(newValue);
  });

Cesium.knockout
  .getObservable(viewModel, "startScale")
  .subscribe(function (newValue) {

    particleSystem.startScale = parseFloat(newValue);
  });

Cesium.knockout
  .getObservable(viewModel, "endScale")
  .subscribe(function (newValue) {

    particleSystem.endScale = parseFloat(newValue);
  });

var options = [
  {

    text: "Circle Emitter",
    onselect: function () {

      particleSystem.emitter = new Cesium.CircleEmitter(2.0);
    },
  },
  {

    text: "Sphere Emitter",
    onselect: function () {

      particleSystem.emitter = new Cesium.SphereEmitter(2.5);
    },
  },
  {

    text: "Cone Emitter",
    onselect: function () {

      particleSystem.emitter = new Cesium.ConeEmitter(
        Cesium.Math.toRadians(45.0)
      );
    },
  },
  {

    text: "Box Emitter",
    onselect: function () {

      particleSystem.emitter = new Cesium.BoxEmitter(
        new Cesium.Cartesian3(10.0, 10.0, 10.0)
      );
    },
  },
];

Sandcastle.addToolbarMenu(options);
边栏推荐
- Experiment 4 QT
- 跳槽字节跳动很难嘛?掌握这些技巧,你也能轻松通过
- Wechat applet reports errors using vant web app
- 直击产业落地 | 飞桨重磅推出业界首个模型选型工具
- July 30, 2021 [wgs/gwas] - whole genome analysis process (Part I)
- MySQL quotation sentence is unlocked: algorithm=insert, lock=none
- Vulfocus entry target
- At the age of 25, I started to work in the Tiankeng industry with buckets. After going through a lot of hardships to become a programmer, my spring finally came
- min_ max_ Gray operator understanding
- What management improvements can CRM bring to enterprises
猜你喜欢

亚马逊测评术语有哪些?

Use of nested loops and output instances

Deep learning - brnn and DRNN
Wechat applet reports errors using vant web app

Recurrence relation (difference equation) -- Hanoi problem

How CRM & PM helps enterprises create optimal sales performance

期末复习-PHP学习笔记1

深度学习——卷积的滑动窗口实现

Deep learning - residual networks resnets

深度学习——语言模型和序列生成
随机推荐
Do you know the IP protocol?
December 13, 2021 [reading notes] | understanding of chain specific database building
February 14, 2022 [reading notes] - life science based on deep learning Chapter 2 Introduction to deep learning (Part 1)
Simple application of generating function
C. Fishingprince Plays With Array
直击产业落地 | 飞桨重磅推出业界首个模型选型工具
Tue Jun 28 2022 15:30:29 gmt+0800 (China standard time) date formatting
MySQL加索引语句不加锁:ALGORITHM=INPLACE, LOCK=NONE
Lexicographic order -- full arrangement in bell sound
Summary and common applications of direction and angle operators in Halcon
Efga design open source framework openlane series (I) development environment construction
奇迹MU服务器租用选择 真实好用 稳定不卡 还能防入侵
tp5设置直接下载文件
深度学习——嵌入矩阵and学习词嵌入andWord2Vec
Final review -php learning notes 4-php custom functions
Introduction notes to pytorch deep learning (XII) neural network - nonlinear activation
Construction of energy conservation supervision system for campus buildings of ankery University
An example of a single service in a cloud project driven by a domain
Introduction to opencv (II): image color space conversion and image saving
Development technology sharing of Jingtan NFT digital collection system