version control
Basic concepts
Version control is a very simple concept , I'll give you an example to illustrate briefly, and you can get a general idea of what it is , When you don't have version control :
-
Yours BOSS Decided to make a software that is often forced by the gray , Find you to develop
-
When you're done , The boss thought it would be better to add a new function
-
When you add new features , The boss thinks the feature may not be very good , Let's get rid of it
-
When you remove this feature , The boss said iron juice , You'd better add it up , I suddenly thought this function was very good
-
You think boss, I quit , You can do it yourself , But reality does make you hold up your keyboard and do it

At this time, smart students may do this , Copy after basic functions , Then make changes to the copy and add new functions , In this way, no matter how wonderful the boss is, you have a way to deal with it :

So this is the simplest version control , Is it very simple ?
Historical development
Version control has gone through four stages , as follows :
- Folder copy
- Local version control
- Centralized version control
- Distributed version control
Folder copy
There's no need to say more about this , Believe that all fools understand , As mentioned in the example above, copy the original product and add new features .
This is really a solution for a long time , But it has a very big problem , For example, the code of my original product is 100000 lines , My new feature has 20000 lines , So my original product (V1) Plus my new features (V2) It's going to take 220000 lines of code to store , It's a waste of storage space (V1 100000 lines ,V2 120000 lines ).
Local version control
To the back , Gradually, there are some software , It can help us do version control , Instead of copying it manually .
also , It has the following characteristics :
1. Only one version can be seen at the same time , If you want to go back to the previous version , It can be rolled back through its command and other operations
2. It won't be easy to copy , It's an incremental update based on the original code , This means that the total amount of code stored in my two versions is only 140000 lines , Very space saving
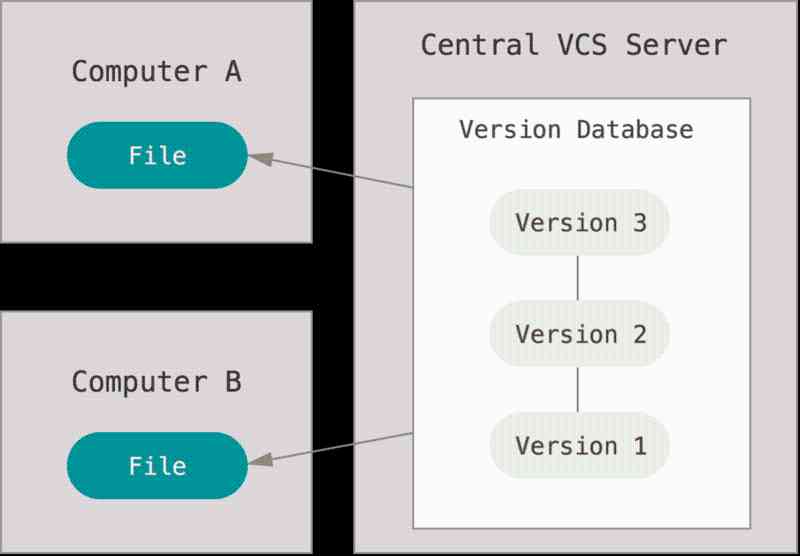
remember , The first feature is very representative , So here's a picture of Git Pictures on the official website , You can see clearly , We can only see one document at a time , But multiple versions are stored in the version Library :

Centralized version control
gradual , People are beginning to find that individual combat can't solve all the problems , We need to co produce .
So when there are multiple developers developing at the same time , There needs to be a common repository for storing code , Now the code will be submitted to a common repository , In this way, the problem of collaborative development is solved , But the corresponding , If the computer in the shared warehouse goes down , Then everyone can't produce , If the situation is worse, such as disk damage in the shared warehouse , Then all your hard work for so long is in vain .
Here are two features , To elaborate :
1. It is mainly used for centralized development
2. All code is submitted to the shared warehouse only , This will bring some security risks
Distributed version control
In order to solve the disadvantages of centralized version control , Distributed version control came out later , Such as Git、Mercurial、Bazaar as well as Darcs etc. , You can choose to push your own code locally , You can also choose to push to a remote warehouse . For the moment , It's a great solution , As shown in the figure :
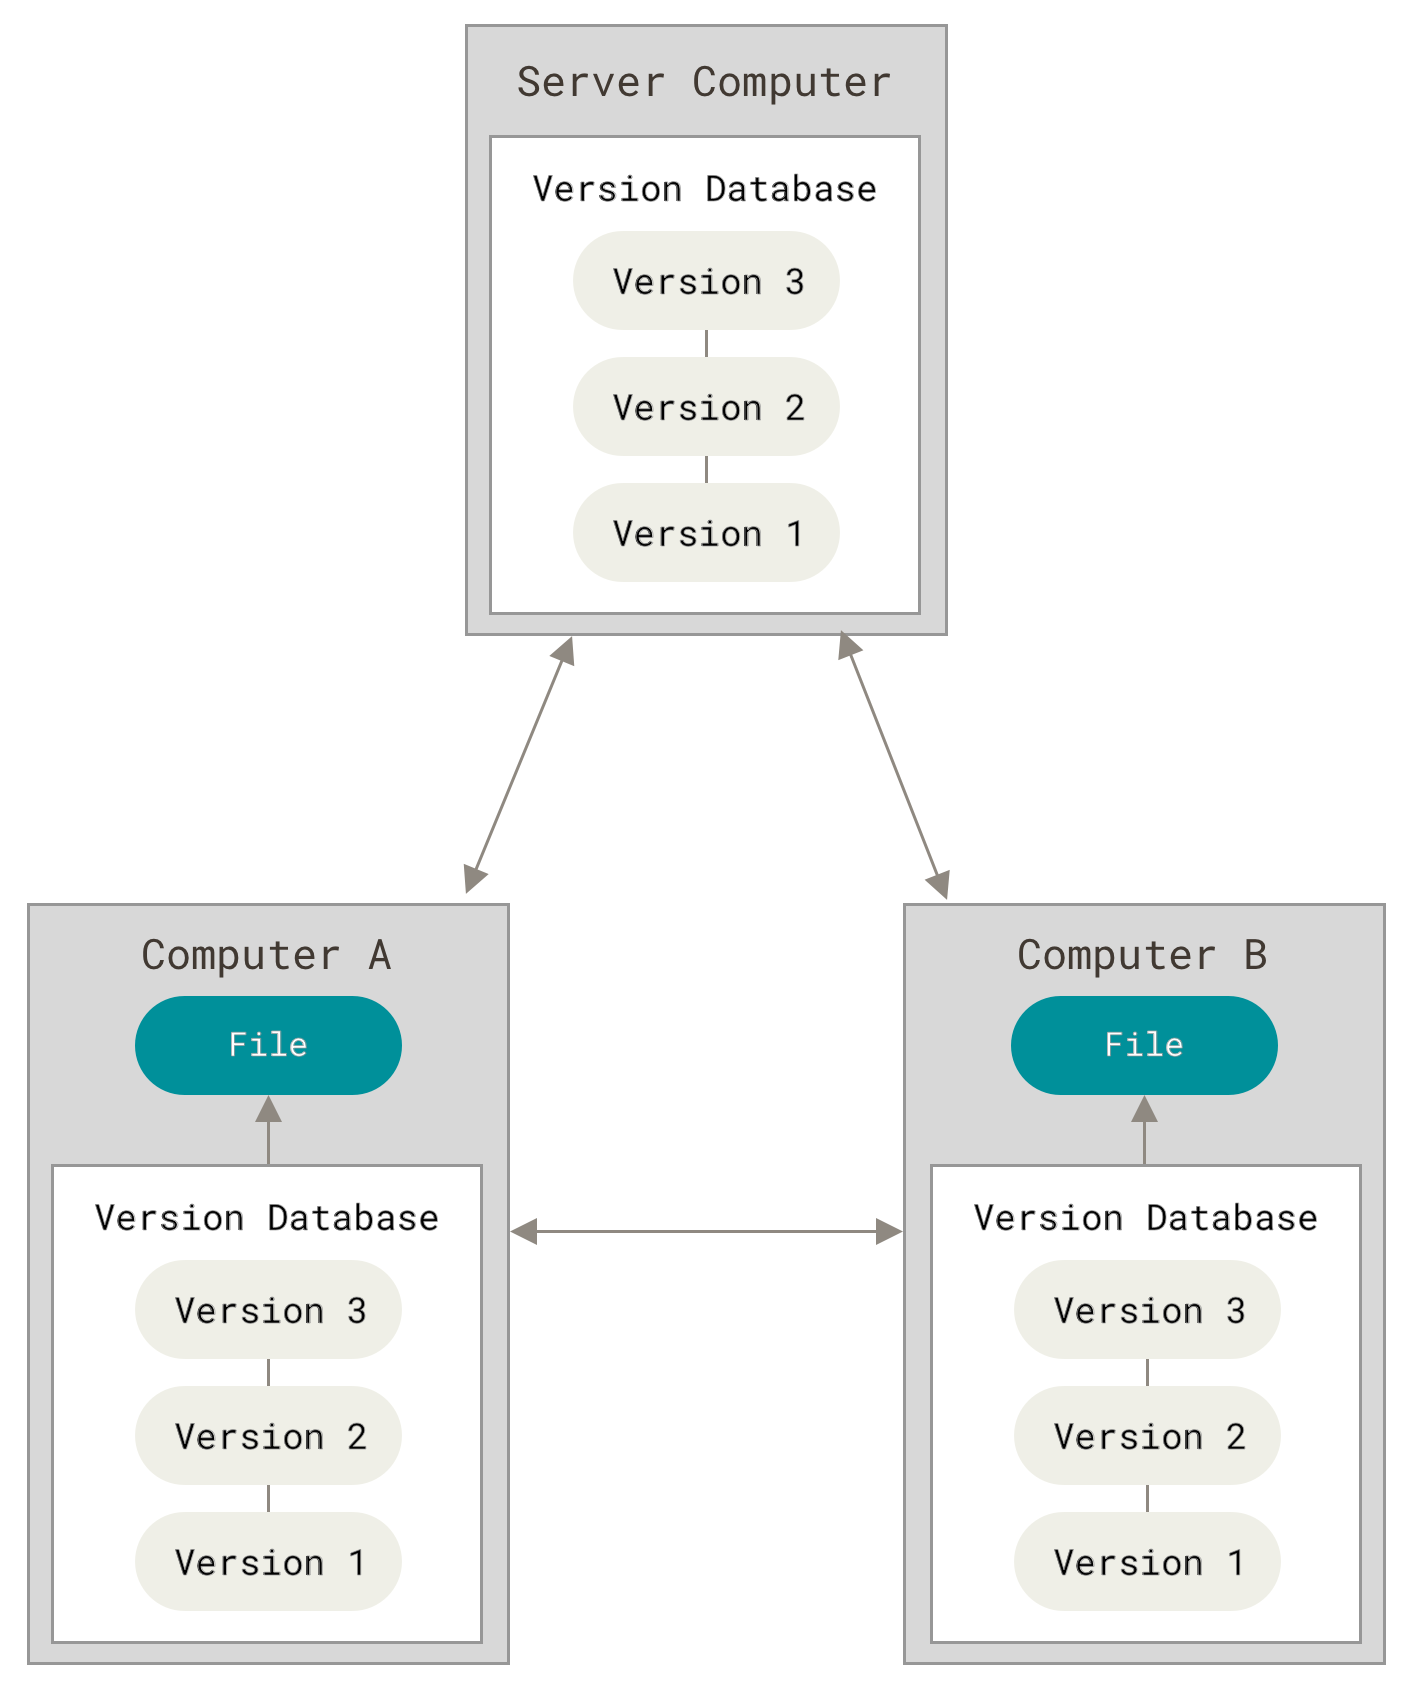
You can be in the same project , Work with people in different groups . You can set up different collaboration processes according to your needs , Such as hierarchical model workflow , This was not possible in previous centralized systems .
Git Introduce
Basic introduction
Git It's distributed version control software , Here is its official website :
Its documentation is very detailed , And it's easy to use , At present, in most scenarios, we choose Git To do version control .
So , It's a general trend to study it , It's unavoidable , Face the wind .
Download and install
The official instructions are very detailed , Check it , It contains Windows/Linux/Mac Installation steps of :
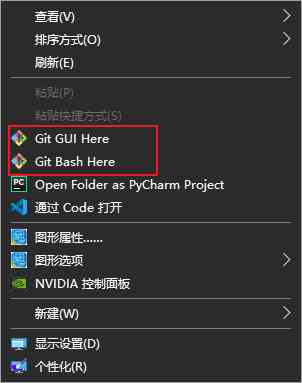
Now let's use Windows For example , When you have finished downloading, just click next , When the installation is complete, right-click the mouse on the desktop. If the following two options appear , The installation is complete .
Local repository
because Git It's distributed version control software , So let's first learn how to submit code locally , Then see how to submit to the remote code base .
Version submission
stay Git in , The first thing we need to do is manage a project .
Go to the project folder , By executing the initialization command Git Take over version control of the current project .
Here we have one mysite Project , There's a index.html, The contents are as follows :

<!DOCTYPE html>
<html lang="en">
<head>
    <meta charset="UTF-8">
    <meta name="viewport" content="width=device-width, initial-scale=1.0">
    <title> master station </title>
</head>
<body>
    <h1> Welcome to my main station </h1>
    <ul>
        <li> I like </li>
        <li> My collection </li>
        <li> My attention </li>
        <li> Historical record </li>
    </ul>
</body>
</html>
Now? , We need to open it terminal, Then go to the folder , Give Way Git Take over mysite Folder .
Or you can right-click under the folder , choice Git Bash Here Then enter the following command in its terminal :
git init
When the initialization command takes effect , stay mysite A... Will be generated in the folder .git Hidden folders for .

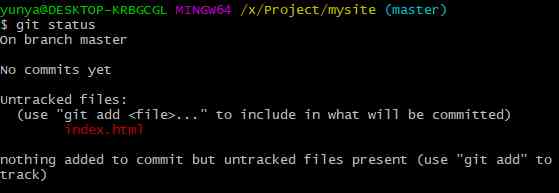
Then we use the following command to detect the status of managed files in the current folder , Enter the following command :
git status
The newly added files and the modified files belong to unmanaged files , In red , As shown below :
Next, let's manage the file , There are two commands for you to choose from :
git add  file name   #  Just manage one file
git add .   #  Represents all files in the current directory
Here we use git add . that will do , After entering the command, check the file status again , It turns green :
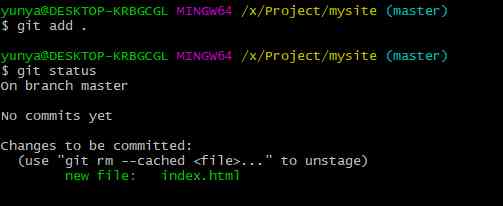
Next we start to build the first version , Just name it v1 Well . Execute the following command for version generation :
git commit -m " Description information "
Here it will prompt an exception , Let you configure user information , enter one user name 、 Email and other information ( Just type... Once ):
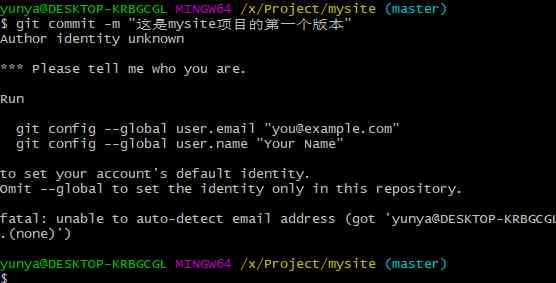
So let's configure personal information , Follow the command it provides :
git config --global user.email " Email address "
git config --global user.name " user name "
And then type in git commit -m " Description information " Submit version , Successful submission will be displayed .
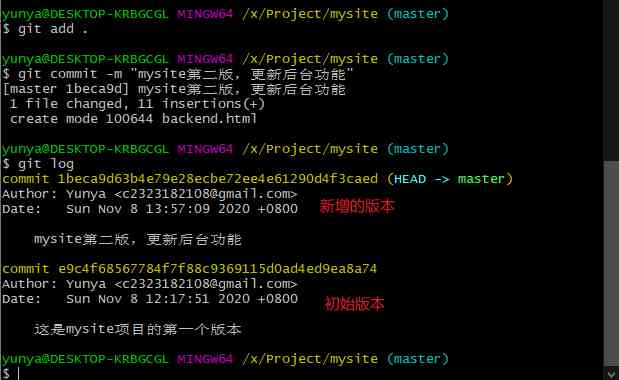
Next use git log Command to view the generated version :
git log

Okay , Now let's summarize the order :
| command | describe |
|---|---|
| git init | initialization git, Give Way git Take over the current folder |
| git status | View the current file status , New or modified files are red , And perform add The files after the command are all green |
| git add [./filename] | Submit documents |
| git commit -m " Description information " | Build a version |
| git log | View version submission information |
Modify and add
When you make changes to files in a project , Will also be Git To detect . As shown below , Let's get rid of index.html In addition, we have added backend.html file .
The contents are as follows :
<!DOCTYPE html>
<html lang="en">
<head>
    <meta charset="UTF-8">
    <meta name="viewport" content="width=device-width, initial-scale=1.0">
    <title> Background management </title>
</head>
<body>
    <h1> Welcome to backstage management </h1>
</body>
</html>

Now? , When we use git status after , You will see backend.html It's red .

At this point, we still need to perform the above steps , To generate a second version .
Version rollback
If now your Boss Tell you that background functions are not needed for the time being , You need to roll back the version , Roll back the second edition to the first edition .
The following command is used to roll back :
#  Roll back the higher version to the lower version , Check the version number first , Set the rollback again
git log
git reset --hard  Version number
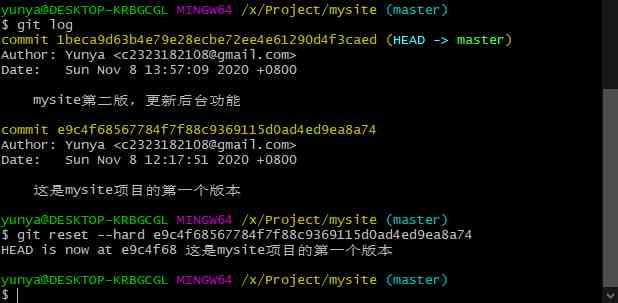
Now? , Check the folder under the project again , You won't see backend.html The file .

meanwhile , Use git log The command doesn't see the second version of the record .

If at this time Boss Tell you , The backstage function is very good, uses again lets you add back , What should you do ? because git log We can't find the version number of the second edition .
take it easy , You can use the following command :
#  Roll back low version to high version , Use reflog View version number , Set the rollback again
git reflog
git reset --hard  Version number
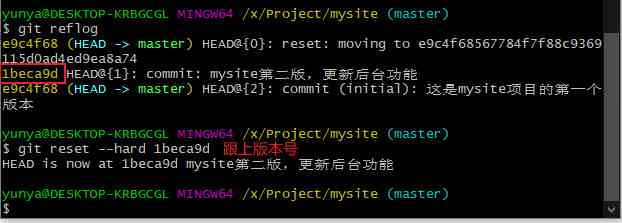
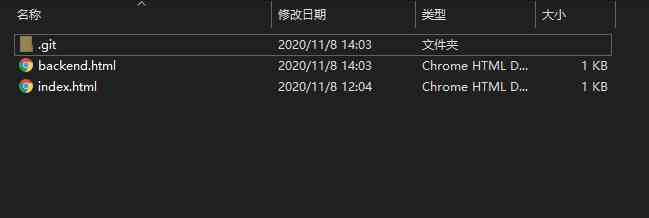
Now? , Look again mysite The contents of the folder , You'll find that backend.html The papers are back .
| command | describe |
|---|---|
| git log | View version submission information , It is often used to roll back a higher version to a lower version |
| git reflog | View version submission information , It is often used to roll back from low version to high version |
| git reset --hard Version number | Do version rollback |
Partition concept
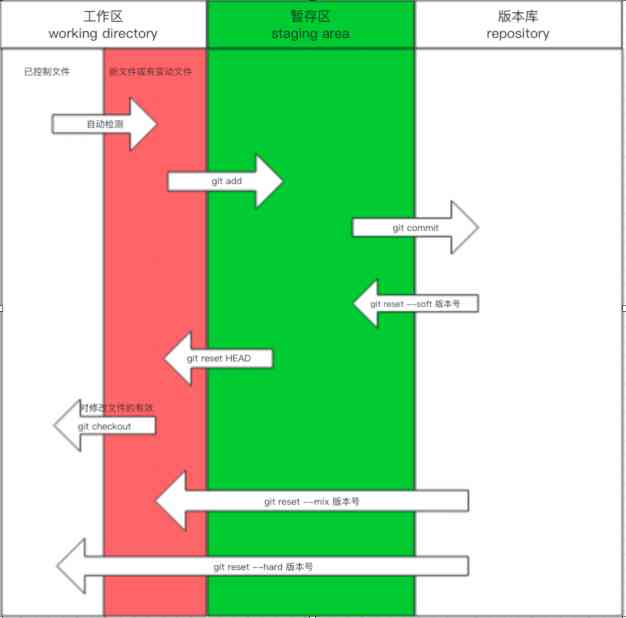
In the above operation , It can be found that a current file can have multiple states :
- To control the State : Means that the document can be git The state of Management , For now, all of them are located in git init The files under the folder are in control state
- In a state of change : When there are new documents , Or after the original document has been modified , Use git status Files in red state
- Staging area status : It means to execute git add After the command , Red status file changes to green status file
- Version library status : It means to execute git commit After the command , Files submitted to the repository
These different states , Corresponding to different partitions , Because at this point we are doing local version control , So the version library here is the local version library :
Use branches
Branch is Git A very important concept in , It allows you to deal with more emergencies , And make you better for collaborative development .
Multiple branches don't affect each other , As shown in the figure below :

The committed versions seen in different branches are not the same
When you create a new branch in a branch , The child branch will inherit all the code in the current branch node
There is one by default master Branch
Use the following command to view branches , You can see , It has one by default master Branch .
git branch

If you want to create a new branch , You can use the following command :
git branch The name of the new branch
In the following example , A new name will be created dev The branch of .

In the picture * Which branch are you in now , If you want to switch branches, you can use the following command :
git checkout Branch name
The following example , We switch the current branch into dev:

Usually , A project requires at least two branches ,dev And master( Default ).
master Branches only hold stable versions . and dev The branch stores the development version .
Now? , I want to write a statistical function , stay dev After the development has been completed and submitted , Switch to master Branch to merge ( You merge under that branch , Just merge the code into that branch ).
<!DOCTYPE html>
<html lang="en">
<head>
    <meta charset="UTF-8">
    <meta name="viewport" content="width=device-width, initial-scale=1.0">
    <title> Data statistics </title>
</head>
<body>
    <h1> Data statistics home page </h1>
</body>
</html>
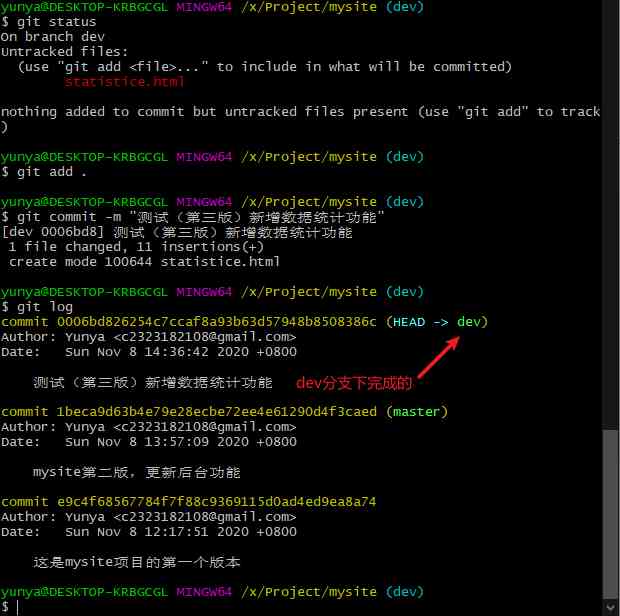
If there is no problem with the test , Use the following command to merge branches ( Switch branches first ):
git merge Branches to merge

Use git log View the submitted version information , You'll see a hint of branch merging :
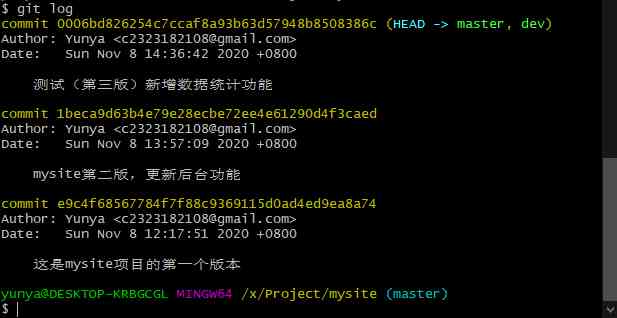
For some branches ( Such as test bug), If you don't want it , It can be deleted :
git branch -d Branch name
The following is a summary of the commands for this section :
| command | describe |
|---|---|
| git branch | View all branches of the current project |
| git branch Branch name | Create a new branch |
| git checkout Branch name | Switch branches |
| git merge Branches to merge | Merging branches , Merge under that branch |
| git branch -d Branch name | Delete the branch |
Merger conflict
Due to multi branch development , Multiple branches may modify the same code , At this time, there will be merger conflicts .
As shown below , We are master About China index.html It's like this :
    <h1> Welcome to my main station </h1>
    <ul>
        <li> I like </li>
        <li> My collection </li>
        <li> My attention </li>
        <li> Historical record </li>
    </ul>
If I'm in master In the branch , by index.html Add a new content , As shown below :
    <h1> Welcome to my main station </h1>
    <ul>
        <li> I like </li>
        <li> My collection </li>
        <li> My attention </li>
        <li> Historical record </li>
        <li> New content (master)</li>
    </ul>
And in master Submit it to the version Library under the branch .

Now I'm going to switch to dev In the branch , Also for the index.html Making a change , The contents are as follows :
    <h1> Welcome to my main station </h1>
    <ul>
        <li> I like </li>
        <li> My collection </li>
        <li> My attention </li>
        <li> Historical record </li>
        <li> New content (dev)</li>
    </ul>
And in dev Commit to the repository in the branch .

Now switch back to master To merge , It will prompt me to merge conflicts :

If you are in the vscode Wait for the editor to open index.html, You can see the following picture :
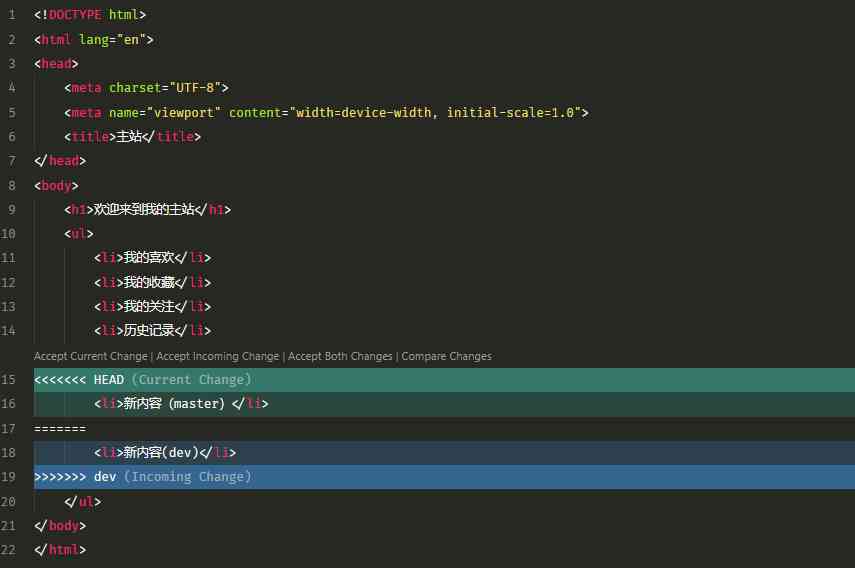
The reason for merge conflicts is that multiple branches modify the same code , When merging Git I don't know who to listen to . So just keep it all , It's up to you to make changes manually .
So I delete it all and solve the merge conflict :
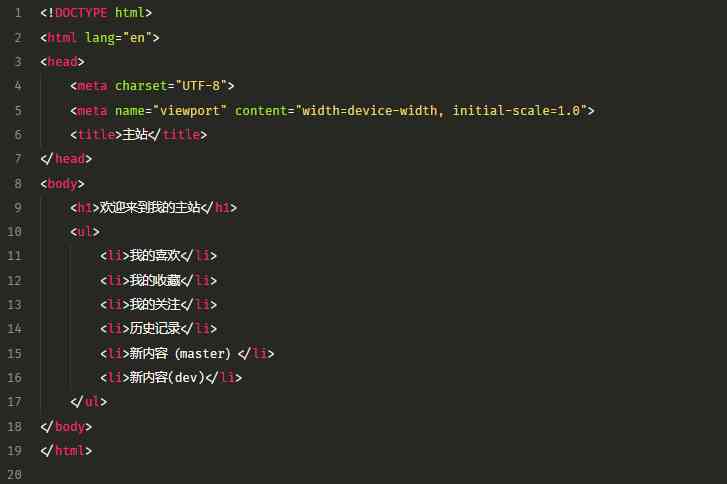
Of course , Finally, generate the final version .
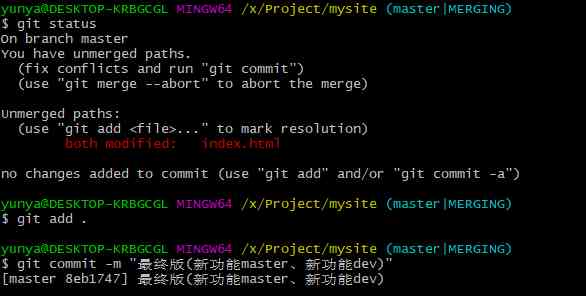
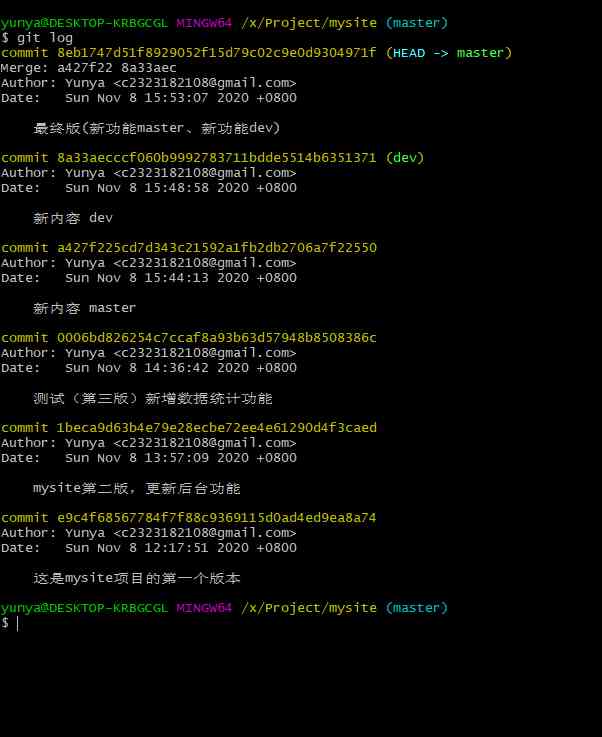
OK, So the introduction of local warehouse is almost the same at present . Take a look at how many versions we've finally produced :
Handle bug
When you master Branches, or stable versions, appear after online deployment bug, What should the processing flow look like ?
As shown in the figure below :

If the online version has bug, A new branch should be created immediately bug Repair , Then submit and merge .
At the same time, it won't delay the progress of your other lines of business , When other lines of business are developed , If there is no conflict in the merger, good luck , If there is a conflict, resolve it .
Remote push
GitHub
Git It is a distributed version control software , Basic local version control has been described above .
Next, we need to introduce how to push the code from the local version library to the remote version library , Of course, there are a lot of remote repositories you can choose from , Here is the introduction GitHub, Because it is currently the most used remote code hosting Repository .
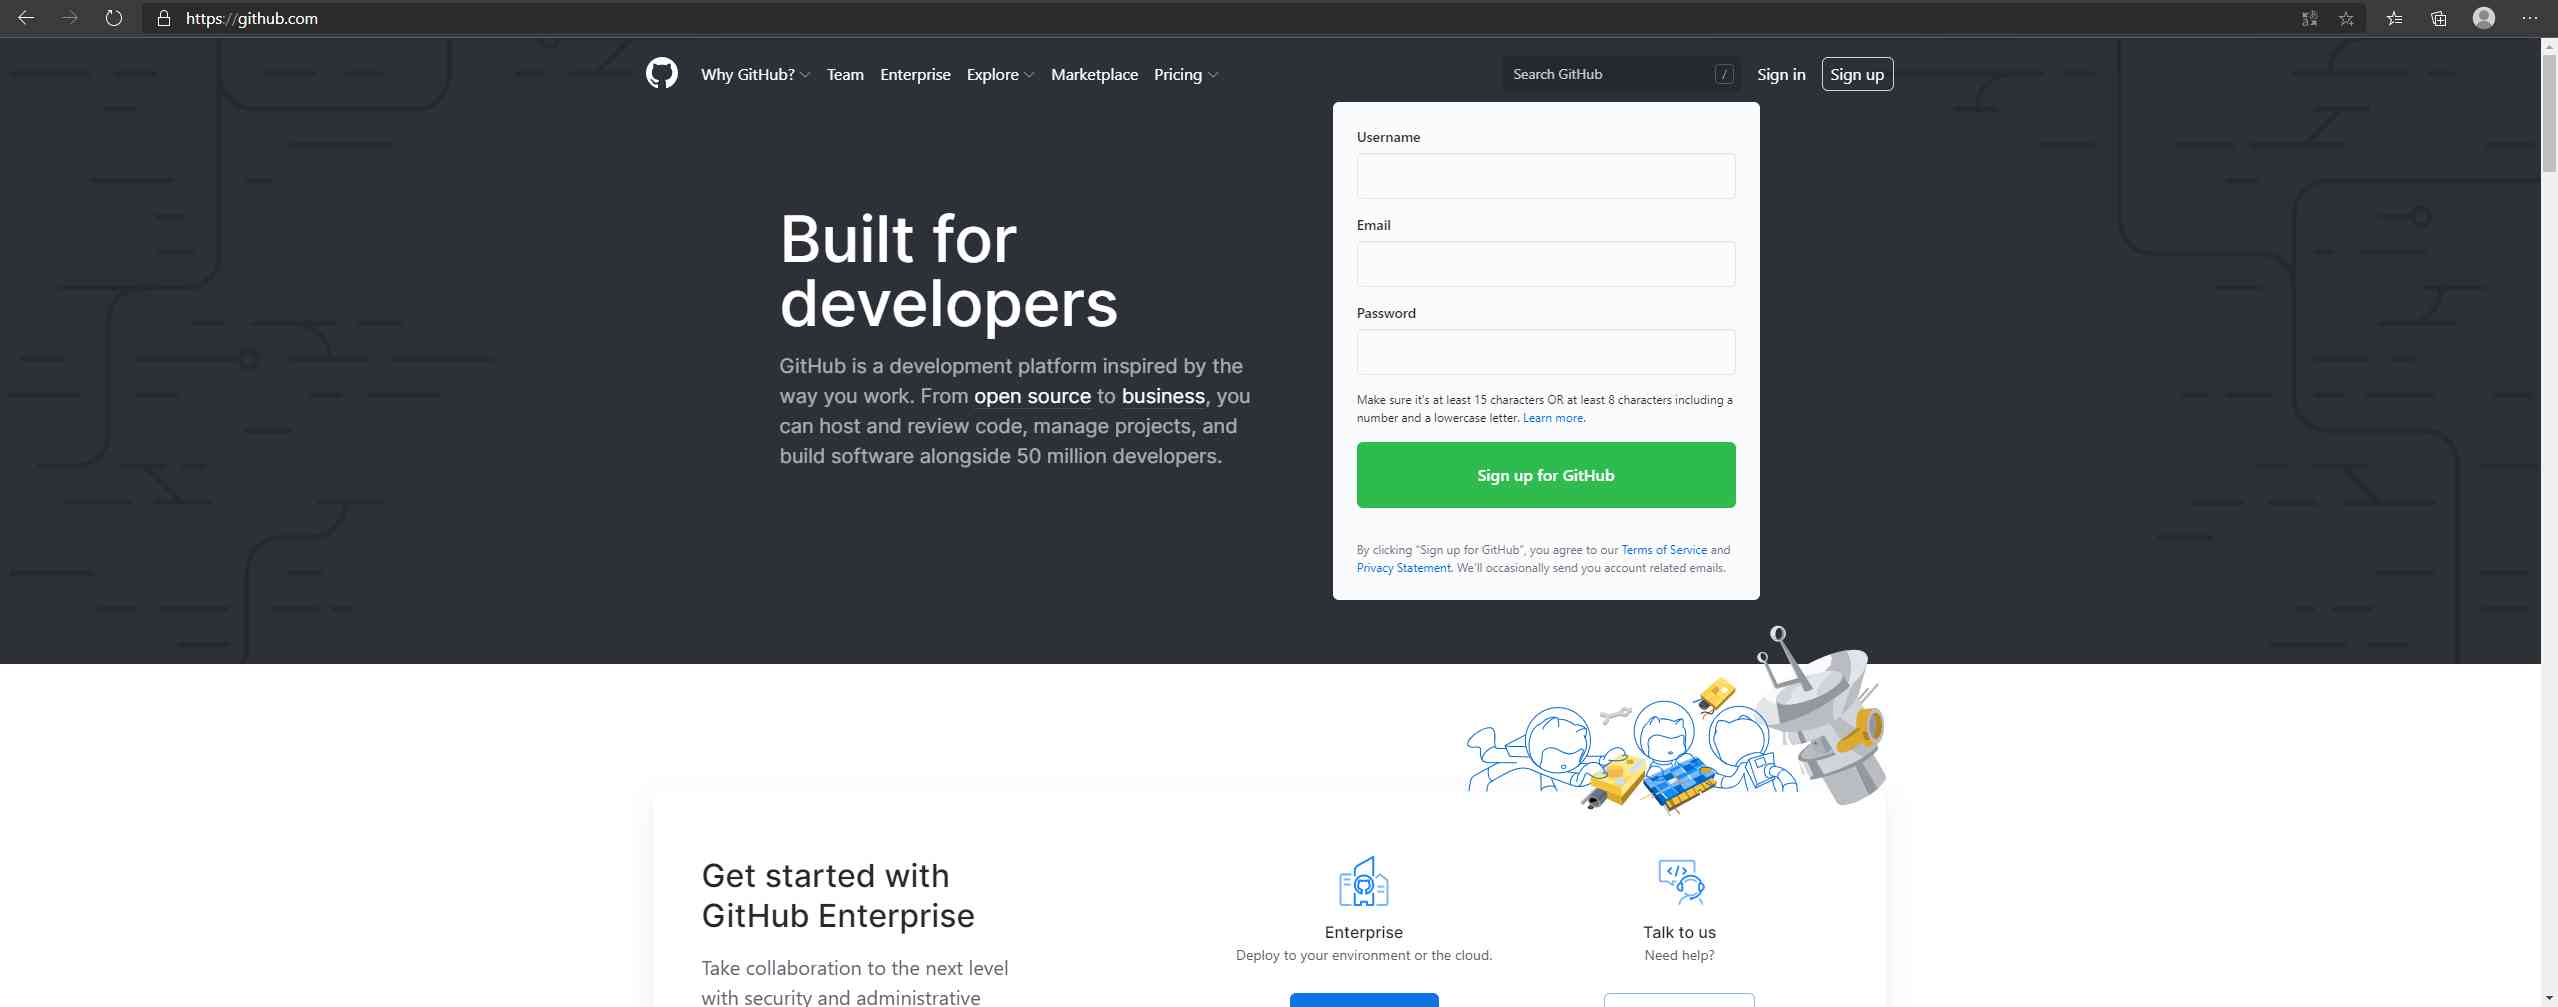
First you need to register a GitHub, There's no more demonstration here , You can register yourself .
Create repository
When we log in GitHub after , The first thing to do is create a remote repository .
Open the warehouse page first :
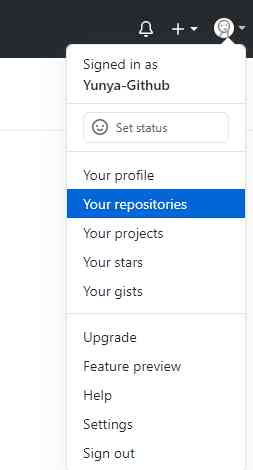
And then click New Ready to build a new warehouse :

Here are some settings :
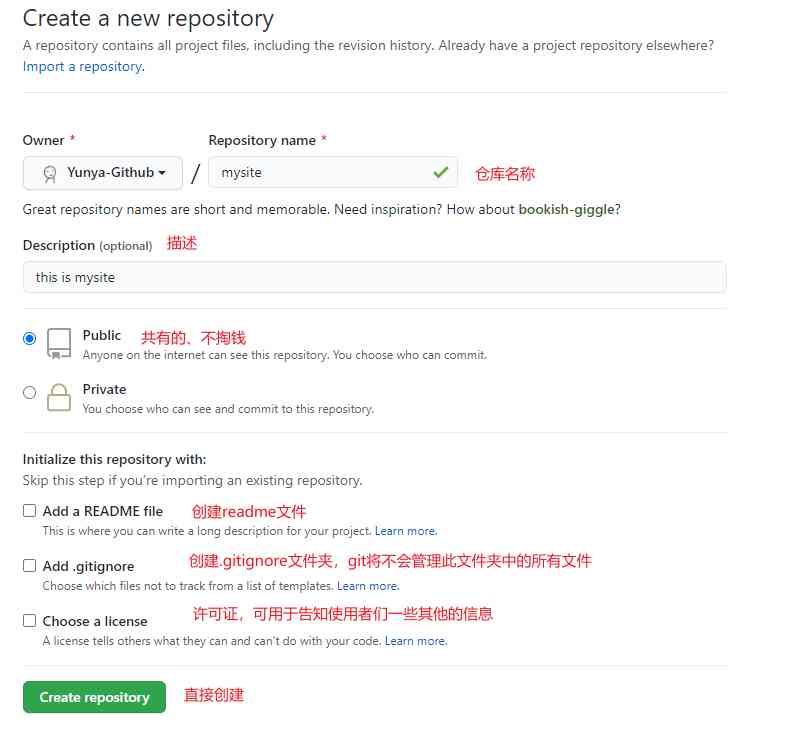
Next you'll see this page :
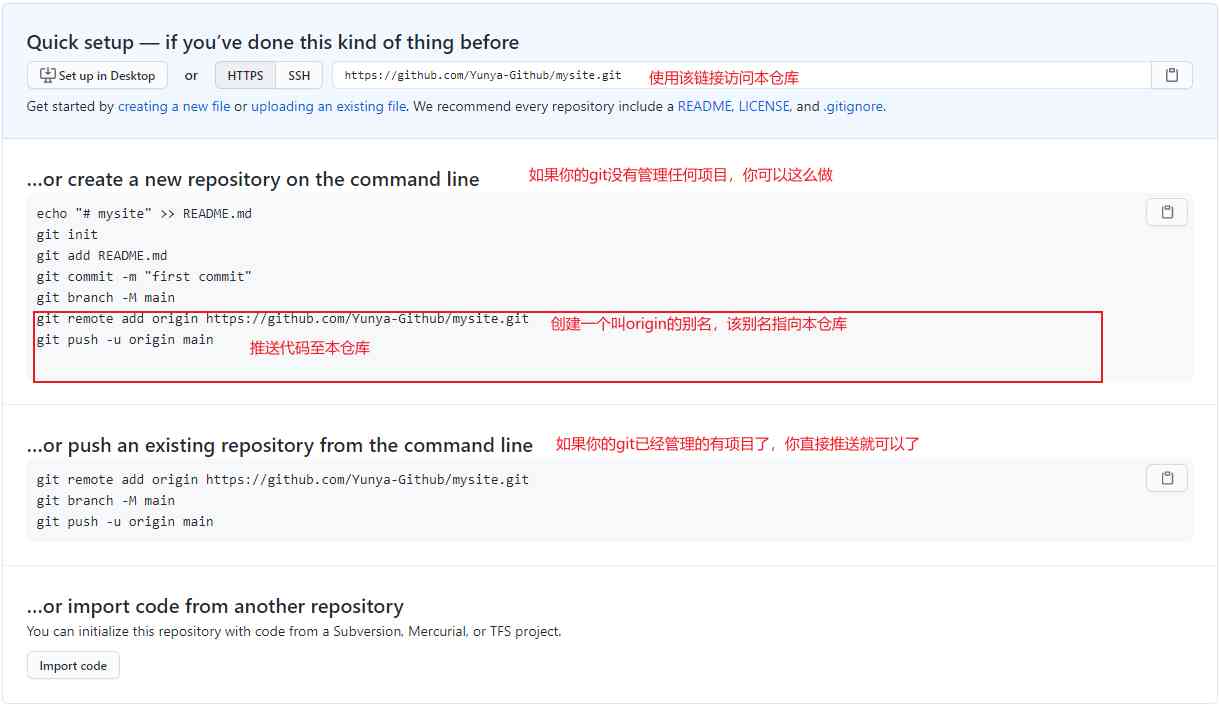
OK, So far, our warehouse has been created .
Push code
Now? , Try to mysite Push the code in to GitHub Well .
Enter the following two commands :
git remote add origin https://github.com/Yunya-Github/mysite.git
git push -u origin master

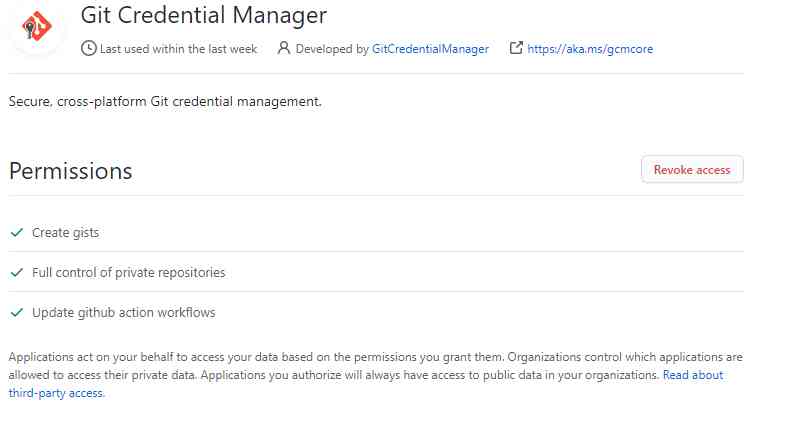
Because this is the first time we use GitHub, So it pops up a page like this :
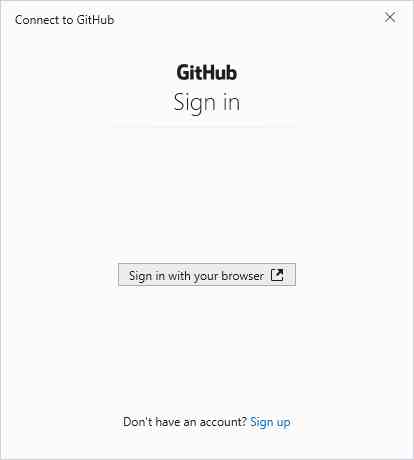
We click on the middle button , Open this page
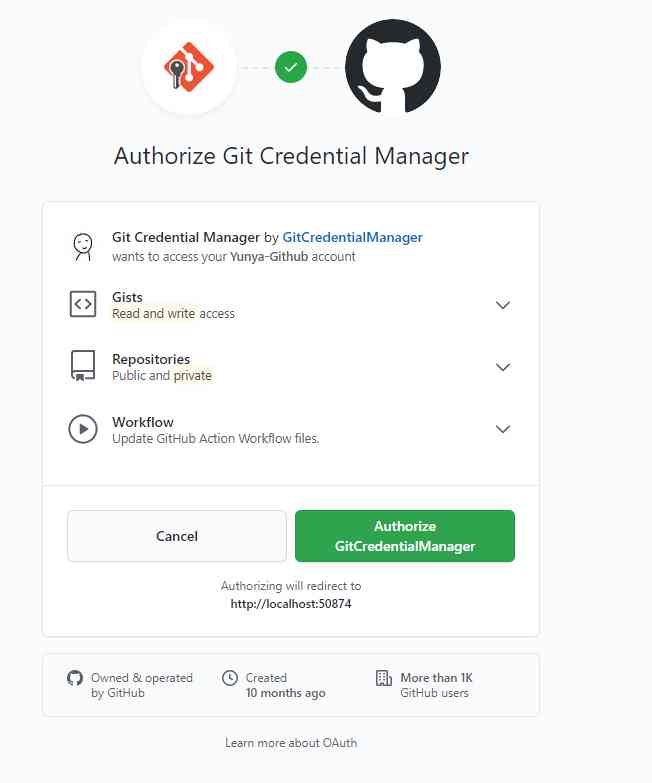
Then click on the green button
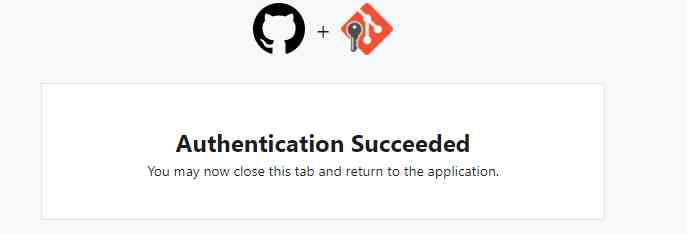
You will receive an email , Open the email and click on the first link , And it's done .
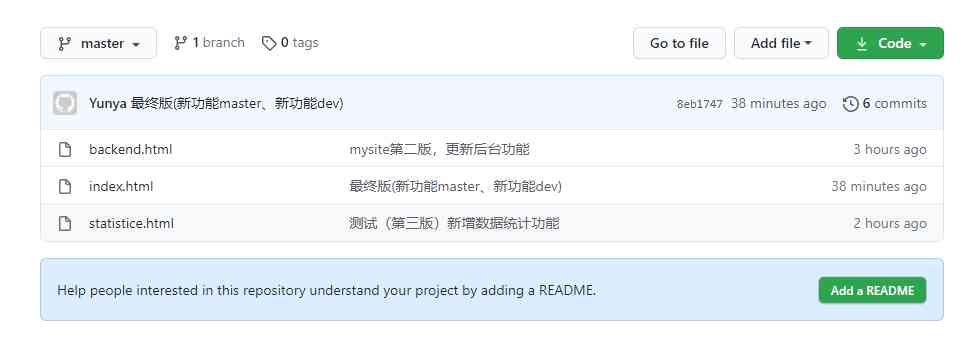
Now open your warehouse , You can see that the files have been uploaded .
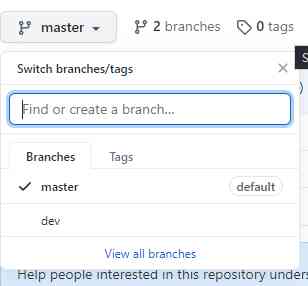
It is worth mentioning that , It just uploaded master Branch , If we want to upload dev Branch , You still need to input push command :
git push -u origin dev

Now? , Whether it's master still dev, Have been successfully uploaded to GitHub It's in .
The following is a summary of the contents of this summary :
| command | describe |
|---|---|
| git remote add Alias Warehouse address | Give the warehouse address an alias |
| git push -u origin Branch name | Push branch to remote warehouse |
matters needing attention :
When pushing code , Push one branch at a time
Pull the code
When you're on a different machine , If you want to continue with unfinished work , You can pull the code from the remote version library and write it .
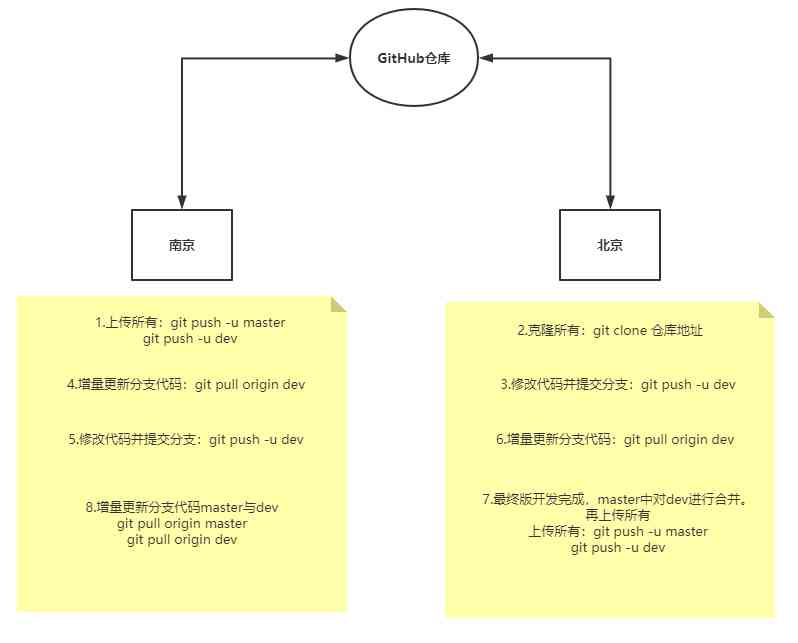
As shown below , I'm in Beijing now , But the code is in Nanjing , So I want to pass GitHub Continue to edit my unfinished code .
First step , Create folder :
X:\>mkdir beijing

X:\>cd beijing

X:\beijing>
The second step , Use git Pull the code :
git clone Remote warehouse address # Automatic alias , The name is origin Clone the entire code ( All branches )

Now we can develop , Enter dev Branch to update .
    <h1> Welcome to my main station </h1>
    <ul>
        <li> I like </li>
        <li> My collection </li>
        <li> My attention </li>
        <li> Historical record </li>
        <li> New content (master)</li>
        <li> New content (dev)</li>
        <li> Content updated at home </li>
    </ul>
After the update is completed, first in dev For local submission , Then submit to GitHub You can go up. .
git push origin -u dev
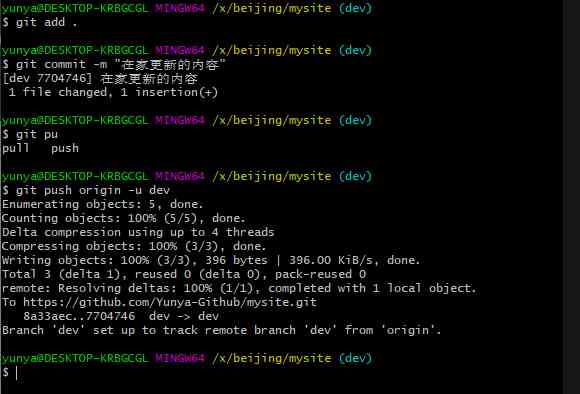
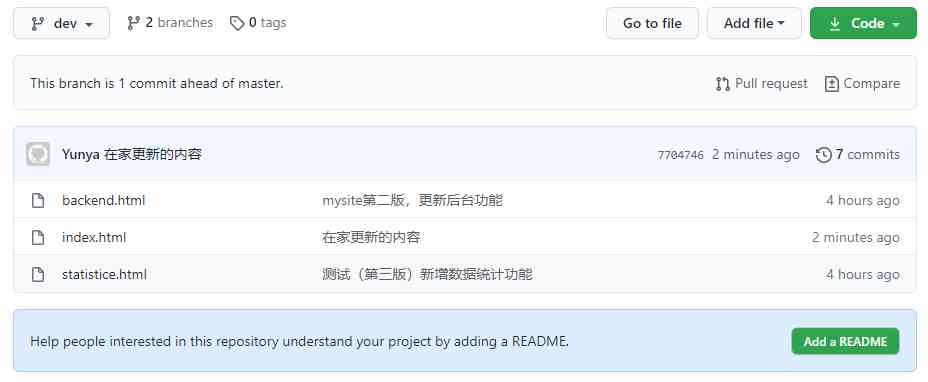
at present ,GitHub The code on dev The branch is also updated :
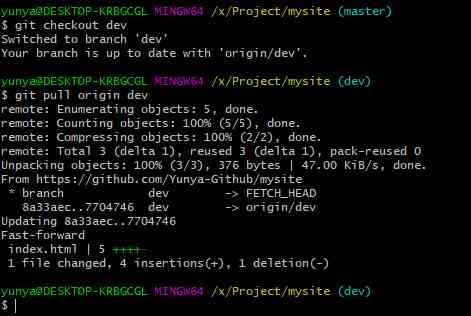
If I come back to Nanjing , To the original office environment , You can use the following command to the original dev Incremental update :
git checkout dev
git pull origin dev  #  Incremental updating
Just go back and forth , I'll draw a picture and feel :
This chapter commands a summary of :
| command | describe |
|---|---|
| git clone Remote warehouse address | Clone all the code from the remote repository ( Use only for the first time ) |
| git pull origin Branch name | Incrementally update the code in a branch |
Partition concept
Because of the remote warehouse involved , So there's another partition :
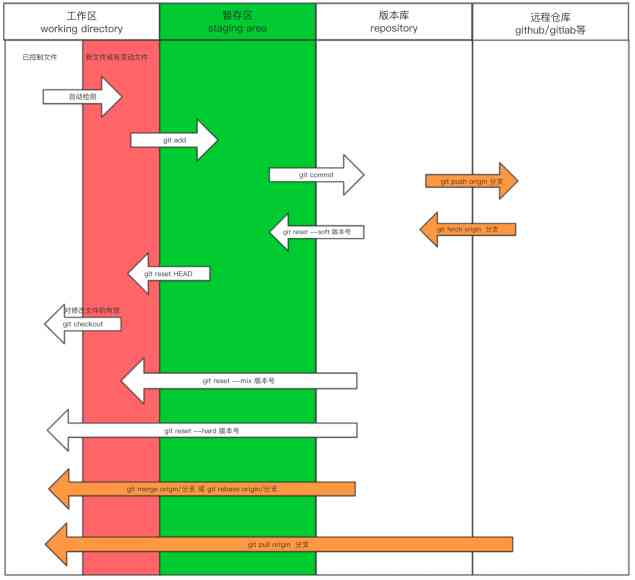
There are several points in this picture , I hope you can pay attention to .
Using incremental updates pull It can actually be split into two commands :
git fetch origin  Branch   #  Pull the branch of the remote version library into the local version library
git marge origin/ Branch   #  Merge the local version of the aerial code into the local branch
Collaborative development
gitflow
gitflow It's a workflow , Here are some processes that should be followed in the development process .
gitflow Common branches
- Production Branch
Which is what we often use Master Branch , Code that this branch recently released to the production environment , Recently released Release, This branch can only be merged from other branches , Cannot be modified directly in this branch
- Develop Branch
This branch is our main development branch , Include all to publish to next Release Code for , This major merger with other branches , such as Feature Branch
- Feature Branch
This branch is mainly used to develop a new function , Once development is complete , We merge back Develop Branch to next Release
- Release Branch
When you need a new release Release When , We are based on Develop Branch create a Release Branch , complete Release after , We merged into Master and Develop Branch
- Hotfix Branch
When we're in Production Discover new Bug When , We need to create one Hotfix, complete Hotfix after , We merge back Master and Develop Branch , therefore Hotfix Changes to go to the next Release
The initial Branch
All in Master On the branch Commit should Tag:( tagging , It will be introduced later )

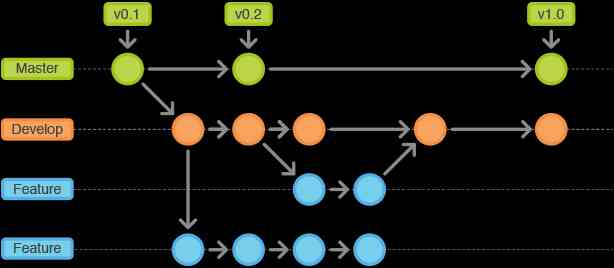
Feature Branch
Feature After the branch is completed , Must merge back Develop Branch , This is usually deleted after merging branches Feature Branch , But we can keep it
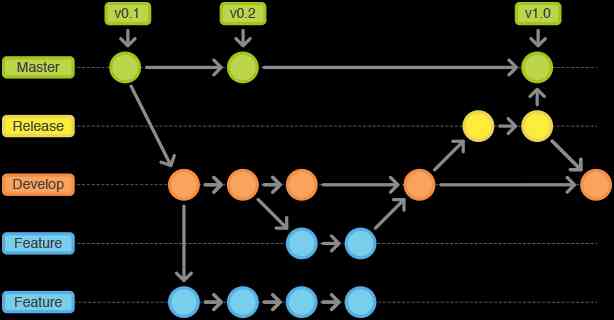
Release Branch
Release Branching is based on Develop Branch creation , It's over Release Points after , We can do it here Release Test on branch , modify Bug etc. . meanwhile , Other developers can develop new Feature( remember : Once hit Release Don't go from Develop Merge new changes on branch to Release Branch )
Release Release When branching , Merge Release To Master and Develop, At the same time Master On the branch Tag remember Release Version number , You can then delete Release The branch .
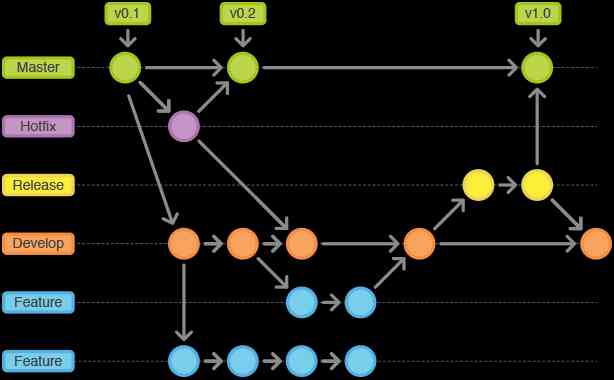
Maintenance branch Hotfix
hotfix Branching is based on Master Branch creation , Need to merge back after development Master and Develop Branch , At the same time Master Play one. tag
Other matters
Of course, there are many branches that you haven't touched , It doesn't matter , It's just a workflow , Maybe your company is using another process .
Individual projects
When it comes to collaborative development , All members need to be able to operate on the same project , At this point, you need to invite members and give them permission , Otherwise, the member will not be able to develop ,GitHub Support two ways to create projects for collaborative development .
my GitHub Now I have a mysite Open projects for , Now I want to invite a developer to co develop
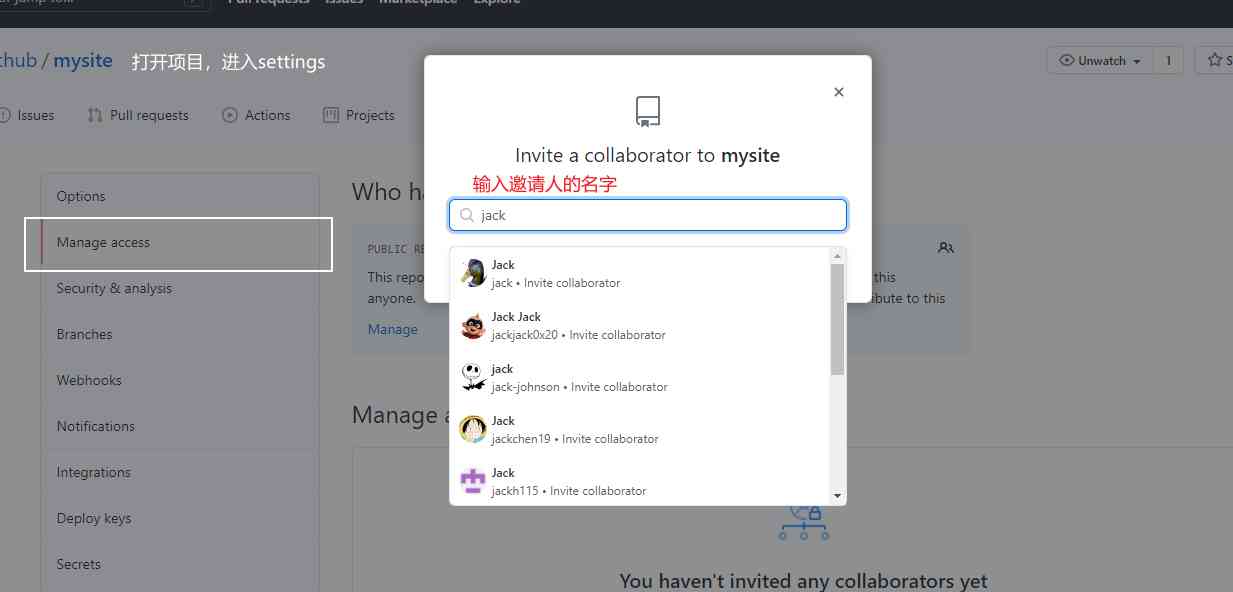
That's it , When he agreed , You can work with me on Collaborative Development .
Organize projects
Companies often use the form of organization for collaborative development , There can be multiple projects under an organization , So let's create an organization now .
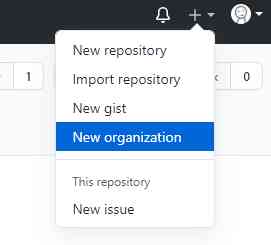
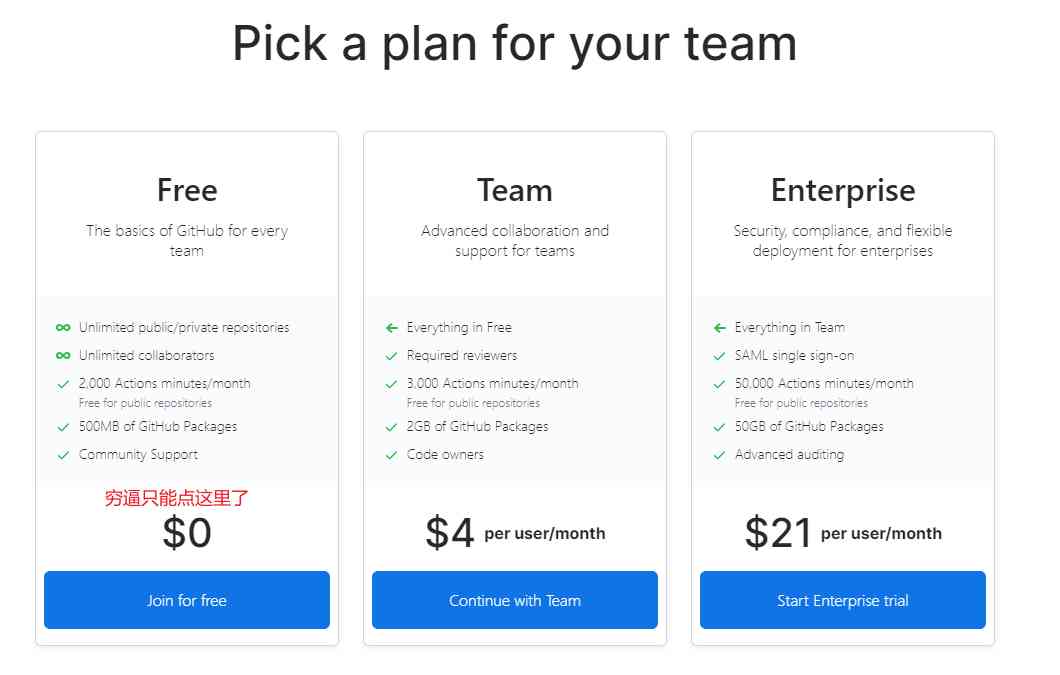
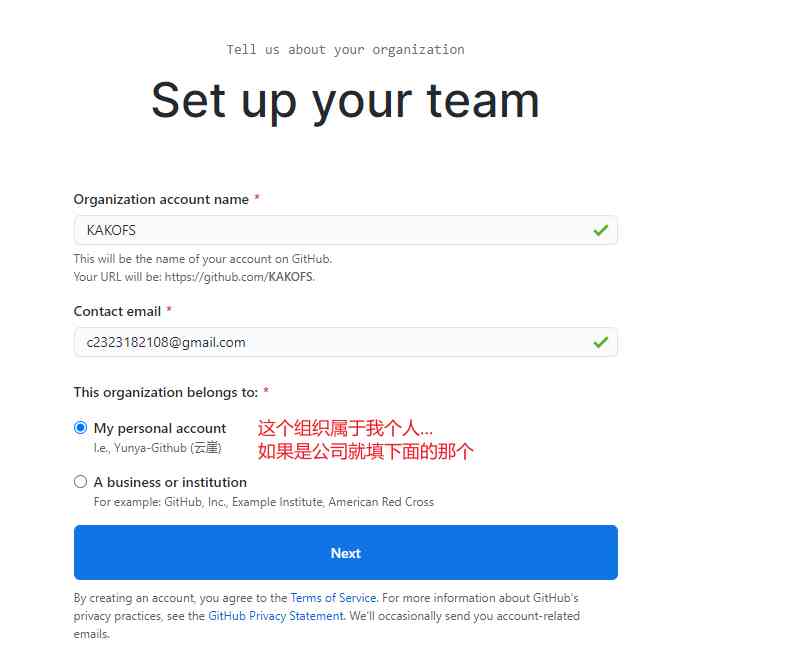
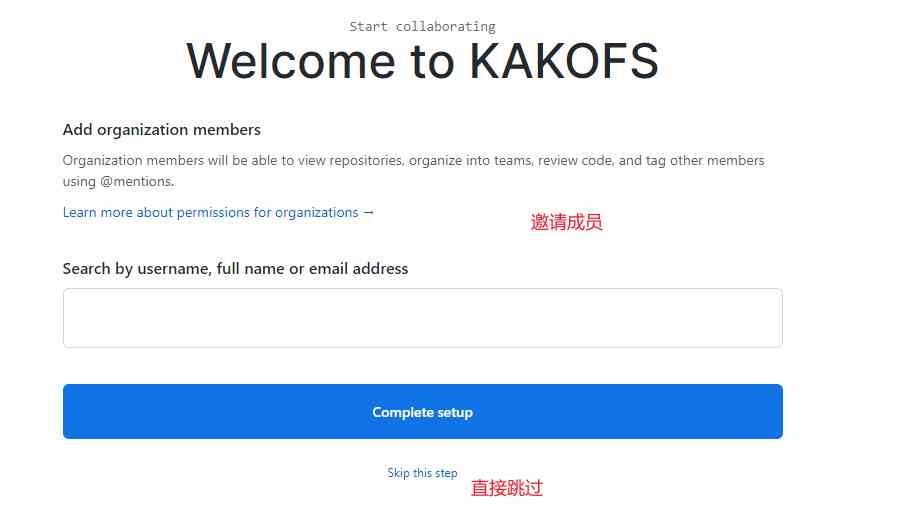
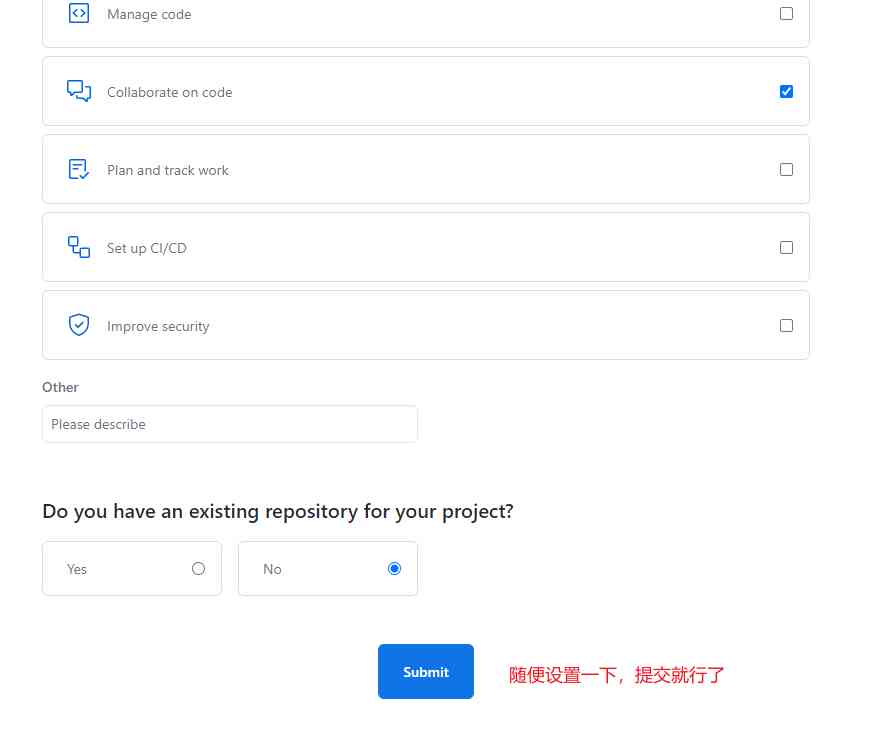
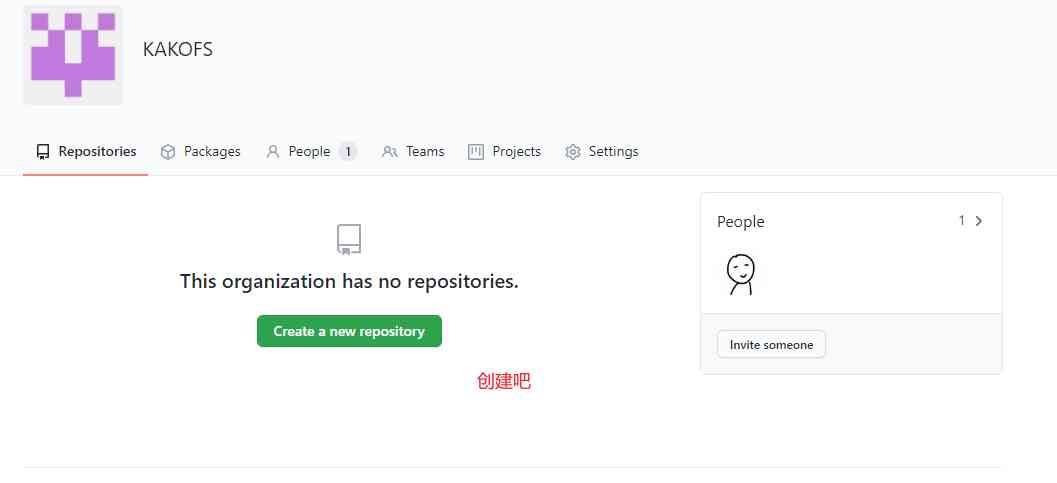
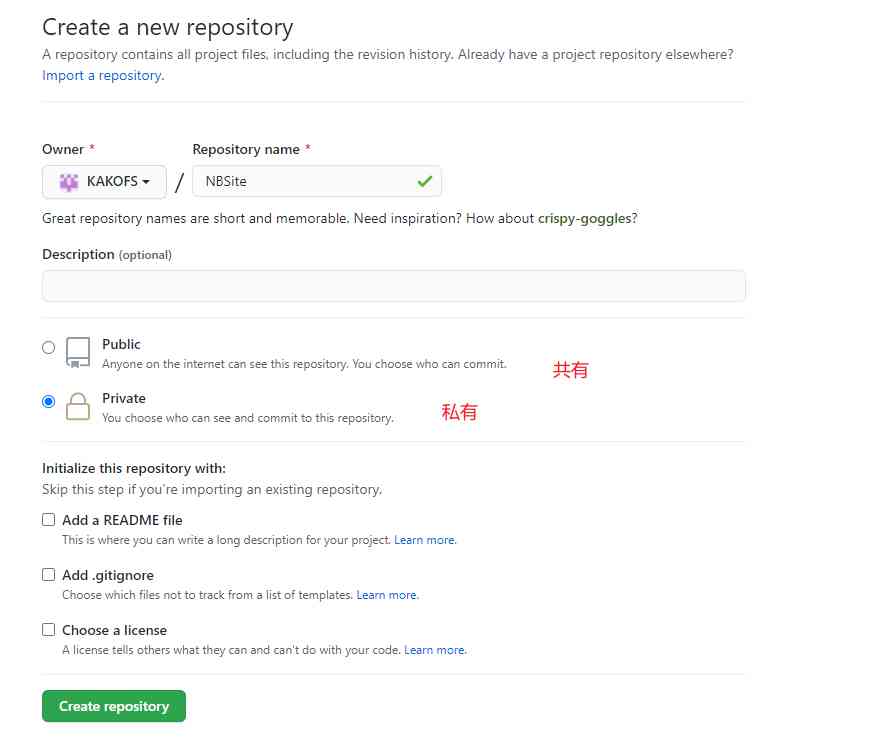
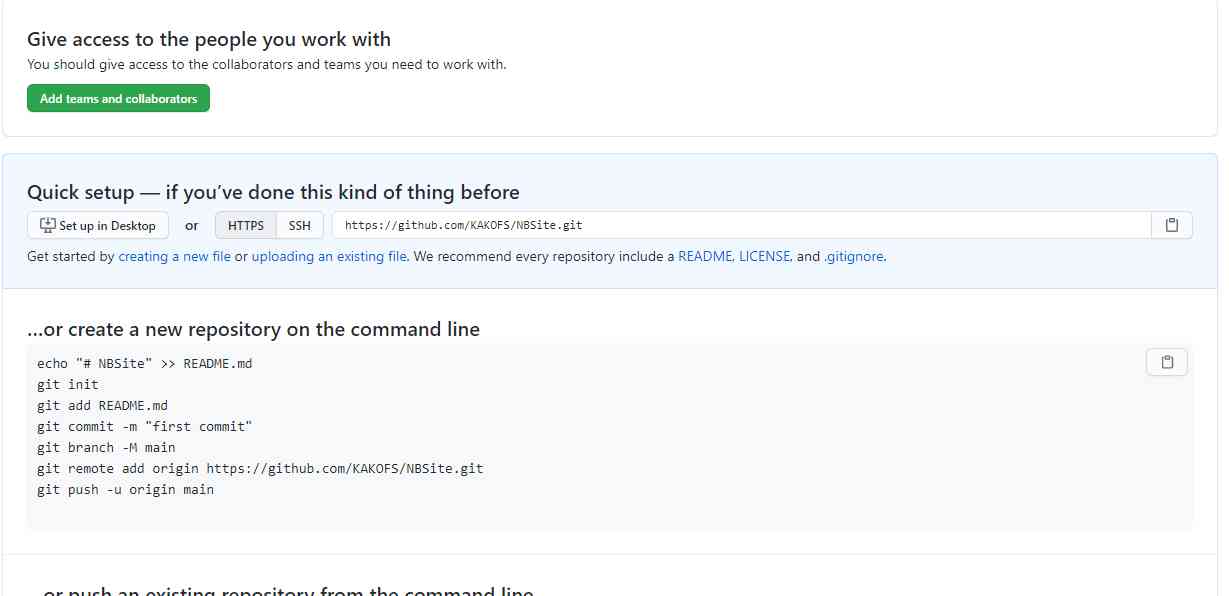
Now? , You can submit your first version to the repository .
tag application
The version number we can see above , It's all a bunch of hashes .
It's obviously very unfriendly , So it's better to give each version an alias when developing , Or label .
Now we've created a new local project called NBSite, And wrote the first edition . We need to put a label on it when we submit it .
git tag -a v1.0 -m " describe "  	#  Create locally tag Information
git tag -d v1.0  			 #  Delete tag
git push origin --tags       #  Will local tag Information is pushed to the remote warehouse
git pull origin --tags       #  Update local tag Version information

git checkout v.10  			 #  Switch tag
git clone -b v-.1   Address   		#  Appoint tag Download code
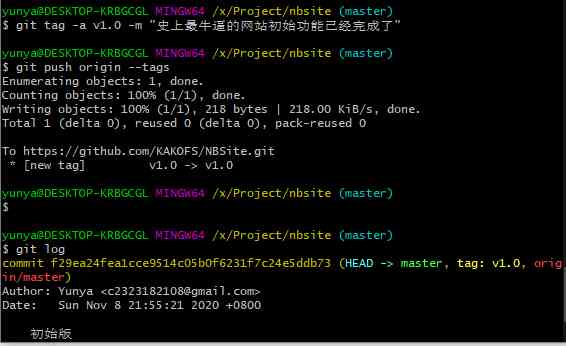
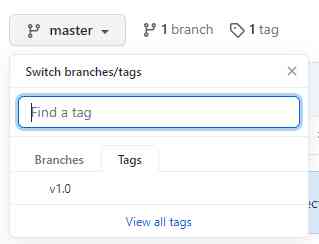
Now? , On our remote warehouse , We've got an initial version of tag 了 , Update later , Remember to label it .
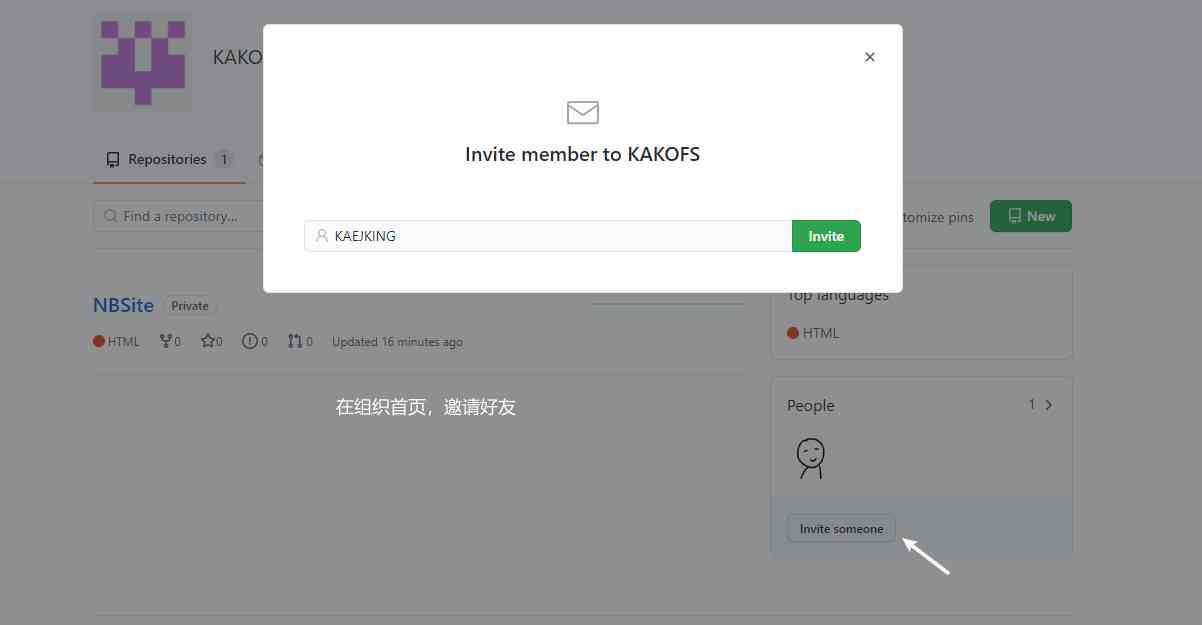
Invite development
First of all, invite our good friends to the stage :
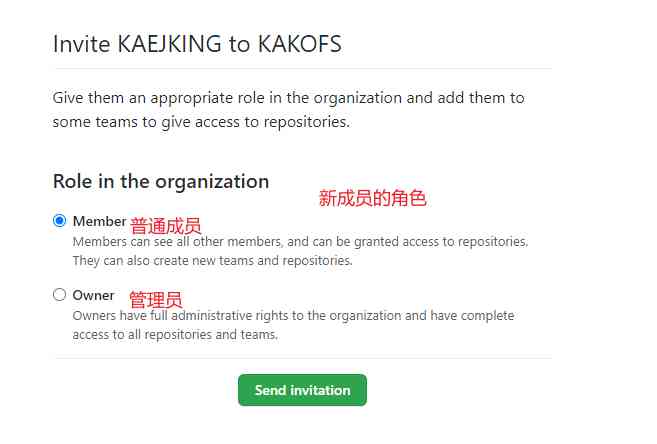
Now? , Our dear KAEJKING After confirmation by email, I have entered the organization , Click on NBSite This project , give KAEJKING jurisdiction .
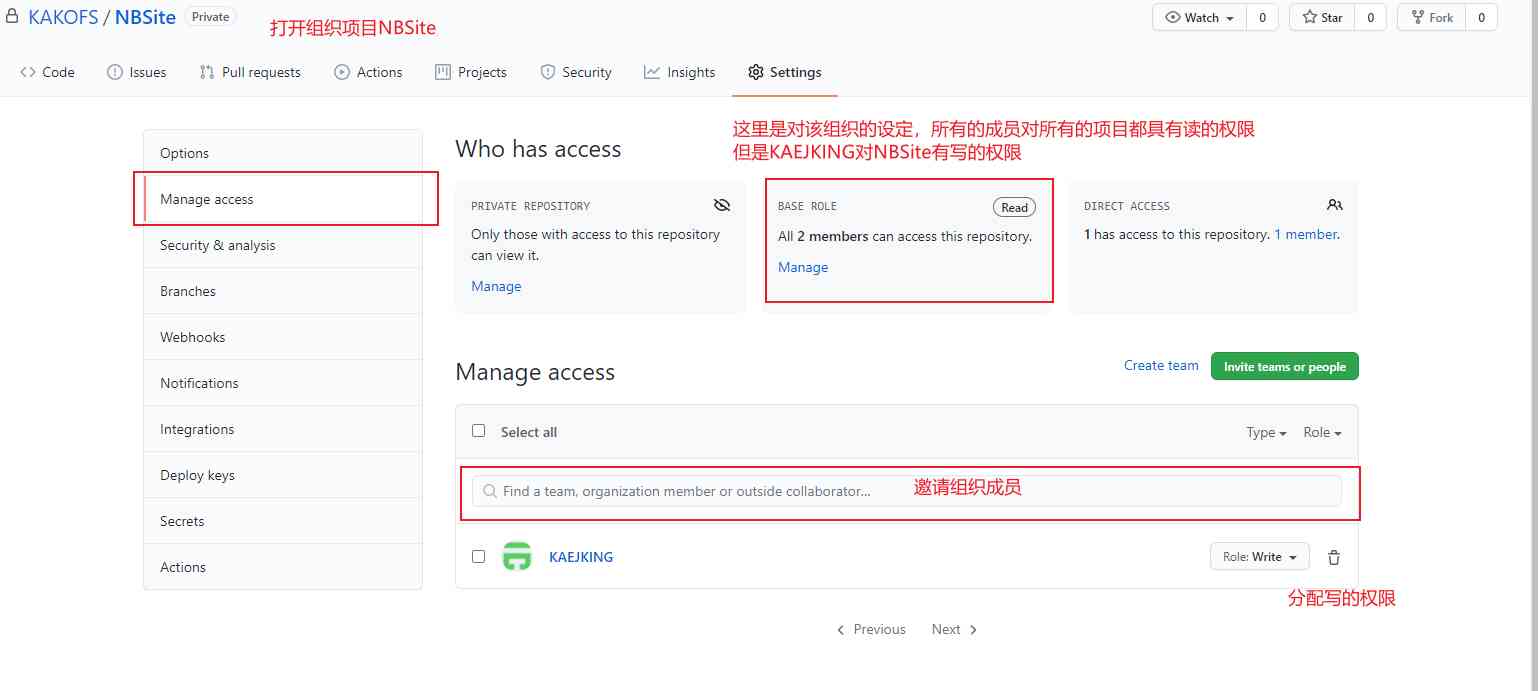
start-up
Now? KAEJKING This member already has write permission . We try to make it right to NBSite Project updates .
git clone https://github.com/KAKOFS/NBSite.git
cd NBSite
git checkout dev  #  Switch to dev
git bransh KAEJKING #  Create a new branch , It can be named after function , It can also be a person's name . Must be in dev Create

#  Write code

git add .
git commit -m "KAEJKING New features developed "
git push origin KAEJKING  #  Push the development branch to the organizational Repository
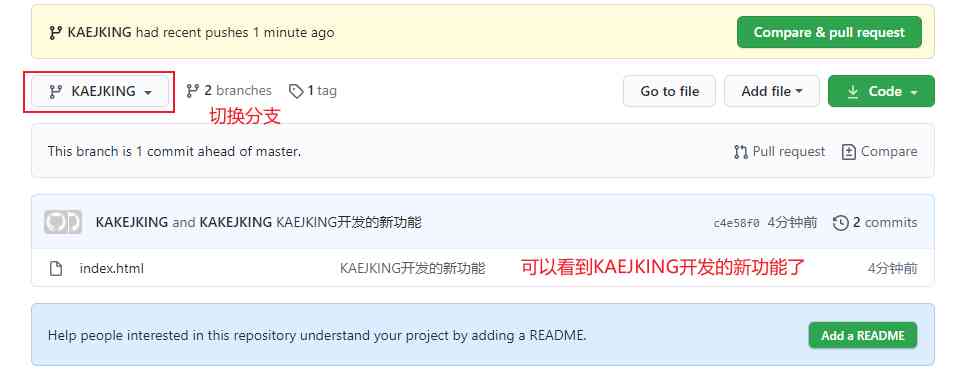
Code review
review It's a new one based on dev The branch of , because KAEJKING Is based on dev The functional branch of . So we need to do code testing before merging , That is to say review Only after finishing can we put KAEJKING Development content merged into dev Branch .
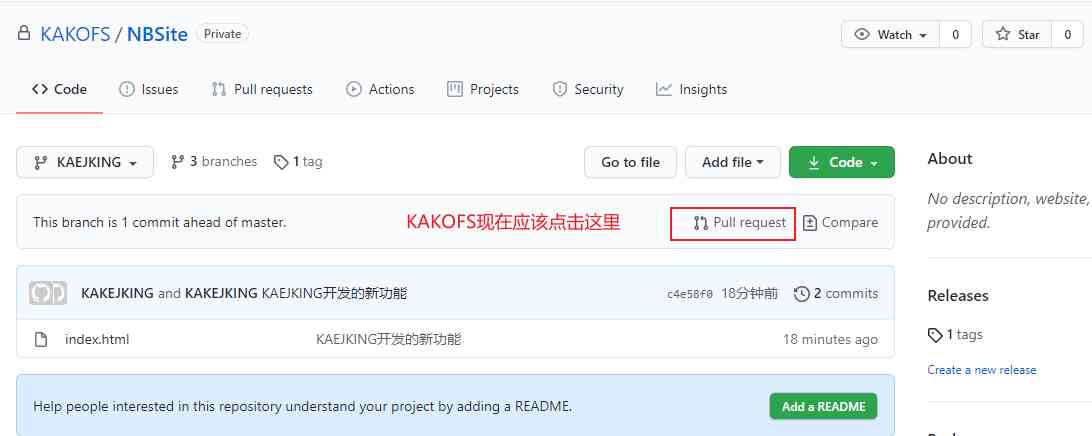
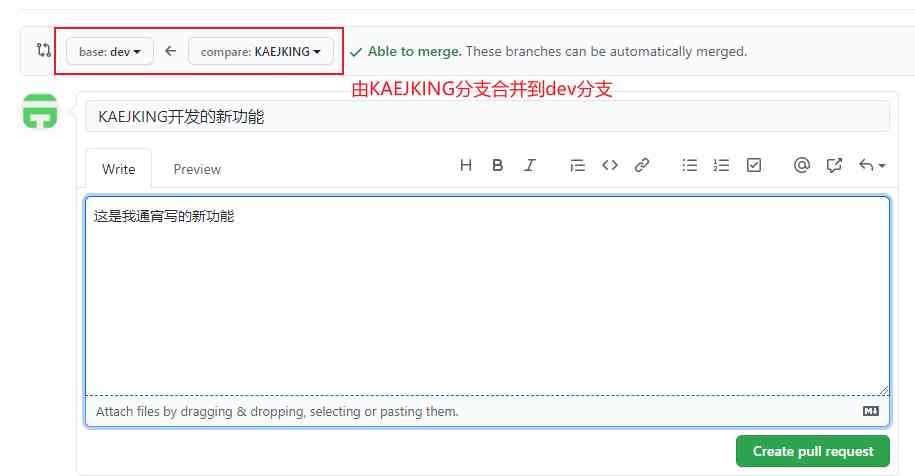
Now? , The administrator has received a merge request . After the review, the code can be merged directly into dev The branch .
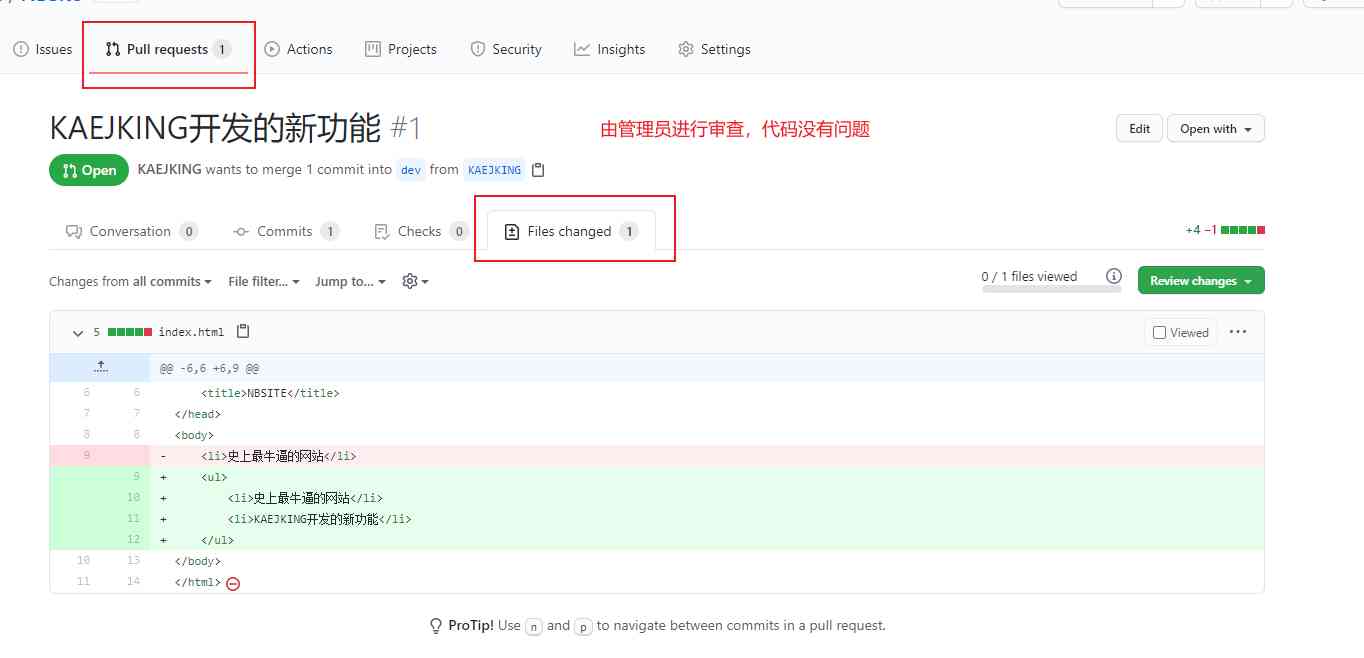
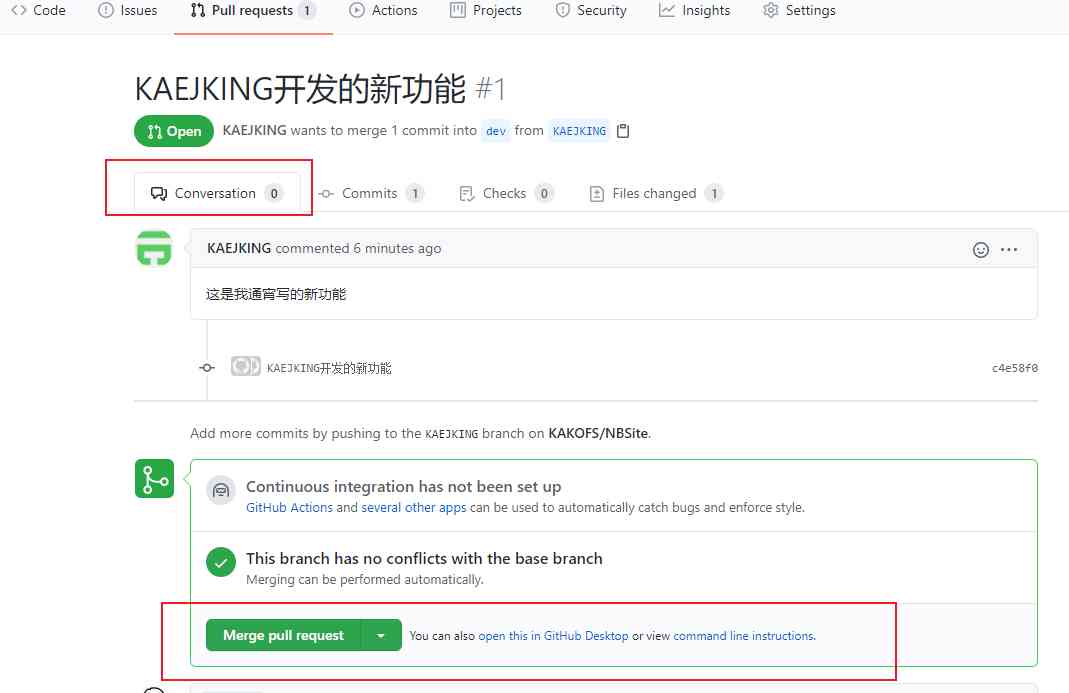
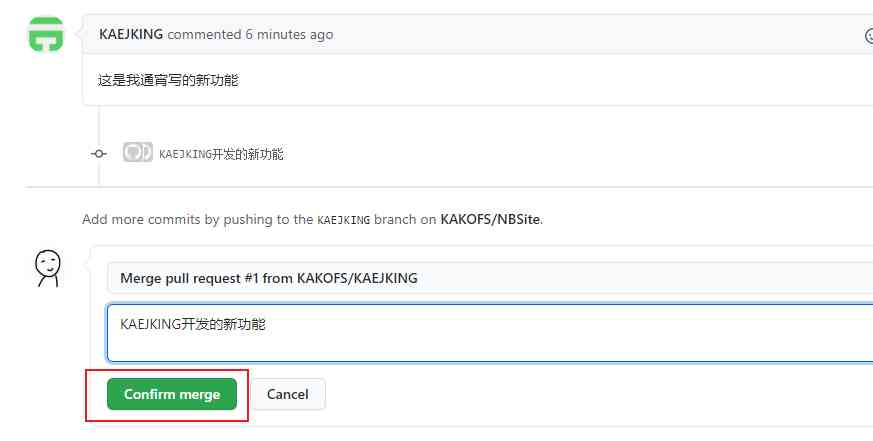
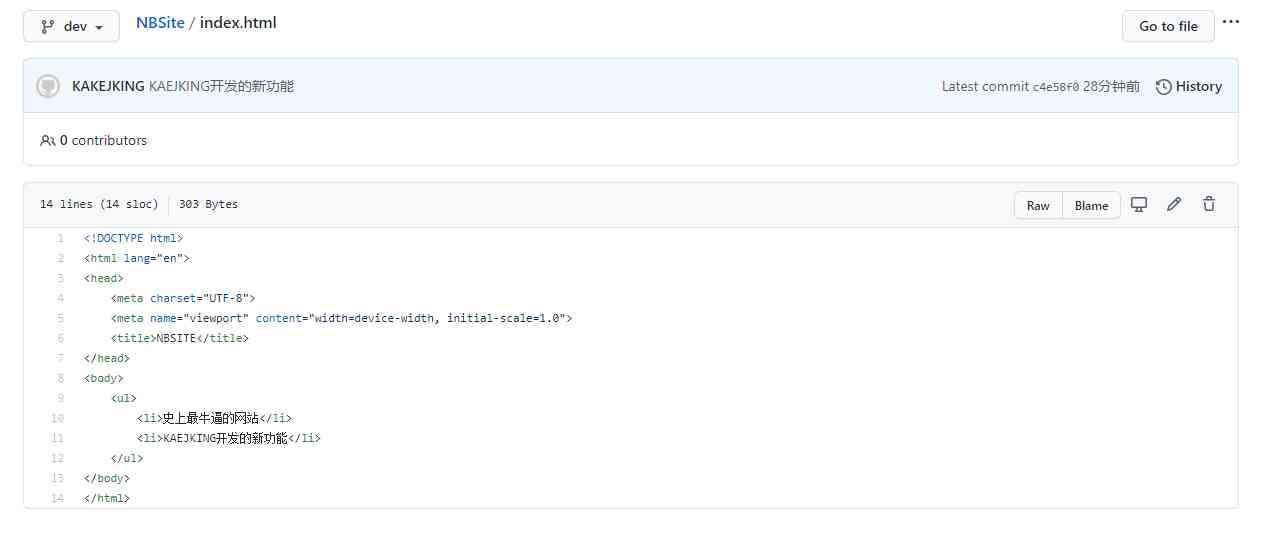
review When it's done ,KAEJKING The new features of writing will be merged into dev In the branch .
Code release
Now? dev The branch has been updated , If you want to update master In the branch , It also needs code release, This is a very rigorous test , So it should be done by a testing team .
-
be based on
devBranch creationreleaseBranchgit checkout dev git checkout -b relase
-
To test
-
Testing is completed , take
relaseThe code is merged intomasterBranchgit merge relase # master Branch to do
-
stay
masterBranch fighttag, Upload code .git tag -a v2 -m " The second version of the official version goes online " git push origin --tags -
The operation and maintenance personnel can download the code and go online
git clone -b v2 Address
Other operating
rebase command
When you submit code every day , Then your submission record will become very cumbersome . As shown below :
print(" The initial release ")
print(" I wrote so much code the first day ")  #  Generate version   The first day
print(" I wrote so much code the next day ")  #  Generate version   the second day
print(" I wrote so much code the third day ")  #  Generate version   On the third day
print(" Finally, the development is finished ")  #  Generate version   The final version
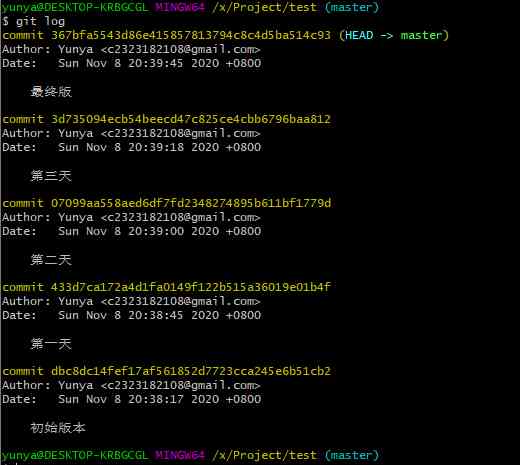
Actually , Yours Boss It doesn't matter how many days you developed , It only cares about the final version .
So we need to merge the middle three days , Make it look simpler .( This could lead to merger conflicts )
Use the following command to merge :
git rebase -i HEAD~4 # Merge four from the top version
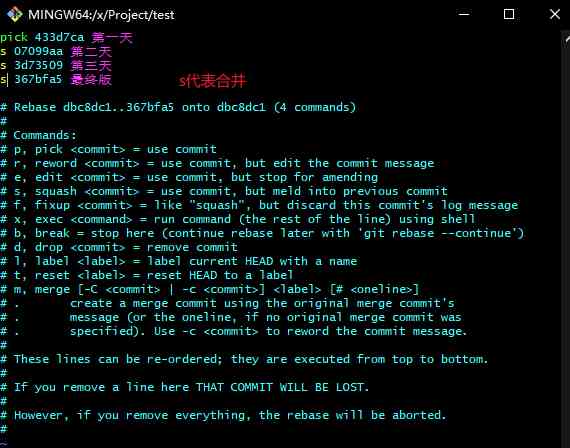
Now it will pop up a vim, Let you edit the description .
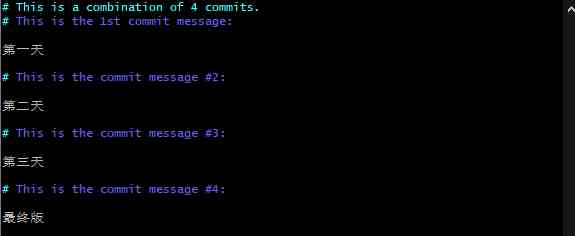
I made a few changes to him .

Reuse git log To view the , It's much simpler :
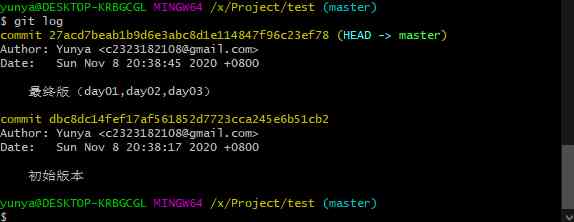
Be careful , It is actually the fusion of multiple versions in the current branch into one version ,
So it may lead to merger conflicts .
The configuration file
git The configuration file in has three parts .
- Warehouse level configuration files : In the warehouse
.git/.gitconfig, This configuration file is only valid for the warehouse . - Global profile :
MacThe system is in~/.gitconfig,WindowsThe system is inC:\Users\< user name >\.gitconfig. - System level configuration files : stay
GitInstallation directory (MacThe installation directory under the system is/usr/local/git) OfetcIn foldergitconfig.
-
Profile of the current project
git config --local user.name "xxx"
git config --local user.email "[email protected]"
-
Global profile
git config --global user.name "xxx" git config --global user.email "[email protected]" -
System profile
git config --system user.name "xxx"
git config --system user.email "[email protected]"

#  Need to have root jurisdiction
SSH
Use SSH You can also push and pull code .
~ Represents the current directory .
-
Generate public key and private key ( Default on ~/.ssh Under the table of contents ,id_rsa.pub For public key ,id_rsa For private key )
ssh-keygen
#  Keep going back , Generate the key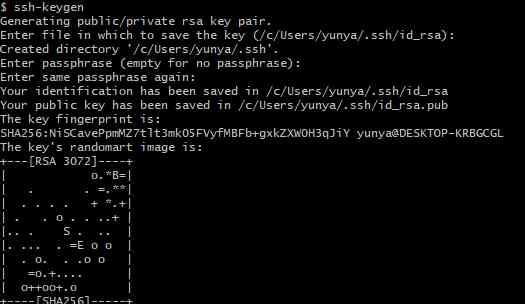
-
Copy the contents of the public key , Set to
GitHubin
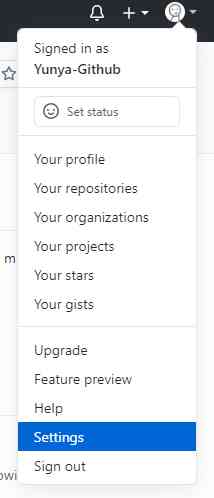
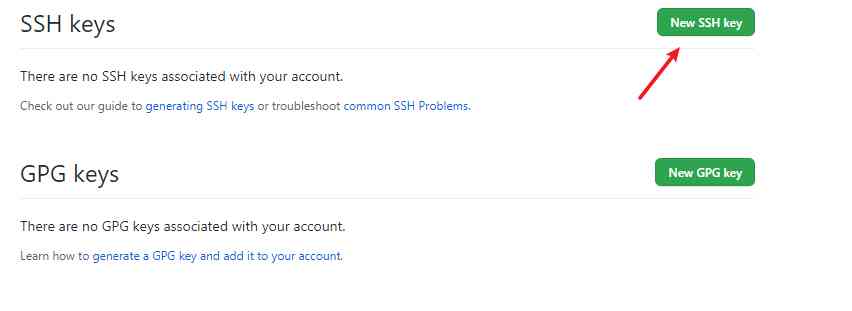
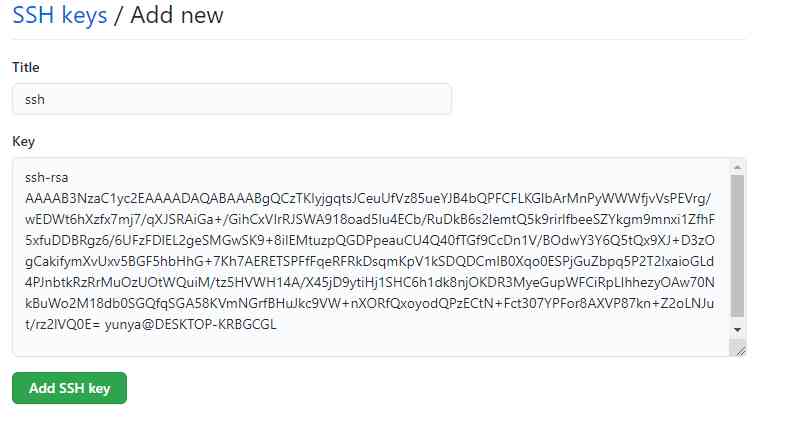
-
stay
GitLocal configurationSSHAddress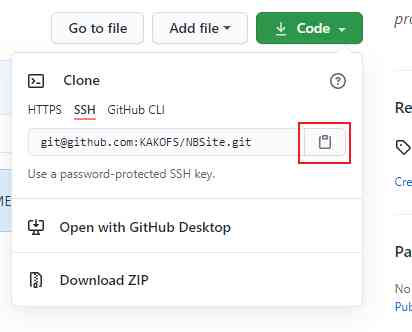
git remote add origin [email protected]:KAKOFS/NBSite.git # ssh Address -
Use the following command
git push origin Branch name
fork Source code
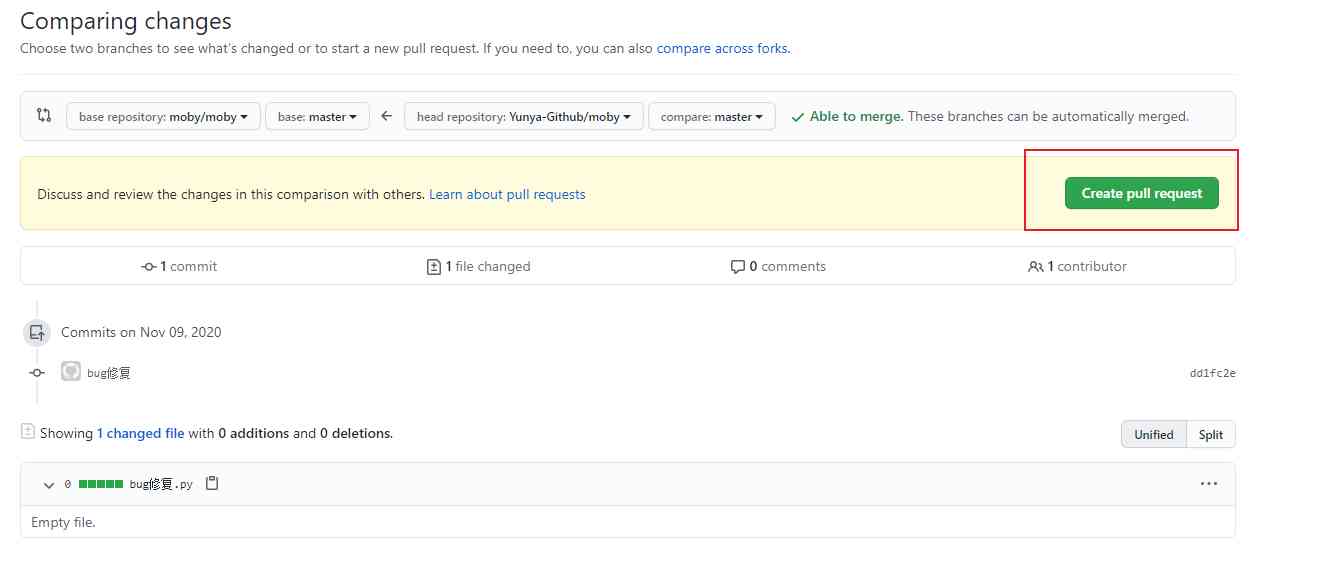
If you want to contribute to the source code of some frameworks , You can use the following steps to make a merge request to the Framework Developer .
-
forkSource code , Copy other people's source code to my own remote repository .
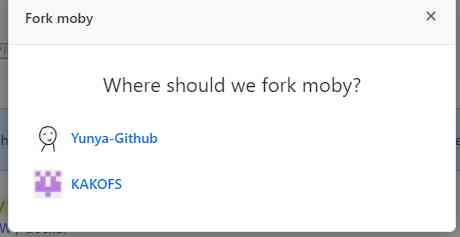
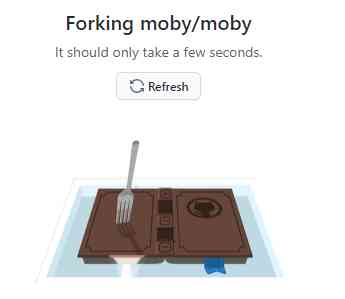

-
Modify the code in your own warehouse
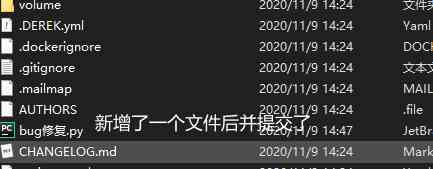

-
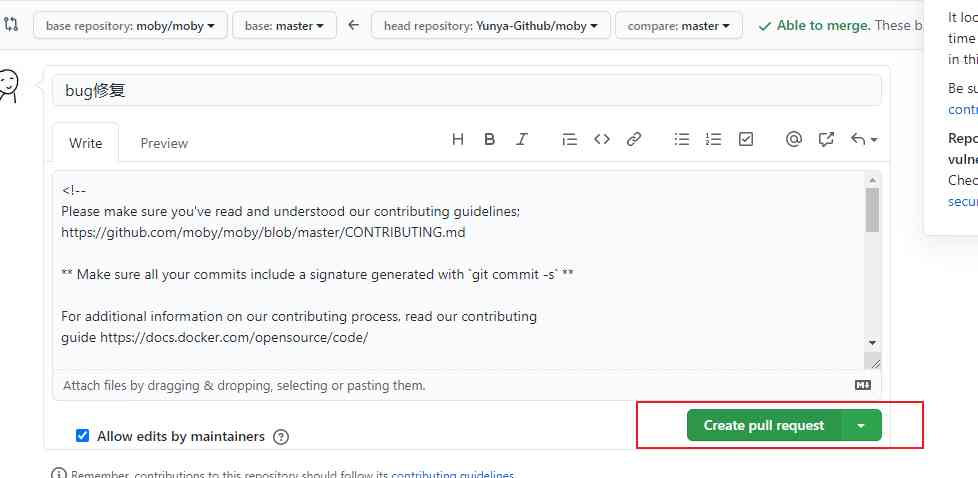
Submit a fix to the source code author
bugapply .(pull request)
Ignore files
Create... In the project .gitignore file , Input matching rules , All matching files in the current project will not be Git Managed by .


You can also have more matching rules :
*.h 	 	#  Ignore .h The suffix file for
!a.h  	 	#  But don't ignore a.h This file
files/   	#  Ignore all files in this folder
*.py[a|b|c] #  Ignore pya、pyb、pyc A file with a suffix
issues&wiki
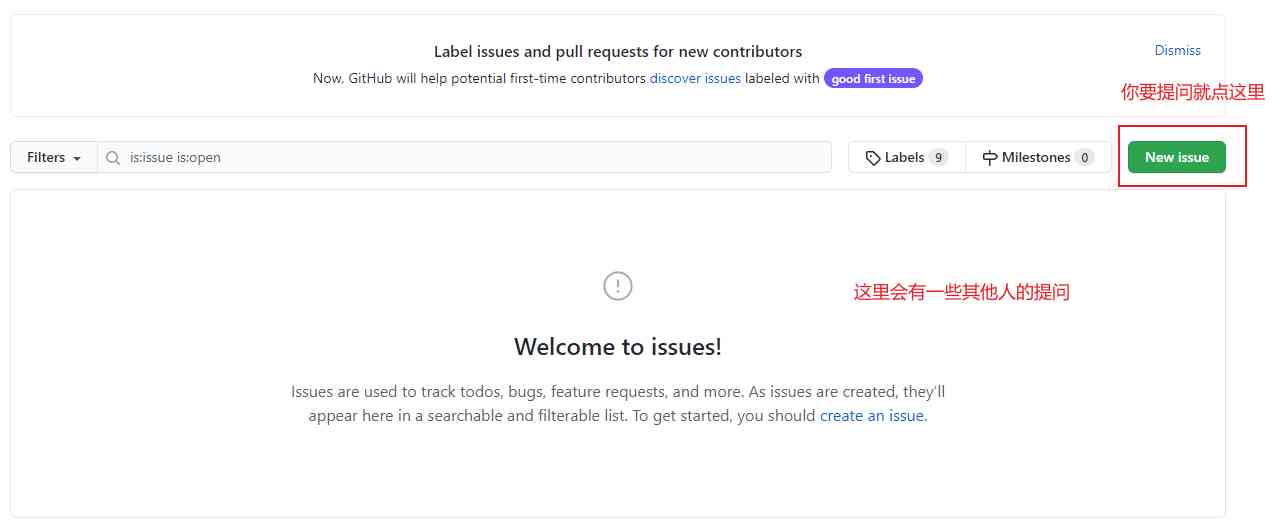
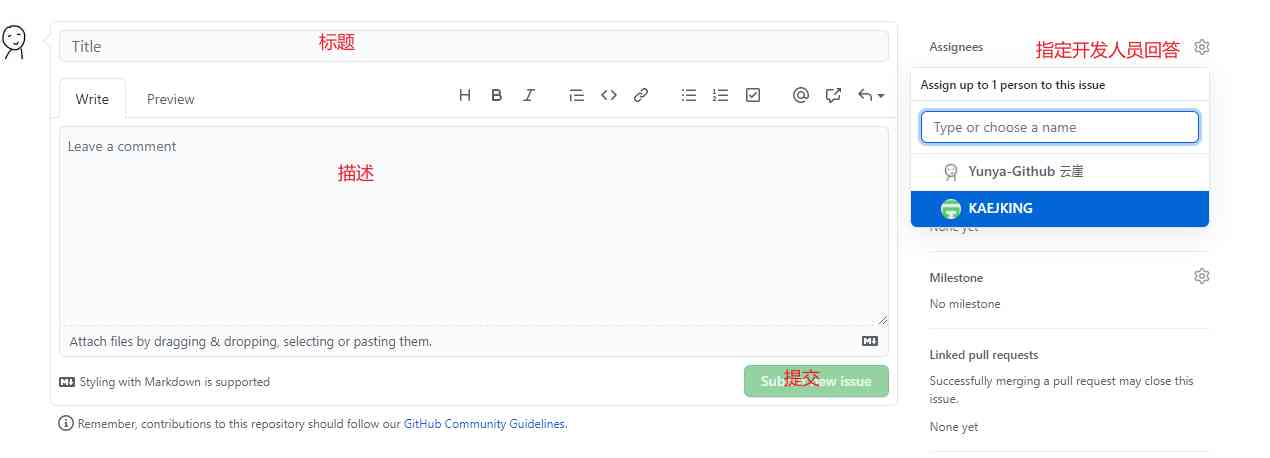
issues You can ask some questions you find , Developers will give you answers .
Use wiki To describe your project , So that the person who takes over your work after you leave will be familiar with the project more quickly .

Delete nonexistent branches
When many people work together to develop , If the remote branch is removed by other development , Execute locally git branch --all The remote branch will still be displayed , You can use the following command to delete :
#  Use  pull  command , add to  -p  Parameters
$ git pull -p

#  Equivalent to the following command
$ git fetch -p
$ git fetch --prune origin
The command of
This order
Here are some of the commands in this article :
| command | describe |
|---|---|
| git init | initialization |
| git status | Check the status |
| git add | Manage assigned files |
| git commit -m " describe " | Generate version |
| git log | View version history ( Before ) |
| git reflog | View version history ( after ) |
| git reset --hard Version number | Version rollback |
| git branch | View all branches |
| git branch Branch name | Create a new branch |
| git checkout Branch name | Switch branches |
| git merge | Branch merging |
| git branch -d Branch name | Delete the branch |
| git remote add Alias Address | Remote warehouse takes alias |
| git push -u Alias Branch | Push a branch to remote warehouse |
| git clone Address | Clone remote warehouse code |
| git pull Alias Branch | Pull a branch code from the remote warehouse , Incremental updating |
| git rebase -i HEAD~ Number of pieces | Version merge |
config
Configuration related commands and parameters :
#  View configuration information
# --local: Warehouse level ,--global: Global level ,--system: The system level
$ git config <--local | --global | --system> -l

#  View the currently active configuration information
$ git config -l

#  Edit profile
# --local: Warehouse level ,--global: Global level ,--system: The system level
$ git config <--local | --global | --system> -e

#  Add configuration item
# --local: Warehouse level ,--global: Global level ,--system: The system level
$ git config <--local | --global | --system> --add <name> <value>

#  Get configuration items
$ git config <--local | --global | --system> --get <name>

#  Delete configuration items
$ git config <--local | --global | --system> --unset <name>

#  Configure the user information in the submission record
$ git config --global user.name < user name >
$ git config --global user.email < Email address >

#  change Git The size of the cache
#  If the content submitted is large , The default cache is smaller , Submission will fail
#  Cache size units :B, for example :524288000(500MB)
$ git config --global http.postBuffer < Cache size >

#  call  git status/git diff  The status of the change is displayed in highlight or color during the command
$ git config --global color.ui true

#  Configuration can cache passwords , Default cache time 15 minute
$ git config --global credential.helper cache

#  Configure password cache time
#  Cache time units : second
$ git config --global credential.helper 'cache --timeout=< Cache time >'

#  Configure long-term storage password
$ git config --global credential.helper store
git clone
Clone a version library from the remote repository to the local .
#  By default, a folder with the same name as the version library is created in the current directory and the version is downloaded to the folder
$ git clone < Web address of remote warehouse >

#  Specify the directory of the local warehouse
$ git clone < Web address of remote warehouse > < Local directory >

# -b  Specify the branch to clone , The default is master Branch
$ git clone < Web address of remote warehouse > -b < Branch name > < Local directory >
git init
Initialize the directory where the project is located , After initialization, a file named .git The catalog of .
#  Initialize local warehouse , Generate... In the current directory  .git  Folder
$ git init
git status
Check the status of the local warehouse .
#  Check the status of the local warehouse
$ git status

#  View the status of the local warehouse in short mode
#  Two columns will be displayed , The first column is the status of the file , The second column is the corresponding file
#  File status :A  newly added ,M  modify ,D  Delete ,??  Not added to Git in
$ git status -s
git remote
Operate remote library .
#  List existing remote warehouses
$ git remote

#  List the details of the remote warehouse , List... After the alias URL Address
$ git remote -v
$ git remote --verbose

#  Add remote repository
$ git remote add < Remote warehouse alias > < Remote warehouse URL Address >

#  Change the alias of the remote warehouse
$ git remote rename < The alias of the original remote warehouse > < New alias >

#  Delete the remote warehouse with the specified name
$ git remote remove < Remote warehouse alias >

#  Modify the remote warehouse  URL  Address
$ git remote set-url < Remote warehouse alias > < New remote warehouse URL Address >
git branch
operation Git The branch order of .
#  List all local branches , The current branch is  "*"  Mark out
$ git branch

#  List all local branches and show last commit , The current branch is  "*"  Mark out
$ git branch -v

#  Create a new branch , The new branch is based on the last commit
$ git branch < Branch name >

#  Change branch name
#  If the original branch name is not specified, it is the current branch
$ git branch -m [< Original branch name >] < New branch name >
#  Force changes to branch name
$ git branch -M [< Original branch name >] < New branch name >

#  Delete the specified local branch
$ git branch -d < Branch name >

#  Force deletion of the specified local branch
$ git branch -D < Branch name >
git checkout
Detection command , Used to create 、 Switch branches, etc .
#  Switch to the specified branch that already exists
$ git checkout < Branch name >

#  Create and switch to the specified branch , Keep all submission records
#  Equate to  "git branch"  and  "git checkout"  Two orders merge
$ git checkout -b < Branch name >

#  Create and switch to the specified branch , Delete all submission records
$ git checkout --orphan < Branch name >

#  Replace the local changes , New files and content that has been added to the staging area are not affected
$ git checkout < File path >
git cherry-pick
Merge the submitted records into the current branch .
#  Merge the submitted records into the current branch
$ git cherry-pick <commit ID>
git add
Add the information of the file to be submitted to the staging area . When using git commit when , The document will be submitted according to the contents in the temporary storage area .
#  Add the specified file to the staging area
$ git add < File path >

#  Add all changes 、 Deleted files to staging area
$ git add -u [< File path >]
$ git add --update [< File path >]

#  Add all changes 、 deleted 、 New files to staging area , Omit  < File path >  This is the current directory
$ git add -A [< File path >]
$ git add --all [< File path >]

#  View all changes 、 Documents deleted but not submitted , Enter a subcommand system
$ git add -i [< File path >]
$ git add --interactive [< File path >]
git commit
Submit the files in the staging area to the local warehouse .
#  Submit files in staging area to local warehouse , Call the text editor to input the description information of this submission
$ git commit

#  Submit the files in the staging area to the local warehouse and add the description information
$ git commit -m "< Description information submitted >"

#  Put all the changes 、 Deleted files are submitted to the local warehouse
#  Does not include files that are not tracked by the version Library , It's the same as calling  "git add -u"
$ git commit -a -m "< Description information submitted >"

#  Modify last submitted description
$ git commit --amend
git fetch
Get the latest version from the remote warehouse to the local tmp On the branch .
#  Get all the latest versions of all branches of the remote warehouse back to the local
$ git fetch < Remote warehouse alias >

#  Retrieve the latest version of the specified branch of the remote warehouse to the local
$ git fetch < Remote host name > < Branch name >
git merge
Merging branches .
#  Merge the specified branch under the current branch
$ git merge < Branch name >
git diff
Compare the differences between versions .
#  Compare the differences between the current file and the files in the staging area , Show changes that are not staged
$ git diff

#  Compare the difference between the files in the staging area and the last commit
$ git diff --cached
$ git diff --staged

#  Compare the difference between the current file and the last submission
$ git diff HEAD

#  View changes since the specified version
$ git diff <commit ID>

#  Compare the differences between the two branches
$ git diff < Branch name > < Branch name >

#  Check the changes of the two branches after they are separated
$ git diff < Branch name >...< Branch name >
git pull
Get the latest version from the remote repository and merge it locally .
First of all, it will execute git fetch, And then execute git merge, Get the branch of HEAD Merge into current branch .
#  Get latest version from remote warehouse .
$ git pull
git push
Push the submission of the local warehouse to the remote warehouse .
#  Push the branch of the local warehouse to the specified branch of the remote warehouse
$ git push < Remote warehouse alias > < Local branch name >:< Remote branch name >

#  Delete the branch of the specified remote warehouse
$ git push < Remote warehouse alias > :< Remote branch name >
$ git push < Remote warehouse alias > --delete < Remote branch name >
git log
Show submitted records .
#  Print all submission records
$ git log

#  Print records from the first submission to the specified submission
$ git log <commit ID>

#  Print a specified number of newly submitted records
$ git log -< The specified quantity >
git reset
Restore submission records .
#  Reset staging area , But the documents are not affected
#  It's equivalent to using  "git add"  Command to update the contents of the staging area to withdraw from the staging area , You can specify a file
#  Is not specified  commit ID  Default to current  HEAD
$ git reset [< File path >]
$ git reset --mixed [< File path >]

#  take  HEAD  Change of direction of , Withdraw to the specified submission record , File not modified
$ git reset <commit ID>
$ git reset --mixed <commit ID>

#  take  HEAD  Change of direction of , Withdraw to the specified submission record , File not modified
#  Equivalent to calling  "git reset --mixed"  I did it again after the order  "git add"
$ git reset --soft <commit ID>

#  take  HEAD  Change of direction of , Withdraw to the specified submission record , The document has also been revised
$ git reset --hard <commit ID>
git revert
Generate a new submission to undo a submission , All submissions prior to this submission will be retained .
#  Generate a new submission to undo a submission
$ git revert <commit ID>
git tag
Commands for manipulating tags .
#  Print all the labels
$ git tag

#  Add lightweight labels , Reference to submitted object , You can specify the previous submission record
$ git tag < Tag name > [<commit ID>]

#  Add a note label with descriptive information , You can specify the previous submission record
$ git tag -a < Tag name > -m < Tag description information > [<commit ID>]

#  Switch to the specified label
$ git checkout < Tag name >

#  Check the tag information
$ git show < Tag name >

#  Delete the specified label
$ git tag -d < Tag name >

#  Submit the specified tags to the remote warehouse
$ git push < Remote warehouse alias > < Tag name >

#  Submit all local tags to remote warehouse
$ git push < Remote warehouse alias > –tags
git mv
Rename a file or folder .
#  Rename the specified file or folder
$ git mv < Source file / Folder > < Target file / Folder >
git rm
Delete files or folders .
#  Remove trace specified file , And delete... From the folder in the local warehouse
$ git rm < File path >

#  Remove tracking specified folder , And delete... From the folder in the local warehouse
$ git rm -r < Folder path >

#  Remove trace specified file , Keep the file in the folder of the local warehouse
$ git rm --cached


