当前位置:网站首页>[deep learning] fast Reid tutorial
[deep learning] fast Reid tutorial
2022-06-13 02:35:00 【The winter holiday of falling marks】
fast-reid Introductory tutorial
ReID, Put it all together Re-identification, The purpose is to find objects similar to the target to be searched in the image database by using various intelligent algorithms .ReID Is a sub task of image retrieval , In essence, it is image retrieval rather than image classification .fast-reid It is a powerful target recognition Reid Open source library , Managed by JD open source . This article mainly introduces fast-reid Use , With the development of technology , about cv It is necessary for practitioners to understand the application of different intelligent algorithm technologies . and ReID It is a relatively downstream task , understand ReID We can learn a lot from the application of related technologies .
List of articles
Recognition by pedestrian Person re-identification For example , The main purpose of pedestrian re recognition is to target a certain target pedestrian in the surveillance camera , Accurately and quickly identify the target pedestrian from a large number of pedestrians in other cameras of the monitoring network . As shown in the figure below ( Picture from the Internet ).

Engineering , The simplest technical process of pedestrian re recognition is as follows .
Pedestrian detection ( target recognition ) --> feature extraction --> Pedestrian tracking ( Target tracking )--> Cross camera pedestrian tracking --> Vector storage and retrieval
A simple technical solution is :
- Pedestrian detection : adopt Yolov5 This kind of target model extracts the pedestrian image of the current frame .
- feature extraction : Based on feature extraction model , Such as through faster-reid The feature vector of pedestrian image is extracted based on the model trained by metric learning .
- Target tracking : Combined with the characteristics of pedestrian areas , adopt deepsort Conduct pedestrian tracking
- Cross camera pedestrian tracking : Based on the global features of deep learning and data association, the cross camera pedestrian target tracking is realized .
- Vector storage and retrieval : For a given pedestrian query vector , Perform vector retrieval with all the vectors to be queried in the pedestrian feature library , That is to calculate the similarity between feature vectors . Usually we can go through faiss Handling this part .
In the above steps , Feature extraction is the key step , Its function is to transform the input pedestrian image into a fixed dimension feature vector , For subsequent target tracking and vector retrieval . Good features need good similarity retention , That is, in the feature space , The vector distance between images with high similarity is relatively close , The vector distance of the image pairs with low similarity is far . The usual way to train this model is called metric learning , Measurement learning is very simple. You can check it yourself .
fast-reid It is an academic and industrial oriented ReID hold-all , It is one of the open source projects of JD . If you want to know more about fast-reid Information about , You can read the author's paper directly FastReID: A Pytorch Toolbox for Real-world Person Re-identification.fast-reid be based on python and pytorch Implement various models , Also provide some scripts that will pytorch Training model go to caffe and TensorRT On . Therefore, it is highly recommended to use fast-reid To study .
fast-reid It's a good one ReID hold-all , Provides a rich code interface , But the code has many small bug, Pay more attention when using . This article only introduces fast-reid The basic use of , No further introduction fast-red The project of , And relevant theoretical knowledge . About fast-reid Use , It's best to step into the source code , There's a lot to learn .fast-reid The project sample code provided in the project is also worth looking at .
A project combining pedestrian re recognition and target detection and tracking , You can see the following article :
Detailed introduction FastReID Each part of the code structure of the article , You can see :
Detailed explanation ReID The components and Trick—— be based on FastReID
See... For all the code in this article :
github: Python-Study-Notes
1 fast-reid Introduce
1.1 fast-reid Installation and project structure
This paper mainly introduces fast-reid The basic use of , Measurement learning and ReID The latest technology suggests learning related papers . The project running environment of this paper is Ubuntu18.01,Python3.8,Pytorch1.8.1+cu102.
about fast-reid First, go to the official warehouse to download the corresponding code to the local , Warehouse address :fast-reid, Then install the corresponding Python library . The specific code is as follows :
git clone https://github.com/JDAI-CV/fast-reid
cd fast-reid
python3 -m pip install -r docs/requirements.txt
About fast-reid The open source project structure is shown in the following figure :

The main one is configs Folder ,fastreid Folder ,projects Folder ,tools The folder and MODEL_ZOO.md.configs The folder provides the structure of different models and training implementation scripts .fastreid Folders provide fast-reid Source code implementation of .projects Provides some information based on fast-reid Project code , All the project code inside is very useful , It is recommended that you all run .tools The folder provides model training and deployment code .MODEL_ZOO.md Pre training models under different data sets are provided , Sure down Get down and run .
In addition, in order to speed up indexing , Get into fast-reid/fastreid/evaluation/rank_cylib/ Catalog , Input make all Compile files to speed up queries . If you find that the python Version is not the system default version , For example, I use python3.8, Need modification Makefile file . As shown below :
all:
  # python3 setup.py build_ext --inplace
  python3.8 setup.py build_ext --inplace
  rm -rf build
clean:
  rm -rf build
  rm -f rank_cy.c *.so
1.2 Data sets and pre training models
1.2.1 Data set introduction
stay fast-reid/datasets/ The catalog provides information about different datasets . You can download it yourself . Here are some of the most commonly used Market-1501 Data sets .
Market-1501 It is a large-scale public benchmark data set for pedestrian re recognition . It consists of 6 Captured by different cameras 1501 A pedestrian , as well as 32,668 Pedestrian image bounding box . The data set is divided into two parts : among 750 Human images for training , rest 751 Human images are used for testing . In the official test protocol , choice 3,368 Query images as query sets query, To include 19,732 Of the reference image gallery Correct match found in image set .
Market-1501
  ├── bounding_box_test (750 One of the 19732 Images for testing )
       ├── -1_c1s1_000401_03.jpg
       ├── 0071_c6s2_072893_01.jpg
       ├── 0071_c6s2_072918_02.jpg
  ├── bounding_box_train (751 One of the 12936 Images for training )
       ├── 0002_c1s1_000451_03.jpg
       ├── 0002_c1s1_000801_01.jpg
       ├── 0430_c5s1_109673_01.jpg
  ├── gt_bbox (25259 Images are manually labeled )
       ├── 0001_c1s1_001051_00.jpg
       ├── 0001_c1s2_041171_00.jpg
       ├── 0933_c6s2_110943_00.jpg
  ├── gt_query (matlab Format , Used to judge a query Which pictures of are good matches and bad matches )
       ├── 0001_c1s1_001051_00_good.mat
       ├── 0794_c2s2_086182_00_good.mat
       ├── 0001_c1s1_001051_00_junk.mat
  ├── query (750 One of the 3368 Images are used to query )
       ├── 0001_c1s1_001051_00.jpg
       ├── 0001_c2s1_000301_00.jpg
       ├── 0001_c3s1_000551_00.jpg
  └── readme.txt
Image naming rules
With 0071_c6s2_072893_01.jpg For example
- 0071 Indicates the number of the current pedestrian , The number range is -1 To 1501,-1 Means not included here 1501 A pedestrian among people ,0000 Background representation ;
- c6 Indicates the number of the current camera , share 6 A camera ;
- s2 Indicates the number of segments of the current camera , Each camera has multiple video clips ;
- 072893 Express c6s2 Of the 072893 Frame picture , The video frame rate is 25fps;
- 01 Express 0071_c6s2_072893 The... On this frame 1 A detection box ,00 Indicates a manual callout box .
Dataset use
It is usually used to measure learning Market-1501 Data sets . In general use bounding_box_train,bounding_box_tes and query Model training and testing are carried out on the images in the data set .
- bounding_box_train: To train the model , Enable the model to learn the image features of the set .
- bounding_box_test: Used to provide... In measurement learning gallery data .
- query: And gallery To test the quality of the model .
1.2.2 Pre training model
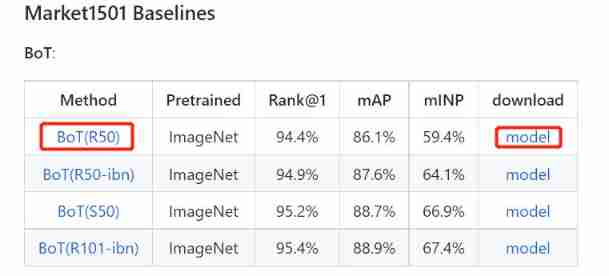
stay fast-reid/MODEL_ZOO.md The file provides the data obtained by different methods under different data sets sota Model . With the simplest Bot stay Market1501 Medium training ResNet50 The model, for example . Click on Method The link under will go to the model configuration file path , Click on download The corresponding pre training model will be downloaded ( Probably 300MB).
For the corresponding config Path at fast-reid/configs Under the table of contents , There are two files used :
configs
  ├── Market1501
       ├── bagtricks_R50.yml
  ├── Base-bagtricks.yml
When the code runs, it will put Base-bagtricks.yml and bagtricks_R50.yml Merge together . Model training test reasoning depends on these two files , Of course, you can manually combine the two files . The specific file modification can be followed up to see different config Documents and official codes , You can start by yourself .
Base-bagtricks.yml
MODEL:
  META_ARCHITECTURE: Baseline

  BACKBONE: #  Model backbone structure
    NAME: build_resnet_backbone
    NORM: BN
    DEPTH: 50x
    LAST_STRIDE: 1
    FEAT_DIM: 2048
    WITH_IBN: False
    PRETRAIN: True

  HEADS:  #  Model head
    NAME: EmbeddingHead
    NORM: BN
    WITH_BNNECK: True
    POOL_LAYER: GlobalAvgPool
    NECK_FEAT: before
    CLS_LAYER: Linear

  LOSSES: #  Training loss
    NAME: ("CrossEntropyLoss", "TripletLoss",)

    CE:
      EPSILON: 0.1
      SCALE: 1.

    TRI:
      MARGIN: 0.3
      HARD_MINING: True
      NORM_FEAT: False
      SCALE: 1.

INPUT: #  Model input image processing method
  SIZE_TRAIN: [ 256, 128 ]
  SIZE_TEST: [ 256, 128 ]

  REA:
    ENABLED: True
    PROB: 0.5

  FLIP:
    ENABLED: True

  PADDING:
    ENABLED: True

DATALOADER: #  How the model reads images
  SAMPLER_TRAIN: NaiveIdentitySampler
  NUM_INSTANCE: 4
  NUM_WORKERS: 8

SOLVER: #  Model training profile
  AMP:
    ENABLED: True
  OPT: Adam
  MAX_EPOCH: 120
  BASE_LR: 0.00035
  WEIGHT_DECAY: 0.0005
  WEIGHT_DECAY_NORM: 0.0005
  IMS_PER_BATCH: 64

  SCHED: MultiStepLR
  STEPS: [ 40, 90 ]
  GAMMA: 0.1

  WARMUP_FACTOR: 0.1
  WARMUP_ITERS: 2000

  CHECKPOINT_PERIOD: 30

TEST: #  Model test configuration
  EVAL_PERIOD: 30
  IMS_PER_BATCH: 128

CUDNN_BENCHMARK: True
bagtricks_R50.yml
Notice that I added a pre training model path .
_BASE_: ../Base-bagtricks.yml #  Link... Under the parent directory Base-bagtricks.yml

DATASETS:
  NAMES: ("Market1501",) #  Dataset path
  TESTS: ("Market1501",) #  Test set path

OUTPUT_DIR: logs/market1501/bagtricks_R50 #  Output result path

MODEL:
  WEIGHTS: model/market_bot_R50.pth #  Pre training model path , I added this sentence myself
2 fast-reid Based on using
The structure of my sample code here is as follows , It is my custom to facilitate debugging and subsequent interface use , Different from the official warehouse , It can not be used in this way .
  ├── configs( Profile path )
    ├── Market1501
      ├── bagtricks_R50.yml
    ├── Base-bagtricks.yml
  ├── datasets( Dataset catalog )
      ├── Market-1501-v15.09.15 ( Do not change the dataset name )
        ├── bounding_box_test (750 One of the 19732 Images for testing )
        ├── bounding_box_train (751 One of the 12936 Images for training )
        ├── query (750 One of the 3368 Images are used to query )
  ├── fastreid
  ├── model( Pre training model catalog ), The downloaded pre training model is stored here
  ├── demo.py( Extract the features of the image , And save ), From the original demo Catalog
  ├── predictor.py ( Model loading file ), From the original demo Catalog
  ├── train_net.py ( Model training and test package code ), From the original tools Catalog
  ├── visualize_result.py ( Visual feature extraction results ), From the original demo Catalog
Focus on a few py file , I moved it directly to the root directory . And the path to save the model file ,config Pre training model address , The name of the dataset should also be noted . The specific use of each file can be seen in the following introduction , There are code comments .
Particular attention ,py File for convenience of debugging , I set it directly in the code args Parameters of , Special attention should be paid to the actual use .
demo.py
This code is the loading model ( call predictor.py), Extract the features of the query image , And save for npy file . Save in demo_output Under the folder , One image for one npy file . These contain eigenvectors npy The file can be used for subsequent vector retrieval .

# encoding: utf-8
"""
@author:  liaoxingyu
@contact: [email protected]
 Extract the features of the image , And save
"""

import argparse
import glob
import os
import sys

import torch.nn.functional as F
import cv2
import numpy as np
import tqdm
from torch.backends import cudnn

sys.path.append('.')

from fastreid.config import get_cfg
from fastreid.utils.logger import setup_logger
from fastreid.utils.file_io import PathManager

from predictor import FeatureExtractionDemo

# import some modules added in project like this below
# sys.path.append("projects/PartialReID")
# from partialreid import *

cudnn.benchmark = True
setup_logger(name="fastreid")


#  Read configuration file
def setup_cfg(args):
    # load config from file and command-line arguments
    cfg = get_cfg()
    # add_partialreid_config(cfg)
    cfg.merge_from_file(args.config_file)
    cfg.merge_from_list(args.opts)
    cfg.freeze()
    return cfg


def get_parser():
    parser = argparse.ArgumentParser(description="Feature extraction with reid models")
    parser.add_argument(
        "--config-file",  # config route , It usually contains model configuration files
        metavar="FILE",
        help="path to config file",
    )
    parser.add_argument(
        "--parallel",  #  Is it parallel
        action='store_true',
        help='If use multiprocess for feature extraction.'
    )
    parser.add_argument(
        "--input",  #  Enter the image path
        nargs="+",
        help="A list of space separated input images; "
             "or a single glob pattern such as 'directory/*.jpg'",
    )
    parser.add_argument(
        "--output",  #  Output result path
        default='demo_output',
        help='path to save features'
    )
    parser.add_argument(
        "--opts",
        help="Modify config options using the command-line 'KEY VALUE' pairs",
        default=[],
        nargs=argparse.REMAINDER,
    )
    return parser


def postprocess(features):
    # Normalize feature to compute cosine distance
    features = F.normalize(features)  #  Feature normalization
    features = features.cpu().data.numpy()
    return features


if __name__ == '__main__':
    args = get_parser().parse_args()  #  Parse input parameters
    #  Debugging use , Delete the following code when using
    # ---
    args.config_file = "./configs/Market1501/bagtricks_R50.yml"  # config route
    args.input = "./datasets/Market-1501-v15.09.15/query/*.jpg"  #  Image path
    # ---

    cfg = setup_cfg(args)  #  Read cfg file
    demo = FeatureExtractionDemo(cfg, parallel=args.parallel)  #  Load feature extractor , That is, loading the model

    PathManager.mkdirs(args.output)  #  Create output path
    if args.input:
        if PathManager.isdir(args.input[0]):  #  Determine whether the input is a path
            # args.input = glob.glob(os.path.expanduser(args.input[0])) #  There is a problem with the original code
            args.input = glob.glob(os.path.expanduser(args.input))  #  Get all file paths under the input path
            assert args.input, "The input path(s) was not found"
        for path in tqdm.tqdm(args.input):  #  Sheet by sheet processing
            img = cv2.imread(path)
            feat = demo.run_on_image(img)  #  Extraction of image features
            feat = postprocess(feat)  #  The post-processing is mainly feature normalization
            np.save(os.path.join(args.output, os.path.basename(path).split('.')[0] + '.npy'), feat)  #  Save the corresponding features of the image , For the next time
visualize_result.py
This code is the loading model ( call predictor.py), Extract the features of the query image , Calculate each precision index of the model . Output model's ROC Result chart , And the matching result image of an image . Output directory is vis_rank_list.
ROC The result diagram is shown in the following figure ,ROC The area under the curve AUC The bigger it is , It means that the better the model is .top1 precision 93.37 about .

The matching result image of an image is as follows . Each picture has 1 Query graph and 5 Query result graph , Left 1 Query image for , Others are query result graphs . The blue box indicates that the query result is wrong , The red box indicates that the query result is correct . There is a title on the query result graph , such as 0.976/false/cam1, Indicates that the feature distance between the current query result image and the query image is 0.976, The query result is false( Query error ), The query result comes from cam1 camera . Query the title on the image , Such as 0.9967/cam2, here 0.9967 It represents the query result precision index of the query image ,cam2 Indicates that the query image is from cam2 camera .


# encoding: utf-8
"""
@author:  xingyu liao
@contact: [email protected]
 Visual feature extraction results
"""

import argparse
import logging
import sys

import numpy as np
import torch
import tqdm
from torch.backends import cudnn

sys.path.append('.')

import torch.nn.functional as F
from fastreid.evaluation.rank import evaluate_rank
from fastreid.config import get_cfg
from fastreid.utils.logger import setup_logger
from fastreid.data import build_reid_test_loader
from predictor import FeatureExtractionDemo
from fastreid.utils.visualizer import Visualizer

# import some modules added in project
# for example, add partial reid like this below
# sys.path.append("projects/PartialReID")
# from partialreid import *

cudnn.benchmark = True
setup_logger(name="fastreid")

logger = logging.getLogger('fastreid.visualize_result')


#  Read configuration file
def setup_cfg(args):
    # load config from file and command-line arguments
    cfg = get_cfg()
    # add_partialreid_config(cfg)
    cfg.merge_from_file(args.config_file)
    cfg.merge_from_list(args.opts)
    cfg.freeze()
    return cfg


def get_parser():
    parser = argparse.ArgumentParser(description="Feature extraction with reid models")
    parser.add_argument(
        "--config-file",  # config route , It usually contains model configuration files
        metavar="FILE",
        help="path to config file",
    )
    parser.add_argument(
        '--parallel',  #  Is it parallel
        action='store_true',
        help='if use multiprocess for feature extraction.'
    )
    parser.add_argument(
        "--dataset-name",  #  Dataset name
        help="a test dataset name for visualizing ranking list."
    )
    parser.add_argument(
        "--output",  #  Output result path
        default="./vis_rank_list",
        help="a file or directory to save rankling list result.",

    )
    parser.add_argument(
        "--vis-label",  #  Whether to view the output results
        action='store_true',
        help="if visualize label of query instance"
    )
    parser.add_argument(
        "--num-vis",  #  How many images are selected for the result display
        default=1000,
        help="number of query images to be visualized",
    )
    parser.add_argument(
        "--rank-sort",  #  The result display is the similarity ranking method , The default order is from small to large
        default="ascending",
        help="rank order of visualization images by AP metric",
    )
    parser.add_argument(
        "--label-sort",  # label The result display is the similarity ranking method , The default order is from small to large
        default="ascending",
        help="label order of visualization images by cosine similarity metric",
    )
    parser.add_argument(
        "--max-rank",  #  Show topk Result , Before default display 10 results
        default=5,
        help="maximum number of rank list to be visualized",
    )
    parser.add_argument(
        "--opts",
        help="Modify config options using the command-line 'KEY VALUE' pairs",
        default=[],
        nargs=argparse.REMAINDER,
    )
    return parser


if __name__ == '__main__':
    args = get_parser().parse_args()
    #  Debugging use , Delete the following code when using
    # ---
    args.config_file = "./configs/Market1501/bagtricks_R50.yml"  # config route
    args.dataset_name = 'Market1501'  #  Dataset name
    args.vis_label = False  #  Whether the display is correct label result
    args.rank_sort = 'descending'  #  Display association results from large to small
    args.label_sort = 'descending'  #  Display association results from large to small
    # ---

    cfg = setup_cfg(args)
    #  You can set... Directly in your code cfg Set the model path in
    # cfg["MODEL"]["WEIGHTS"] = './configs/Market1501/bagtricks_R50.yml'
    test_loader, num_query = build_reid_test_loader(cfg, dataset_name=args.dataset_name)  #  Create test data sets
    demo = FeatureExtractionDemo(cfg, parallel=args.parallel)  #  Load feature extractor , That is, loading the model

    logger.info("Start extracting image features")
    feats = []  #  Image features , Used to save the image features of each pedestrian
    pids = []  #  Pedestrians id, For each pedestrian id
    camids = []  #  The camera you took , Cameras showing pedestrians id
    #  Save the read pedestrian image one by one , And keep relevant information
    for (feat, pid, camid) in tqdm.tqdm(demo.run_on_loader(test_loader), total=len(test_loader)):
        feats.append(feat)
        pids.extend(pid)
        camids.extend(camid)

    feats = torch.cat(feats, dim=0)  #  take feats Convert to tensor Two dimensional vector of , The vector dimension is [ Number of images , Feature dimension ]
    #  Here is the query and gallery The data is put together , You need to slice query and gallery The data of
    q_feat = feats[:num_query]
    g_feat = feats[num_query:]
    q_pids = np.asarray(pids[:num_query])
    g_pids = np.asarray(pids[num_query:])
    q_camids = np.asarray(camids[:num_query])
    g_camids = np.asarray(camids[num_query:])

    # compute cosine distance  Calculate the cosine distance
    q_feat = F.normalize(q_feat, p=2, dim=1)
    g_feat = F.normalize(g_feat, p=2, dim=1)
    distmat = 1 - torch.mm(q_feat, g_feat.t())  #  here distmat Represents the distance between two images , The smaller, the closer
    distmat = distmat.numpy()

    #  Calculate various evaluation indexes  cmc[0] Namely top1 precision , Should be 93% about , There will be fluctuations in accuracy
    logger.info("Computing APs for all query images ...")
    cmc, all_ap, all_inp = evaluate_rank(distmat, q_pids, g_pids, q_camids, g_camids)
    logger.info("Finish computing APs for all query images!")

    visualizer = Visualizer(test_loader.dataset)  #  establish Visualizer class
    visualizer.get_model_output(all_ap, distmat, q_pids, g_pids, q_camids, g_camids)  #  Save results

    logger.info("Start saving ROC curve ...")  #  preservation ROC curve
    fpr, tpr, pos, neg = visualizer.vis_roc_curve(args.output)
    visualizer.save_roc_info(args.output, fpr, tpr, pos, neg)
    logger.info("Finish saving ROC curve!")

    logger.info("Saving rank list result ...")  #  Save the association results of some query images , Are arranged in the order
    query_indices = visualizer.vis_rank_list(args.output, args.vis_label, args.num_vis,
                                             args.rank_sort, args.label_sort, args.max_rank)
    logger.info("Finish saving rank list results!")
train_net.py
This code calls config file , Training or testing models . Training model settings args.eval_only = False, The reverse is the test model . The test model results are shown in the following figure . The code is well encapsulated , Put up all the required test indicators .

In addition, it encapsulates too much code , If you want to know the clear training code, check fast-reid/tools/plain_train_net.py, This file provides detailed training code without too much encapsulation .
#!/usr/bin/env python
# encoding: utf-8
"""
@author:  sherlock
@contact: [email protected]
 Model training and test package code
"""

import sys

sys.path.append('.')

from fastreid.config import get_cfg
from fastreid.engine import DefaultTrainer, default_argument_parser, default_setup, launch
from fastreid.utils.checkpoint import Checkpointer


#  Read configuration file
def setup(args):
    """
    Create configs and perform basic setups.
    """
    cfg = get_cfg()
    cfg.merge_from_file(args.config_file)
    cfg.merge_from_list(args.opts)
    cfg.freeze()
    default_setup(cfg, args)
    return cfg


def main(args):
    cfg = setup(args)
    #  Model test
    if args.eval_only:
        cfg.defrost()
        cfg.MODEL.BACKBONE.PRETRAIN = False
        model = DefaultTrainer.build_model(cfg)
        #  Load pre training model
        Checkpointer(model).load(cfg.MODEL.WEIGHTS)  # load trained model

        res = DefaultTrainer.test(cfg, model)
        return res
    #  model training
    trainer = DefaultTrainer(cfg)

    trainer.resume_or_load(resume=args.resume)
    return trainer.train()


if __name__ == "__main__":
    args = default_argument_parser().parse_args()
    #  Debugging use , Delete the following code when using
    # ---
    args.config_file = "./configs/Market1501/bagtricks_R50.yml"  # config route
    args.eval_only = True  #  Whether to test the model ,False Represents a training model ,True Represents the test model
    # ---

    print("Command Line Args:", args)
    launch(
        main,
        args.num_gpus,
        num_machines=args.num_machines,
        machine_rank=args.machine_rank,
        dist_url=args.dist_url,
        args=(args,),
    )
3 Reference resources
3.1 The code base
3.2 file
边栏推荐
- Introduction to armv8/armv9 - learning this article is enough
- json,xml,txt
- 哈夫曼树及其应用
- Microsoft Pinyin opens U / V input mode
- Thinking back from the eight queens' question
- Graph theory, tree based concept
- ROS learning-6 detailed explanation of publisher programming syntax
- Automatic differential reference
- [reading point paper] yolo9000:better, faster, stronger, (yolov2), integrating various methods to improve the idea of map and wordtree data fusion
- Understand speech denoising
猜你喜欢

Summary of innovative ideas of transformer model in CV

05 tabBar导航栏功能
![[reading papers] transformer miscellaneous notes, especially miscellaneous](/img/c3/7788b1bcd71b90c18cf66bb915db32.jpg)
[reading papers] transformer miscellaneous notes, especially miscellaneous

ROS learning-8 pit for custom action programming

Paipai loan parent company Xinye quarterly report diagram: revenue of RMB 2.4 billion, net profit of RMB 530million, a year-on-year decrease of 10%

在IDEA使用C3P0连接池连接SQL数据库后却不能显示数据库内容
![[data and Analysis Visualization] data operation in D3 tutorial 3-d3](/img/c9/82385b125a8e47d900c320b5f4f3b2.jpg)
[data and Analysis Visualization] data operation in D3 tutorial 3-d3

How to destroy a fragment- How to destroy Fragment?

Introduction to armv8/armv9 - learning this article is enough

(novice to) detailed tutorial on machine / in-depth learning with colab from scratch
随机推荐
Automatic differential reference
Barrykay electronics rushes to the scientific innovation board: it is planned to raise 360million yuan. Mr. and Mrs. Wang Binhua are the major shareholders
[reading papers] comparison of deeplobv1-v3 series, brief review
Area of basic exercise circle ※
Resource arrangement
Leetcode 450. Delete node in binary search tree [binary search tree]
After idea uses c3p0 connection pool to connect to SQL database, database content cannot be displayed
Redirection setting parameters -redirectattributes
Port mapping between two computers on different LANs (anydesk)
02 优化微信开发者工具默认的结构
How to destroy a fragment- How to destroy Fragment?
FFmpeg原理
ROS learning -5 how function packs with the same name work (workspace coverage)
[pytorch] kaggle image classification competition arcface + bounding box code learning
[Dest0g3 520迎新赛] 拿到WP还整了很久的Dest0g3_heap
Armv8-m (Cortex-M) TrustZone summary and introduction
Mbedtls migration experience
01 初识微信小程序
Surpass the strongest variant of RESNET! Google proposes a new convolution + attention network: coatnet, with an accuracy of 89.77%!
C # illustrated tutorial (Fourth Edition) chapter7-7.2 accessing inherited members