当前位置:网站首页>[Deep Learning 21 Days Learning Challenge] 2. Complex sample classification and recognition - convolutional neural network (CNN) clothing image classification
[Deep Learning 21 Days Learning Challenge] 2. Complex sample classification and recognition - convolutional neural network (CNN) clothing image classification
2022-08-04 06:05:00 【Live up to [email protected]】
活动地址:CSDN21天学习挑战赛
完成了深度学习环境搭建和卷积神经网络(CNN)实现mnist手写数字识别的学习实践,最后Summarize the knowledge points,今天,Continue to study with the teacher卷积神经网络(CNN)服装图像分类.
学习总结如下:(代码附后)
1、数据分析
1.1 了解fashion_mnist数据集
The teacher loads the dataset: datasets.fashion_mnist.load_data()
用到的是:fashion_mnist数据集
FashionMNIST 是一个图像数据集. It is provided by a German fashion technology company.其涵盖了来自 10 种类别的共 7 万个Front images of different products.FashionMNIST 的大小、格式和训练集/测试集划分与原始的 MNIST 完全一致.60000/10000的训练测试数据划分,28x28 的灰度图片.
Data classification instructions:
| 标签值 | 分类 |
|---|---|
| 0 | T恤 / 上衣 (T-shirt/top) |
| 1 | 裤子 (Trouser) |
| 2 | 套衫 (Pullover) |
| 3 | 连衣裙 (Dress) |
| 4 | 外套 (Coat) |
| 5 | 凉鞋 (Sandal) |
| 6 | 衬衫 (Shirt) |
| 7 | 运动鞋 (Sneaker) |
| 8 | 包 (Bag) |
| 9 | 短靴 (Ankle boot) |
Data visualization preview:
1.2 分析数据集
with just learned手写识别数据集相比较,This time the clothing classification dataset特点明显,i.e. like data complexity:服装分类的数据复杂度significantly higher than手写数据.
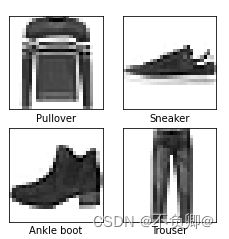
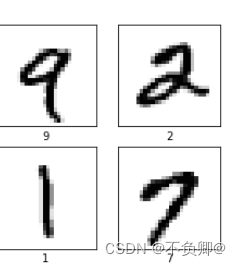
数据大小:同样都是7 万个样本,训练集/The test set is divided the same:60000/10000,28x28 的灰度图片.
分类情况:都是多分类(10分类)
2、模型搭建
Comparison with handwriting recognition models,One more convolutional layer is added,We concluded in the previous section,卷积层的作用是:用于从输入的高维数组中提取特征.Each convolution kernel of a convolutional layer is a feature map,用于提取某一个特征,The number of convolution kernels determines the number of output features of the convolution layer .
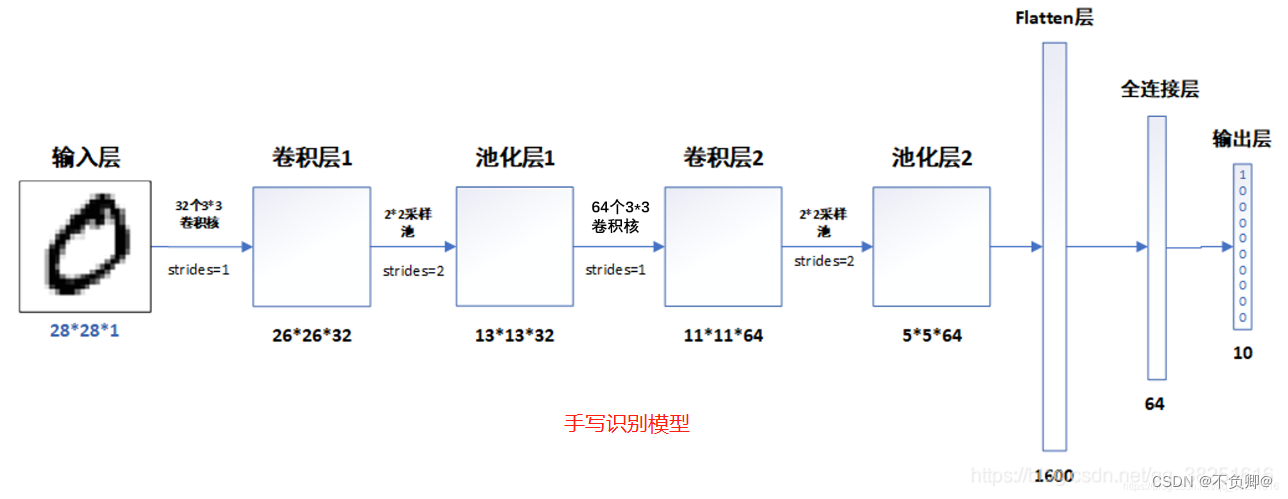
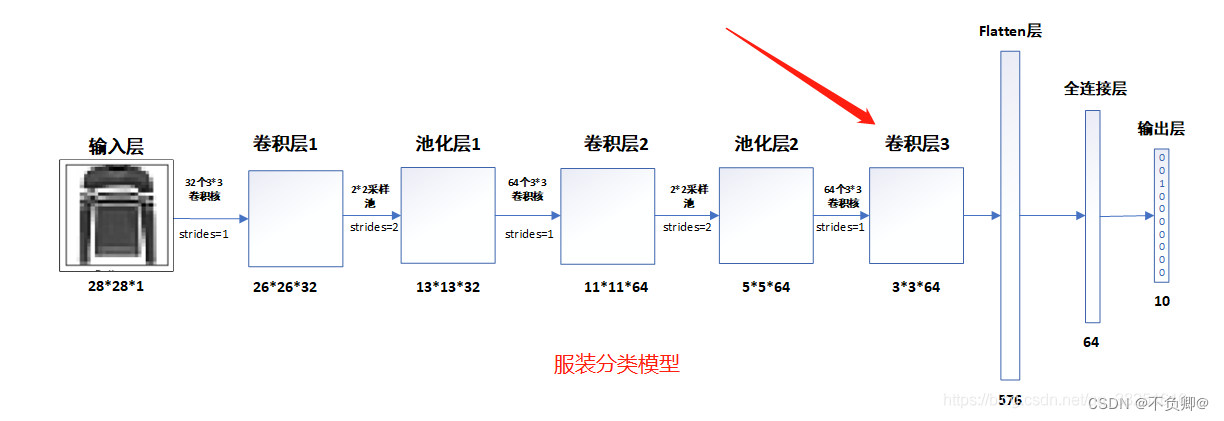
model = models.Sequential([
    layers.Conv2D(32, (3, 3), activation='relu', input_shape=(28, 28, 1)), #卷积层1,卷积核3*3
    layers.MaxPooling2D((2, 2)),                   #池化层1,2*2采样
    layers.Conv2D(64, (3, 3), activation='relu'),  #卷积层2,卷积核3*3
    layers.MaxPooling2D((2, 2)),                   #池化层2,2*2采样
    layers.Conv2D(64, (3, 3), activation='relu'),  #卷积层3,卷积核3*3

    layers.Flatten(),                      #Flatten层,连接卷积层与全连接层
    layers.Dense(64, activation='relu'),   #全连接层,特征进一步提取
    layers.Dense(10)                       #输出层,输出预期结果
])
使用model.summary() , 打印网络结构,如下: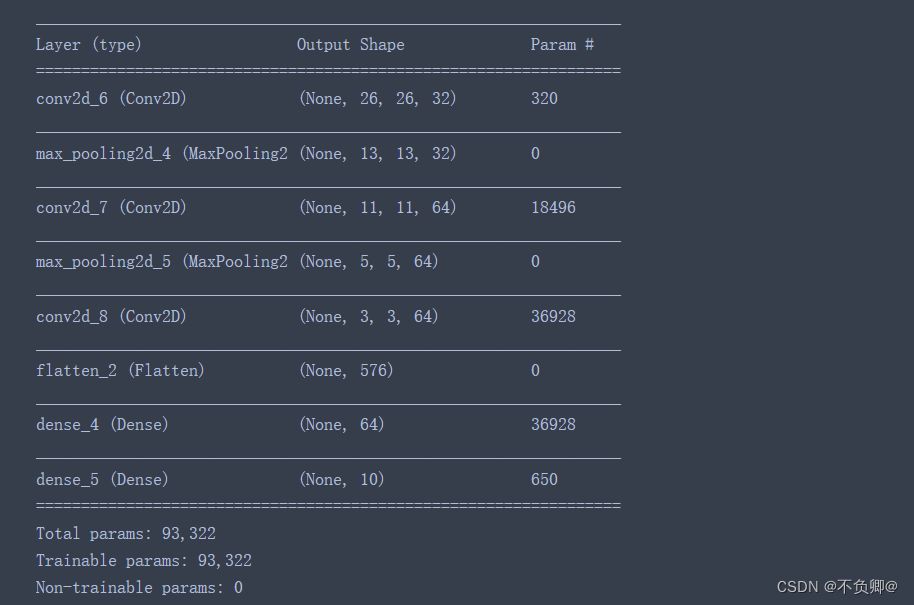
3、配置模型
因为和手写识别模型一样,are used for training classification,所以,此处用到的优化器、损失函数、指标参数一致.
model.compile(optimizer='adam',
              loss=tf.keras.losses.SparseCategoricalCrossentropy(from_logits=True),
              metrics=['accuracy'])
4、训练模型
history = model.fit(train_images, train_labels, epochs=10,
                    validation_data=(test_images, test_labels))
- validation_data=(测试集输入特征,测试集标签)
- epochs = 迭代次数
这里的historyis the data returned by receiving model training,其中包含:
- loss:训练集损失值
- accuracy:训练集准确率
- val_loss:测试集损失值
- val_accruacy:测试集准确率
我们打印看看:print(history.history)
训练过程: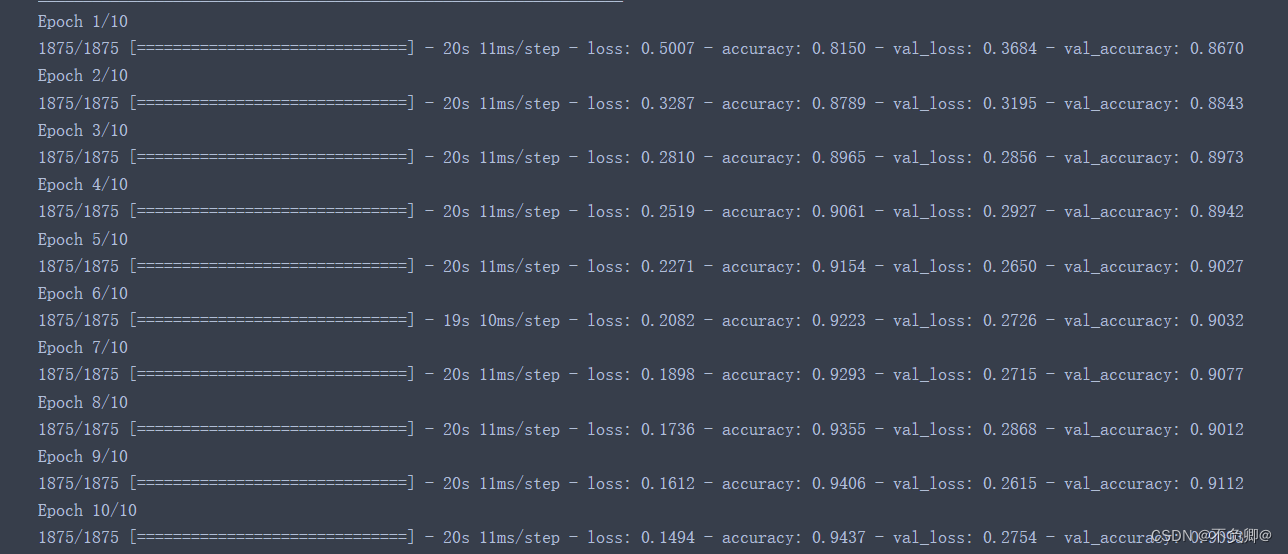
输出说明:
- loss:训练集损失值
- accuracy:训练集准确率
- val_loss:测试集损失值
- val_accruacy:测试集准确率
5、测试集预测
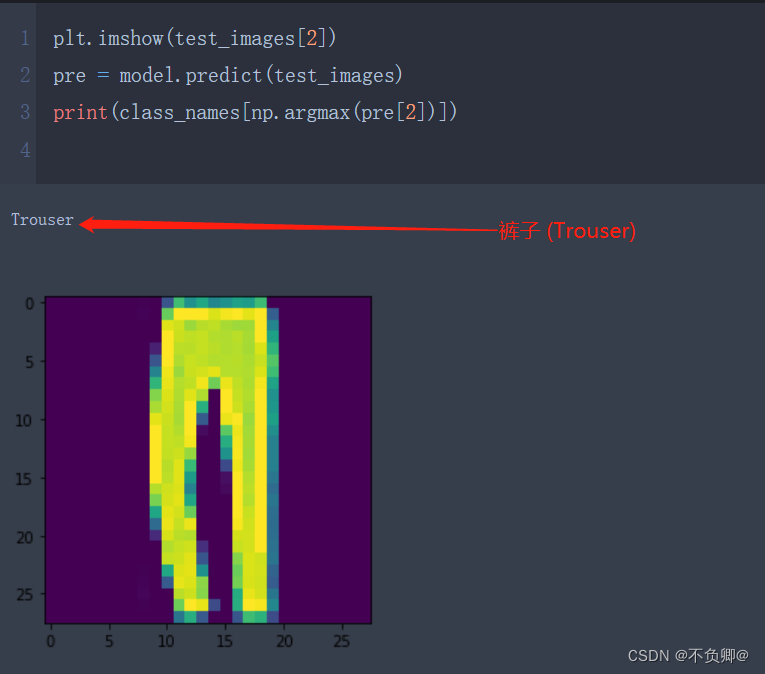
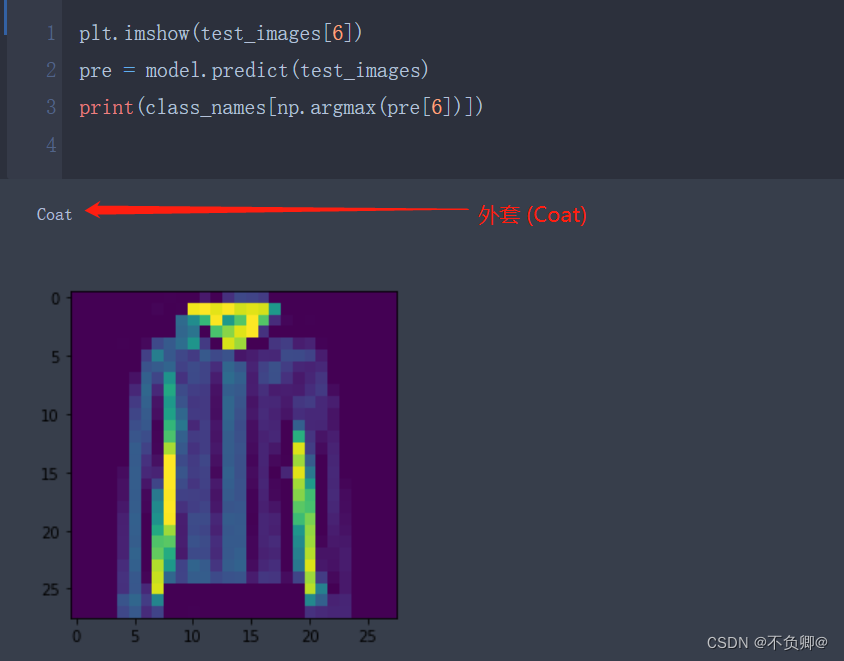
6、模型评估
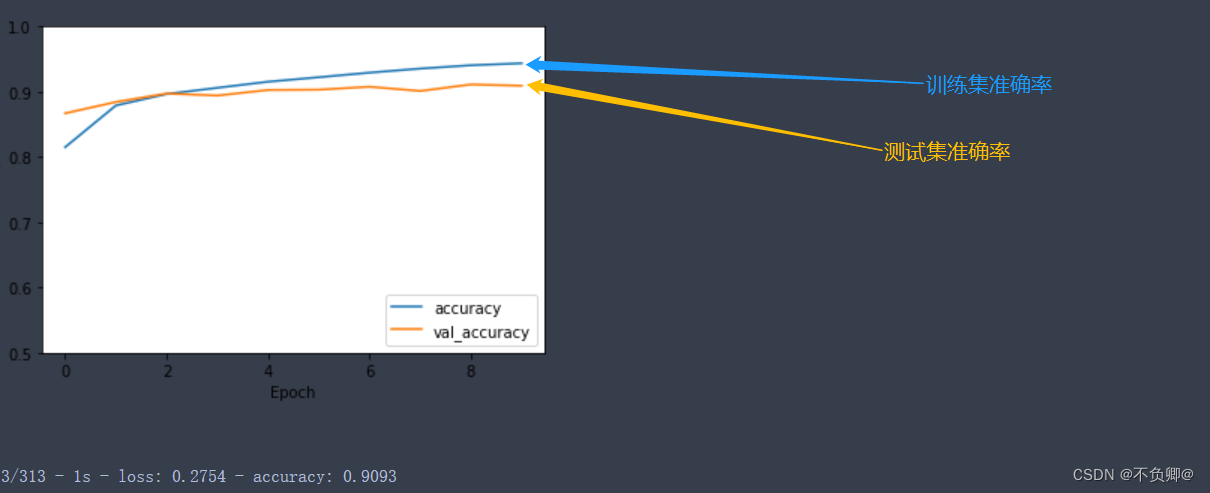
plt.plot(history.history['accuracy'], label='accuracy')
plt.plot(history.history['val_accuracy'], label = 'val_accuracy')
plt.xlabel('Epoch')
plt.ylabel('Accuracy')
plt.ylim([0.5, 1])
plt.legend(loc='lower right')
plt.show()

test_loss, test_acc = model.evaluate(test_images,  test_labels, verbose=2)
print("测试准确率为:",test_acc)

7、完整代码
import tensorflow as tf
from tensorflow.keras import datasets, layers, models
import matplotlib.pyplot as plt
import numpy as np
(train_images, train_labels), (test_images, test_labels) = datasets.fashion_mnist.load_data()
train_images, test_images = train_images / 255.0, test_images / 255.0
#调整数据到我们需要的格式
train_images = train_images.reshape((60000, 28, 28, 1))
test_images = test_images.reshape((10000, 28, 28, 1))
class_names = ['T-shirt/top', 'Trouser', 'Pullover', 'Dress', 'Coat',
               'Sandal', 'Shirt', 'Sneaker', 'Bag', 'Ankle boot']
plt.figure(figsize=(20,10))
for i in range(20):
    plt.subplot(5,10,i+1)
    plt.xticks([])
    plt.yticks([])
    plt.grid(False)
    plt.imshow(train_images[i], cmap=plt.cm.binary)
    plt.xlabel(class_names[train_labels[i]])
plt.show()
model = models.Sequential([
    layers.Conv2D(32, (3, 3), activation='relu', input_shape=(28, 28, 1)), #卷积层1,卷积核3*3
    layers.MaxPooling2D((2, 2)),                   #池化层1,2*2采样
    layers.Conv2D(64, (3, 3), activation='relu'),  #卷积层2,卷积核3*3
    layers.MaxPooling2D((2, 2)),                   #池化层2,2*2采样
    layers.Conv2D(64, (3, 3), activation='relu'),  #卷积层3,卷积核3*3

    layers.Flatten(),                      #Flatten层,连接卷积层与全连接层
    layers.Dense(64, activation='relu'),   #全连接层,特征进一步提取
    layers.Dense(10)                       #输出层,输出预期结果
])
model.summary()
model.compile(optimizer='adam',
              loss=tf.keras.losses.SparseCategoricalCrossentropy(from_logits=True),
              metrics=['accuracy'])

history = model.fit(train_images, train_labels, epochs=10,
                    validation_data=(test_images, test_labels))
plt.imshow(test_images[1])
pre = model.predict(test_images)
print(class_names[np.argmax(pre[1])])
plt.plot(history.history['accuracy'], label='accuracy')
plt.plot(history.history['val_accuracy'], label = 'val_accuracy')
plt.xlabel('Epoch')
plt.ylabel('Accuracy')
plt.ylim([0.5, 1])
plt.legend(loc='lower right')
plt.show()
test_loss, test_acc = model.evaluate(test_images,  test_labels, verbose=2)
print("测试准确率为:",test_acc)
学习日记
**
1,学习知识点
a、认识和使用fashion_mnist数据集
b、卷积神经网络(CNN)Basic use of complex sample classification and recognition
c、模型评估方法
2,学习遇到的问题
Continue to nibble on the watermelon book,bad tonic foundation
版权声明
本文为[Live up to [email protected]]所创,转载请带上原文链接,感谢
https://yzsam.com/2022/216/202208040525326978.html
边栏推荐
猜你喜欢
flink onTimer定时器实现定时需求
![[Deep Learning 21 Days Learning Challenge] 1. My handwriting was successfully recognized by the model - CNN implements mnist handwritten digit recognition model study notes](/img/62/ab3dbbd7d4d0009c7cba5e45879f25.png)
[Deep Learning 21 Days Learning Challenge] 1. My handwriting was successfully recognized by the model - CNN implements mnist handwritten digit recognition model study notes
Install dlib step pit record, error: WARNING: pip is configured with locations that require TLS/SSL
多项式回归(PolynomialFeatures)

flink问题整理
(十三)二叉排序树
ISCC-2022
Briefly say Q-Q map; stats.probplot (QQ map)

线性回归简介01---API使用案例
RecyclerView的用法
随机推荐
flink onTimer定时器实现定时需求
Kubernetes基本入门-概念介绍(一)
Dictionary feature extraction, text feature extraction.
oracle临时表与pg临时表的区别
纳米级完全删除MYSQL5.7以及一些吐槽
自动化运维工具Ansible(5)流程控制
剑指 Offer 20226/30
【深度学习21天学习挑战赛】0、搭建学习环境
Commons Collections1
VScode配置PHP环境
SQL练习 2022/6/30
thymeleaf中 th:href使用笔记
ReentrantLock(公平锁、非公平锁)可重入锁原理
postgresql 游标(cursor)的使用
安卓连接mysql数据库,使用okhttp
win云服务器搭建个人博客失败记录(wordpress,wamp)
(十五)B-Tree树(B-树)与B+树
flink-sql所有表格式format
MySQL最左前缀原则【我看懂了hh】
Upload靶场搭建&&第一二关