当前位置:网站首页>Pytoch learning notes (III) use, modification, training (cpu/gpu) and verification of the model
Pytoch learning notes (III) use, modification, training (cpu/gpu) and verification of the model
2022-07-26 13:32:00 【Did Xiao Hu get stronger today】
List of articles
Use and modification of existing models
import torchvision

vgg16_true = torchvision.models.vgg16(pretrained=True)

print(vgg16_true)
Run code :
The storage address of the downloaded data set :

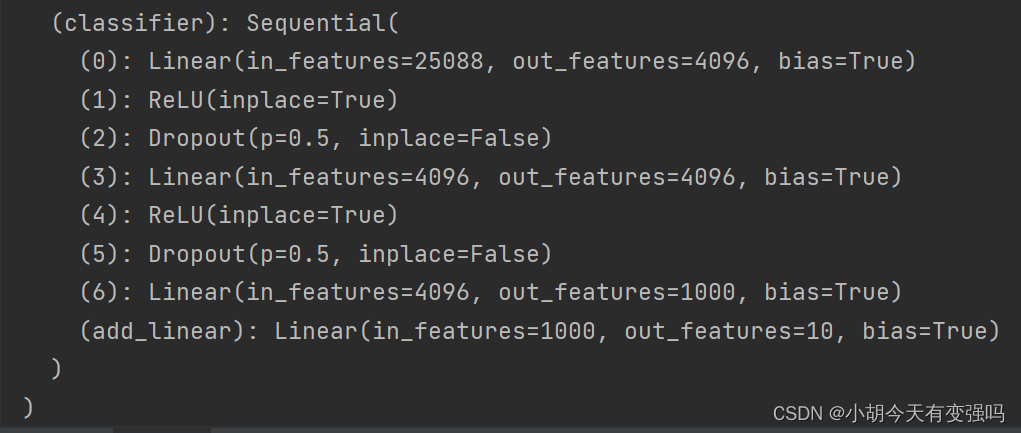
Add a linear layer on the basis of the original model ;
import torchvision
from torch import nn

vgg16_true = torchvision.models.vgg16(pretrained=True)

print(vgg16_true)

train_data = torchvision.datasets.CIFAR10('../data', transform=torchvision.transforms.ToTensor(), download=True)

#  add to
vgg16_true.classifier.add_module('add_linear', nn.Linear(1000, 10))
#  modify
vgg16_true.classifier[6] = nn.Linear(4096, 10)

print(vgg16_true)
Save and read the network model
import torch
import torchvision

vgg16 = torchvision.models.vgg16(pretrained=False)
#  Save the way 1, Model structure + Model parameters
torch.save(vgg16, "vgg16_method1.path")

#  Save the way 2, Model parameters ( The official recommendation )
torch.save(vgg16.state_dict(), "vgg16_method2.path")
import torch
import torchvision

#  The way 1》 Save the way 1, Load model
# model = torch.load("vgg16_method1.path")
# print(model)

#  The way 1》 Save the way 2, Load model

vgg16 = torchvision.models.vgg16(pretrained=False)
vgg16.load_state_dict(torch.load("vgg16_method2.path"))
# model = torch.load("vgg16_method2.path")
print(vgg16)
Complete model training routine
import torch
import torchvision
from torch import nn
from torch.nn import Sequential, Conv2d, MaxPool2d, Flatten, Linear
from torch.utils.data import DataLoader
from torch.utils.tensorboard import SummaryWriter
from model import *
# Prepare the dataset
train_data = torchvision.datasets.CIFAR10(root="../data", train=True, transform=torchvision.transforms.ToTensor(), download=True)
test_data = torchvision.datasets.CIFAR10(root="../data", train=False, transform=torchvision.transforms.ToTensor(), download=True)
# length
train_data_size = len(train_data)
test_data_size = len(test_data)
print(" The length of the training data set is :{}".format(train_data_size))
print(" The length of the test data set is :{}".format(test_data_size))
# utilize DataLoader To load data
train_dataloader = DataLoader(train_data, batch_size=64)
test_dataloader = DataLoader(test_data, batch_size=64)
# Create a network model
tudui = Tudui()
# Loss function
loss_fn = nn.CrossEntropyLoss()
# Optimizer
learning_rate = 1e-2
optimizer = torch.optim.SGD(tudui.parameters(), lr=learning_rate)
# Set some parameters of the training network
# Record the number of workouts
total_train_step = 0
# Record the number of tests
total_test_step = 0
# Number of training rounds
epoch = 10
# add to tensorboard
writer = SummaryWriter("../logs_train")
for i in range(epoch):
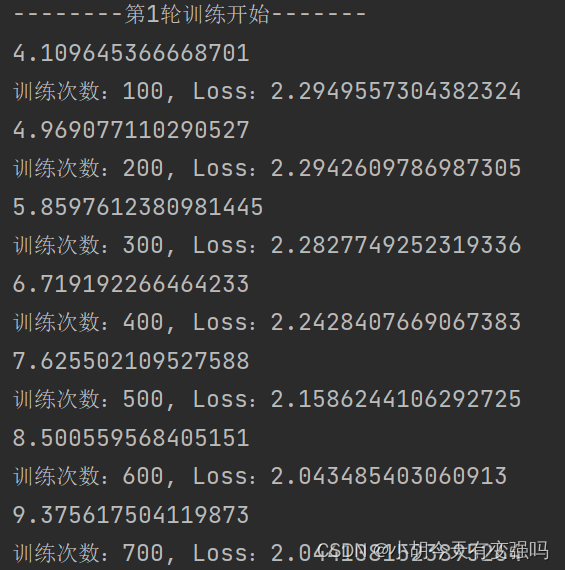
print("-------- The first {} Round of training begins -------".format(i + 1))
# The training steps begin
for data in train_dataloader:
imgs, targets = data
outputs = tudui(imgs)
loss = loss_fn(outputs, targets)
# Optimizer optimization model
optimizer.zero_grad()
loss.backward()
optimizer.step()
total_train_step += 1
if total_train_step % 100 == 0:
print(" Training times :{}, Loss:{}".format(total_train_step, loss.item()))
writer.add_scalar("train_loss", loss.item(), total_train_step)
# The test step begins
total_test = 0
total_accuracy = 0
with torch.no_grad():
for data in test_dataloader:
imgs, targets = data
outputs = tudui(imgs)
loss = loss_fn(outputs, targets)
total_test_loss = total_test + loss.item()
accuracy = (outputs.argmax(1) == targets).sum()
total_accuracy = total_accuracy + accuracy
print(" On the overall test set Loss:{}".format(total_test_loss))
print(" Accuracy on the overall test set :{}".format(total_accuracy/test_data_size))
writer.add_scalar("test_loss", total_test_loss, total_test_step)
writer.add_scalar("test_accuracy", total_accuracy/test_data_size, total_test_step)
total_test_step += 1
torch.save(tudui, "tudui_{}.pth".format(i))
print(" Model saved ")
writer.close()

utilize GPU Training
1. The first way
A network model data ( Input , mark ) Loss function Find the first three parameters , call .cuda() return
import torch
import torchvision
from torch import nn
from torch.nn import Sequential, Conv2d, MaxPool2d, Flatten, Linear
from torch.utils.data import DataLoader
from torch.utils.tensorboard import SummaryWriter
import time

from model import *

#  Prepare the dataset
train_data = torchvision.datasets.CIFAR10(root="../data", train=True, transform=torchvision.transforms.ToTensor(), download=True)
test_data = torchvision.datasets.CIFAR10(root="../data", train=False, transform=torchvision.transforms.ToTensor(), download=True)

# length
train_data_size = len(train_data)
test_data_size = len(test_data)

print(" The length of the training data set is :{}".format(train_data_size))
print(" The length of the test data set is :{}".format(test_data_size))

#  utilize DataLoader To load data
train_dataloader = DataLoader(train_data, batch_size=64)
test_dataloader = DataLoader(test_data, batch_size=64)

#  Create a network model
class Tudui(nn.Module):
    def __init__(self):
        super(Tudui, self).__init__()

        self.model = Sequential(
            Conv2d(3, 32, 5, 1, padding=2),
            MaxPool2d(2),
            Conv2d(32, 32, 5, 1, padding=2),
            MaxPool2d(2),
            Conv2d(32, 64, 5, 1, padding=2),
            MaxPool2d(2),
            Flatten(),
            Linear(64 * 4 *4, 64),
            Linear(64, 10)
        )

    def forward(self, x):
        x =self.model(x)
        return x

tudui = Tudui()
if torch.cuda.is_available():
    tudui = tudui.cuda()

#  Loss function
loss_fn = nn.CrossEntropyLoss()
if torch.cuda.is_available():
    loss_fn = loss_fn.cuda()

#  Optimizer
learning_rate = 1e-2
optimizer = torch.optim.SGD(tudui.parameters(), lr=learning_rate)

#  Set some parameters of the training network
#  Record the number of workouts
total_train_step = 0

#  Record the number of tests
total_test_step = 0

#  Number of training rounds
epoch = 10

#  add to tensorboard
writer = SummaryWriter("../logs_train")
start_time = time.time()
for i in range(epoch):
    print("-------- The first {} Round of training begins -------".format(i + 1))

    # The training steps begin
    tudui.train()
    for data in train_dataloader:
        if torch.cuda.is_available():
            imgs, targets = data
            imgs = imgs.cuda()
        targets = targets.cuda()
        outputs = tudui(imgs)
        loss = loss_fn(outputs, targets)

        #  Optimizer optimization model
        optimizer.zero_grad()
        loss.backward()
        optimizer.step()

        total_train_step += 1
        if total_train_step % 100 == 0:
            end_time = time.time()
            print(end_time - start_time)
            print(" Training times :{}, Loss:{}".format(total_train_step, loss.item()))
            writer.add_scalar("train_loss", loss.item(), total_train_step)

    #  The test step begins
    tudui.eval()
    total_test = 0
    total_accuracy = 0
    with torch.no_grad():
        for data in test_dataloader:
            if torch.cuda.is_available():
                imgs, targets = data
                imgs = imgs.cuda()
            targets = targets.cuda()
            outputs = tudui(imgs)
            loss = loss_fn(outputs, targets)
            total_test_loss = total_test + loss.item()
            accuracy = (outputs.argmax(1) == targets).sum()
            total_accuracy = total_accuracy + accuracy

    print(" On the overall test set Loss:{}".format(total_test_loss))
    print(" Accuracy on the overall test set :{}".format(total_accuracy/test_data_size))
    writer.add_scalar("test_loss", total_test_loss, total_test_step)
    writer.add_scalar("test_accuracy", total_accuracy/test_data_size, total_test_step)
    total_test_step += 1

    torch.save(tudui, "tudui_{}.pth".format(i))
    print(" Model saved ")

writer.close()
GPU Training :
CPU Training :

Native configuration CPU by AMD Ryzen 7 5800H with Radeon Graphics Eight cores ,GPU by
Nvidia GeForce RTX 3060 Laptop GPU ( 6 GB / lenovo ), It can be seen that running with a graphics card is still much faster .
If the computer doesn't have GPU, You can use Google .
Sign in https://colab.research.google.com/ , You need to register your Google account and login to use , Select File , New notebook .

You can see GPU It doesn't work :![[ Failed to transfer the external chain picture , The origin station may have anti-theft chain mechanism , It is suggested to save the pictures and upload them directly (img-5wD1ii0y-1658804427176)(C:\Users\Husheng\Desktop\ Learning notes \image-20220725170218869.png)]](/img/08/02bcb39c9784c15d67155f9d094c85.png)
If you want to use, you can modify the following settings :
Click on modify —> Notebook settings , Select the hardware accelerator as GPU, Click save :

Test again at this time ,GPU You can use it :
The above gpu Copy the code of version , function

It can also work normally , And it's very fast , Than my notebook 3060 It's much faster , It's ridiculous !!!
2. The second way :
.to(device)
Device = torch.device(“cpu”)
Torch.device(“cuda”)
Torch.device(“cuda.0”)
Torch.device(“cuda.1”)
import torch
import torchvision
from torch import nn
from torch.nn import Sequential, Conv2d, MaxPool2d, Flatten, Linear
from torch.utils.data import DataLoader
from torch.utils.tensorboard import SummaryWriter
import time

from model import *

#  Define the training equipment
device = torch.device("cuda")

#  Prepare the dataset
train_data = torchvision.datasets.CIFAR10(root="../data", train=True, transform=torchvision.transforms.ToTensor(), download=True)
test_data = torchvision.datasets.CIFAR10(root="../data", train=False, transform=torchvision.transforms.ToTensor(), download=True)

# length
train_data_size = len(train_data)
test_data_size = len(test_data)

print(" The length of the training data set is :{}".format(train_data_size))
print(" The length of the test data set is :{}".format(test_data_size))

#  utilize DataLoader To load data
train_dataloader = DataLoader(train_data, batch_size=64)
test_dataloader = DataLoader(test_data, batch_size=64)

#  Create a network model
class Tudui(nn.Module):
    def __init__(self):
        super(Tudui, self).__init__()

        self.model = Sequential(
            Conv2d(3, 32, 5, 1, padding=2),
            MaxPool2d(2),
            Conv2d(32, 32, 5, 1, padding=2),
            MaxPool2d(2),
            Conv2d(32, 64, 5, 1, padding=2),
            MaxPool2d(2),
            Flatten(),
            Linear(64 * 4 *4, 64),
            Linear(64, 10)
        )

    def forward(self, x):
        x =self.model(x)
        return x

tudui = Tudui()
tudui = tudui.to(device)

#  Loss function
loss_fn = nn.CrossEntropyLoss()
loss_fn = loss_fn.to(device)

#  Optimizer
learning_rate = 1e-2
optimizer = torch.optim.SGD(tudui.parameters(), lr=learning_rate)

#  Set some parameters of the training network
#  Record the number of workouts
total_train_step = 0

#  Record the number of tests
total_test_step = 0

#  Number of training rounds
epoch = 10

#  add to tensorboard
writer = SummaryWriter("../logs_train")
start_time = time.time()
for i in range(epoch):
    print("-------- The first {} Round of training begins -------".format(i + 1))

    # The training steps begin
    tudui.train()
    for data in train_dataloader:
        imgs, targets = data
        imgs = imgs.to(device)
        targets = targets.to(device)
        outputs = tudui(imgs)
        loss = loss_fn(outputs, targets)

        #  Optimizer optimization model
        optimizer.zero_grad()
        loss.backward()
        optimizer.step()

        total_train_step += 1
        if total_train_step % 100 == 0:
            end_time = time.time()
            print(end_time - start_time)
            print(" Training times :{}, Loss:{}".format(total_train_step, loss.item()))
            writer.add_scalar("train_loss", loss.item(), total_train_step)

    #  The test step begins
    tudui.eval()
    total_test = 0
    total_accuracy = 0
    with torch.no_grad():
        for data in test_dataloader:
            imgs, targets = data
            imgs = imgs.to(device)
            targets = targets.to(device)
            outputs = tudui(imgs)
            loss = loss_fn(outputs, targets)
            total_test_loss = total_test + loss.item()
            accuracy = (outputs.argmax(1) == targets).sum()
            total_accuracy = total_accuracy + accuracy

    print(" On the overall test set Loss:{}".format(total_test_loss))
    print(" Accuracy on the overall test set :{}".format(total_accuracy/test_data_size))
    writer.add_scalar("test_loss", total_test_loss, total_test_step)
    writer.add_scalar("test_accuracy", total_accuracy/test_data_size, total_test_step)
    total_test_step += 1

    torch.save(tudui, "tudui_{}.pth".format(i))
    print(" Model saved ")

writer.close()
Completed model validation routine
Complete model validation ( test ,demo) tricks : Using a trained model , Then give it input .
import torch
import torchvision
from PIL import Image
from torch import nn
from torch.nn import Conv2d, MaxPool2d, Flatten, Linear, Sequential

image_path = "../imgs/airplane.png"
image = Image.open(image_path)
print(image)

# image = image.convert('RGB')

transform = torchvision.transforms.Compose([torchvision.transforms.Resize((32, 32)),
                                            torchvision.transforms.ToTensor()])

image = transform(image)
print(image.shape)

class Tudui(nn.Module):
    def __init__(self):
        super(Tudui, self).__init__()

        self.model = Sequential(
            Conv2d(3, 32, 5, 1, padding=2),
            MaxPool2d(2),
            Conv2d(32, 32, 5, 1, padding=2),
            MaxPool2d(2),
            Conv2d(32, 64, 5, 1, padding=2),
            MaxPool2d(2),
            Flatten(),
            Linear(64 * 4 * 4, 64),
            Linear(64, 10)
        )

    def forward(self, x):
        x =self.model(x)
        return x

model = torch.load("tudui_0.pth")
print(model)
image = torch.reshape(image, (1, 3, 32, 32))
model.eval()
with torch.no_grad():
    image = image.cuda()
    output = model(image)
print(output)

print(output.argmax(1))
![[ Failed to transfer the external chain picture , The origin station may have anti-theft chain mechanism , It is suggested to save the pictures and upload them directly (img-0smcLlpD-1658804427178)(C:\Users\Husheng\Desktop\ Learning notes \image-20220725203146266.png)]](/img/f9/e44708f5160436365ed2cac7c6b9e7.png)
Reference material
边栏推荐
- The last time I heard about eBay, or the last time
- Time complexity analysis of bubble sorting
- 【C语言学习者必会的题目集锦1】巩固基础,稳步提高
- Win11+VS2019配置YOLOX
- B+ tree index use (8) sorting use and precautions (20)
- 带你熟悉云网络的“电话簿”:DNS
- We were tossed all night by a Kong performance bug
- 多线程使用不当导致的 OOM
- SuperMap iclient for leaflet loads Gauss Kruger projection three-dimensional zonation CGCS2000 geodetic coordinate system WMTs service
- Ultimate doll 2.0 | cloud native delivery package
猜你喜欢

3D modeling and rendering based on B é zier curve

panic: Error 1045: Access denied for user ‘root‘@‘117.61.242.215‘ (using password: YES)

Hcip day 12 notes sorting (BGP Federation, routing rules)

估值15亿美元的独角兽被爆裁员,又一赛道遇冷?

Detailed relation extraction model casrel

The serialization class in unity is in JSON format

12 brand management of commodity system in gulimall background management
Unity中序列化类为json格式

One stroke problem (Chinese postman problem)
Unicorn, valued at $1.5 billion, was suddenly laid off, and another track was cold?
随机推荐
How to build a customer-centric product blueprint: suggestions from the chief technology officer
Student examination system based on C #
JUC总结
Huawei computer test ~ offset realizes string encryption
JS object assignment problem
官宣!艾德韦宣集团与百度希壤达成深度共创合作
Sword finger offer (x): rectangular coverage
Ultimate doll 2.0 | cloud native delivery package
[upper computer tutorial] Application of integrated stepping motor and Delta PLC (as228t) under CANopen communication
Comparison between SIGMOD function and softmax function
pomerium
MySQL data directory (3) -- table data structure MyISAM (XXVI)
AI theory knowledge map 1 Foundation
File upload and download performance test based on the locust framework
解决方案丨5G技术助力搭建智慧园区
A college archives management system based on asp.net
Parent class reference to child class (parent class reference points to child class object)
B+树(3)聚簇索引,二级索引 --mysql从入门到精通(十五)
Photoshop (cc2020) unfinished
B+ tree index use (8) sorting use and precautions (20)