当前位置:网站首页>Understanding and difference between viewbinding and databinding
Understanding and difference between viewbinding and databinding
2022-07-04 13:51:00 【My cat's name is bingbin】
I've been putting ViewBinding Take it for granted. DataBinding, It's not until recent study that I found that they are not a thing . So write this note to help understand and distinguish between them .
One 、ViewBinding
1. What is? ViewBinding
Let's see what the official said first .
Through the view binding function , You can more easily write code that can interact with views . After enabling view binding in the module , For each of the modules XML The layout file generates a binding class . An instance of a bound class contains pairs that have... In the corresponding layout ID Direct references to all views of .
in the majority of cases , View binding will replace
findViewByIdsource : View binding | Android developer | Android Developers (google.cn)
In the contact Android When , Get a component in the layout through findViewById To get . For example, get one Button, So the way of writing is
val btn: Button = findViewById(R.id.btn) So when there are many components , It needs a lot of findViewById To get , It's very cumbersome . Then I'm learning from teacher Guolin 《 The first line of code 》, Guo Shenshu mentioned kotlin-android-extensions This plugin . This plug-in can help us save findViewById, In use Kotlin You can write directly through the view component Id To get .
For example, there is one in the view id by btn Of Button Components , So in Acitivy There will be one of them btn Variable . This plug-in helps us simplify the above steps .
But this plug-in was quickly Google Abandoned , stay AndroidStudio There will be a warning .

Instead, it's ViewBinding.
and Viewbinding Is to give everyone xml The layout generates a corresponding binding class . such as activity_main.xml Layout , It will generate a ActivityMainBinding class .
2. How do you use it? ViewBinding
Want to use ViewBinding, The first thing you need to do is build.gradle Add configuration to the list .
android {
    ...
    buildFeatures {
        viewBinding true
    }
}
And then create a MainActivity, And write down the layout file activity_main.xml
<?xml version="1.0" encoding="utf-8"?>
<androidx.constraintlayout.widget.ConstraintLayout xmlns:android="http://schemas.android.com/apk/res/android"
xmlns:app="http://schemas.android.com/apk/res-auto"
xmlns:tools="http://schemas.android.com/tools"
android:layout_width="match_parent"
android:layout_height="match_parent"
tools:context=".MainActivity">
<Button
android:id="@+id/btn"
android:layout_width="match_parent"
android:layout_height="wrap_content"
android:text="button"
app:layout_constraintEnd_toEndOf="parent"
app:layout_constraintStart_toStartOf="parent"
app:layout_constraintTop_toTopOf="parent" />
<TextView
android:id="@+id/tv"
android:layout_width="match_parent"
android:layout_height="wrap_content"
android:layout_marginTop="8dp"
android:text="textView"
android:textColor="@color/black"
android:gravity="center"
app:layout_constraintEnd_toEndOf="parent"
app:layout_constraintStart_toStartOf="parent"
app:layout_constraintTop_toBottomOf="@+id/btn" />
</androidx.constraintlayout.widget.ConstraintLayout>And then in Activity Use in
class MainActivity : AppCompatActivity() {
    override fun onCreate(savedInstanceState: Bundle?) {
        super.onCreate(savedInstanceState)
        val binding = ActivityMainBinding.inflate(layoutInflater)
        setContentView(binding.root)
    }
}
ViewBinding Help us generate a ActivityMainBinding class , We go through ActivityMainBinding.inflate() To load the layout .
Then we can go through binding To operate the layout .
class MainActivity : AppCompatActivity() {
    override fun onCreate(savedInstanceState: Bundle?) {
        super.onCreate(savedInstanceState)
        val binding = ActivityMainBinding.inflate(layoutInflater)
        setContentView(binding.root)

        binding.btn.setOnClickListener {
            Toast.makeText(this, "click", Toast.LENGTH_SHORT).show()
        }
        binding.tv.text = "setText"
    }
}
This saves us FindViewById Steps for , This is also ViewBinding Maximum function .
Two 、DataBinding
1. What is? DataBinding
Let's first look at the official statement
Data binding library is a kind of support library , With this library , You can use declarative format ( Not programmatically ) Bind the interface components in the layout to the data source in the application .
source : Data binding library | Android developer | Android Developers (google.cn)
The official words here are a little incomprehensible . Then I'll try to explain .
For example, we need to modify one TextView Of text value , I got it in the code before TextView Components , And then through textView.text To assign . such as
val str = "setText"
binding.tv.text = str
Or when we want to get one TextView When the text value of , It also needs to pass textView.text To get
val value = binding.tv.text.toString()Such operation is programmed , Assign or take values in logic code . If we can in xml The layout file declares which variable the value of the component is bound to , It will be much more convenient .
utilize DataBinding You can do that , such as
<?xml version="1.0" encoding="utf-8"?>
    <layout xmlns:android="http://schemas.android.com/apk/res/android">
       <data>
           <variable name="user" type="com.example.User"/>
       </data>
       <LinearLayout
           android:orientation="vertical"
           android:layout_width="match_parent"
           android:layout_height="match_parent">
           <TextView android:layout_width="wrap_content"
               android:layout_height="wrap_content"
               android:text="@{user.firstName}"/>
           <TextView android:layout_width="wrap_content"
               android:layout_height="wrap_content"
               android:text="@{user.lastName}"/>
       </LinearLayout>
    </layout>
This declarative way binds data . The specific use method will be given below .
2. How do you use it? DataBinding
2.1 Basic usage
Want to use DataBinding, Also need now build.gradle Add configuration to the list
android {
    ...
    buildFeatures {
        dataBinding true
    }
}
Then we create a User The entity class , For binding data
class User(var firstName: String, var lastName: String) {}Then write the layout activity_main.xml
<?xml version="1.0" encoding="utf-8"?>
    <layout xmlns:android="http://schemas.android.com/apk/res/android">
       <data>
           <variable name="user" type="com.example.User"/>
       </data>
       <LinearLayout
           android:orientation="vertical"
           android:layout_width="match_parent"
           android:layout_height="match_parent">
           <TextView android:layout_width="wrap_content"
               android:layout_height="wrap_content"
               android:text="@{user.firstName}"/>
           <TextView android:layout_width="wrap_content"
               android:layout_height="wrap_content"
               android:text="@{user.lastName}"/>
       </LinearLayout>
    </layout>
Notice the format here , The outermost layer is a Layout label , It contains data Labels and LinearLayout label , This is a Databinding Is represented by ,LinearLayout In fact, it is the root layout here .
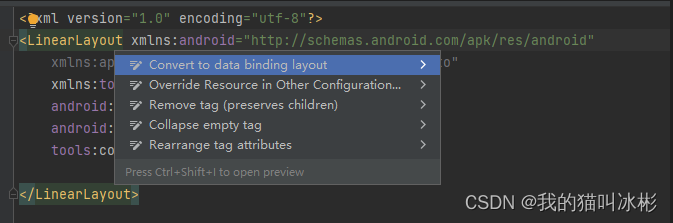
How to form such a document ? In the original xml In the document , Move the cursor to the location of the root layout , Then press alt+enter The option switch to DataBinding The format of .
Then analyze the code of the layout file .
        <data>
           <variable name="user" type="com.example.User"/>
       </data>
data The label represents the data source ,name Is the name. ,type It's the type . there type That's what we wrote earlier User Entity class .
    <LinearLayout
           android:orientation="vertical"
           android:layout_width="match_parent"
           android:layout_height="match_parent">
           <TextView android:layout_width="wrap_content"
               android:layout_height="wrap_content"
               android:text="@{user.firstName}"/>
           <TextView android:layout_width="wrap_content"
               android:layout_height="wrap_content"
               android:text="@{user.lastName}"/>
       </LinearLayout>
And then in TextView Inside text attribute , adopt @{} Format to get data Variables declared in the tag .
Finally back to Activity To bind data .
class MainActivity : AppCompatActivity() {
    override fun onCreate(savedInstanceState: Bundle?) {
        super.onCreate(savedInstanceState)
        val binding: ActivityMainBinding =
            DataBindingUtil.setContentView(this, R.layout.activity_main)
        binding.user = User("Test", "User")
    }
}
The first is the definition DataBinding Time and ViewBinding Somewhat different ,DataBinding It's through DataBindingUtil.setContentView To bind the layout .
The last line is data binding .
The results after operation are as follows :
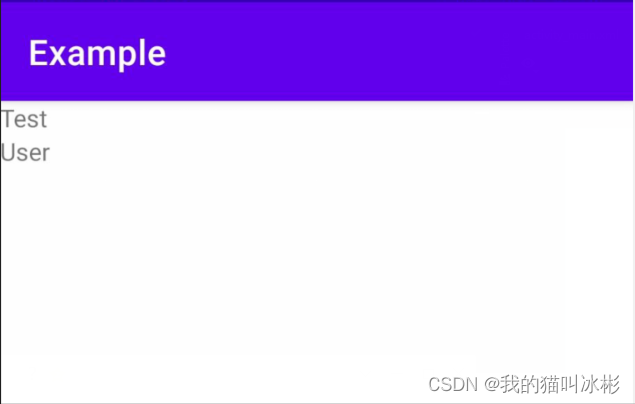
This is it. databinding The most basic usage .
2.2 Bind click event
databinding It can not only bind data , It can also bind some events , For example, click event .
Let's create a Handlers, Add a onClick() Method , Used for click event callback .
class Handlers {
fun myOnClick(view: View) {
Log.d("Handlers", "onClick()")
}
}Then modify the layout file just now , Add one Button Components , And then in data The label states just now Handlers.
<?xml version="1.0" encoding="utf-8"?>
<layout xmlns:android="http://schemas.android.com/apk/res/android">
<data>
<variable name="handler" type="com.example.example.Handlers" />
<variable name="user" type="com.example.example.User"/>
</data>
<LinearLayout
android:orientation="vertical"
android:layout_width="match_parent"
android:layout_height="match_parent">
...
<Button
android:layout_width="match_parent"
android:layout_height="wrap_content"
android:onClick="@{handler::onClick}"
android:text="Button"/>
</LinearLayout>
</layout>
Be careful Button Of onClick attribute . Still through @{} To call variables , And the method call is "::".
It should be noted that , The signature of the custom method must be exactly the same as that in the listener object method . For example, the click event is View.OnClickListner Of onClick(view: View), Then the custom method parameters must also be consistent :myOnClick(view: View), Otherwise, an error will be reported .
Then run and try , Click button , Check the log .
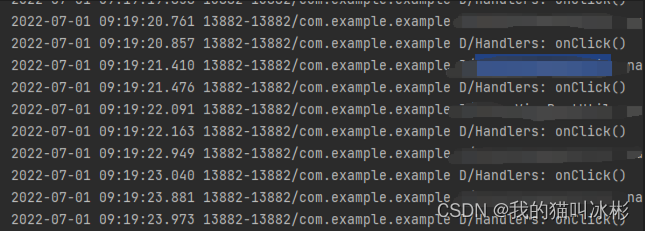
Bind succeeded .
2.3 Using observable data objects
The previous foundation uses , We just know DataBinding How to assign values declaratively rather than programmatically . But in this case , If we want to change the value in the view , We still need to assign values in the code to modify .
Data binding , We prefer to bind the value of the component attribute directly to a variable , When the variable changes, the value of the component attribute changes accordingly , We don't need to assign again .
To achieve this, when a value changes , The effect of a corresponding change in another value , It's easy for us to think Observer mode . Then we can turn the variable into an observable data object .
If you want to realize Observable Interface , It is troublesome for some simple types . Therefore, variables of basic types can be declared with the following classes
ObservableBoolean
ObservableByte
ObservableChar
ObservableShort
ObservableInt
ObservableLong
ObservableFloat
ObservableDouble
ObservableParcelable
Next, let's practice and test .
Let's modify a User Entity class
class User {
    val firstName = ObservableField<String>()
    val lastName = ObservableField<String>()
    val age = ObservableInt()
}
Notice that we use the variable declaration here val, Because you want to use Observable Try to avoid unpacking or sealing , stay Java The statement should also be pubc final attribute
private static class User {
        public final ObservableField<String> firstName = new ObservableField<>();
        public final ObservableField<String> lastName = new ObservableField<>();
        public final ObservableInt age = new ObservableInt();
    }
Someone here may have questions , use val Defines how I modify the value of a variable ? Actually Observable The implementation classes of all provide get() and set() Function to modify specific values .
Then add a new one in the layout TextView To show age Variable .
<?xml version="1.0" encoding="utf-8"?>
<layout xmlns:android="http://schemas.android.com/apk/res/android">
<data>
<variable name="handler" type="com.example.example.Handlers" />
<variable name="user" type="com.example.example.User"/>
</data>
<LinearLayout
android:orientation="vertical"
android:layout_width="match_parent"
android:layout_height="match_parent">
<TextView android:layout_width="wrap_content"
android:layout_height="wrap_content"
android:text="@{user.firstName}"/>
<TextView android:layout_width="wrap_content"
android:layout_height="wrap_content"
android:text="@{user.lastName}"/>
<TextView android:layout_width="wrap_content"
android:layout_height="wrap_content"
android:text="@{String.valueOf(user.age)}"/>
<Button
android:layout_width="match_parent"
android:layout_height="wrap_content"
android:onClick="@{handler::onClick}"
android:text="Change"/>
</LinearLayout>
</layout>
Then make a change Handlers Click event logic , Click the button to modify user Variable value .
class Handlers(private val user: User) {
fun onClick(view: View) {
user.firstName.set("Luka")
user.lastName.set("Dončić")
user.age.set(23)
Log.d("Handlers", "onClick()")
}
}Last in MainActivity Binding inside
package com.example.example
import androidx.appcompat.app.AppCompatActivity
import android.os.Bundle
import android.widget.Toast
import androidx.databinding.DataBindingUtil
import com.example.example.databinding.ActivityMainBinding
class MainActivity : AppCompatActivity() {
override fun onCreate(savedInstanceState: Bundle?) {
super.onCreate(savedInstanceState)
val binding: ActivityMainBinding =
DataBindingUtil.setContentView(this, R.layout.activity_main)
val user = User()
user.firstName.set("Stephen")
user.lastName.set("Curry")
user.age.set(34)
binding.user = user
binding.handler = Handlers(user)
}
}The end result is as follows
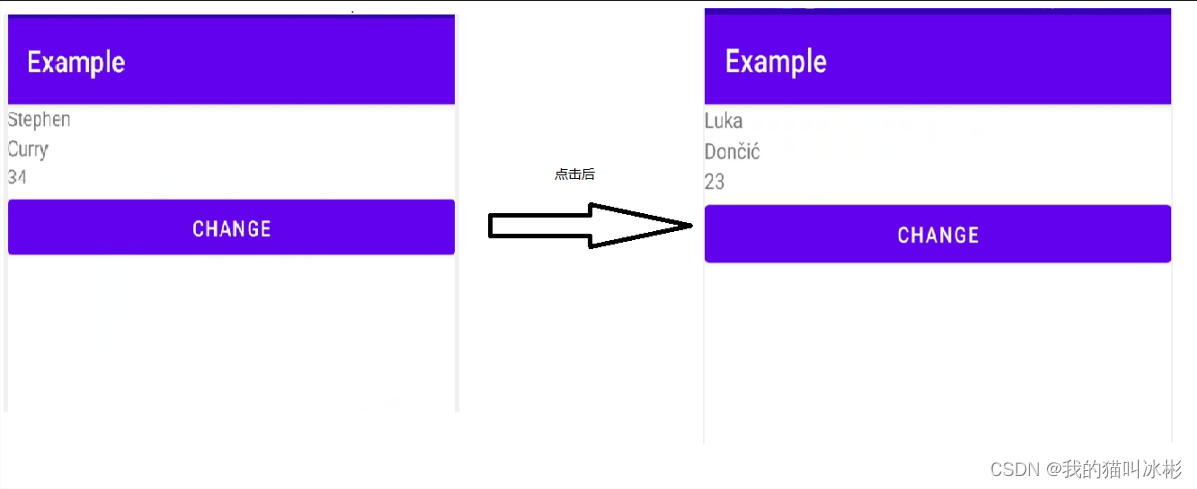
In this way, we don't have to assign values to component properties anymore , Just modify the value of the bound variable .
3、 ... and 、 difference
See here , Believe that you are ViewBinding and DataBinding Have a certain understanding of . Next, I'll summarize their differences .
Purpose is different .ViewBinding Is just to help developers save writing findViewById Steps for ; and DataBinding It is used to bind data , Be able to bind the view data and code variables , And realize automatic update . This feature makes DataBinding Energy and harmony MVVM The framework works well .
Initialization is different .ViewBinding By generated Binding Class inflate Method to load the layout , Then you need to use Activity Of setContentView() Method . and Databinding It is through DataBindingUtil.setContentView() To bind .
Inclusion relation .DataBinding Also have ViewBinding The function of , You can also omit findViewById() Method .
Four 、 summary
This article understands what is ViewBinding and DataBinding, And made a difference analysis of them , Deepen the understanding of both of them .
The main references of this paper are Android developer | Android Developers (google.cn)
边栏推荐
- Go 语言入门很简单:Go 实现凯撒密码
- CVPR 2022 | transfusion: Lidar camera fusion for 3D target detection with transformer
- XML入门三
- Iptables foundation and Samba configuration examples
- CA: efficient coordinate attention mechanism for mobile terminals | CVPR 2021
- 2022年山东省安全员C证考试题库及在线模拟考试
- Redis - how to install redis and configuration (how to quickly install redis on ubuntu18.04 and centos7.6 Linux systems)
- 数据库公共字段自动填充
- 美国土安全部长:国内暴力极端主义是目前美面临的最大恐怖主义威胁之一
- Is the outdoor LED screen waterproof?
猜你喜欢
JVM series - stack and heap, method area day1-2

Database lock table? Don't panic, this article teaches you how to solve it

Oracle 被 Ventana Research 评为数字创新奖总冠军
分布式BASE理论

. Net delay queue
When MDK uses precompiler in header file, ifdef is invalid

光环效应——谁说头上有光的就算英雄
Distributed base theory
ASP. Net core introduction I
高质量软件架构的唯一核心指标
随机推荐
Iptables foundation and Samba configuration examples
C语言程序设计
HAProxy高可用解决方案
Golang sets the small details of goproxy proxy proxy, which is applicable to go module download timeout and Alibaba cloud image go module download timeout
上汽大通MAXUS正式发布全新品牌“MIFA”,旗舰产品MIFA 9正式亮相!
C#基础深入学习一
8 expansion sub packages! Recbole launches 2.0!
CVPR 2022 | transfusion: Lidar camera fusion for 3D target detection with transformer
室外LED屏幕防水吗?
Deploy halo blog with pagoda
高质量软件架构的唯一核心指标
Getting started with microservices
Introduction to reverse debugging PE structure resource table 07/07
Apache服务器访问日志access.log设置
[cloud native | kubernetes] in depth understanding of ingress (12)
提高MySQL深分页查询效率的三种方案
舔狗舔到最后一无所有(状态机)
Rsyslog configuration and use tutorial
remount of the / superblock failed: Permission denied
逆向调试入门-PE结构-资源表07/07