当前位置:网站首页>Solana NFT开发指南
Solana NFT开发指南
2022-08-05 03:23:00 【新缸中之脑】
在这个教程中,我们将学习如何编写 Rust 智能合约并使用 Metaplex 在 Solana 上铸造 NFT。

用熟悉的语言学习 Web3.0 开发 :Java | Php | Python | .Net / C# | Golang | Node.JS | Flutter / Dart
在 Solana 开发中,我们回面临许多奇怪的自定义错误和错误,并且由于 Solana 开发生态系统没有 Eth 开发生态系统那么大,因此修复它们可能非常困难和令人沮丧。但不用担心。当遇到困难时,只需在正确的地方寻找解决方案。
在我的开发过程中,我不断地在Anchor discord 服务器、Metaplex和Superteam服务器上提出疑问,并查看 GitHub 上的其他代码仓库和 Metaplex 程序库本身。
1、项目概况
在这个教程中,我们将使用的工具包括:
- Solana CLI 工具— 官方 Solana CLI 工具集
- Anchor Framework — 用于开发 Solana 程序的高级框架。这是必须的,除非你是大神级开发人员,不过在这种情况下你应该不会阅读此博客。哈哈。
- Solana/web3.js — web3.js的 Solana 版本
- Solana/spl-token — 使用 spl 通证的包
- Mocha — 一个 JS 测试工具
2、准备工作
在命令行使用以下命令将你的网络设置为 devnet:
solana config set --url devnet
要确认它是否有效,请在执行上述命令后检查输出:
Config File: /Users/anoushkkharangate/.config/solana/cli/config.yml
RPC URL: https://api.devnet.solana.com
WebSocket URL: wss://api.devnet.solana.com/ (computed)
Keypair Path: /Users/anoushkkharangate/.config/solana/id.json
Commitment: confirmed
接下来,请参考Solana wallet docs设置文件系统钱包,并使用命令solana airdrop 1添加一些devnet的 sol通证。
最后,使用另一个anchor CLI终端 通过以下命令创建一个anchor项目:
anchor init <name-of-your-project>
确保Anchor.toml也设置为 devnet。
[features]
seeds = false
[programs.devnet]
metaplex_anchor_nft = "Fg6PaFpoGXkYsidMpWTK6W2BeZ7FEfcYkg476zPFsLnS"
[registry]
url = "https://anchor.projectserum.com"
[provider]
cluster = "devnet"
wallet = "/Users/<user-name>/.config/solana/id.json"
[scripts]
test = "yarn run ts-mocha -p ./tsconfig.json -t 1000000 tests/**/*.ts"
3、导入依赖项
在项目中,必须有一个名为程序的文件夹。转到programs/<your-project-name>/Cargo.toml并添加这些依赖项。确保使用版本0.24.2,可以使用avm来更改它:
[dependencies]
anchor-lang = "0.24.2"
anchor-spl = "0.24.2"
mpl-token-metadata = {version = "1.2.7", features = ["no-entrypoint"]}
由于安全漏洞,Anchor 已删除 0.24.2 之前的所有版本,因此请确保使用该版本
然后转到src 中的lib.rs文件并导入这些:
use anchor_lang::prelude::*;
use anchor_lang::solana_program::program::invoke;
use anchor_spl::token;
use anchor_spl::token::{MintTo, Token};
use mpl_token_metadata::instruction::{create_master_edition_v3, create_metadata_accounts_v2};
现在我们可以编写 mint 函数了!
4、NFT账户结构实现
首先,让我们mint为函数创建账户结构:
#[derive(Accounts)]
pub struct MintNFT<'info> {
    #[account(mut)]
    pub mint_authority: Signer<'info>,
/// CHECK: This is not dangerous because we don't read or write from this account
    #[account(mut)]
    pub mint: UncheckedAccount<'info>,
    // #[account(mut)]
    pub token_program: Program<'info, Token>,
    /// CHECK: This is not dangerous because we don't read or write from this account
    #[account(mut)]
    pub metadata: UncheckedAccount<'info>,
    /// CHECK: This is not dangerous because we don't read or write from this account
    #[account(mut)]
    pub token_account: UncheckedAccount<'info>,
    /// CHECK: This is not dangerous because we don't read or write from this account
    pub token_metadata_program: UncheckedAccount<'info>,
    /// CHECK: This is not dangerous because we don't read or write from this account
    #[account(mut)]
    pub payer: AccountInfo<'info>,
    pub system_program: Program<'info, System>,
    /// CHECK: This is not dangerous because we don't read or write from this account
    pub rent: AccountInfo<'info>,
    /// CHECK: This is not dangerous because we don't read or write from this account
    #[account(mut)]
    pub master_edition: UncheckedAccount<'info>,
}
不要担心未检查的帐户,因为我们会将其传递给 Metaplex 程序,它会为我们检查。
为了在 Anchor 中使用 Unchecked 帐户,我们需要在每个帐户上方添加此注释:
/// CHECK: This is not dangerous because we don't read or write from this account
5、NFT合约Mint函数实现
让我们创建一个函数,使用刚刚创建的结构来铸造通证:
pub fn mint_nft(
        ctx: Context<MintNFT>,
        creator_key: Pubkey,
        uri: String,
        title: String,
    ) -> Result<()> {
        msg!("Initializing Mint NFT");
        let cpi_accounts = MintTo {
            mint: ctx.accounts.mint.to_account_info(),
            to: ctx.accounts.token_account.to_account_info(),
            authority: ctx.accounts.payer.to_account_info(),
        };
 msg!("CPI Accounts Assigned");
        let cpi_program = ctx.accounts.token_program.to_account_info();
        msg!("CPI Program Assigned");
        let cpi_ctx = CpiContext::new(cpi_program, cpi_accounts);
        msg!("CPI Context Assigned");
        token::mint_to(cpi_ctx, 1)?;
        msg!("Token Minted !!!");
        let account_info = vec![Solana NFT
            ctx.accounts.metadata.to_account_info(),
            ctx.accounts.mint.to_account_info(),
            ctx.accounts.mint_authority.to_account_info(),
            ctx.accounts.payer.to_account_info(),
            ctx.accounts.token_metadata_program.to_account_info(),
            ctx.accounts.token_program.to_account_info(),
            ctx.accounts.system_program.to_account_info(),
            ctx.accounts.rent.to_account_info(),
        ];
        msg!("Account Info Assigned");
        let creator = vec![Solana NFT
            mpl_token_metadata::state::Creator {
                address: creator_key,
                verified: false,
                share: 100,
            },
            mpl_token_metadata::state::Creator {
                address: ctx.accounts.mint_authority.key(),
                verified: false,
                share: 0,
            },
        ];
        msg!("Creator Assigned");
        let symbol = std::string::ToString::to_string("symb");
        invoke(
            &create_metadata_accounts_v2(
                ctx.accounts.token_metadata_program.key(),
                ctx.accounts.metadata.key(),
                ctx.accounts.mint.key(),
                ctx.accounts.mint_authority.key(),
                ctx.accounts.payer.key(),
                ctx.accounts.payer.key(),
                title,
                symbol,
                uri,
                Some(creator),
                1,
                true,
                false,
                None,
                None,
            ),
            account_info.as_slice(),
        )?;
        msg!("Metadata Account Created !!!");
        let master_edition_infos = vec![Solana NFT
            ctx.accounts.master_edition.to_account_info(),
            ctx.accounts.mint.to_account_info(),
            ctx.accounts.mint_authority.to_account_info(),
            ctx.accounts.payer.to_account_info(),
            ctx.accounts.metadata.to_account_info(),
            ctx.accounts.token_metadata_program.to_account_info(),
            ctx.accounts.token_program.to_account_info(),
            ctx.accounts.system_program.to_account_info(),
            ctx.accounts.rent.to_account_info(),
        ];
        msg!("Master Edition Account Infos Assigned");
        invoke(
            &create_master_edition_v3(
                ctx.accounts.token_metadata_program.key(),
                ctx.accounts.master_edition.key(),
                ctx.accounts.mint.key(),
                ctx.accounts.payer.key(),
                ctx.accounts.mint_authority.key(),
                ctx.accounts.metadata.key(),
                ctx.accounts.payer.key(),
                Some(0),
            ),
            master_edition_infos.as_slice(),
        )?;
        msg!("Master Edition Nft Minted !!!");
        Ok(())
    }
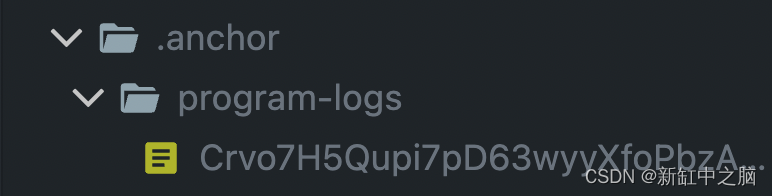
如果想调试你的程序,最好使用
msg!()记录想要检查的任何值。它接受字符串,因此必须使用std::string::ToString来转换。 你的日志将出现在终端或.anchor/program-logs/<program-id>
有几点需要说明一下。
creator数组需要包含铸造 NFT 的人,但你可以将份额设置为 0,所以这并不重要。这是代码:
let creator = vec![Solana NFT
            mpl_token_metadata::state::Creator {
                address: creator_key,
                verified: false,
                share: 100,
            },
            mpl_token_metadata::state::Creator {
                address: ctx.accounts.mint_authority.key(),
                verified: false,
                share: 0,
            },
        ];
我还没有实现集合,因为它不在本指南的范围内,但你可以使用以下方法来实现:
mpl_token_metadata::instruction::set_and_verify_collection
为什么我在这里将 Max supply 设置为 0?在 Metaplex 中,如果是一种通证,那么你必须将其最大供应量设置为零,因为总供应量 - 声称的供应量 (1-1) 等于 0。
&create_master_edition_v3(
                ctx.accounts.token_metadata_program.key(),
                ctx.accounts.master_edition.key(),
                ctx.accounts.mint.key(),
                ctx.accounts.payer.key(),
                ctx.accounts.mint_authority.key(),
                ctx.accounts.metadata.key(),
                ctx.accounts.payer.key(),
                Some(0), // max supply 0
            ),
编写函数后,运行anchor build && anchor deploy,应该会看到已部署的程序 ID
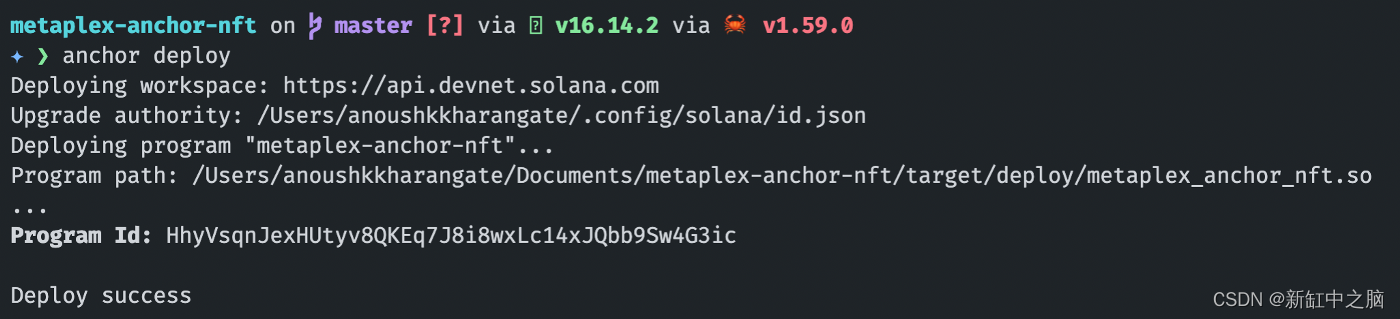
将此程序 ID 粘贴到Anchor.toml和lib.rs文件中,替换全部的默认ID即Fg6PaFpoGXkYsidMpWTK6W2BeZ7FEfcYkg476zPFsLnS。
6、调用 Mint 函数
在做任何事情之前,请确保已导入@solana/web3.js和@solana/spl-token。 在tests/<test-file>.ts里面添加这些导入和常量:
import {
  TOKEN_PROGRAM_ID,
  createAssociatedTokenAccountInstruction,
  getAssociatedTokenAddress,
  createInitializeMintInstruction,
  MINT_SIZE,
} from "@solana/spl-token";
import { LAMPORTS_PER_SOL } from "@solana/web3.js";
const { PublicKey, SystemProgram } = anchor.web3; q
const TOKEN_METADATA_PROGRAM_ID = new anchor.web3.PublicKey(
      "metaqbxxUerdq28cj1RbAWkYQm3ybzjb6a8bt518x1s"
    );
    const lamports: number =
      await program.provider.connection.getMinimumBalanceForRentExemption(
        MINT_SIZE
      );
    const getMetadata = async (
      mint: anchor.web3.PublicKey
    ): Promise<anchor.web3.PublicKey> => {
      return (
        await anchor.web3.PublicKey.findProgramAddress(
          [
            Buffer.from("metadata"),
            TOKEN_METADATA_PROGRAM_ID.toBuffer(),
            mint.toBuffer(),
          ],
          TOKEN_METADATA_PROGRAM_ID
        )
      )[0];
    };
    const getMasterEdition = async (
      mint: anchor.web3.PublicKey
    ): Promise<anchor.web3.PublicKey> => {
      return (
        await anchor.web3.PublicKey.findProgramAddress(
          [
            Buffer.from("metadata"),
            TOKEN_METADATA_PROGRAM_ID.toBuffer(),
            mint.toBuffer(),
            Buffer.from("edition"),
          ],
          TOKEN_METADATA_PROGRAM_ID
        )
      )[0];
    };
    const mintKey: anchor.web3.Keypair = anchor.web3.Keypair.generate();
现在让我们制作通证和关联的通证账户,如下面代码所示:
const NftTokenAccount = await getAssociatedTokenAddress(
      mintKey.publicKey,
      program.provider.wallet.publicKey
    );
    console.log("NFT Account: ", NftTokenAccount.toBase58());
    const mint_tx = new anchor.web3.Transaction().add(
      anchor.web3.SystemProgram.createAccount({
        fromPubkey: program.provider.wallet.publicKey,
        newAccountPubkey: mintKey.publicKey,
        space: MINT_SIZE,
        programId: TOKEN_PROGRAM_ID,
        lamports,
      }),
      createInitializeMintInstruction(
        mintKey.publicKey,
        0,
        program.provider.wallet.publicKey,
        program.provider.wallet.publicKey
      ),
      createAssociatedTokenAccountInstruction(
        program.provider.wallet.publicKey,
        NftTokenAccount,
        program.provider.wallet.publicKey,
        mintKey.publicKey
      )
    );
    const res = await program.provider.send(mint_tx, [mintKey]);
    console.log(
      await program.provider.connection.getParsedAccountInfo(mintKey.publicKey)
    );
    console.log("Account: ", res);
    console.log("Mint key: ", mintKey.publicKey.toString());
    console.log("User: ", program.provider.wallet.publicKey.toString());
    const metadataAddress = await getMetadata(mintKey.publicKey);
    const masterEdition = await getMasterEdition(mintKey.publicKey);
    console.log("Metadata address: ", metadataAddress.toBase58());
    console.log("MasterEdition: ", masterEdition.toBase58());
注意:mint 和 freeze 权限必须相同,否则不起作用。
createInitializeMintInstruction( mintKey.publicKey, 0,
 program.provider.wallet.publicKey,// mint auth
 program.provider.wallet.publicKey // freeze auth
),
现在,调用 mint 函数并传递数据和帐户:
const tx = await program.rpc.mintNft(
      mintKey.publicKey,
      "https://arweave.net/y5e5DJsiwH0s_ayfMwYk-SnrZtVZzHLQDSTZ5dNRUHA",
      "NFT Title",
      {
        accounts: {
          mintAuthority: program.provider.wallet.publicKey,
          mint: mintKey.publicKey,
          tokenAccount: NftTokenAccount,
          tokenProgram: TOKEN_PROGRAM_ID,
          metadata: metadataAddress,
          tokenMetadataProgram: TOKEN_METADATA_PROGRAM_ID,
          payer: program.provider.wallet.publicKey,
          systemProgram: SystemProgram.programId,
          rent: anchor.web3.SYSVAR_RENT_PUBKEY,
          masterEdition: masterEdition,
        },
      }
    );
    console.log("Your transaction signature", tx);
好了!现在只需运行anchor test,就应该能够铸造你的 NFT:
Account:  4swRFMNovHCkXY3gDgAGBXZwpfFuVyxWpWsgXqbYvoZG1M63nZHxyPRm7KTqAjSdTpHn2ivyPr6jQfxeLsB6a1nX
Mint key:  DehGx61vZPYNaMWm9KYdP91UYXXLu1XKoc2CCu3NZFNb
User:  7CtWnYdTNBb3P9eViqSZKUekjcKnMcaasSMC7NbTVKuE
Metadata address:  7ut8YMzGqZAXvRDro8jLKkPnUccdeQxsfzNv1hjzc3Bo
MasterEdition:  Au76v2ZDnWSLj23TCu9NRVEYWrbVUq6DAGNnCuALaN6o
Your transaction signature KwEst87H3dZ5GwQ5CDL1JtiRKwcXJKNzyvQShaTLiGxz4HQGsDA7EW6rrhqwbJ2TqQFRWzZFvhfBU1CpyYH7WhH
     Is initialized! (6950ms)
  1 passing (7s)
  Done in 9.22s.
如果提示任何带有 0x1 等十六进制值的自定义程序错误,请将十六进制值转换为纯文本,然后前往metaplex github
并使用你的浏览器搜索“error(”
可以在这里查看 NFT:solscan
7、结束语
我希望本指南对所有 Solana 极客有用。当我第一次尝试铸造 NFT 时感到非常困难,希望这篇文章对你有所帮助。可以从这里下载教程里的代码。
原文链接: Solana区块链NFT开发入门 — 汇智网
边栏推荐
- Dynamic management of massive service instances
- 2022.8.4-----leetcode.1403
- 今年七夕,「情蔬」比礼物更有爱
- 毕设-基于SSM房屋租赁管理系统
- 数学-求和符号的性质
- AI + Small Nucleic Acid Drugs | Eleven Completes $22 Million Seed Round Financing
- Why is the pca component not associated
- Hash table lookup (hash table)
- Summary of domestic environments supported by SuperMap
- ASP.NET application--Hello World
猜你喜欢
用CH341A烧录外挂Flash (W25Q16JV)
![[论文笔记] MapReduce: Simplified Data Processing on Large Clusters](/img/89/8adef42b0cfd154e6fa7205afaeade.png)
[论文笔记] MapReduce: Simplified Data Processing on Large Clusters
Use SuperMap iDesktopX data migration tool to migrate ArcGIS data
Open-Falcon of operation and maintenance monitoring system
![[Filter tracking] based on matlab unscented Kalman filter inertial navigation + DVL combined navigation [including Matlab source code 2019]](/img/c9/fff226b6d33a773b59a0314a99a788.png)
[Filter tracking] based on matlab unscented Kalman filter inertial navigation + DVL combined navigation [including Matlab source code 2019]

Confessing the era of digital transformation, Speed Cloud engraves a new starting point for value

CPDA|How Operators Learn Data Analysis (SQL) from Negative Foundations
通过模拟Vite一起深入其工作原理
QT MV\MVC structure
21 Days Learning Challenge (2) Use of Graphical Device Trees
随机推荐
通过模拟Vite一起深入其工作原理
Simple description of linked list and simple implementation of code
dmp (dump) dump file
开发Hololens遇到The type or namespace name ‘HandMeshVertex‘ could not be found..
Is your data safe in this hyperconnected world?
队列题目:最近的请求次数
private package
Leading the highland of digital medicine, Zhongshan Hospital explores to create a "new paradigm" for future hospitals
【七夕节】浪漫七夕,代码传情。将爱意变成绚烂的立体场景,给她(他)一个惊喜!(送代码)
undo problem
Turn: Charles Handy: Who you are is more important than what you do
The problem of lack of dynamic library "libtinfo.so.5" in ksql application under UOS system
数学-求和符号的性质
After the large pixel panorama is completed, what are the promotion methods?
【Daily Training】1403. Minimum Subsequence in Non-Increasing Order
YYGH-13-Customer Service Center
The pit of std::string::find return value
From "useable" to "easy to use", domestic software is self-controllable and continues to advance
Syntax basics (variables, input and output, expressions and sequential statements)
惨遭打脸:字节某部门竟有这么多测试员