当前位置:网站首页>Shutter nestedscrollview sliding folding head pull-down refresh effect
Shutter nestedscrollview sliding folding head pull-down refresh effect
2022-06-28 05:24:00 【Young people who get up early】
.
—— Holding a sword in the end of the world , Start with your little accumulation , Where to go , We must keep improving , Beautiful application experience From the processing of details , More from the self-demand and efforts of farmers
Flutter It's Google's latest mobile development framework .
【x1】 Daily reminder of WeChat official account At any time Accumulate... Every day I can't help it Scan the code at the bottom of the article to pay attention to
【x2】 Various series of video tutorials Free and open source Focus on You don't get lost
【x3】 Series articles One million Demo At any time Copy and paste Use
【x4】 The five minute video takes you quickly through the build
【x5】 Source code at a glance
As shown in the figure below , Yours APP The project will certainly be applied to such a scenario .

With the character of Xiaobian , To achieve a million Demo Copy and paste at any time is sure to need the source code
The complete source code is here
Next step by step to achieve , First of all, it uses a separate one dart File as a starting entry , To facilitate Demo To achieve the effect of , The definition is as follows :
        // Start the function

void main() {

  runApp(RootApp());

}


// root directory

class RootApp extends StatelessWidget {

  @override

  Widget build(BuildContext context) {

    return MaterialApp(

      theme: ThemeData(primaryColor: Colors.grey[200]),

      // Default start page

      home: HomePage(),

    );

  }

}
- 1.
- 2.
- 3.
- 4.
- 5.
- 6.
- 7.
- 8.
- 9.
- 10.
- 11.
- 12.
- 13.
- 14.
- 15.
- 16.
Initialize to create a TabController Used to control TabBar And TabBarView The linkage effect of :
        class HomePage extends StatefulWidget {

  @override

  State<StatefulWidget> createState() {

    return _ScrollHomePageState();

  }

}


class _ScrollHomePageState extends State with SingleTickerProviderStateMixin {


  // Here the tag page uses TabView So you need to create a controller

  TabController tabController;


  // Page initialization method

  @override

  void initState() {

    super.initState();

    // initialization

    tabController = new TabController(length: 3, vsync: this);

  }


  // Page destruction callback lifecycle

  @override

  void dispose() {

    tabController.dispose();

  }

  ...

}
- 1.
- 2.
- 3.
- 4.
- 5.
- 6.
- 7.
- 8.
- 9.
- 10.
- 11.
- 12.
- 13.
- 14.
- 15.
- 16.
- 17.
- 18.
- 19.
- 20.
- 21.
- 22.
- 23.
- 24.
- 25.
- 26.
- 27.
For the body of the page Used Scaffold :
        @override

 Widget build(BuildContext context) {

   // Build the body of the page

   return Scaffold(

     // The drop-down refresh

     body: RefreshIndicator(

       // Scrollable components send when scrolling ScrollNotification Type of notice

       notificationPredicate: (ScrollNotification notifation) {

         // This property contains the current ViewPort And scrolling position

         ScrollMetrics scrollMetrics = notifation.metrics;

         if (scrollMetrics.minScrollExtent == 0) {

           return true;

         } else {

           return false;

         }

       },

       // Refresh callback method

       onRefresh: () async {

         // Simulate network refresh   wait for 2 second

         await Future.delayed(Duration(milliseconds: 2000));

         // Return value to end refresh

         return Future.value(true);

       },

       child: buildNestedScrollView(),

     ),

   );

 }
- 1.
- 2.
- 3.
- 4.
- 5.
- 6.
- 7.
- 8.
- 9.
- 10.
- 11.
- 12.
- 13.
- 14.
- 15.
- 16.
- 17.
- 18.
- 19.
- 20.
- 21.
- 22.
- 23.
- 24.
- 25.
- 26.
- 27.
RefreshIndicator It's a drop-down refresh component , Used to trigger the pull-down refresh effect , Direct nesting NestedScrollView Slide layout to use
        //NestedScrollView  Basic use of

 Widget buildNestedScrollView() {

   // Slide view

   return NestedScrollView(

     // Configure foldable head layout

     headerSliverBuilder: (BuildContext context, bool innerBoxIsScrolled) {

       return [buildSliverAppBar()];

     },

     // The main content of the page

     body: buidChildWidget(),

   );

 }
- 1.
- 2.
- 3.
- 4.
- 5.
- 6.
- 7.
- 8.
- 9.
- 10.
- 11.
- 12.
NestedScrollView There are two parts , Part of it is the folded head , Use SliverAppBar To achieve , The other part is the main body of the slide switch page Use TabBarView To achieve
        // It's usually used  PageView + BottomNavigationBar  perhaps  TabBarView + TabBar  When

 // You'll find that when you switch to another page ,  The previous page will be destroyed ,  When you go back to the previous page ,  The page will be rebuilt ,

 // And then the data will be reloaded ,  Control will re render   It brings a very bad user experience .

 // because TabBarView It's also used internally PageView,  So the solutions are the same

 // The main content of the page

 Widget buidChildWidget() {

   return TabBarView(

     controller: tabController,

     children: <Widget>[

       ItemPage1(1),

       ItemPage1(2),

       ItemPage1(3),

     ],

   );

 }
- 1.
- 2.
- 3.
- 4.
- 5.
- 6.
- 7.
- 8.
- 9.
- 10.
- 11.
- 12.
- 13.
- 14.
- 15.
SliverAppBar The implementation is as follows :
        //flexibleSpace Collapsible content area

  buildSliverAppBar() {

    return SliverAppBar(

      title: buildHeader(),

      // Center the title

      centerTitle: true,

      // When this value is true when  SliverAppBar  Will be fixed at the top of the page

      // When this value is fase when  SliverAppBar  It's going to slide up with the slide

      pinned: true,

      // The duty of true when  SliverAppBar Set up title Will slide up and hide

      // And then configure bottom It will be shown in the original AppBar The location of

      // The duty of false when  SliverAppBar Set up title Will it hide

      // And then configure bottom It will be shown in the original AppBar Set up title below

      floating: false,

      // When snap Configure to true when , Slide the page down ,SliverAppBar( And the configuration of flexibleSpace Content ) It will immediately show ,

      // On the other hand when snap Configure to false when , When sliding down , Only when ListView When you slide your data to the top ,SliverAppBar It will be displayed in the dropdown .

      snap: false,

      elevation: 0.0,

      // The height of the deployment

      expandedHeight: 380,

      //AppBar The content area under

      flexibleSpace: FlexibleSpaceBar(

        // background

        // The configuration is a widget That is to say, you can use any

        //Widget Combine   The direct use here is a picture

        background: buildFlexibleSpaceWidget(),

      ),

      bottom: buildFlexibleTooBarWidget(),

    );

  }
- 1.
- 2.
- 3.
- 4.
- 5.
- 6.
- 7.
- 8.
- 9.
- 10.
- 11.
- 12.
- 13.
- 14.
- 15.
- 16.
- 17.
- 18.
- 19.
- 20.
- 21.
- 22.
- 23.
- 24.
- 25.
- 26.
- 27.
- 28.
- 29.
- 30.
SliverAppBar There are three parts in it , The first part is the title section , adopt title Attribute configuration , The code is as follows :
        // structure SliverAppBar The title of the title

 buildHeader() {

   // Transparent components

   return Container(

     width: double.infinity,

     padding: EdgeInsets.only(left: 10),

     height: 38,

     decoration: BoxDecoration(

       color: Colors.white,

       border: Border.all(color: Colors.white),

       borderRadius: BorderRadius.circular(30),

     ),

     child: Row(

       mainAxisAlignment: MainAxisAlignment.center,

       children: [

         Icon(

           Icons.search_rounded,

           size: 18,

         ),

         SizedBox(

           width: 4,

         ),

         Text(

           " Search for ",

           style: TextStyle(

             fontSize: 14,

           ),

         ),

       ],

     ),

   );

 }
- 1.
- 2.
- 3.
- 4.
- 5.
- 6.
- 7.
- 8.
- 9.
- 10.
- 11.
- 12.
- 13.
- 14.
- 15.
- 16.
- 17.
- 18.
- 19.
- 20.
- 21.
- 22.
- 23.
- 24.
- 25.
- 26.
- 27.
- 28.
- 29.
- 30.
- 31.
- 32.
The second part is the carousel used to fold parts , adopt flexibleSpace Property configuration FlexibleSpaceBar Middle configuration , The code is as follows :
        buildFlexibleSpaceWidget() {

   return Column(

     children: [

       Container(

         height: 240,

         child: BannerHomepage(isTitle: false,),

       ),

       Container(

         child: Row(

           children: [

             Expanded(

               child: Container(

                 height: 120,

                 color: Colors.blueGrey,

                 child: Image.asset("images/banner5.jpeg"),

               ),

             ),

             Expanded(

               child: Container(

                 color: Colors.brown,

                 height: 120,

                 child: Image.asset("images/banner6.jpeg"),

               ),

             ),

           ],

         ),

       )

     ],

   );

 }
- 1.
- 2.
- 3.
- 4.
- 5.
- 6.
- 7.
- 8.
- 9.
- 10.
- 11.
- 12.
- 13.
- 14.
- 15.
- 16.
- 17.
- 18.
- 19.
- 20.
- 21.
- 22.
- 23.
- 24.
- 25.
- 26.
- 27.
- 28.
- 29.
- 30.
BannerHomepage The implementation of the carousel diagram is here
The third part is through bottom Configured TabBar TAB bar , Combine it here PreferredSize To use , The code is as follows :
        //[SliverAppBar] Of bottom Attribute configuration

 Widget buildFlexibleTooBarWidget() {

   //[PreferredSize] Used to configure in AppBar Or is it SliverAppBar

   // Of bottom in   Realization  PreferredSizeWidget

   return PreferredSize(

     // Define size

     preferredSize: Size(MediaQuery.of(context).size.width, 44),

     // Configure any child Widget

     child: Container(

       alignment: Alignment.center,

       child: Container(

         color: Colors.grey[200],

         // As you slide up ,TabBar The width of the

         // Parent layout Container Constraint is  center alignment

         // So what Cheng shows is the middle x The effect of axis magnification

         width: MediaQuery.of(context).size.width,

         child: TabBar(

           controller: tabController,

           tabs: <Widget>[

             new Tab(

               text: " Tag one ",

             ),

             new Tab(

               text: " Label two ",

             ),

             new Tab(

               text: " Tag three ",

             ),

           ],

         ),

       ),

     ),

   );

 }
- 1.
- 2.
- 3.
- 4.
- 5.
- 6.
- 7.
- 8.
- 9.
- 10.
- 11.
- 12.
- 13.
- 14.
- 15.
- 16.
- 17.
- 18.
- 19.
- 20.
- 21.
- 22.
- 23.
- 24.
- 25.
- 26.
- 27.
- 28.
- 29.
- 30.
- 31.
- 32.
- 33.
- 34.
With the character of Xiaobian , To achieve a million Demo Copy and paste at any time is sure to need the source code
The complete source code is here

Of course, with Xiaobian's character , There must be a video recording , Click here , have interest in You can focus on Watermelon Video — Young people who get up early
边栏推荐
- JS 文本框失去焦点修改全半角文字和符号
- 【C语言练习——打印空心正方形及其变形】
- [JVM] - Division de la mémoire en JVM
- Assembly common instructions
- Reactive dye research: lumiprobe af594 NHS ester, 5-isomer
- Organize the online cake mall project
- Qcom LCD commissioning
- codeforces每日5题(均1700)
- 改性三磷酸盐研究:Lumiprobe氨基-11-ddUTP
- What is the difference between AC and DC?
猜你喜欢

Reactive dye research: lumiprobe af594 NHS ester, 5-isomer

【JVM】——JVM中内存划分

Learn Taiji Maker - mqtt Chapter 2 (IV) esp8266 reserved message application

2022 new version NFT source code source code of China meta universe digital collection art trading platform

sqlmap工具使用手册
![[untitled] drv8825 stepping motor drive board schematic diagram](/img/30/02f695592f3b624ebbb2b7a9f68052.png)
[untitled] drv8825 stepping motor drive board schematic diagram
The latest examination questions and answers for the eight members (standard members) of Liaoning architecture in 2022

交流电和直流电的区别是什么?
Amino dye research: lumiprobe fam amine, 6-isomer
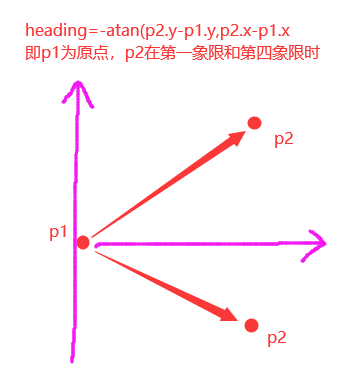
The heading angle of sliceplane is the same as that of math Corresponding transformation relation of atan2 (y, x)
随机推荐
Study on chemical properties and technology of biovendor rage ELISA Kit
gsap的简单用法
Redis 的 最新windows 版本 5.0.14
2022烟花爆竹经营单位安全管理人员特种作业证考试题库及模拟考试
lotus v1.16.0 calibnet
msa. h: There is no such file or directory
QCOM LCD调试
Prove that there are infinite primes / primes
交流电和直流电的区别是什么?
Based on the order flow tool, what can we see?
How does the power outlet transmit electricity? Simple problems that have plagued my little friend for so many years
BioVendor sRAGE抗体解决方案
程序员-放羊娃
【无标题】drv8825步进电机驱动板子原理图
mysql 导出查询结果成 excel 文件
OpenSSL client programming: SSL session failure caused by an obscure function
2022 high altitude installation, maintenance and removal examination questions and answers
Quartus replication IP core
DH parameters of robotics and derivation using MATLAB symbolic operation
msa.h:没有那个文件或目录