当前位置:网站首页>Pyqt interface production (login + jump page)
Pyqt interface production (login + jump page)
2022-07-03 14:31:00 【Colored sponge】
4.1 Create login interface
Start by opening Qt-Designer, choice Widget, It and Main Window The difference is that :Main Window There are toolbars, menu bars, status bars, etc , and Widget It is suitable for a simple login interface . Here's the picture :

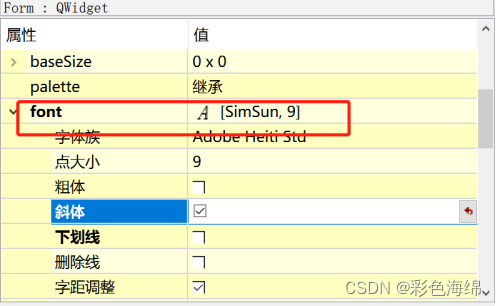
First, as shown in the following figure , Here you can set the title as login , Then insert a logo picture , You can also set the size and style of the font Title .
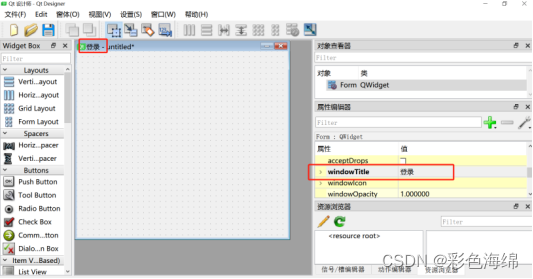

Next, the input boxes are all used Line Edit, The login button is Push Button. Set the size of login interface to be fixed , No arbitrary scaling , Set the maximum and minimum windows to be long 380, wide 300.


Password set to password form , Its password is set to 1234, Click the login button to enter the main interface .
4.2 Making the main interface
Next, create a new , choice Main Window,Main Window There are toolbars, menu bars, status bars, etc , Suitable for the main interface . Here's the picture :

Click the draw button , You can draw a picture , Click Cancel to return to the previous page ( The login page ), The following code part is the style setting of the middle drawing area :
self.label_3.setObjectName("label_3")
self.label_3.setFrameShape(QtWidgets.QFrame.Box)
# Set shadow It is said that only by adding this step can you set the border color ./// The optional styles are Raised、Sunken、Plain( The color cannot be set ) etc.
self.label_3.setFrameShadow(QtWidgets.QFrame.Raised)
# Set the background color , Including border color
# self.label.setStyleSheet()
self.label_3.setFrameShape(QFrame.Box)
# Set border style
# Set the background fill color 'background-color: rgb(0, 0, 0)'
# Set border color border-color: rgb(255, 170, 0);
self.label_3.setStyleSheet( 'border-width: 1px;border-style: solid;border-color: rgb(255, 170, 0);background-color: rgb(100, 149, 237);')
4.3 pyqt Interface code implementation
After the interface development is completed , take .ui The file is converted to .py file . take login.ui and main.ui convert to login.py file and main.py. After placing the control , Saving will be done in ui The form of the document . That's when you need to use PyUIC Tools to transform it into Py Documents can only be found in Pycharm Open in . Open the converted Python file , You can see that the whole interface is written in the form of a class , At this time, it cannot be run directly . Because now it's just a class , We need to instantiate it .
How to show what we have created GUi Program , We need to QtWidgets.QMainWindow() Medium show() Function to display the interface . There are generally three ways to write here .
The first is to directly instantiate a QtWidgets.QMainWindow() class , And then use show() function .
The second is to create a new class , Simultaneous inheritance QtWidgets.QMainWindow() and UI_MainWindow() Two classes , In this way, this new class will have methods of two classes at the same time .
The third is to let UI_MainWindow() Inherit QtWidgets.QMainWindow(), also i Rewrite one of def init() Method .
This design Interface and business logic are separated .
This step mainly realizes the business logic , That is, after clicking the login and exit buttons, the operation to be performed by the program . For the convenience of subsequent maintenance , Interface and business logic are separated to achieve . That is to say, it is realized by creating main program calling interface file . There are 2 Benefits . The first 1 Is to achieve clear logic . The first 2 If the interface or logic needs to be changed later , Good maintenance . newly build index.py Documentation procedure , call login.py file and main.py.index.py The document code is as follows :
import sys
from PyQt5 import QtCore, QtGui, QtWidgets
from PyQt5.QtWidgets import QApplication, QMainWindow, QPushButton
#  Import login.py、main.py It's all about
import login
import main
from PyQt5.QtCore import Qt
class Win_Login:
    def __init__(self):
        self.ui = QUiLoader().load(login.ui)
class main(main.Ui_MainWindow, QMainWindow):
    def __init__(self):
        super(main, self).__init__()
        self.setupUi(self)  #  initialization
        self.pushButton_1.clicked.connect(self.display)
    def display(self):
        self.label_3.resize(400, 300)  #  reset Label size
        self.label_3.setScaledContents(True)  #  Set picture adaptive window size
        self.label_3.setPixmap(QtGui.QPixmap("CO2.png"))
  class login(login.Ui_Form, QMainWindow):
    def __init__(self):
        super(login, self).__init__()
        self.setupUi(self)
if __name__ == '__main__':
    QApplication.setAttribute(Qt.AA_EnableHighDpiScaling)  #  Support automatic zoom of high score screen
    app = QApplication(sys.argv)
    #  by main_window Classes and login_window Class creation object
    main_window = main()
    login_window = login()
    #  Show login window
    login_window.show()
    #  Will be displayed main_window Bind to clicking the login page button
    login_window.btn_login.clicked.connect(main_window.show)
    main_window.pushButton_2.clicked.connect(main_window.close)
    #  Shut down the program , Release resources
    sys.exit(app.exec_())
Add to the question :
(1) But at this time, there are problems , Designed interface size and pycharm The size of the display window after running is inconsistent , See the picture below , After checking the data, it is found that the resolution problem , So you need to add a sentence to the display window function :
QApplication.setAttribute(Qt.AA_EnableHighDpiScaling)
# Support automatic zoom of high score screen .

(2) The call here is popular , Why? ? Because it does not regard this directory as the directory of modules , You can set this directory to generate source code directory .


4.4 The final functional interface style


边栏推荐
- Paper sharing: generating playful palettes from images
- 愉悦资本新双币基金近40亿元完成首次关账
- 中国PETG市场预测及战略研究报告(2022版)
- Luogu p5194 [usaco05dec]scales s solution
- Luogu p4047 [jsoi2010] tribal division solution
- Bibit pharmaceutical rushed to the scientific innovation board: annual revenue of 970000, loss of 137million, proposed to raise 2billion
- Luogu p5018 [noip2018 popularization group] symmetric binary tree problem solution
- Mysql多表查询 #子查询
- Understand the application scenario and implementation mechanism of differential segment
- Get permissions dynamically
猜你喜欢

NPM install is stuck with various strange errors of node NPY

Four data flows and cases of grpc

泰凌冲刺科创板:拟募资13亿 国家大基金与小米长江是股东
分布式事务(Seata) 四大模式详解

Eight sorts
Why is this error reported when modifying records in the database

牛客网:过河卒

Use of constraintlayout
Thinking about the arrangement problem in the backtracking problem (leetcode questions 46 and 47)

7-9 find a small ball with a balance
随机推荐
Exercise 10-2 recursive factorial sum
【北大青鸟昌平校区】互联网行业中,哪些岗位越老越吃香?
MongoDB索引
Luogu p5018 [noip2018 popularization group] symmetric binary tree problem solution
6-9 statistics of single digits (15 points)
J-luggage lock of ICPC Shenyang station in 2021 regional games (simple code)
MongoDB数据库入门的常用命令
pyQt界面制作(登录+跳转页面)
洛谷P4047 [JSOI2010]部落划分 题解
中国锂电池电解液行业市场专项调研报告(2022版)
Special research report on the market of lithium battery electrolyte industry in China (2022 Edition)
Eight sorts
ZABBIX saves the page blank after adding calculated items
修改数据库中的记录为什么报这个错
US stock listing of polar: how can the delivery of 55000 units support the valuation of more than 20billion US dollars
Luogu p5194 [usaco05dec]scales s solution
Find specified characters
Zhonggan micro sprint technology innovation board: annual revenue of 240million, net loss of 17.82 million, proposed to raise 600million
别再问自己适不适合做软件测试了
Understand the application scenario and implementation mechanism of differential segment