当前位置:网站首页>Detailed deployment and configuration of CEPH cluster (II)
Detailed deployment and configuration of CEPH cluster (II)
2022-07-28 12:12:00 【InfoQ】
Ceph Detailed cluster deployment configuration
One 、
Deployment structure

Two 、 The system configuration
1、
Modify host name
[[email protected] ~]# vi /etc/hostname
CENTOS7-1
2、
edit hosts file
192.168.116.141 CENTOS7-1
192.168.116.142 CENTOS7-2
192.168.116.143 CENTOS7-3
3、
modify yum Source
[ceph]
name=Ceph packages for $basearch
baseurl=https://mirrors.tuna.tsinghua.edu.cn/ceph/rpm-mimic/el7/x86_64/
enabled=1
gpgcheck=1
type=rpm-md
gpgkey=https://download.ceph.com/keys/release.asc

[ceph-noarch]
name=Ceph noarch packages
#  Official source
#baseurl=http://download.ceph.com/rpm-mimic/el7/noarch
#  Tsinghua source
baseurl=https://mirrors.tuna.tsinghua.edu.cn/ceph/rpm-mimic/el7/noarch/
enabled=1
gpgcheck=1
type=rpm-md
gpgkey=https://download.ceph.com/keys/release.asc

[ceph-source]
name=Ceph source packages
baseurl=https://mirrors.tuna.tsinghua.edu.cn/ceph/rpm-mimic/el7/SRPMS/
enabled=1
gpgcheck=1
type=rpm-md
gpgkey=https://download.ceph.com/keys/release.asc
4、
install ceph And ceph-deploy Components
yum update && yum -y install ceph ceph-deployyum install epel-release -y
yum -y install python2-pip5、
install NTP Time synchronization tool
yum install ntp ntpdate ntp-doc -ysystemctl enable ntpd/usr/sbin/ntpdate ntp1.aliyun.com > /dev/null 2>&1; /sbin/hwclock -w3、 ... and 、 Password free SSH land
1、
It's not recommended to use the built-in users of the system , Create a ceph_user user , The password is also set to ceph_user:
useradd -d /home/ceph_user -m ceph_user
passwd ceph_user
2、
Set up sudo jurisdiction
echo "ceph_user ALL = (root) NOPASSWD:ALL" | sudo tee
/etc/sudoers.d/ceph_user
sudo chmod 0440 /etc/sudoers.d/ceph_user3、 Generate the key :
4、
Distribute the key to each machine node
ssh-copy-id [email protected]
ssh-copy-id [email protected]
ssh-copy-id [email protected]
5、
Modify... On the management node ~/.ssh/config file , simplify SSH Input information for remote connection :
su rootHost CENTOS7-1
Hostname CENTOS7-1
User ceph_user
Host CENTOS7-2
Hostname CENTOS7-2
User ceph_user
Host CENTOS7-3
Hostname CENTOS7-3
User ceph_userchmod 600 ~/.ssh/config6、 Open ports , Non-production environment , You can disable the firewall directly :
systemctl stop firewalld.service
systemctl disable firewalld.service
7、
SELINUX Set up
setenforce 0SELINUX=disabledFour 、
Cluster setup configuration
1、 Create the cluster configuration directory on the management node ,cd /usr/local:
mkdir ceph-cluster
cd ceph-cluster2、 Create clusters , Contains three machine nodes :
ceph-deploy new CENTOS7-1 CENTOS7-2 CENTOS7-33、
If there is a problem with the installation and configuration of the next cluster , You can execute the following command to clear , reinstall :
ceph-deploy purge CENTOS7-1 CENTOS7-2 CENTOS7-3
ceph-deploy purgedata CENTOS7-1 CENTOS7-2 CENTOS7-3
ceph-deploy forgetkeysrm -rf /var/run/ceph/4、
Modify the configuration file , Some configurations need to be used later :
vi /usr/local/ceph-cluster/ceph.conf[global]
# The public network
public network = 192.168.88.0/24
# Set up pool Pool default allocation quantity The default number of copies is 3
osd pool default size = 2
# Tolerate more clock errors
mon clock drift allowed = 2
mon clock drift warn backoff = 30
# Allow deletion of pool
mon_allow_pool_delete = true
[mgr]
# Turn on WEB The dashboard mgr modules = dashboard5、
Execution and installation :
ceph-deploy install CENTOS7-1 CENTOS7-2 CENTOS7-3
ceph_deploy][ERROR ] RuntimeError: Failed to execute command: ceph --versionyum -y install ceph 6、 initial monitor Information :
ceph-deploy mon create-initial ## ceph-deploy --overwrite-conf mon create-initial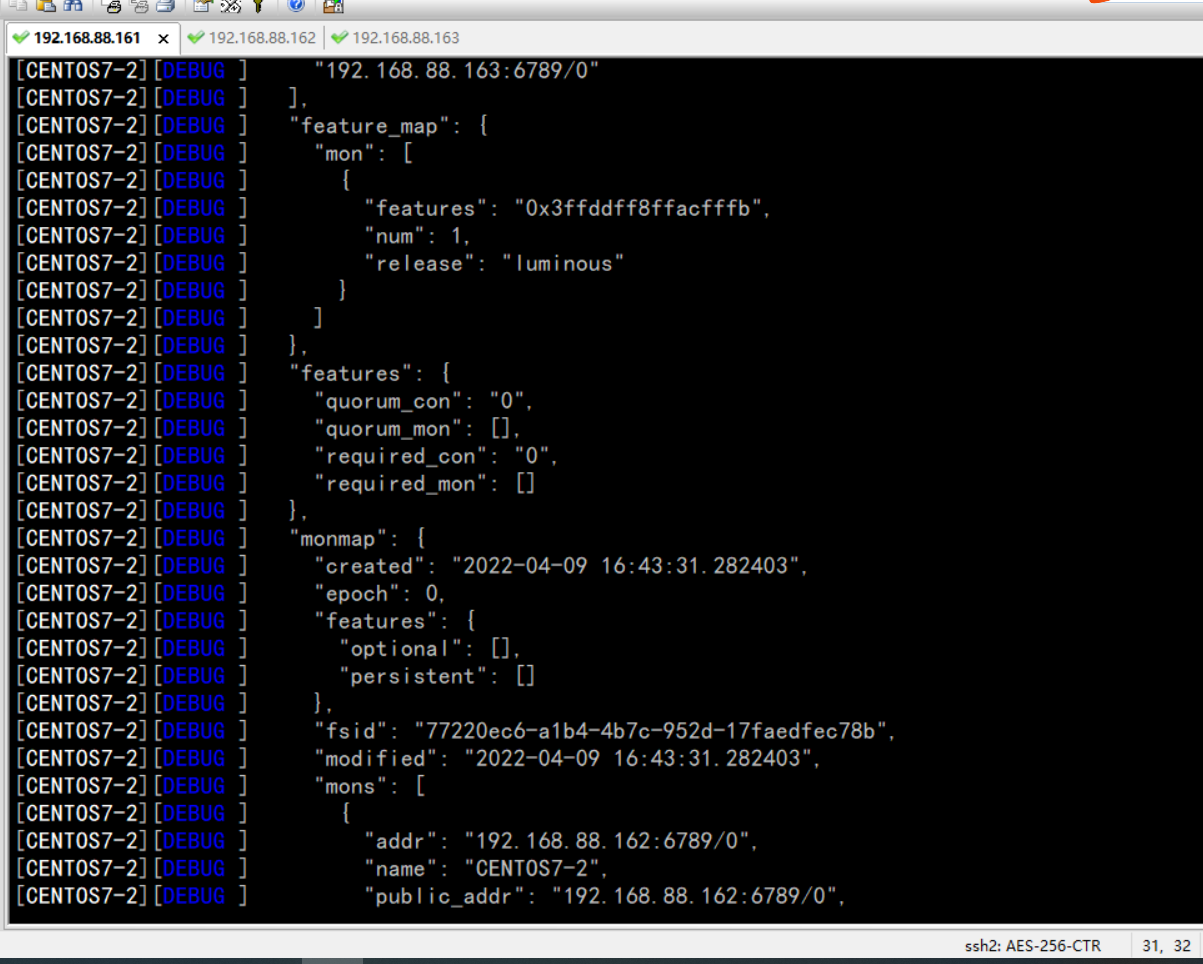

7、
Synchronize management information :
ceph-deploy admin CENTOS7-1 CENTOS7-2 CENTOS7-3
8、
install mgr( Manage daemons ), Greater than 12.x Version needs to be installed , We have the latest version , To be implemented :
ceph-deploy mgr create CENTOS7-1 CENTOS7-2 CENTOS7-3
9、
install OSD( Object storage device )


ceph-deploy osd create --data /dev/sdb CENTOS7-1ceph-deploy gatherkeys CENTOS7-110、
Verify nodes :
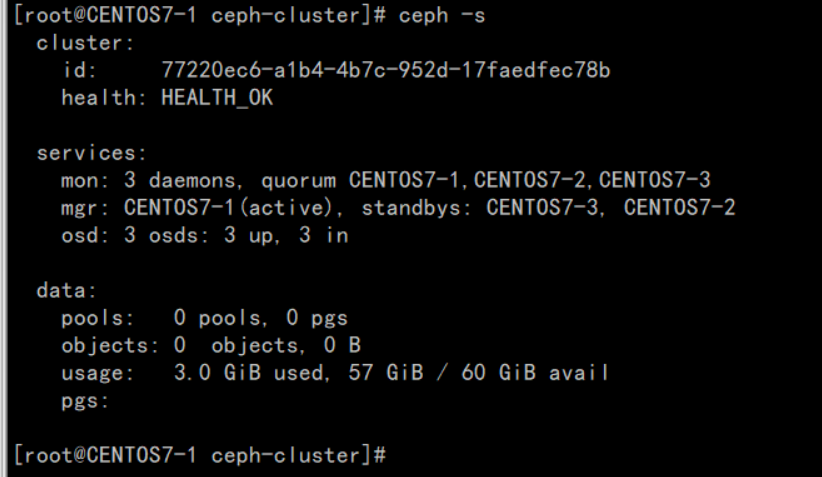
ntpdate ntp1.aliyun.com5、 ... and 、
Installation management background
1、 Turn on dashboard modular
ceph mgr module enable dashboard2、
Generate signature
ceph dashboard create-self-signed-cert3、
Create directory
mkdir mgr-dashboard[[email protected] mgr-dashboard]# pwd
/usr/local/ceph-cluster/mgr-dashboard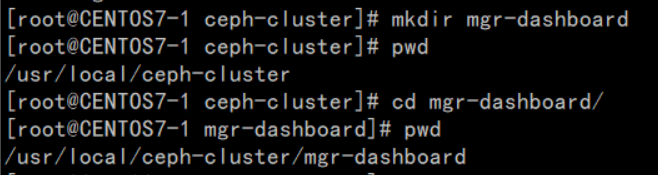
4、
Generate key pair
cd /usr/local/ceph-cluster/mgr-dashboardopenssl req -new -nodes -x509 -subj "/O=IT/CN=ceph-mgr-dashboard" -days 3650 -keyout dashboard.key -out dashboard.crt -extensions v3_ca
5、
start-up dashboard
ceph mgr module disable dashboard
ceph mgr module enable dashboard
6、
Set up IP And PORT
ceph config set mgr mgr/dashboard/server_addr 192.168.88.161
ceph config set mgr mgr/dashboard/server_port 18843
7、
close HTTPS
ceph config set mgr mgr/dashboard/ssl false8、
View service information
[[email protected] mgr-dashboard]# ceph mgr services
{
 "dashboard": "https://node1:8443/"
}
9、 Set management user and password
ceph dashboard set-login-credentials admin admin
10、
visit

6、 ... and 、
establish Cephfs
1、 Create two storage pools , Execute two commands :
ceph osd pool create cephfs_data 128
ceph osd pool create cephfs_metadata 64ceph osd lspools
2.、 establish fs, The name is fs_test:
ceph fs new fs_test cephfs_metadata cephfs_data3、
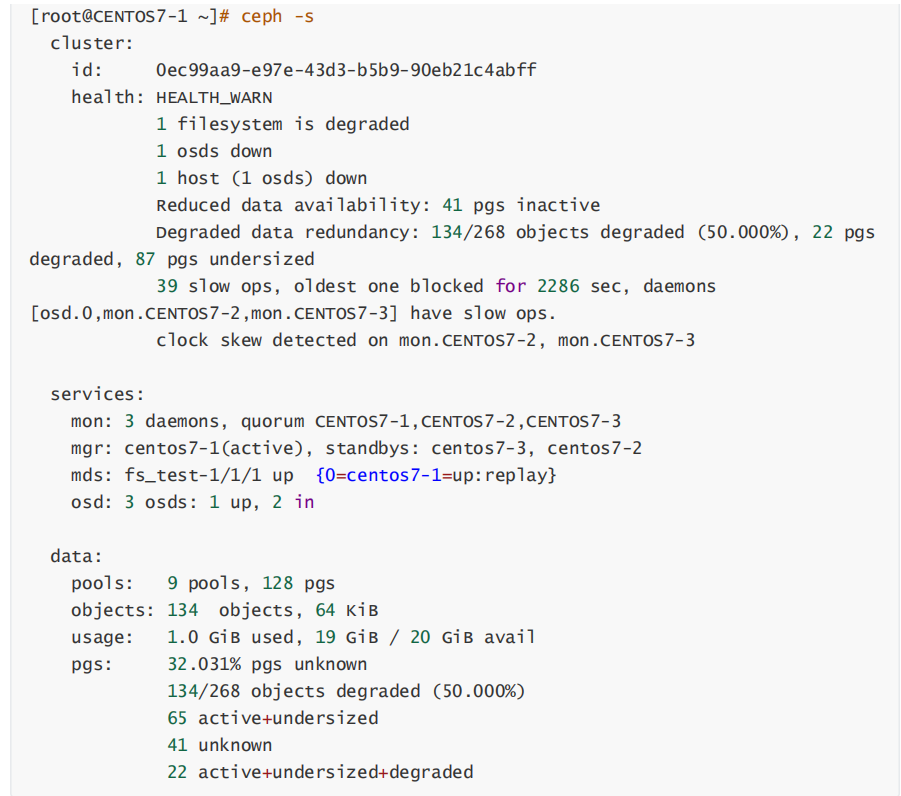
Status view , The following information represents normal :
[[email protected] mgr-dashboard]# ceph fs ls
name: fs_test, metadata pool: cephfs_metadata, data pools: [cephfs_data ][[email protected] ceph-cluster]# ceph mds stat
fs_test-1/1/1 up {0=CENTOS7-2=up:active}, 2 up:standbyceph fs rm fs_test --yes-i-really-mean-it
ceph osd pool delete cephfs_data cephfs_data --yes-i-really-really-mean-it[mon] mon allow pool delete = true4、
use fuse mount
yum -y install ceph-fuse5、 Create mount directory
mkdir -p /usr/local/cephfs_directory6、
mount cephfs
ceph-fuse -k /etc/ceph/ceph.client.admin.keyring -m 192.168.88.161:6789 /usr/local/cephfs_directory
7、
View disk mount information

7、 ... and 、
Client connection verification (Rados Java)
1、 Install well JDK、GIT and MAVEN
2、 download rados java Client source code
git clone https://github.com/ceph/rados-java.git
3、
perform MAVEN install , Ignore test cases :
[[email protected] rados-java]# mvn install -Dmaven.test.skip=true
4、
Create soft link , Join in CLASSPATH
ln -s /usr/local/sources/rados-java/target/rados-0.7.0.jar /opt/jdk1.8.0_301/jre/lib/ext/rados-0.7.0.jaryum -y install jnaln -s /usr/share/java/jna.jar /opt/jdk1.8.0_301/jre/lib/ext/jna.jar[[email protected] target]# ll
/opt/jdk1.8.0_301/jre/lib/ext/jna.jar lrwxrwxrwx 1 root root /opt/jdk1.8.0_301/jre/lib/ext/jna.jar -> /usr/share/java/jna.jar[[email protected] target]# ll
/opt/jdk1.8.0_301/jre/lib/ext/rados-0.7.0.jar lrwxrwxrwx 1 root root
/opt/jdk1.8.0_301/jre/lib/ext/rados- 0.7.0.jar -> /usr/local/sources/rados-java/target/rados-0.7.0.jar5、
establish JAVA Test class
importcom.ceph.rados.Rados;
importcom.ceph.rados.exceptions.*;
importjava.io.File;
publicclassCephClient{
    publicstaticvoidmain(Stringargs[]){
        try{
            Radoscluster=newRados("admin");
            System.out.println("Createdclusterhandle.");
            Filef=newFile("/etc/ceph/ceph.conf");
            cluster.confReadFile(f);
            System.out.println("Readtheconfigurationfile.");
            cluster.connect();
            System.out.println("Connectedtothecluster.");
 }catch(RadosExceptione){
 System.out.println(e.getMessage()+":"+e.getReturnValue());
 }
 }
}
6、
Run validation
[[email protected] sources]# javac CephClient.java
[[email protected] sources]# java CephClient
Created cluster handle.
Read the configuration file.
Connected to the cluster.边栏推荐
- The principle and use of the wrap file of tolua
- 2022.07.11 summer training personal qualifying (VI)
- SkiaSharp 之 WPF 自绘 拖曳小球(案例版)
- Idea replication module
- P5472 [noi2019] douzhudi (expectation, Mathematics)
- Hcip (condition matching and OSPF packet related knowledge)
- Use Baidu PaddlePaddle easydl to complete garbage classification
- Reasons and solutions for moving the first column to the last column in El table
- 学会使用MySQL的Explain执行计划,SQL性能调优从此不再困难
- 简单选择排序与堆排序
猜你喜欢

Develop your own NPM package from 0

The principle and use of the wrap file of tolua
Training mode and practice of digital applied talents in Colleges and Universities under the integration of industry and education

Service Workers让网站动态加载Webp图片

安徽京准:北斗卫星同步时钟|北斗同步时钟|NTP网络时钟服务器

Shell (II)

本地化、低时延、绿色低碳:阿里云正式启用福州数据中心

Lyscript get previous and next instructions

Hcip rip comprehensive experiment

配置Jupyter远程服务器
随机推荐
P5472 [NOI2019] 斗主地(期望、数学)
Shell (I)
简单选择排序与堆排序
2022.07.06 summer training personal qualifying (I)
Untiy controls the playback speed of animation
Several reincarnation stories
REST风格
Force deduction solution summary 735 planetary collision
[diary of supplementary questions] [2022 Hangdian summer school 2] k-dos card
Lua 中 __index、__newindex、rawget、rawset的理解
配置Jupyter远程服务器
A natural choice
【补题日记】[2022牛客暑期多校2]I-let fat tension
WebView详解
业务可视化-让你的流程图'Run'起来(4.实际业务场景测试)
Lua对table进行深拷贝
OsCache缓存监控刷新工具
Full resolution of the use of go native plug-ins
P5472 [noi2019] douzhudi (expectation, Mathematics)
Traversal and copy of files in jar package