当前位置:网站首页>Yolov5 input (I) -- mosaic data enhancement | CSDN creative punch in
Yolov5 input (I) -- mosaic data enhancement | CSDN creative punch in
2022-07-03 05:07:00 【TT ya】
Beginner little rookie , I hope it's like taking notes and recording what I've learned , Also hope to help the same entry-level people , I hope the big guys can help correct it ~ Tort made delete .
Catalog
3、random_perspective() function ( See code analysis for details )
One 、 Principle analysis
YOLOv5 Adopt and YOLOv4 Same Mosaic Data to enhance .
Main principle : It combines a selected picture with a random 3 Cut the picture randomly , Then splice it into a picture as training data .
This can enrich the background of the picture , And the stitching of four pictures together improves batch_size, It's going on batch normalization( normalization ) Four pictures will also be calculated when .
This way YOLOv5 On itself batch_size Not very dependent on .
Two 、 The code analysis
1、 Main part ——load_mosaic
    labels4, segments4 = [], []
    s = self.img_size # Get image size
    yc, xc = (int(random.uniform(-x, 2 * s + x)) for x in self.mosaic_border)  # mosaic center x, y
    #random.uniform Randomly generate real numbers in the above range ( That is, half the image size to 1.5 Times image size )
    # Here is random generation mosaic Center point
First initialize that the annotation list is empty , Then get the image size s
Use according to the image size random.uniform() Random generation mosaic Center point , The scope is ( That is, half the image size to 1.5 Times image size )
    indices = [index] + random.choices(self.indices, k=3)  # 3 additional image indices
    # Randomly generate another 3 Index of pictures
    #random.choices—— Random generation 3 Index within the total number of pictures
    # Then index together , Package it with the originally selected pictures indices
    random.shuffle(indices)
    # Sort these index values randomly
utilize random.choices() Randomly generate another 3 Index of pictures , Will this 4 Fill in the index of the picture indices list , And then use it random.shuffle() Sort these index values randomly
for i, index in enumerate(indices): # Loop through these pictures
        # Load image
        img, _, (h, w) = load_image(self, index)# Load pictures and height and width
Loop through this 4 A picture , And call load_image() Function to load the image and the corresponding height and width
The next step is how to place this 4 Zhang Tula ~
        # place img in img4
        if i == 0:  # top left( top left corner )
            img4 = np.full((s * 2, s * 2, img.shape[2]), 114, dtype=np.uint8)  # base image with 4 tiles
            # Mr. Cheng background
            x1a, y1a, x2a, y2a = max(xc - w, 0), max(yc - h, 0), xc, yc  # xmin, ymin, xmax, ymax (large image)
            # Set the position on the big picture ( Or the original size , Or zoom in )(w,h) or (xc,yc)( The new big picture )
            x1b, y1b, x2b, y2b = w - (x2a - x1a), h - (y2a - y1a), w, h  # xmin, ymin, xmax, ymax (small image)
            # Select the position on the small graph ( Original picture )
The first picture is in the upper left corner
img4 First use np.full() Function filling initialization big picture , The size is 4 The picture is so big
Then set the position of the picture on the big picture , And corresponding in the original drawing ( Small picture ) Position coordinates intercepted on
        elif i == 1:  # top right( Upper right corner )
            x1a, y1a, x2a, y2a = xc, max(yc - h, 0), min(xc + w, s * 2), yc
            x1b, y1b, x2b, y2b = 0, h - (y2a - y1a), min(w, x2a - x1a), h
        elif i == 2:  # bottom left( The lower left corner )
            x1a, y1a, x2a, y2a = max(xc - w, 0), yc, xc, min(s * 2, yc + h)
            x1b, y1b, x2b, y2b = w - (x2a - x1a), 0, w, min(y2a - y1a, h)
        elif i == 3:  # bottom right( The lower right corner )
            x1a, y1a, x2a, y2a = xc, yc, min(xc + w, s * 2), min(s * 2, yc + h)
            x1b, y1b, x2b, y2b = 0, 0, min(w, x2a - x1a), min(y2a - y1a, h)
be left over 3 Prepared by Zhang rufa
        img4[y1a:y2a, x1a:x2a] = img[y1b:y2b, x1b:x2b]  # img4[ymin:ymax, xmin:xmax]
        # Paste the corresponding small picture on the big picture
Paste the corresponding part of the small picture on the large picture
        padw = x1a - x1b
        padh = y1a - y1b
        # Calculate the offset from the small picture to the large picture , To calculate mosaic The location of the enhanced label
Calculate the offset from the small picture to the large picture , To calculate mosaic The location of the enhanced label
        # Labels
        labels, segments = self.labels[index].copy(), self.segments[index].copy()
        # Get tag
        if labels.size:
            labels[:, 1:] = xywhn2xyxy(labels[:, 1:], w, h, padw, padh)  # normalized xywh to pixel xyxy format
            # take xywh( Percentage those values ) Standardize to pixels xy Format
            segments = [xyn2xy(x, w, h, padw, padh) for x in segments]
            # Convert to pixel segment
        labels4.append(labels)
        segments4.extend(segments)
        # Fill in the list
Yes label Label to initialize :
First read the corresponding picture label, And then xywh Format label Standardize to pixels xy Format .
segments Convert to pixel segment format
Then fill in the previously prepared annotation list
    # Concat/clip labels
    labels4 = np.concatenate(labels4, 0) # Complete array splicing
    for x in (labels4[:, 1:], *segments4):
        np.clip(x, 0, 2 * s, out=x)  # clip when using random_perspective()
        #np.clip Intercept function , The fixed value is 0 To 2s Inside
    # img4, labels4 = replicate(img4, labels4)  # replicate
The first label List for array splicing , Convert the format , To facilitate the following processing , And intercept the data in 0 To 2 Times the size of the picture
    # Augment
    # Conduct mosaic When you put the four pictures together shape by [2*img_size,2*img_size]
    # Yes mosaic The integrated images are rotated randomly 、 translation 、 The zoom 、 tailoring , and resize Enter a size for img_size
    img4, labels4, segments4 = copy_paste(img4, labels4, segments4, p=self.hyp['copy_paste'])
    img4, labels4 = random_perspective(img4, labels4, segments4,
                                       degrees=self.hyp['degrees'],
                                       translate=self.hyp['translate'],
                                       scale=self.hyp['scale'],
                                       shear=self.hyp['shear'],
                                       perspective=self.hyp['perspective'],
                                       border=self.mosaic_border)  # border to remove
Conduct mosaic When you put the four pictures together shape by [2*img_size,2*img_size]
And right mosaic The integrated images are rotated randomly 、 translation 、 The zoom 、 tailoring , and resize Enter a size for img_size
return img4, labels4Finally, return the processed image and the corresponding label
2、load_image function
load_image function : Load the picture according to the ratio between the set input size and the original size of the picture ratio Conduct resize
First, get the image of the index
def load_image(self, i):
    #load_image Load the picture according to the ratio between the set input size and the original size of the picture ratio Conduct resize
    # loads 1 image from dataset index 'i', returns im, original hw, resized hw
    im = self.imgs[i]# Get the image of the index
Determine whether the image has cache , That is, have you ever scaled ( I'm not sure if this understanding is correct , If you are wrong, please tell me in the comment area , Thank you very much! ~)
without :
First go to the corresponding folder to find
If you can find : Load this picture
If you can't find it : Read the path of this figure , Then an error is reported, and the picture of the corresponding path cannot be found
Read the original height, width and setting of this picture resize The proportion
If this ratio is not equal to 1, Then we will resize Let's zoom
Finally, return to this picture , Original height and width and scaled height and width
    if im is None:  # not cached in ram
        # If the picture is not cached ( I haven't done any scaling yet )
        npy = self.img_npy[i] # Go to the folder to find
        if npy and npy.exists():  # load npy
            im = np.load(npy) # When we find it, we will load this picture
        else:  # read image
            path = self.img_files[i] # If you can't find the picture, read the path of the original picture
            im = cv2.imread(path)  # BGR
            assert im is not None, f'Image Not Found {path}' # Report an error and can't find this picture
        h0, w0 = im.shape[:2]  # orig hw
        # Read the original height and width of this picture
        r = self.img_size / max(h0, w0)  # ratio
        # Set up resize The proportion
        if r != 1:  # if sizes are not equal
            im = cv2.resize(im, (int(w0 * r), int(h0 * r)),
                            interpolation=cv2.INTER_AREA if r < 1 and not self.augment else cv2.INTER_LINEAR)# Zoom
        return im, (h0, w0), im.shape[:2]  # im, hw_original, hw_resized
If there is
Then return to this picture directly , Original height and width and scaled height and width ~
    else:
        return self.imgs[i], self.img_hw0[i], self.img_hw[i]  # im, hw_original, hw_resized
3、random_perspective() function ( See code analysis for details )
Random transformation
computing method : The product of the coordinate vector and the transformation matrix
First, get the height and width of the picture with the border
def random_perspective(im, targets=(), segments=(), degrees=10, translate=.1, scale=.1, shear=10, perspective=0.0,
                       border=(0, 0)):
    # torchvision.transforms.RandomAffine(degrees=(-10, 10), translate=(0.1, 0.1), scale=(0.9, 1.1), shear=(-10, 10))
    # targets = [cls, xyxy]

    # Picture height and width ( add border Frame )
    height = im.shape[0] + border[0] * 2  # shape(h,w,c)
    width = im.shape[1] + border[1] * 2
Then calculate the center point
    # Center
    C = np.eye(3)# Generate 3*3 The diagonal of is 1 Diagonal matrix of
    #x The center of the direction
    C[0, 2] = -im.shape[1] / 2  # x translation (pixels)
    #y The center of the direction
    C[1, 2] = -im.shape[0] / 2  # y translation (pixels)
Then there are various transformations ( Spin and so on ) Matrix preparation
    # Perspective
    # perspective
    P = np.eye(3)# Generate 3*3 The diagonal of is 1 Diagonal matrix of
    # Random generation x,y Perspective value in direction
    P[2, 0] = random.uniform(-perspective, perspective)  # x perspective (about y)
    P[2, 1] = random.uniform(-perspective, perspective)  # y perspective (about x)

    # Rotation and Scale
    # Rotate and scale
    R = np.eye(3)# Generate 3*3 The diagonal of is 1 Diagonal matrix of
    a = random.uniform(-degrees, degrees)# Randomly generate angles in the range
    # a += random.choice([-180, -90, 0, 90])  # add 90deg rotations to small rotations
    s = random.uniform(1 - scale, 1 + scale) # Randomly generate scaling
    # s = 2 ** random.uniform(-scale, scale)
    R[:2] = cv2.getRotationMatrix2D(angle=a, center=(0, 0), scale=s)# The affine change matrix is assigned to R The first two lines

    # Shear
    # Bending angle
    S = np.eye(3)# Generate 3*3 The diagonal of is 1 Diagonal matrix of
    S[0, 1] = math.tan(random.uniform(-shear, shear) * math.pi / 180)  # x shear (deg)
    S[1, 0] = math.tan(random.uniform(-shear, shear) * math.pi / 180)  # y shear (deg)

    # Translation
    # transformation ( Zoom in and out ?)
    T = np.eye(3)
    T[0, 2] = random.uniform(0.5 - translate, 0.5 + translate) * width  # x translation (pixels)
    T[1, 2] = random.uniform(0.5 - translate, 0.5 + translate) * height  # y translation (pixels)
Then there is the combined rotation matrix
    # Combined rotation matrix
    # Combined rotation matrix
    M = T @ S @ R @ P @ C  # order of operations (right to left) is IMPORTANT
    # Combine by matrix multiplication
    if (border[0] != 0) or (border[1] != 0) or (M != np.eye(3)).any():  # image changed
        # No borders or any transformations
        if perspective:# If perspective
            im = cv2.warpPerspective(im, M, dsize=(width, height), borderValue=(114, 114, 114))
            #cv2.warpPerspective Perspective transformation function , It can keep the straight line without deformation , But parallel lines may no longer be parallel
        else:  # affine
            im = cv2.warpAffine(im, M[:2], dsize=(width, height), borderValue=(114, 114, 114))
            #cv2.warpAffine Radiative transformation function , Rotation can be realized , translation , The zoom , And the transformed parallel lines are still parallel
Then, transform the coordinates of the label
    # Transform label coordinates
    # Transform label coordinates
    n = len(targets)# Number of targets
    if n:# If there is a goal
        use_segments = any(x.any() for x in segments)# Judge segments Whether it is empty or whether it is all 0( Target pixel segment )
        new = np.zeros((n, 4))# Initialize information matrix , Every goal 4 Messages xywh
        if use_segments:  # warp segments( deformation segments)
            # If it's not empty
            segments = resample_segments(segments)  # upsample
            # On the sampling
            for i, segment in enumerate(segments):
                xy = np.ones((len(segment), 3))
                xy[:, :2] = segment# The first two columns are the pixel segments in the center of the target
                xy = xy @ M.T  # transform conversion
                xy = xy[:, :2] / xy[:, 2:3] if perspective else xy[:, :2]  # perspective rescale or affine
                # Perspective processing , Rescale or affine
                #xy The last column of is all 1 It's for and M.T When matrices multiply , Only with the last M.T Multiply the last line of , and M.T The last line of is P The perspective value set at that time

                # clip Build
                new[i] = segment2box(xy, width, height)

        else:  # warp boxes( deformation box)
            xy = np.ones((n * 4, 3))
            xy[:, :2] = targets[:, [1, 2, 3, 4, 1, 4, 3, 2]].reshape(n * 4, 2)  # x1y1, x2y2, x1y2, x2y1
            xy = xy @ M.T  # transform
            xy = (xy[:, :2] / xy[:, 2:3] if perspective else xy[:, :2]).reshape(n, 8)  # perspective rescale or affine

            # create new boxes
            x = xy[:, [0, 2, 4, 6]]
            y = xy[:, [1, 3, 5, 7]]
            new = np.concatenate((x.min(1), y.min(1), x.max(1), y.max(1))).reshape(4, n).T

            # clip
            # Remove the box that is cut too small after the above series of operations
            new[:, [0, 2]] = new[:, [0, 2]].clip(0, width)
            new[:, [1, 3]] = new[:, [1, 3]].clip(0, height)
Finally, calculate the candidate box and return
        # filter candidates
        i = box_candidates(box1=targets[:, 1:5].T * s, box2=new.T, area_thr=0.01 if use_segments else 0.10)# Calculate the candidate box
        targets = targets[i]
        targets[:, 1:5] = new[i]

    return im, targets
You are welcome to criticize and correct in the comment area , thank you ~
边栏推荐
- Do you know UVs in modeling?
- Force GCC to compile 32-bit programs on 64 bit platform
- Basic knowledge of reflection (detailed explanation)
- Class loading mechanism (detailed explanation of the whole process)
- Market status and development prospect prediction of global fermentation acid industry in 2022
- JS dynamic table creation
- [basic grammar] Snake game written in C language
- 1094 the largest generation (25 points)
- 编译GCC遇到的“pthread.h” not found问题
- [research materials] 2021 annual report on mergers and acquisitions in the property management industry - Download attached
猜你喜欢

Online VR model display - 3D visual display solution
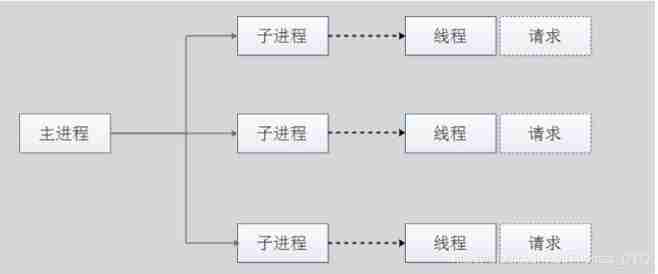
Apache MPM model and ab stress test

Analysis of proxy usage of ES6 new feature

Thesis reading_ Chinese NLP_ ELECTRA

leetcode452. Detonate the balloon with the minimum number of arrows
![[research materials] 2022q1 game preferred casual game distribution circular - Download attached](/img/13/5a67c5d08131745759fdc70a71cf0f.jpg)
[research materials] 2022q1 game preferred casual game distribution circular - Download attached
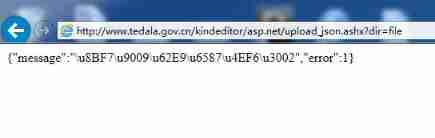
Ueditor, FCKeditor, kindeditor editor vulnerability
![[set theory] relationship properties (common relationship properties | relationship properties examples | relationship operation properties)](/img/af/8dfa783c87363a9d75c52e7680d508.jpg)
[set theory] relationship properties (common relationship properties | relationship properties examples | relationship operation properties)

音频焦点系列:手写一个demo理解音频焦点与AudioMananger
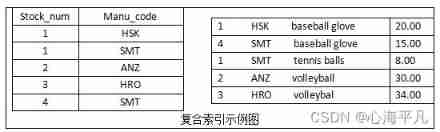
Gbase8s composite index (I)
随机推荐
[clock 223] [binary tree] [leetcode high frequency]: 102 Sequence traversal of binary tree
Use posture of sudo right raising vulnerability in actual combat (cve-2021-3156)
leetcode435. Non overlapping interval
Shell script Basics - basic grammar knowledge
1119 pre- and post order traversals (30 points)
Learning record of arouter principle
Coordinatorlayout appbarrayout recyclerview item exposure buried point misalignment analysis
MySQL master-slave configuration
Thesis reading_ Chinese medical model_ eHealth
Force GCC to compile 32-bit programs on 64 bit platform
Market status and development prospect prediction of the global autonomous hybrid underwater glider industry in 2022
Do you know UVs in modeling?
appium1.22.x 版本后的 appium inspector 需单独安装
The programmer resigned and was sentenced to 10 months for deleting the code. JD came home and said that it took 30000 to restore the database. Netizen: This is really a revenge
Market status and development prospect prediction of global fermentation acid industry in 2022
Messy change of mouse style in win system
[research materials] 2022q1 game preferred casual game distribution circular - Download attached
On typescript and grammar
Go language interface learning notes Continued
[Yu Yue education] basic reference materials of interchangeability and measurement technology of Zhongyuan Institute of Technology