当前位置:网站首页>GFS分布式文件系统
GFS分布式文件系统
2022-07-05 23:23:00 【橘子超好吃】
文章目录
一、GlusterFS简介
- GFS是一个可扩展的分布式文件系统
- 由存储服务器、客户端以及NFS/Samba存储网关(可选,根据需要选择使用)组成。
- 没有元数据服务器组件,这有助于提升整个系统的性能、可靠性和稳定性。
MFS
传统的分布式文件系统大多通过元服务器来存储元数据,元数据包含存储节点上的目录信息、目录结构等。这样的设计在浏览目录时效率高,但是也存在一些缺陷,例如单点故障。一旦元数据服务器出现故障,即使节点具备再高的冗余性,整个存储系统也将崩溃。而 GlusterFS分布式文件系统是基于无元服务器的设计,数据横向扩展能力强,具备较高的可靠性及存储效率。
GclusterFs同时也是Scale-out(横向扩展)存储解决方案Gluster的核心,在存储数据方面具有强大的横向扩展能力,通过扩展能够支持数PB存储容量和处理数千客户端。
GlusterFS支持借助TCP/IP或InfiniBandRDMA网络(一种支持多并发链接的技术,具有高带宽、低时延、高扩展性的特点)将物理分散分布的存储资源汇聚在一起,统一提供存储服务,并使用统一全局命名空间来管理数据。
1 、GlusterFs特点
扩展性和高性能
GlusterFs利用双重特性来提供高容量存储解决方案。
(1)Scale-Out架构允许通过简单地增加存储节点的方式来提高存储容量和性能(磁盘、计算和I/o资源都可以独立增加),支持10GbE和InfiniBand等高速网络互联。
(2)Cluster弹性哈希(ElasticHash)解决了GlusterFS对元数据服务器的依赖,改善了单点故障和性能瓶颈,真正实现了并行化数据访问。GlusterFS采用弹性哈希算法在存储池中可以智能地定位任意数据分片(将数据分片存储在不同节点上),不需要查看索引或者向元数据服务器查询。高可用性
GlusterFS可以对文件进行自动复制,如镜像或多次复制,从而确保数据总是可以访问,甚至是在硬件故障的情况下也能正常访问。
当数据出现不一致时,自我修复功能能够把数据恢复到正确的状态,数据的修复是以增量的方式在后台执行,几乎不会产生性能负载。
GlusterFS可以支持所有的存储,因为它没有设计自己的私有数据文件格式,而是采用操作系统中主流标准的磁盘文件系统(如EXT3、XFS等)来存储文件,因此数据可以使用传统访问磁盘的方式被访问。全局统一命名空间
分布式存储中,将所有节点的命名空间整合为统一命名空间,将整个系统的所有节点的存储容量组成一个大的虚拟存储池,供前端主机访问这些节点完成数据读写操作。弹性卷管理
GlusterFs通过将数据储存在逻辑卷中,逻辑卷从逻辑存储池进行独立逻辑划分而得到。
逻辑存储池可以在线进行增加和移除,不会导致业务中断。逻辑卷可以根据需求在线增长和缩减,并可以在多个节点中实现负载均衡。
文件系统配置也可以实时在线进行更改并应用,从而可以适应工作负载条件变化或在线性能调优。基于标准协议
GlusterFS存储服务支持 NFS、CIFS、HPTP、FTP、SMB 及 Gluster原生协议,完全与 POSIX标准(可移植操作系统接口)兼容。
现有应用程序不需要做任何修改就可以对Gluster 中的数据进行访问,也可以使用专用API进行访问。
2、GlusterFS术语
- Brick(存储块) :
指可信主机池中由主机提供的用于物理存储的专用分区,是GlusterFS中的基本存储单元,同时也是
可信存储池中服务器上对外提供的存储目录。
存储目录的格式由服务器和目录的绝对路径构成,表示方法为SERVER:EXPORT,如20.0.0.12:
/ data/ mydir/。 - volume(逻辑卷):
一个逻辑卷是一组Brick 的集合。卷是数据存储的逻辑设备,类似于LVM中的逻辑卷。大部分Gluster管理操作是在卷上进行的。 - FUSE:
是一个内核模块,允许用户创建自己的文件系统,无须修改内核代码。 - VFS:
内核空间对用户空间提供的访问磁盘的接口。 - Glusterd (后台管理进程) :
在存储群集中的每个节点上都要运行。
3、模块化堆栈式架构
- GlusterFS 采用模块化、维栈式的架构。
- 通过对模块进行各种组合,即可实现复杂的功能。例如Replicate模块可实现RATD1,Stripe模块可实现 RAID0,通过两者的组合可实现RAID10 和RAID01,同时获得更高的性能及可靠性。
4、Glusterfs的工作流程
- (1)客户端或应用程序通过Glusterfs的挂载点访问数据。
- (2)linux系统内核通过VFSAPI收到请求并处理。
- (3)VFS将数据递交给FUSE内核文件系统,并向系统注册一个实际的文件系统FSE,而FUS文件系统则是将数据通过ldev/fuse设备文件递交给了GlusterFs client端。可以将FUSE文件系统理解为一个代理。
- (4)GlusterFs client 收到数据后,client根据配置文件的配置对数据进行处理。
- (5)经过GlusterFS client 处理后,通过网络将数据传递至远端的 GlusterFS server,并且将数据写入到服务器存储设备上。
5、弹性 HASH 算法
弹性 HASH 算法是 Davies-Meyer 算法的具体实现,通过 HASH 算法可以得到一个 32 位的整数范围的 hash 值,假设逻辑卷中有 N 个存储单位 Brick,则 32 位的整数范围将被划分为 N 个连续的子空间,每个空间对应一个 Brick。
当用户或应用程序访问某一个命名空间时,通过对该命名空间计算 HASH 值,根据该 HASH 值所对应的 32 位整数空间定位数据所在的 Brick。
弹性 HASH 算法的优点:
- 保证数据平均分布在每一个 Brick 中。
- 解决了对元数据服务器的依赖,进而解决了单点故障以及访问瓶颈。
二、GlusterFS的卷类型
GlusterFS 支持七种卷,即分布式卷、条带卷、复制卷、分布式条带卷、分布式复制卷、条带复制卷和分布式条带复制卷。
分布式卷(默认):文件通过HASH算法分布到所有Brick Server上,这种卷是GFS的基础;以文件为单位根据HASH算法散列到不同的Brick,其实只是扩大了磁盘空间,并不具备容错能力,属于文件级RAID 0
条带卷(默认):类似RAID 0,文件被分成数据库并以轮询的方式分布到多个Brick Server上,文件存储以数据块为单位,支持大文件存储,文件越大,读取效率越高
复制卷(Replica volume):将文件同步到多个Brick上,使其具备多个文件副本,属于文件级RAID 1,具有容错能力。因为数据分散在多个Brick中,所以读性能得到很大提升,但写性能下降
分布式条带卷(Distribute Stripe volume):Brick Server数量是条带数(数据块分布的Brick数量)的倍数,兼具分布式卷和条带的特点
分布式复制卷(Distribute Replica volume):Brick Server数量是镜像数(数据副本 数量)的倍数,兼具分布式卷和复制卷的特点
条带复制卷(Stripe Replca volume):类似RAID 10,同时具有条带卷和复制卷的特点
分布式条带复制卷(Distribute Stripe Replicavolume):三种基本卷的复合卷通常用于类Map Reduce应用。
三、部署GlusterFS群集
实验准备
node1服务器:20.0.0.10
node2服务器:20.0.0.5
node3服务器:20.0.0.6
node4服务器:20.0.0.7
客户端节点:20.0.0.12
四台虚拟机个添加4块网卡,仅做实验,无需太大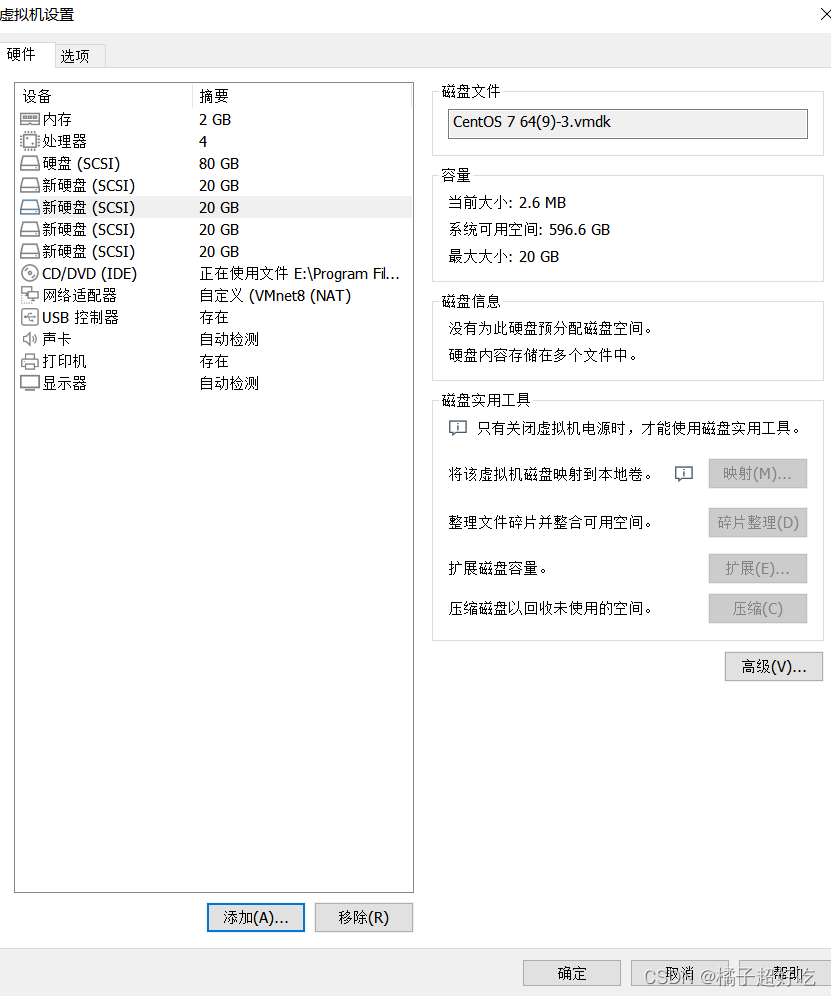
1、更改节点名称
##修改主机名
hostname node1
su

hostname node2
su

hostname node3
su

hostname node4
su
2、节点进行磁盘挂载,安装本地源
cd /opt
vim /fdisk.sh
#!/bin/bash
NEWDEV=`ls /dev/sd* | grep -o 'sd[b-z]' | uniq`
for VAR in $NEWDEV
do
echo -e "n\np\n\n\n\nw\n" | fdisk /dev/$VAR &> /dev/null
mkfs.xfs /dev/${
VAR}"1" &> /dev/null
mkdir -p /data/${
VAR}"1" &> /dev/null
echo "/dev/${VAR}"1" /data/${VAR}"1" xfs defaults 0 0" >> /etc/fstab
done
mount -a &> /dev/null
chmod +x /opt/fdisk.sh
cd /opt/
./fdisk.sh
[[email protected] /opt] # echo "20.0.0.10 node1" >> /etc/hosts
[[email protected] /opt] # echo "20.0.0.5 node2" >> /etc/hosts
[[email protected] /opt] # echo "20.0.0.6 node3" >> /etc/hosts
[[email protected] /opt] # echo "20.0.0.7 node4" >> /etc/hosts

[[email protected] /opt] # ls
fdisk.sh  rh
[[email protected] /opt] # rz -E
rz waiting to receive.
[[email protected] /opt] # ls
fdisk.sh  gfsrepo.zip  rh
[[email protected] /opt] # unzip gfsrepo.zip

[[email protected] /opt] # cd /etc/yum.repos.d/
[[email protected] /etc/yum.repos.d] # ls
local.repo  repos.bak
[[email protected] /etc/yum.repos.d] # mv * repos.bak/
mv: 无法将目录"repos.bak" 移动至自身的子目录"repos.bak/repos.bak" 下
[[email protected] /etc/yum.repos.d] # ls
repos.bak
[[email protected] /etc/yum.repos.d] # vim glfs.repo

[glfs]
name=glfs
baseurl=file:///opt/gfsrepo
gpgcheck=0
enabled=1

[[email protected] /etc/yum.repos.d] # yum clean all && yum makecache
已加载插件:fastestmirror, langpacks
正在清理软件源: glfs
Cleaning up everything
Maybe you want: rm -rf /var/cache/yum, to also free up space taken by orphaned data from disabled or removed repos
已加载插件:fastestmirror, langpacks
glfs                                                                  | 2.9 kB  00:00:00
(1/3): glfs/filelists_db                                              |  62 kB  00:00:00
(2/3): glfs/other_db                                                  |  46 kB  00:00:00
(3/3): glfs/primary_db                                                |  92 kB  00:00:00
Determining fastest mirrors
元数据缓存已建立
[[email protected] /etc/yum.repos.d] # yum -y install glusterfs glusterfs-server glusterfs-fuse glusterfs-rdma

[[email protected] /etc/yum.repos.d] # systemctl start glusterd.service
[[email protected] /etc/yum.repos.d] # systemctl enable glusterd.service
Created symlink from /etc/systemd/system/multi-user.target.wants/glusterd.service to /usr/lib/systemd/system/glusterd.service.

[[email protected] /etc/yum.repos.d] # systemctl status glusterd.service
3、添加节点创建集群
添加节点到存储信任池中
[[email protected] ~] # gluster peer probe node1
peer probe: success. Probe on localhost not needed
[[email protected] ~] # gluster peer probe node2
peer probe: success.
[[email protected] ~] # gluster peer probe node3
peer probe: success.
[[email protected] ~] # gluster peer probe node4
peer probe: success.

[[email protected] ~] # gluster peer status
Number of Peers: 3

Hostname: node2
Uuid: 2ee63a35-6e83-4a35-8f54-c9c0137bc345
State: Peer in Cluster (Connected)

Hostname: node3
Uuid: e63256a9-6700-466f-9279-3e3efa3617ec
State: Peer in Cluster (Connected)

Hostname: node4
Uuid: 9931effa-92a6-40c7-ad54-7361549dd96d
State: Peer in Cluster (Connected)
4、创建分布式卷
#创建分布式卷,没有指定类型,默认创建的是分布式卷

[[email protected] ~] # gluster volume create dis-volume node1:/data/sdb1 node2:/data/sdb1 force
volume create: dis-volume: success: please start the volume to access data

[[email protected] ~] # gluster volume list
dis-volume

[[email protected] ~] # gluster volume start dis-volume
volume start: dis-volume: success

[[email protected] ~] # gluster volume info dis-volume

Volume Name: dis-volume
Type: Distribute
Volume ID: 8f948537-5ac9-4091-97eb-0bdcf142f4aa
Status: Started
Snapshot Count: 0
Number of Bricks: 2
Transport-type: tcp
Bricks:
Brick1: node1:/data/sdb1
Brick2: node2:/data/sdb1
Options Reconfigured:
transport.address-family: inet
nfs.disable: on
5、创建条带卷
#指定类型为 stripe,数值为 2,且后面跟了 2 个 Brick Server,所以创建的是条带卷
[[email protected] ~] # gluster volume create stripe-volume stripe 2 node1:/data/sdc1 node2:/data/sdc1 force
volume create: stripe-volume: success: please start the volume to access data

[[email protected] ~] # gluster volume start stripe-volume
volume start: stripe-volume: success

[[email protected] ~] # gluster volume info stripe-volume

Volume Name: stripe-volume
Type: Stripe
Volume ID: b1185b78-d396-483f-898e-3519d3ef8e37
Status: Started
Snapshot Count: 0
Number of Bricks: 1 x 2 = 2
Transport-type: tcp
Bricks:
Brick1: node1:/data/sdc1
Brick2: node2:/data/sdc1
Options Reconfigured:
transport.address-family: inet
nfs.disable: on
6、创建复制卷
#指定类型为 replica,数值为 2,且后面跟了 2 个 Brick Server,所以创建的是复制卷
[[email protected] ~] # gluster volume create rep-volume replica 2 node3:/data/sdb1 node4:/data/sdb1 force
volume create: rep-volume: success: please start the volume to access data

[[email protected] ~] # gluster volume start rep-volume
volume start: rep-volume: success

[[email protected] ~] # gluster volume info rep-volume

Volume Name: rep-volume
Type: Replicate
Volume ID: 9d39a2a6-b71a-44a5-8ea5-5259d8aef518
Status: Started
Snapshot Count: 0
Number of Bricks: 1 x 2 = 2
Transport-type: tcp
Bricks:
Brick1: node3:/data/sdb1
Brick2: node4:/data/sdb1
Options Reconfigured:
transport.address-family: inet
nfs.disable: on
7、创建分布式条带卷
#指定类型为 stripe,数值为 2,而且后面跟了 4 个 Brick Server,是 2 的两倍,所以创建的是分布式条带卷
[[email protected] ~] # gluster volume create dis-stripe stripe 2 node1:/data/sdd1 node2:/data/sdd1 node3:/data/sdd1 node4:/data/sdd1 force
volume create: dis-stripe: success: please start the volume to access data

[[email protected] ~] # gluster volume start dis-stripe
volume start: dis-stripe: success

[[email protected] ~] # gluster volume info dis-stripe

Volume Name: dis-stripe
Type: Distributed-Stripe
Volume ID: beb7aa78-78d1-435f-8d29-c163878c73f0
Status: Started
Snapshot Count: 0
Number of Bricks: 2 x 2 = 4
Transport-type: tcp
Bricks:
Brick1: node1:/data/sdd1
Brick2: node2:/data/sdd1
Brick3: node3:/data/sdd1
Brick4: node4:/data/sdd1
Options Reconfigured:
transport.address-family: inet
nfs.disable: on
8、部署gluster客户端
[[email protected] ~]#systemctl stop firewalld
[[email protected] ~]#setenforce 0

[[email protected] ~]#cd /opt
[[email protected] opt]#ls
rh
[[email protected] opt]#rz -E
rz waiting to receive.
[[email protected] opt]#ls
gfsrepo.zip  rh
[[email protected] opt]#unzip gfsrepo.zip
[[email protected] opt]#cd /etc/yum.repos.d/
[[email protected] yum.repos.d]#ls
local.repo  repos.bak
[[email protected] yum.repos.d]#mv * repos.bak/
mv: 无法将目录"repos.bak" 移动至自身的子目录"repos.bak/repos.bak" 下
[[email protected] yum.repos.d]#ls
repos.bak
[[email protected] yum.repos.d]#vim glfs.repo

[glfs]
name=glfs
baseurl=file:///opt/gfsrepo
gpgcheck=0
enabled=1


[[email protected] yum.repos.d]#yum clean all && yum makecache

[[email protected] yum.repos.d]#yum -y install glusterfs glusterfs-fuse

[[email protected] yum.repos.d]#mkdir -p /test/{
    dis,stripe,rep,dis_stripe,dis_rep}
[[email protected] yum.repos.d]#cd /test/
[[email protected] test]#ls
dis  dis_rep  dis_stripe  rep  stripe
[[email protected] test]#

[[email protected] test]#echo "20.0.0.10 node1" >> /etc/hosts
[[email protected] test]#echo "20.0.0.5 node2" >> /etc/hosts
[[email protected] test]#echo "20.0.0.6 node3" >> /etc/hosts
[[email protected] test]#echo "20.0.0.7 node4" >> /etc/hosts
[[email protected] test]#mount.glusterfs node1:dis-volume /test/dis
[[email protected] test]#mount.glusterfs node1:stripe-volume /test/stripe
[[email protected] test]#mount.glusterfs node1:rep-volume /test/rep
[[email protected] test]#mount.glusterfs node1:dis-stripe /test/dis_stripe
[[email protected] test]#mount.glusterfs node1:dis-rep /test/dis_rep
[[email protected] test]#
[[email protected] test]#df -h
文件系统             容量  已用  可用 已用% 挂载点
/dev/sda2             16G  3.5G   13G   22% /
devtmpfs             898M     0  898M    0% /dev
tmpfs                912M     0  912M    0% /dev/shm
tmpfs                912M   18M  894M    2% /run
tmpfs                912M     0  912M    0% /sys/fs/cgroup
/dev/sda5             10G   37M   10G    1% /home
/dev/sda1             10G  174M  9.9G    2% /boot
tmpfs                183M  4.0K  183M    1% /run/user/42
tmpfs                183M   40K  183M    1% /run/user/0
/dev/sr0             4.3G  4.3G     0  100% /mnt
node1:dis-volume     6.0G   65M  6.0G    2% /test/dis
node1:stripe-volume  8.0G   65M  8.0G    1% /test/stripe
node1:rep-volume     3.0G   33M  3.0G    2% /test/rep
node1:dis-stripe      21G  130M   21G    1% /test/dis_stripe
node1:dis-rep         11G   65M   11G    1% /test/dis_rep

[[email protected] test]#cd /opt
[[email protected] opt]#dd if=/dev/zero of=/opt/demo1.log bs=1M count=40
记录了40+0 的读入
记录了40+0 的写出
41943040字节(42 MB)已复制,0.0311576 秒,1.3 GB/秒
[[email protected] opt]#dd if=/dev/zero of=/opt/demo2.log bs=1M count=40
记录了40+0 的读入
记录了40+0 的写出
41943040字节(42 MB)已复制,0.182058 秒,230 MB/秒
[[email protected] opt]#dd if=/dev/zero of=/opt/demo3.log bs=1M count=40
记录了40+0 的读入
记录了40+0 的写出
41943040字节(42 MB)已复制,0.196193 秒,214 MB/秒
[[email protected] opt]#dd if=/dev/zero of=/opt/demo4.log bs=1M count=40
记录了40+0 的读入
记录了40+0 的写出
41943040字节(42 MB)已复制,0.169933 秒,247 MB/秒
[[email protected] opt]#dd if=/dev/zero of=/opt/demo5.log bs=1M count=40
记录了40+0 的读入
记录了40+0 的写出
41943040字节(42 MB)已复制,0.181712 秒,231 MB/秒
[[email protected] opt]#
[[email protected] opt]#ls -lh /opt
[[email protected] opt]#cp demo* /test/dis
[[email protected] opt]#cp demo* /test/stripe/
[[email protected] opt]#cp demo* /test/rep/
[[email protected] opt]#cp demo* /test/dis_stripe/
[[email protected] opt]#cp demo* /test/dis_rep/

[[email protected] opt]#cd /test/
[[email protected] test]#tree
.
├── dis
│   ├── demo1.log
│   ├── demo2.log
│   ├── demo3.log
│   ├── demo4.log
│   └── demo5.log
├── dis_rep
│   ├── demo1.log
│   ├── demo2.log
│   ├── demo3.log
│   ├── demo4.log
│   └── demo5.log
├── dis_stripe
│   ├── demo1.log
│   ├── demo2.log
│   ├── demo3.log
│   ├── demo4.log
│   └── demo5.log
├── rep
│   ├── demo1.log
│   ├── demo2.log
│   ├── demo3.log
│   ├── demo4.log
│   └── demo5.log
└── stripe
    ├── demo1.log
    ├── demo2.log
    ├── demo3.log
    ├── demo4.log
    └── demo5.log

5 directories, 25 files
[[email protected] test]#
9、查看文件分布
1、查看文件分布
##查看分布式文件分布
[[email protected] ~] # ls -lh /data/sdb1
总用量 160M
-rw-r--r--. 2 root root 40M 7月   4 20:47 demo1.log
-rw-r--r--. 2 root root 40M 7月   4 20:47 demo2.log
-rw-r--r--. 2 root root 40M 7月   4 20:47 demo3.log
-rw-r--r--. 2 root root 40M 7月   4 20:47 demo4.log

[[email protected] ~]#ll -h /data/sdb1
总用量 40M
-rw-r--r--. 2 root root 40M 7月   4 20:47 demo5.log

##查看条带卷文件分布
[[email protected] ~] # ls -lh /data/sdc1
总用量 100M
-rw-r--r--. 2 root root 20M 7月   4 20:47 demo1.log
-rw-r--r--. 2 root root 20M 7月   4 20:47 demo2.log
-rw-r--r--. 2 root root 20M 7月   4 20:47 demo3.log
-rw-r--r--. 2 root root 20M 7月   4 20:47 demo4.log
-rw-r--r--. 2 root root 20M 7月   4 20:47 demo5.log

[[email protected] ~]#ll -h /data/sdc1
总用量 100M
-rw-r--r--. 2 root root 20M 7月   4 20:47 demo1.log
-rw-r--r--. 2 root root 20M 7月   4 20:47 demo2.log
-rw-r--r--. 2 root root 20M 7月   4 20:47 demo3.log
-rw-r--r--. 2 root root 20M 7月   4 20:47 demo4.log
-rw-r--r--. 2 root root 20M 7月   4 20:47 demo5.log

##查看复制卷文件分布
[[email protected] ~]#ll -h /data/sdb1
总用量 200M
-rw-r--r--. 2 root root 40M 7月   4 20:47 demo1.log
-rw-r--r--. 2 root root 40M 7月   4 20:47 demo2.log
-rw-r--r--. 2 root root 40M 7月   4 20:47 demo3.log
-rw-r--r--. 2 root root 40M 7月   4 20:47 demo4.log
-rw-r--r--. 2 root root 40M 7月   4 20:47 demo5.log

[[email protected] ~]#ll -h /data/sdb1
总用量 200M
-rw-r--r--. 2 root root 40M 7月   4 20:47 demo1.log
-rw-r--r--. 2 root root 40M 7月   4 20:47 demo2.log
-rw-r--r--. 2 root root 40M 7月   4 20:47 demo3.log
-rw-r--r--. 2 root root 40M 7月   4 20:47 demo4.log
-rw-r--r--. 2 root root 40M 7月   4 20:47 demo5.log

##查看分布式条带卷分布
[[email protected] ~] # ll -h /data/sdd1
总用量 60M
-rw-r--r--. 2 root root 20M 7月   4 20:47 demo1.log
-rw-r--r--. 2 root root 20M 7月   4 20:47 demo2.log
-rw-r--r--. 2 root root 20M 7月   4 20:47 demo3.log

[[email protected] ~]#ll -h /data/sdd1
总用量 60M
-rw-r--r--. 2 root root 20M 7月   4 20:47 demo1.log
-rw-r--r--. 2 root root 20M 7月   4 20:47 demo2.log
-rw-r--r--. 2 root root 20M 7月   4 20:47 demo3.log

[[email protected] ~]#ll -h /data/sdd1
总用量 40M
-rw-r--r--. 2 root root 20M 7月   4 20:47 demo4.log
-rw-r--r--. 2 root root 20M 7月   4 20:47 demo5.log

[[email protected] ~]#ll -h /data/sdd1
总用量 40M
-rw-r--r--. 2 root root 20M 7月   4 20:47 demo4.log
-rw-r--r--. 2 root root 20M 7月   4 20:47 demo5.log
2、破坏性测试
#1、挂起 node2 节点或者关闭glusterd服务来模拟故障
[[email protected] ~]# systemctl stop glusterd.service
#2、在客户端上查看文件是否正常
#分布式卷数据查看
[[email protected] test]# ll /test/dis/ #在客户机上发现少了demo5.log文件,这个是在node2上的
总用量 163840
-rw-r--r-- 1 root root 41943040 7月 4 20:48 demo1.log
-rw-r--r-- 1 root root 41943040 7月 4 20:48 demo2.log
-rw-r--r-- 1 root root 41943040 7月 4 20:48 demo3.log
-rw-r--r-- 1 root root 41943040 7月 4 20:48 demo4.log
#条带卷
[[email protected] test]# cd /test/stripe/ #无法访问,条带卷不具备冗余性
[[email protected] stripe]# ll
总用量 0
#分布式条带卷
[[email protected] test]# ll /test/dis_stripe/ #无法访问,分布条带卷不具备冗余性
总用量 40960
-rw-r--r-- 1 root root 41943040 7月 4 20:48 demo5.log
#分布式复制卷
[[email protected] test]# ll /test/dis_rep/ #可以访问,分布式复制卷具备冗余性
总用量 204800
-rw-r--r-- 1 root root 41943040 7月 4 20:48 demo1.log
-rw-r--r-- 1 root root 41943040 7月 4 20:48 demo2.log
-rw-r--r-- 1 root root 41943040 7月 4 20:48 demo3.log
-rw-r--r-- 1 root root 41943040 7月 4 20:48 demo4.log
-rw-r--r-- 1 root root 41943040 7月 4 20:48 demo5.log
#挂起 node2 和 node4 节点,在客户端上查看文件是否正常
#测试复制卷是否正常
[[email protected] rep]# ls -l /test/rep/ #在客户机上测试正常,数据有
总用量 204800
-rw-r--r-- 1 root root 41943040 7月 4 20:48 demo1.log
-rw-r--r-- 1 root root 41943040 7月 4 20:48 demo2.log
-rw-r--r-- 1 root root 41943040 7月 4 20:48 demo3.log
-rw-r--r-- 1 root root 41943040 7月 4 20:48 demo4.log
-rw-r--r-- 1 root root 41943040 7月 4 20:48 demo5.log
#测试分布式条卷是否正常
[[email protected] dis_stripe]# ll /test/dis_stripe/ #在客户机上测试没有数据
总用量 0
#测试分布式复制卷是否正常
[[email protected] dis_rep]# ll /test/dis_rep/ #在客户机上测试正常,有数据
总用量 204800
-rw-r--r-- 1 root root 41943040 7月 4 20:49 demo1.log
-rw-r--r-- 1 root root 41943040 7月 4 20:49 demo2.log
-rw-r--r-- 1 root root 41943040 7月 4 20:49 demo3.log
-rw-r--r-- 1 root root 41943040 7月 4 20:49 demo4.log
-rw-r--r-- 1 root root 41943040 7月 4 20:49 demo5.log
四、其他维护命令
1.查看GlusterFS卷
gluster volume list

2.查看所有卷的信息
gluster volume info

3.查看所有卷的状态
gluster volume status

4.停止一个卷
gluster volume stop dis-stripe

5.删除一个卷,注意:删除卷时,需要先停止卷,且信任池中不能有主机处于宕机状态,否则删除不成功
gluster volume delete dis-stripe

6.设置卷的访问控制
##仅拒绝
gluster volume set dis-rep auth.allow 20.0.0.20

##仅允许
gluster volume set dis-rep auth.allow 20.0.0.*	  #设置20.0.0.0网段的所有IP地址都能访问dis-rep卷(分布式复制卷)
边栏推荐
- 3D reconstruction of point cloud
- Différence entre hors bande et en bande
- Go language implementation principle -- lock implementation principle
- 数学公式截图识别神器Mathpix无限使用教程
- How to quickly understand complex businesses and systematically think about problems?
- 带外和带内的区别
- ORB_ SLAM2/3
- MySQL (2) -- simple query, conditional query
- Realize reverse proxy client IP transparent transmission
- 698. Divided into k equal subsets ●●
猜你喜欢

芯源&立创EDA训练营——无刷电机驱动
基于脉冲神经网络的物体检测

Rasa 3.x 学习系列-Rasa 3.2.1 新版本发布

There are 14 God note taking methods. Just choose one move to improve your learning and work efficiency by 100 times!

SpreadJS 15.1 CN 与 SpreadJS 15.1 EN

Neural structured learning - Part 3: training with synthesized graphs

保研笔记一 软件工程与计算卷二(1-7章)
Scala concurrent programming (II) akka

698. 划分为k个相等的子集 ●●

Xinyuan & Lichuang EDA training camp - brushless motor drive
随机推荐
Calculating the number of daffodils in C language
[classical control theory] summary of automatic control experiment
Judge whether the binary tree is a complete binary tree
《牛客刷verilog》Part III Verilog企业真题
(4)UART應用設計及仿真驗證2 —— TX模塊設計(無狀態機)
帶外和帶內的區別
Multi view 3D reconstruction
Différence entre hors bande et en bande
(4) UART application design and simulation verification 2 - RX module design (stateless machine)
Go language implementation principle -- lock implementation principle
二叉树递归套路总结
The PNG image is normal when LabVIEW is opened, and the full black image is obtained when Photoshop is opened
3D point cloud slam
What is the process of building a website
Non rigid / flexible point cloud ICP registration
698. 划分为k个相等的子集 ●●
424. 替换后的最长重复字符 ●●
Spécifications techniques et lignes directrices pour la sélection des tubes TVS et ESD - Recommandation de jialichuang
6-axis and 9-axis IMU attitude estimation
Difference between out of band and in band