当前位置:网站首页>An introduction to the skeleton tool
An introduction to the skeleton tool
2022-08-03 13:02:00 【Rainwing Light Dust】

一、介绍
【骨骼工具】快捷键是M.
If you can't find it in the toolbar, you can click these three small dots,在里边找.
![[外链图片转存失败,源站可能有防盗链机制,建议将图片保存下来直接上传(img-sS0SgxJJ-1659075595925)(D:\Typora图片\image-20220729112540617.png)]](/img/a6/1a4a6eb19bf0dbb7cc9a8b8fbf8aab.png)
Then drag and drop to the toolbar,方便使用.
二、作用
【骨骼工具】Generally used in two-dimensional,Some actions of the characters(走路/跑步之类的).
用【骨骼工具】Bind the limbs of the character to operate,让人物动起来.
三、演示
Here is a simple case demonstration.
①先用【矩形工具】画一个矩形.
![[外链图片转存失败,源站可能有防盗链机制,建议将图片保存下来直接上传(img-UW0vdGe3-1659075595926)(D:\Typora图片\image-20220729112920271.png)]](/img/ff/d1c1363f89cff93774ee7ac7f825fb.png)
②转化为元件
用【选择工具】Select this rectangle,然后按F8将它转化为元件.
这里取名为“矩形”.
![[外链图片转存失败,源站可能有防盗链机制,建议将图片保存下来直接上传(img-8xXxNyqL-1659075595927)(D:\Typora图片\image-20220729113214912.png)]](/img/cc/6d45bf5354492ff22bef44f5a4e56d.png)
③复制一个
然后按住Altkey and drag the rectangle down(复制一个).
![[外链图片转存失败,源站可能有防盗链机制,建议将图片保存下来直接上传(img-jYoJeQRi-1659075595927)(D:\Typora图片\image-20220729113118742.png)]](/img/4d/ff91c6f0aad5117e8c2e247c4f6ee0.png)
Select the second rectangle,用【任意变形工具】改变大小.
![[外链图片转存失败,源站可能有防盗链机制,建议将图片保存下来直接上传(img-hpLplWFS-1659075595928)(D:\Typora图片\image-20220729113340586.png)]](/img/c1/4624318cc592fd6674a27473b565b0.png)
Then make another copy,放在下方.
Move the top one up.
![[外链图片转存失败,源站可能有防盗链机制,建议将图片保存下来直接上传(img-E8aMLc6Y-1659075595929)(D:\Typora图片\image-20220729113437243.png)]](/img/86/5331629d4b17a64e87ac6b32ca8198.png)
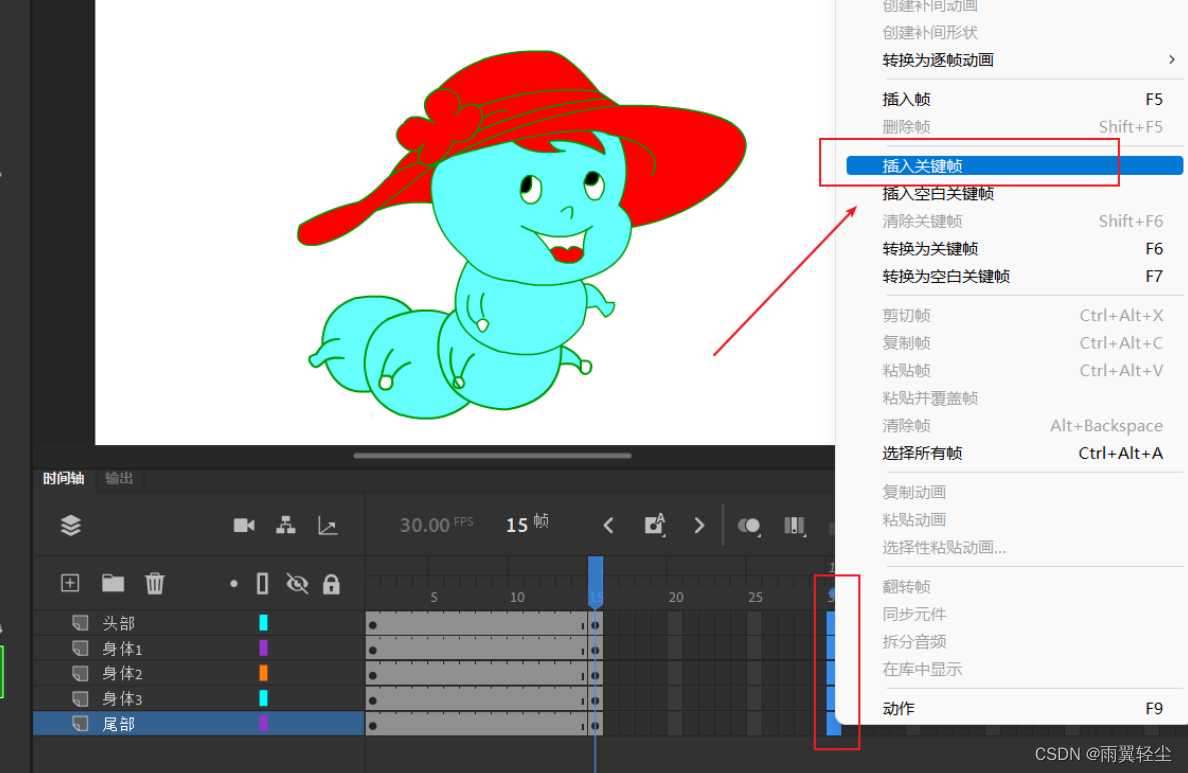
④用【骨骼工具】绑定
The specific mouse operation is shown in the figure:(The small bone under the mouse is white and cannot be dragged,It is black to drag)
Remember that the left mouse button does not move,按住拖拽!
![[外链图片转存失败,源站可能有防盗链机制,建议将图片保存下来直接上传(img-zBJ4NTWY-1659075595930)(D:\Typora图片\image-20220729113907308.png)]](/img/3b/25fbf075ade1ec2b8ee6ac576f719f.png)
这些点,Equivalent to the joints of the human leg.
可以用【选择工具】Drag these joints,Let it move flexibly.
![[外链图片转存失败,源站可能有防盗链机制,建议将图片保存下来直接上传(img-sPROiz94-1659075595930)(D:\Typora图片\image-20220729114253449.png)]](/img/65/50e026c787b934b0f66b0538331a35.png)
四、案例
Here I drew a Kakashi with the straight line tool,Just make up your mind.
(1)Import the finished image
Let's make a dynamic effect of flowing hair.(Remember to turn the hair part into an element first)
![[外链图片转存失败,源站可能有防盗链机制,建议将图片保存下来直接上传(img-171dcKRV-1659075595931)(D:\Typora图片\image-20220729122730501.png)]](/img/26/6109db8e6dd8750b98c098af71fd1f.png)
(2)Fixed bones
Double click on the hair section,into the element.
![[外链图片转存失败,源站可能有防盗链机制,建议将图片保存下来直接上传(img-QteCBk7M-1659075595932)(D:\Typora图片\image-20220729122907891.png)]](/img/23/c806382f7963352bc1845151c2a138.png)
为了方便操作,I removed some lines.
![[外链图片转存失败,源站可能有防盗链机制,建议将图片保存下来直接上传(img-iuvLHNTg-1659075595935)(D:\Typora图片\image-20220729123956319.png)]](/img/45/43402d4579b6860c2dc234c0079d8f.png)
用【骨骼工具】Fix a rough outline.
![[外链图片转存失败,源站可能有防盗链机制,建议将图片保存下来直接上传(img-NTGnFmHE-1659075595940)(D:\Typora图片\image-20220729135558723.png)]](/img/f1/0d7e4934c0e1278e59a2eb9deffaba.png)
(3)添加帧
点击第15帧的位置,按F5添加帧.
![[外链图片转存失败,源站可能有防盗链机制,建议将图片保存下来直接上传(img-Sbe7JSjW-1659075595940)(D:\Typora图片\image-20220729123425752.png)]](/img/48/d6aeacb29ab45d3d0d606e56001225.png)
(4)移动骨骼
Now let's move the bones.(It's just bones,Give your hair the transformed look)
![[外链图片转存失败,源站可能有防盗链机制,建议将图片保存下来直接上传(img-96lzshav-1659075595940)(D:\Typora图片\image-20220729135754243.png)]](/img/1c/ea28fb99d346507a3b90b40c626f33.png)
然后在40frame positionF5创建帧.
Move the bones again,Move to the first look.
![[外链图片转存失败,源站可能有防盗链机制,建议将图片保存下来直接上传(img-FLwp7rn1-1659075595941)(D:\Typora图片\image-20220729140212002.png)]](/img/f7/46618673848b3fd8356f295de61375.png)
(5)复制
Then just copy the frames one by one.
Click this point(第15帧),右键“Copy the pose”.
![[外链图片转存失败,源站可能有防盗链机制,建议将图片保存下来直接上传(img-uCzB6S93-1659075595941)(D:\Typora图片\image-20220729140422521.png)]](/img/e9/0bc79db6b9902775b1a26e0fa767ed.png)
然后在第60帧的位置,F5插入帧,然后右键“Paste pose”.
![[外链图片转存失败,源站可能有防盗链机制,建议将图片保存下来直接上传(img-Vealp3Uy-1659075595941)(D:\Typora图片\image-20220729140958321.png)]](/img/2b/af60ebd9beada73d4fd242b4270f33.png)
(6)动效
看一下效果:

写在最后:
Note the point into the hair element section,再进行制作.
A small case was completed this time,I don't know if everyone got it.
希望文章对你有帮助,拜拜~
边栏推荐
猜你喜欢


随机推荐
【蓝桥杯选拔赛真题48】Scratch跳舞机游戏 少儿编程scratch蓝桥杯选拔赛真题讲解
YOLOv5 training data prompts No labels found, with_suffix is used, WARNING: Ignoring corrupted image and/or label appears during yolov5 training
从零开始C语言精讲篇5:指针
Image fusion SDDGAN article learning
别再用if-else了,分享一下我使用“策略模式”的项目经验...
-找树根-
R语言ggplot2可视化:使用ggpubr包的ggsummarystats函数可视化箱图(通过ggfunc参数设置)、在可视化图像的下方添加描述性统计结果表格
【云原生 · Kubernetes】部署Kubernetes集群
一些测试相关知识
图像融合DDcGAN学习笔记
7月份最后一篇博客
项目概述、推送和存储平台准备
Use %Status value
长城简漫·暑期安全篇⑤ 这个强,不能逞
nacos应用
bash while loop and until loop
B站回应“HR 称核心用户都是 Loser”:该面试官去年底已被劝退,会吸取教训加强管理
word标尺有哪些作用
数据库系统原理与应用教程(074)—— MySQL 练习题:操作题 141-150(十八):综合练习
【Verilog】HDLBits题解——Circuits/Sequential Logic/Latches and Flip-Flops