当前位置:网站首页>ClickHouse原理解析与应用实践》读书笔记(8)
ClickHouse原理解析与应用实践》读书笔记(8)
2022-07-08 00:29:00 【Aiky哇】
开始学习《ClickHouse原理解析与应用实践》,写博客作读书笔记。
本文全部内容都来自于书中内容,个人提炼。

第10章:
第11章 管理与运维
11.1 用户配置
user.xml配置文件默认位于/etc/clickhouse-server路径下。
定义用户相关的配置项,包括系统参数的设定、 用户的定义、权限以及熔断机制等。
【这部分的参数可以在会话级别更改。】
11.1.1 用户profile
作用类似于用户角色,多组,预先定义在 user.xml中。
<yandex>
<profiles><!-- 配置profile -->
    <default> <!-- 自定义名称,默认角色-->
        <max_memory_usage>10000000000</max_memory_usage>
        <use_uncompressed_cache>0</use_uncompressed_cache>
    </default>
    <test1> <!-- 自定义名称,默认角色-->
        <allow_experimental_live_view>1</allow_experimental_live_view>
        <distributed_product_mode>allow</distributed_product_mode>
    </test1>
</profiles>
……
可以在CLI中直接切换到想要的profile:
SET profile = test1
名称为default的profile是默认配置,必须有,没有报错。
profile 在定义中引用其他的 profile名称可以实现继承。
<normal_inherit> <!-- 只有read查询权限-->
    <profile>test1</profile>
    <profile>test2</profile>
    <distributed_product_mode>deny</distributed_product_mode>
</normal_inherit>
新的参数值会覆盖原有的参数值。
11.1.2 配置约束
constraints标签可以设置一组约束条件。
- Min:最小值约束,在设置相应参数的时候,取值不能小于该阈值。
- Max:最大值约束,在设置相应参数的时候,取值不能大于该阈值。
- Readonly:只读约束,该参数值不允许被修改。
<profiles><!-- 配置profiles -->
    <default> <!-- 自定义名称,默认角色-->
        <max_memory_usage>10000000000</max_memory_usage>
        <distributed_product_mode>allow</distributed_product_mode>
        <constraints><!-- 配置约束-->
            <max_memory_usage>
                <min>5000000000</min>
                <max>20000000000</max>
            </max_memory_usage>
            <distributed_product_mode>
                <readonly/>
            </distributed_product_mode>
        </constraints>
    </default>
例子中给两组参数设置了约束。
此时使用set修改参数值时会报错。
在default中默认定义的constraints约束,将作为默认的全局约束,自动被其他profile继承。
11.1.3 用户定义
定义一个新用户,必须包含以下几项属性。
1.username
指定登录用户名,全局唯一属性。
2.password
登录密码。
(1)明文密码
<password>123</password>

免密码登录:
<password></password>


(2)SHA256加密
<password_sha256_hex>a665a45920422f9d417e4867efdc4fb8a04a1f3fff1fa07e998e86f7f7a27ae3</password_sha256_hex>

对密码123加密:
# echo -n 123 | openssl dgst -sha256
(stdin)= a665a45920422f9d417e4867efdc4fb8a04a1f3fff1fa07e998e86f7f7a27ae3


(3)double_sha1加密
<password_double_sha1_hex>23ae809ddacaf96af0fd78ed04b6a265e05aa257</password_double_sha1_hex>
对密码123加密:
# echo -n 123 | openssl dgst -sha1 -binary | openssl dgst -sha1
(stdin)= 23ae809ddacaf96af0fd78ed04b6a265e05aa257
3. networks
被允许登录的网络地址,用于限制用户登录的客户端地址,关于这方面的介绍将会在 11.2节展开。
4.profile
直接引用相应的名称即可
<default>
    <profile>default</profile>
</default>
5.quota
一种熔断机制。会在 11.3节展开。
11.2 权限管理
11.2.1 访问权限
1.网络访问权限
网络访问权限使用networks标签设置,用于限制某个用户登录的客户端地址 。
在设置之后,该用户将只能从指定的地址登录。
(1)IP地址:直接使用IP地址进行设置。
<ip>127.0.0.1</ip>

(2)host主机名称:通过host主机名称设置。
<host>ch5.nauu.com</host>

(3)正则匹配:通过表达式来匹配host名称
<host>^ch\d.nauu.com$</host>

举例:
<user_normal>
    <password></password>
    <networks>
        <ip>10.37.129.13</ip>
    </networks>
    <profile>default</profile>
    <quota>default</quota>
</user_normal>
2.数据库与字典访问权限
通过allow_databases和allow_dictionaries标签进行设置。
如果不进行任何定义,则表示不进行限制。
该用户在登录之后,将只能看到为其开放了访问权限的数据库和字典。
<user_normal>
    ……
    <allow_databases>
        <database>default</database>
        <database>test_dictionaries</database>
    </allow_databases>
    <allow_dictionaries>
        <dictionary>test_flat_dict</dictionary>
    </allow_dictionaries>
</user_normal>
11.2.2 查询权限
整个权限体系的第二层防护。
查询权限可以分成以下四类:
- 读权限:包括SELECT、EXISTS、SHOW和DESCRIBE查询。
- 写权限:包括INSERT和OPTIMIZE查询。
- 设置权限:包括SET查询。
- DDL权限:包括CREATE、DROP、ALTER、RENAME、ATTACH、 DETACH和TRUNCATE查询。
- 其他权限:包括KILL和USE查询,任何用户都可以执行这些查询。
通过以下两项配置标签控制:
- readonly:读权限、写权限和设置权限均由此标签控制,它有三种取值。
- 取值为0时,不进行任何限制(默认值)。
- 取值为1时,只拥有读权限(只能执行SELECT、EXISTS、SHOW 和DESCRIBE)。
- 取值为2时,拥有读权限和设置权限(在读权限基础上,增加 了SET查询)。
- allow_ddl:DDL权限由此标签控制,它有两种取值。
- 取值为0时,不允许DDL查询。
- 取值为1时,允许DDL查询(默认值)。
<profiles>
    <normal> <!-- 只有read读权限-->
        <readonly>1</readonly>
        <allow_ddl>0</allow_ddl>
    </normal>
    <normal_1> <!-- 有读和设置参数权限-->
        <readonly>2</readonly>
        <allow_ddl>0</allow_ddl>
    </normal_1>
将角色赋予给用户即可。
11.2.3 数据行级权限
权限体系中的第三层防护,决定了一个用户能够看到什么数据。
数据权限使用databases标签定义。
<databases>
    <database_name><!--数据库名称-->
        <table_name><!--表名称-->
            <filter> id < 10</filter><!--数据过滤条件-->
        </table_name>
    </database_name>
举例:
<user_normal>
    ……
    <databases>
        <default><!--默认数据库-->
            <test_row_level><!—表名称-->
                <filter>id < 10</filter>
            </test_row_level>
            <!—支持组合条件
            <test_query_all>
                <filter>id <= 100 or repo >= 100</filter>
            </test_query_all> -->
        </default>
    </databases>
数据权限的设定是如何实现的呢?分析它的执行日志:
Expression
    Expression
        Filter –增加了过滤的步骤
            MergeTreeThread
可以发现,上述代码在普通查询计划的基础之上自动附加了Filter过滤的步骤。
使用了这项功能之后,PREWHERE优化将不再生效 。
11.3 熔断机制
当使用的资源数量达到阈值时,那么正在进行的操作会被自动中断。
熔断机制可以分为两类。
1.根据时间周期的累积用量熔断
在这种方式下,系统资源的用量是按照时间周期累积统计的 。
这种方式通过users.xml内的quotas标签来定义资源配额。
<quotas>
    <default> <!-- 自定义名称 -->
        <interval>
            <duration>3600</duration><!-- 时间周期 单位:秒 -->
            <queries>0</queries>
            <errors>0</errors>
            <result_rows>0</result_rows>
            <read_rows>0</read_rows>
            <execution_time>0</execution_time>
        </interval>
    </default>
</quotas>- default:表示自定义名称,全局唯一。
- duration:表示累积的时间周期,单位是秒。
- queries:表示在周期内允许执行的查询次数,0表示不限制。
- errors:表示在周期内允许发生异常的次数,0表示不限制。
- result_row:表示在周期内允许查询返回的结果行数,0表示不限制。
- read_rows:表示在周期内在分布式查询中,允许远端节点读取的数据行数,0表示不限制。
- execution_time:表示周期内允许执行的查询时间,单位是秒,0表示不限制。
将配额添加到用户下即可。<quota>名称<quota>
2.根据单次查询的用量熔断
在这种方式下,系统资源的用量是按照单次查询统计的,而具体的熔断规则,则是由许多不同配置项组成的,这些配置项需要定义在用户profile中。 比如max_memory_usage。
【这部分参数书中给出的太少了,可以直接参考官网。Restrictions on Query Complexity | ClickHouse Docs】
11.4 数据备份
11.4.1 导出文件备份
#通过dump的形式将数据导出为本地文件。
#clickhouse-client --query="SELECT * FROM test_backup" > /chbase/test_backup.tsv

#将备份数据再次导入
# cat /chbase/test_backup.tsv | clickhouse-client --query "INSERT INTO test_backup FORMAT TSV"

#也可以直接复制它的整个目录文件
# mkdir -p /chbase/backup/default/ & cp -r /chbase/data/default/test_backup /chbase/backup/default/
11.4.2 通过快照表备份
快照表实质上就是普通的数据表,例如按天或者按周创建。
-- 首先需要建立一张与原表结构相同的数据表。
CREATE TABLE test_backup_0206 AS test_backup

--备份数据
INSERT INTO TABLE test_backup_0206 SELECT * FROM test_backup

--考虑到容灾问题,将上述SQL语句改远程查询的形式:
INSERT INTO TABLE test_backup_0206 SELECT * FROM remote('ch5.nauu.com:9000', 'default', 'test_backup', 'default')
11.4.3 按分区备份
ClickHouse目前提供了FREEZE与FETCH两种方式,
1.使用FREEZE备份
ALTER TABLE tb_name FREEZE PARTITION partition_expr分区在被备份之后,会被统一保存到ClickHouse根路径/shadow/N子目录下。其中,N是一个自增长的整数,它的含义是备份的次数(FREEZE执行过多少次),具体次数由shadow子目录下的increment.txt文件记录。
而分区备份实质上是对原始目录文件进行硬链接操作,所以并不会导致额外的存储空间。 整个备份的目录会一直向上追溯至data根路径的整个链路:
/data/[database]/[table]/[partition_folder]例如执行下面的语句,会对数据表partition_v2的201908分区进行备份:
ALTER TABLE partition_v2 FREEZE PARTITION 201908进入shadow子目录,即能够看到刚才备份的分区目录:
# pwd
/chbase/data/shadow/1/data/default/partition_v2
# ll
total 4
drwxr-x---. 2 clickhouse clickhouse 4096 Sep 1 00:22 201908_5_5_0
对于备份分区的还原操作,则需要借助ATTACH装载分区的方式来实现。这意味着如果要还原数据,首先需要主动将shadow子目录下的分区文件复制到相 应数据表的detached目录下,然后再使用ATTACH语句装载。
2.使用FETCH备份
FETCH只支持ReplicatedMergeTree系列的表引擎.
ALTER TABLE tb_name FETCH PARTITION partition_id FROM zk_path
工作原理与ReplicatedMergeTree同步数据的原理类似。
找到一个最合适的副本,下载分区数据并保存到对应数据表的 detached目录下。
与FREEZE一样,对于备份分区的还原操作,也需要借助ATTACH装载分区来实现。
FREEZE和FETCH虽然都能实现对分区文件的备份,但是它们并不会备份数据表的元数据。所以说如果想做到万无一失的备份,还需要对数据表的元数据进行备份,它们是/data/metadata目录下的[table].sql文件。目前这些元数据需要用户通过复制的形式单独备份。
11.5 服务监控
11.5.1 系统表
主要是三张系统表:metrics、events和asynchronous_metrics。
1.metrics
用于统计ClickHouse服务在运行时,当前正在执行的高层次的概要信息,包括正在执行的查询总次数、正在发生的合并操作总次数等。
2.events
events用于统计ClickHouse服务在运行过程中已经执行过的高层次的累积概要信息,包括总的查询次数、总的SELECT查询次数等 。
3.asynchronous_metrics
asynchronous_metrics用于统计ClickHouse服务运行过程时,当前正在后台异步运行的高层次的概要信息,包括当前分配的内存、执行队列中的任务数量等。
11.5.2 查询日志
目前主要有6种类型
1.query_log
记录了ClickHouse服务中所有已经执行的查询记录。
<query_log>
    <database>system</database>
    <table>query_log</table>
    <partition_by>toYYYYMM(event_date)</partition_by>
    <!—刷新周期-->
    <flush_interval_milliseconds>7500</flush_interval_milliseconds>
</query_log>
query_log开启后,即可以通过相应的系统表对记录进行查询:
SELECT type,concat(substr(query,1,20),'...')query,read_rows,
query_duration_ms AS duration FROM system.query_log LIMIT 6
query_log日志记录的信息十分完善,涵盖了查询语句、执行时间、执行用户返回的数据量和执行用户等。
2.query_thread_log
记录了所有线程的执行查询的信息。
<query_thread_log>
    <database>system</database>
    <table>query_thread_log</table>
    <partition_by>toYYYYMM(event_date)</partition_by>
    <flush_interval_milliseconds>7500</flush_interval_milliseconds>
</query_thread_log>
query_thread_log日志记录的信息涵盖了线程名称、查询语句、执行时间和内存用量等。
3.part_log
记录了MergeTree系列表引擎的分区操作日志。
<part_log>
    <database>system</database>
    <table>part_log</table>
    <flush_interval_milliseconds>7500</flush_interval_milliseconds>
</part_log>
part_log日志记录的信息涵盖了操纵类型、表名称、分区信息和执行时间等。
4.text_log
记录了ClickHouse运行过程中产生的一系列打印日志,包括INFO、DEBUG和Trace。
<text_log>
    <database>system</database>
    <table>text_log</table>
    <flush_interval_milliseconds>7500</flush_interval_milliseconds>
</text_log>
text_log日志记录的信息涵盖了线程名称、日志对象、日志信息和执行时间等。
5.metric_log
metric_log日志用于将system.metrics和system.events中的数据汇聚到一起。
<metric_log>
    <database>system</database>
    <table>metric_log</table>
    <flush_interval_milliseconds>7500</flush_interval_milliseconds>
    <collect_interval_milliseconds>1000</collect_interval_milliseconds>
</metric_log>
collect_interval_milliseconds表示收集metrics和events数据的时间周期。
metric_log开启后,即可以通过相应的系统表对记录进行查询。
11.6 本章小结
介绍了用户的定义方法和权限的设置方法。
介绍了如何通过熔断机制保护 ClickHouse系统资源不会被过度使用。
介绍了日常运行情况的监控项。
边栏推荐
- The persistence mode of redis - RDB and AOF persistence mechanisms
- 碳刷滑环在发电机中的作用
- 保姆级教程:Azkaban执行jar包(带测试样例及结果)
- Sword finger offer II 041 Average value of sliding window
- Remote Sensing投稿經驗分享
- 正则表达式
- 2022国内十大工业级三维视觉引导企业一览
- 能力贡献 GBASE三大解决方案入选“金融信创生态实验室-金融信创解决方案(第一批)”
- Anaconda3 download address Tsinghua University open source software mirror station
- 如何制作企业招聘二维码?
猜你喜欢
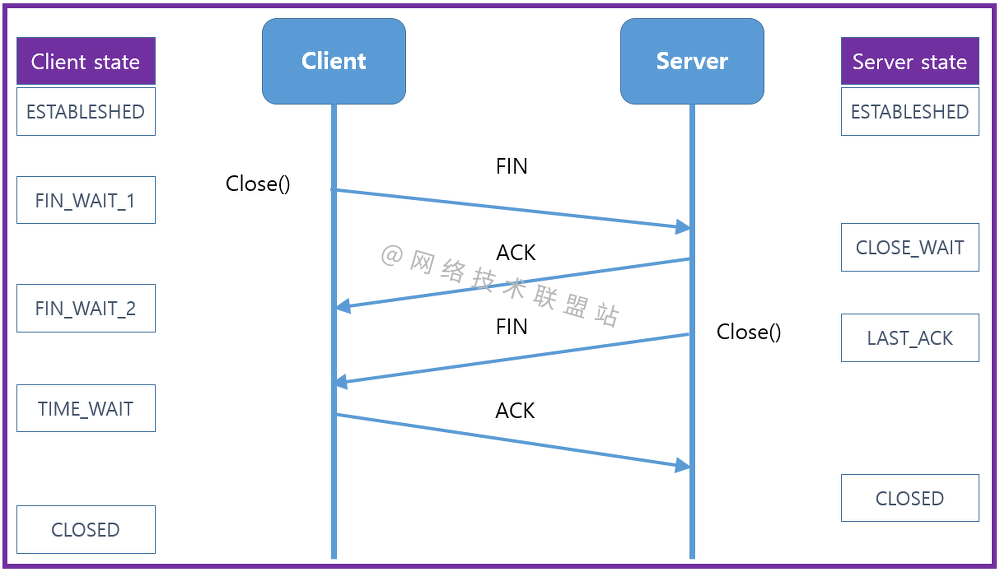
Graphic network: uncover the principle behind TCP's four waves, combined with the example of boyfriend and girlfriend breaking up, which is easy to understand
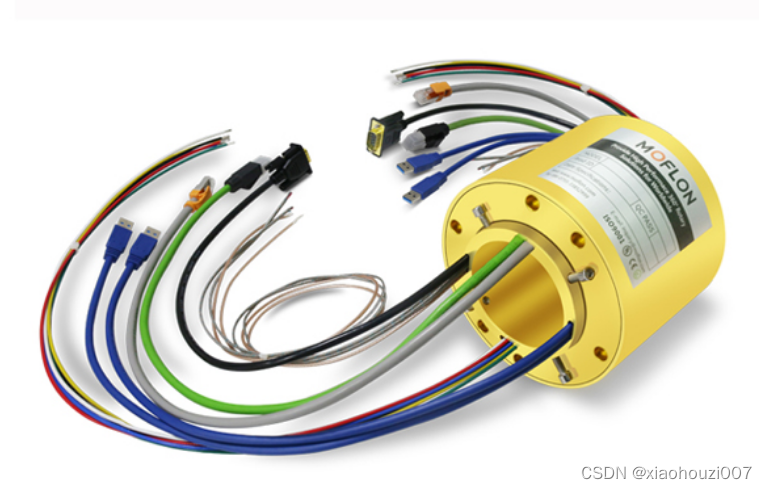
Application of slip ring in direct drive motor rotor

LeetCode 练习——剑指 Offer 36. 二叉搜索树与双向链表
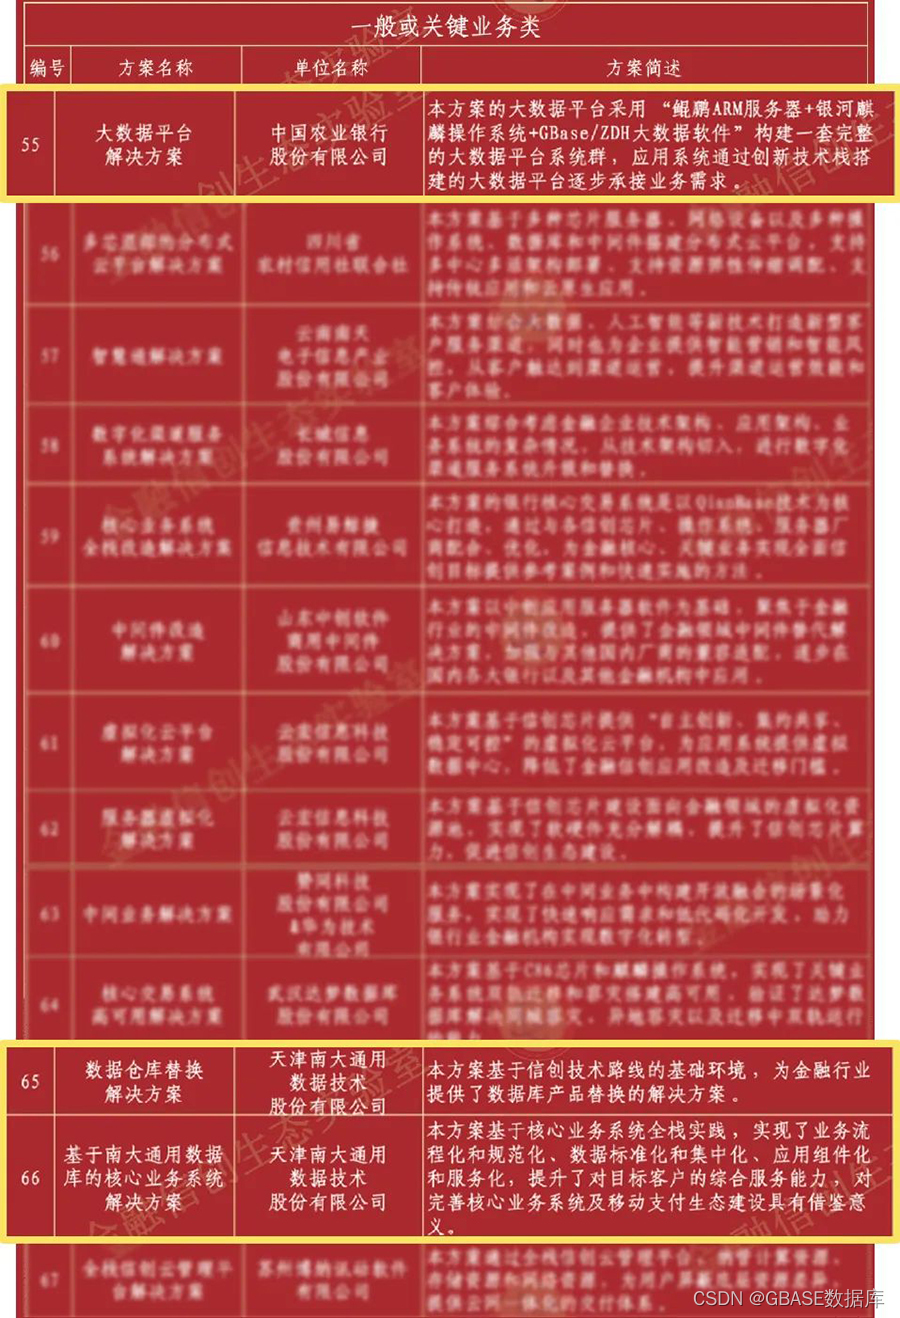
能力贡献 GBASE三大解决方案入选“金融信创生态实验室-金融信创解决方案(第一批)”

如何制作企业招聘二维码?
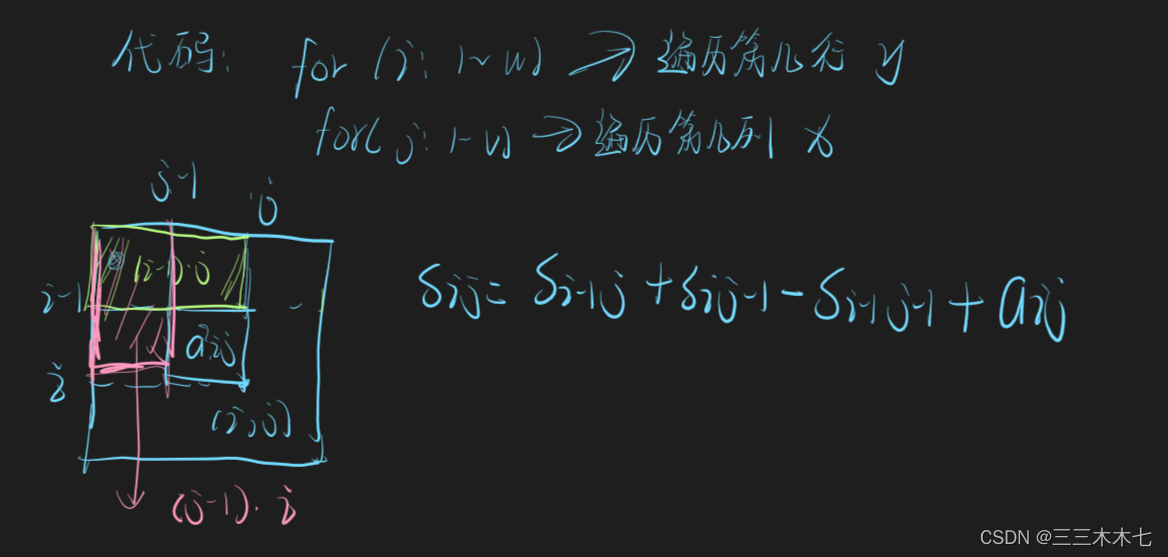
Sum of submatrix
![[target tracking] |dimp: learning discriminative model prediction for tracking](/img/72/d151fe0eb0a92e8c6931e6c50dad0f.png)
[target tracking] |dimp: learning discriminative model prediction for tracking

日志特征选择汇总(基于天池比赛)

系统测试的类型有哪些,我给你介绍

神经网络与深度学习-5- 感知机-PyTorch
随机推荐
How to realize batch control? MES system gives you the answer
Apache多个组件漏洞公开(CVE-2022-32533/CVE-2022-33980/CVE-2021-37839)
第七章 行为级建模
Sword finger offer II 041 Average value of sliding window
The numerical value of the number of figures thought of by the real-time update of the ranking list
图解网络:揭开TCP四次挥手背后的原理,结合男女朋友分手的例子,通俗易懂
ArrayList源码深度剖析,从最基本的扩容原理,到魔幻的迭代器和fast-fail机制,你想要的这都有!!!
Summary of log feature selection (based on Tianchi competition)
common commands
云原生应用开发之 gRPC 入门
Chapter 7 behavior level modeling
Usage of hydraulic rotary joint
Apache multiple component vulnerability disclosure (cve-2022-32533/cve-2022-33980/cve-2021-37839)
跨模态语义关联对齐检索-图像文本匹配(Image-Text Matching)
Urban land use distribution data / urban functional zoning distribution data / urban POI points of interest / vegetation type distribution
Write a pure handwritten QT Hello World
Dataworks duty table
PHP 计算个人所得税
Codeforces Round #633 (Div. 2) B. Sorted Adjacent Differences
【目标跟踪】|atom