当前位置:网站首页>Fastapi learning Day1
Fastapi learning Day1
2022-06-30 06:37:00 【IQ catch urgent ("") consult the great God】
Catalog
send out post request , use postman test
Request header pass parameters Header
Request body passing parameters
json Format transfer data ,Body class
form Transfer data in form format , Import Form class
JSONResponse The format of the returned data is json object
HTMLResponse The way to return data is html page
FileResponse The way to return data is by file
Return through the template engine HTML page
install pyCharm
Download Community Edition , Just refer to other bloggers , Note that file——settings——project——project interpreter Package management
Using skills
file——Settings——Appearance Set the background color and the font and font size of the toolbar

file——Settings——Editor——font Set the font size and line spacing of the editing page

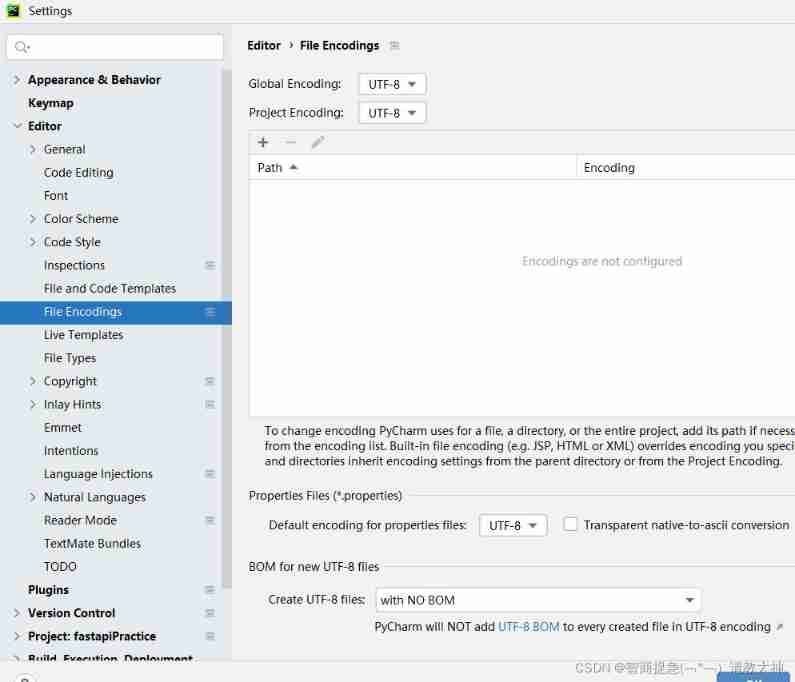
file——Settings——Editor——File Encodings Set the encoding form
FastAPI yes python web frame , The focus is on asynchronous programming ,python3.6 Above version
It can be used FastAPI Develop web site 、 Development web API、 Make a test platform 、 Continuous integration tools 、 Generating documentation
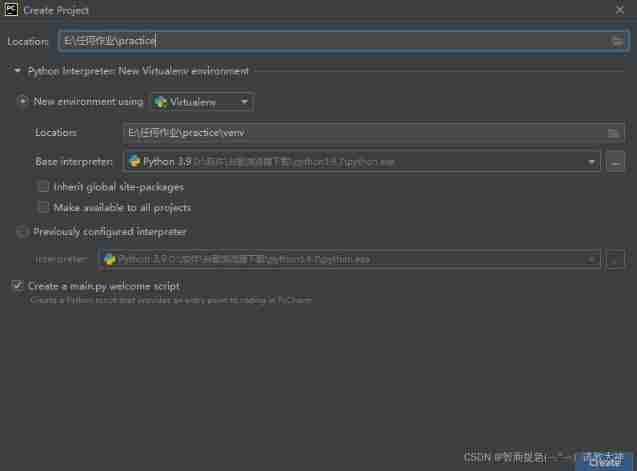
Create project
choice new environment using Will create a venv Virtual environment for , The advantage of this is that each project is an independent space , There will be no version dependency conflicts , It will not pollute the previous system environment
choice previously configured interpreter, The previously configured interpreter , Then select the... On your computer python edition , Then the virtual environment will be created , stay file——settings——project——project interpreter in
show all—— + —— New environment A virtual environment venv —— ok
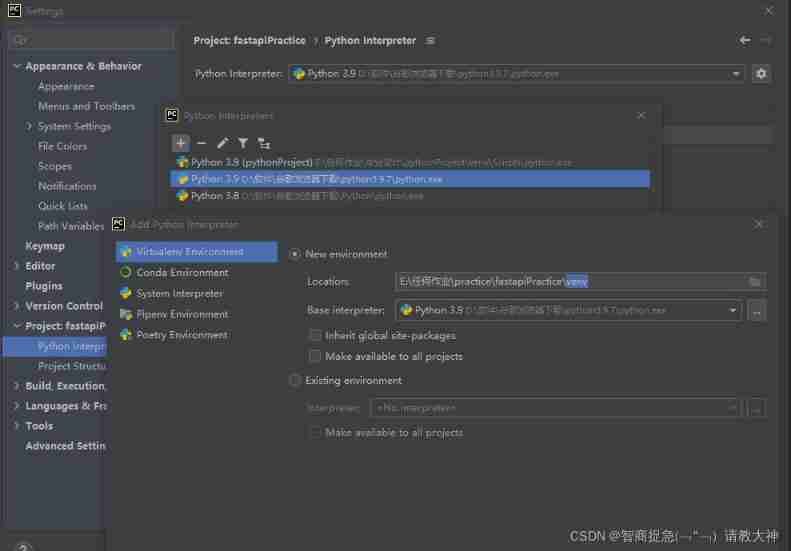
The results of the two methods are the same , Definitely choose the first
install FastAPI Tools for
Method 1 : stay pyCharm Package management tools can be used in
stay file——settings——project——project interpreter in , Click on +, Search for fastapi, Click on Install

Method 2 : Common methods , Applicable to all editors
Open the terminal (pyCharm: Terminal)
Get into venv A virtual environment ——venv\Scripts\activate.bat, Then install fastapi
pip install fastapi[all]
To save memory space , What libraries can be used and what libraries are being installed , Do not install all
pip install fastapi——pip install uvicorn,uvicorn Is the server , The most basic thing is to need these two
pip list View installed Libraries
Use FastAPI
1. Import from fastapi import FastAPI
2. Initialize object app=FastAPI()
3.main function
 Method 1 :
if __name__ == '__main__':
    uvicorn.run(app)
Method 2 : At terminal uvicorn main:app --reload (main File name )
notes
1. fastapi Document path
2. """ The annotation information will be synchronized to the document """
send out post request , use postman test
@app.post("/login")
def login():
    return {"msg":"login success"}
# Support multiple requests
@app.api_route("/login",methods=("GET","POST"))
def login():
return {"msg":"login success"}obtain URL Parameters
# /city/{city}?q=xx  city Is the path parameter ,?q=xx For query parameters , It is required after operation , Otherwise, it will report a mistake , add option after   Query parameters become optional
#http://127.0.0.1:8000/city/Beijing?query_string=xx
@app.get('/city/{city}')
def city(city:str, query_string: Optional[str]=None):
    return {'city':city, 'query_string': query_string}
# test http://127.0.0.1:8000/user/2 , 2 For the parameters passed
@app.get("/user/{id}") / Additive variables
def user(id):
return {"id":id}# http://127.0.0.1:8000/stu?id=8 Query string
@app.get("/stu") ? Additive variables
def stu(id):
return {"id":id}
Different method paths can be the same
@app.post('/stu')
def stu():
    return {"hello":"world"}
Request header pass parameters Header
Get the user name and password token, Is stored in the request header , You need to import Header, use token Value to access other interfaces , That is, use the request header to pass parameters
@app.get("/pra")
def pra(id,token=Header(None)):   # Default parameters , The names have to be consistent ,token——postman Inside, too token
    return {"id":id,"token":token}
Request body passing parameters
#  Request body Body, Default parameters , Random names
@app.post("/login")
def login(a=Body(None)):
    return {"a":a}
json Format transfer data ,Body class

form Transfer data in form format , Import Form class
Ensure that the accepted field name is consistent with the passed field name ,Form The form class needs to be downloaded python-multipart
@app.post("/login")
def login(name=Form(None),age=Form(None)):
    return {"data":{"name":name,"age":age}}
Modify response status code
JSONResponse The format of the returned data is json object
 Import required from fastapi.responses import JSONResponse
# content Returned data   status_code Status code   headers You can add parameters in the request header
@app.get("/user")
def user():
    return JSONResponse(content={"msg":"get user"},
                        status_code=202,
                        headers={"a":"b"})
HTMLResponse The way to return data is html page
@app.get("/")
def user():
    html_content = """"
    <html>
    <body><p style="color:red">Hello World</p></body>
    </html>
    """
    return HTMLResponse(content=html_content)
FileResponse The way to return data is by file
@app.get("/avatar")
def user():
    avatar = 'static/mage.jpg'
    return FileResponse(avatar,filename="mage.jpg")
No, filename="mage.jpg" Parameters , The browser directly displays the picture , You have this parameter , The browser will prompt to download the picture
Need to download a package :aiofiles—— pip install aiofiles

Return through the template engine HTML page
from fastapi.templating import Jinja2Templates Common template engine
install pip install jinja2
The data of pages on the web will change , All you need Request obtain
from fastapi import FastAPI,Request
from fastapi.templating import Jinja2Templates
app = FastAPI()
template = Jinja2Templates("pages")
#  Return through the template engine HTML page , context Parameters cannot be left blank , And inside must be request
@app.get("/")
def user(username,req: Request):
    return template.TemplateResponse("index.html",context={"request":req,"name":username})
username Put the obtained data into the template engine
"name":username—— username It's from the background ,name It's the front end , Background rendering to foreground

边栏推荐
- 1.7 - CPU performance indicators
- Summary of 2 billion redis data migration
- Is Huatai stock trading safe? I want to open an account online.
- 多线程进阶篇
- Collections tool class (V)
- 01. regular expression overview
- Redux source code implementation
- gazebo/set_ model_ State topic driving UAV model through posture
- Connect to remote server
- HuaWei满级大牛首次分享出这份598页网络协议全彩手册
猜你喜欢
A complete performance test process

Bat usage details 2

My experience in functional testing for so many years

1.8 - multi level storage
Initial love with mqtt

Gazebo model modification

1.9 - Cache

Multithreading advanced level

MySQL中的InnoDB引擎

Learn fpga---ram IP core and key parameters from the bottom structure

随机推荐
Basic use of markdown
Detailed description of methods in the interface
c# - C#用fo-dicom对CT图像的PixelData进行处理和转换
Idea run SQL file
New project folder based on PIO plug-in in vscode -- Interpretation
Rhcsa day 3
How to use unmarshaljson
Image processing 7- image enhancement
Go pack and unpack
2020-10-06
多线程进阶篇
Usage of case, casez and casex statements in Verilog
写一个C程序判断系统是大端字节序还是小端字节序
从底层结构开始学习FPGA----RAM IP核及关键参数介绍
Installing googleplay environment on Huawei mobile phones
VIM view file code
Application of redis client list in practice
1.4 - 定点数与浮点数
Unable to read file for extraction: gdx64. dll
File transfer protocol, FTP file sharing server