当前位置:网站首页>Introduction and application of rampax in unity: optimization of dissolution effect
Introduction and application of rampax in unity: optimization of dissolution effect
2022-07-04 04:45:00 【Blowing breeze and three drops of water】
Unity in RampTex Introduction and Application : Optimization of dissolution effect
Last article The dissolution effect and its basic principle are introduced , The next two articles add optimization content on this basis .
Today's main content is as follows :
- Introduce RampTex
- Use RampTex To optimize the edges of the dissolve effect
Let's first look at the final effect :

Then compare the effect before :

You can see , Optimized effect , There is a burning feeling on the edge of dissolution , It looks a little more dazzling than the original effect , Not so dry .
And to achieve this effect , We need the help of RampTex To achieve .
RampTex Like noise texture , It's also Shader There is a technology used more , Especially in the field of cartoon rendering , Used to make large color textures of layers , The effect is very good .
Then let's begin to introduce RampTex Well .
What is? RampTex
Ramp There are steps , steep hill , The meaning of gradual change , therefore RampTex Can be translated as : Gradient texture .
Let's first see what the gradient texture looks like :

You can see , The characteristic of this texture is , u The color of the direction ( Use (u, 0) Value ) It's a gradient effect ( white -> yellow -> red -> ash -> black ), and v The color of the direction is the same , Strictly speaking, this texture is only a one-dimensional texture , v There is no need for direction information . Below RampTex It illustrates the problem :

That is to say, we can store only a small amount of information , This is also the next optimization point , The next chapter will introduce .
So how to understand RampTex Well ?
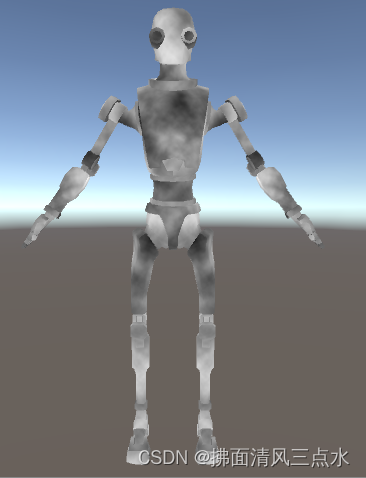
Because the original model used PBR Made by rendering , It is not very intuitive to explain this principle , So here we change a model :

On the left is from RampTex sampling , On the right is normal sampling , In the middle is the display of the overlapping effect of two textures .
You can see , The part framed by the blue box , The texture is a yellow to red gradient from left to right , It can correspond to .
The diagram above should be more intuitive , We use RampTex To sample , You can get a gradient effect .
Of course , there RampTex It is used for dissolving , Instead of adding a gradient effect to the model itself , So it looks a little strange , ^_^.
So far , We just need to understand : RampTex Is a gradient texture , Used to provide a kind of gradient information . Note that the gradient information here is not necessarily color , It can also be some kind of judgment condition , Just use color to show and store , It's just intuitive , The noise texture introduced earlier is similar , It's important to understand this , If we only regard it as color information , So many concepts and principles cannot be well understood .
Use RampTex To optimize the edges of the dissolve effect
I understand RampTex Is used to provide gradient information after this , Let's analyze the effect we want .
Imagine , The scene when the flame burns the paper , Is the part of the paper closest to the flame from white to white yellow to yellow red , Finally, the change process of red , It's a little abstract to describe , You can search the Internet by yourself to observe .
The gradient process and the gradient information used are through RampTex To provide .
Look at the picture above , Is it from white to yellow , Then from yellow to red , Finally, it's dark ? This is the physical phenomenon used to simulate the burning of paper by flame .
Combined with the noise texture introduced before , We need to change it from black to white , Mapping to RampTex From white to yellow , Red again , Finally, the black process .
Isn't it a little unclear ?
Now I try to say human words .
First, use noise texture to map the model :
Through the content of the previous article , We know , The darker the part , It means that the more first to dissolve , The whiter part represents the later dissolution .

If necessary RampTex The changes of map to this process , We need to use the value of noise texture to RampTex sampling :

in other words , The black part on the noise texture , stay RampTex The upper part should be white , The gray part on the noise texture , Corresponding RampTex The yellow and red part .
Here I specially deepened the effect mapping effect , The situation itself is not so obvious .
I believe you should feel a little , In short, it can be understood here : Use the value of the noise texture ( By pixels uv Coordinate sampling results ), To sample RampTex Just get this effect .

Then superimpose the texture effect of the model itself :

obviously , This is not the effect we want .
What we need : There is only a gradient effect on the dissolution edge , Other parts display normally .
Next, we will analyze it in several cases , If this pixel :
- Dissolution occurs , Directly discard pixels
- No dissolution occurred
- Use the color sampled by its own texture
- Use the color sampled by its own texture + Gradient sampled color
among " Use the color sampled by its own texture " It can be used " Use the color sampled by its own texture + Gradient sampled color ( But the color value is 0, It is equivalent to not adding )" To replace .
So we came to the conclusion that , If you want to achieve your goal , “ It only needs ”, For pixels that do not dissolve :
- If this pixel is the pixel around the dissolved pixel , Then attach the color sampled by the gradient
- Otherwise, the additional color is 0, Which is black
What about? ? It looks very simple ?
It's strange to be simple …
The problem that this algorithm must solve is : How do I know that those pixels are pixels around dissolved pixels ???
Of course, the most intuitive idea is to make judgments :
fixed4 frag (v2f i) : SV_Target
{
    fixed4 dissolveCol = tex2D(_DissolveTex, i.uv.zw);
    clip(dissolveCol.r - _DissolveThreshold);

    // ----  Get dissolved edge pixels
    fixed4 rampColor = 0; //  Use primary colors for colors outside the three-layer circle
    fixed offset = dissolveCol.r - _DissolveThreshold;
    if (offset >= 0)
    {
        if (offset < 0.04)
        {
            rampColor = tex2D(_RampTex, 0);
        }
        else if (offset < 0.08)
        {
            rampColor = tex2D(_RampTex, dissolveCol);
        }
        else if (offset < 0.12)
        {
            rampColor = fixed4(0, 0.2, 0, 0);
        }
    }
    // ----  end

    fixed4 col = tex2D(_MainTex, i.uv.xy);
    col += rampColor;

    return col;
}
because dissolveCol.r - _DissolveThreshold < 0 Pixels of will dissolve , abandoned , therefore offset = dissolveCol.r - _DissolveThreshold; This offset It can be used to judge the dissolved edge pixels .
We go through offset Divide the dissolved edge pixels into three layers :
- first floor
0 ~ 0.04Let's give one 0 As sampling coordinates , stay RampTex Upper sampling to obtain white - The second floor
0.04 ~ 0.08Select the noise sampling value as the sampling coordinate , stay RampTex Upsampling varies with the noise sampling value change - The second floor
0.08 ~ 0.12We fix it to one green
in other words , The dissolving edge will have three colors , In turn, is : white , ( The change color from white to yellow, then to red, and finally to the primary color ), green . The following figure clearly shows our expected results :

After removing the influence of primary color , The effect is clearer :
void frag(...)
{
    //....
    col += rampColor;
    if (rampColor.r > 0)
    {
       col = rampColor;
    }

    return col;
}

Then let's see the real effect :

Isn't it a little interesting ? ha-ha .
But this directly specifies the color , And used many if, It's kind of silly , So in the next article, let's change another idea to realize .
summary
Today, let's learn from the example of optimization of dissolution effect RampTex, The main presentation combines actual use to introduce RampTex, Is to deepen everyone's understanding of RampTex To know and understand , The dissolving effect itself is not the point .
The next article will use another idea to realize the final part of outline color , Or based on RampTex, It's just more reasonable and natural . The main purpose is to introduce SmoothStep Function and its use , Maybe for students who are not good at mathematics like me , It will be difficult to understand , But this implementation is very beautiful , At the same time, we can once again appreciate mathematics and Shader The charm of .
Okay , That's how it is today , I hope that's helpful .
边栏推荐
- 附件四:攻击方评分标准.docx
- Leader: who uses redis expired monitoring to close orders and get out of here!
- Formatted text of Kivy tutorial (tutorial includes source code)
- Y55. Chapter III kubernetes from entry to proficiency -- HPA controller and metrics server (28)
- 最长递增子序列问题(你真的会了吗)
- PaddleHub人脸识别方案部署,将训练好的模型在pytchrom中进行部署应用
- Emlog user registration plug-in is worth 80 yuan
- Rhcsa 04 - process management
- The five pictures tell you: why is there such a big gap between people in the workplace?
- Wobo Union ended its strategic evaluation and decided to retain Bozi's business with excellent performance
猜你喜欢

qt下开发mqtt的访问程序
Talking about JVM
![[Yugong series] go teaching course 001 in July 2022 - Introduction to go language premise](/img/f2/3b95f53d67cd1d1979163910dbeeb8.png)
[Yugong series] go teaching course 001 in July 2022 - Introduction to go language premise
两万字带你掌握多线程
Correct the classpath of your application so that it contains a single, compatible version of com. go

RAC delete damaged disk group
![[security attack and Defense] how much do you know about serialization and deserialization?](/img/cd/cc7d53b818e9a45dec22eada11bb24.png)
[security attack and Defense] how much do you know about serialization and deserialization?

Create ASM disk through DD

Kivy教程之 格式化文本 (教程含源码)

Wechat official account infinite callback authorization system source code
随机推荐
AcWing第 58 场周赛
UnicodeDecodeError: ‘gbk‘ codec can‘t decode byte 0x98 in position 1093: illegal multibyte sequence
"Don't care too much about salary when looking for a job", this is the biggest lie I've ever heard
Select function variable column name in dplyr of R language
Graduation project
【安全攻防】序列化与反序列,你了解多少?
6-5漏洞利用-SSH弱口令破解利用
【愚公系列】2022年7月 Go教学课程 001-Go语言前提简介
DCDC电源电流定义
Senior developers tell you, how to write excellent code?
I.MX6U-ALPHA开发板(C语言版本LED驱动实验)
Talking about what a high-quality little red book copy needs to have
Virtual commodity account trading platform source code_ Support personal QR code collection
Use NRM and NVM to manage your NPM source and node versions
Operate the server remotely more gracefully: the practice of paramiko Library
EventBridge 在 SaaS 企业集成领域的探索与实践
1. Mx6u-alpha development board (LED drive experiment in C language version)
新手找陪驾要注意什么
附件六:防守工作簡報.docx
RPC技术