当前位置:网站首页>[yolov5 6.0 | 6.1 deploy tensorrt to torch serve] environment construction | model transformation | engine model deployment (detailed packet file writing method)
[yolov5 6.0 | 6.1 deploy tensorrt to torch serve] environment construction | model transformation | engine model deployment (detailed packet file writing method)
2022-07-07 00:36:00 【Live like yourself】
I suddenly found out , About deployment TensorRT There are so few articles , So , I decided to share some successful practices and experiences about this part of the content . I hope you can share it , Let more people see !!!
QQ: 1757093754
My operating environment :
Yolov5 6.0: Currently officially updated to 6.1 —> 2022.7.5
python:3.8(anaconda3 2021.5)
CUDA: 11.4
CUDNN: 8.2.2
TensorRT: 8.2.2.1
torch:1.9.1+cu111
torchvision:0.10.1+cu111
vs:2019
OpenCV:4.5.0< If your yolov5 The version is 6.0、6.1, You don't have to OpenCV>
notes : If there is a problem with the environment during operation , Be sure to check your environment version !!!
notes :Yolov5 1~5 The version is not well encapsulated TensorRT Conversion process , Therefore, we need to use other methods to complete the model transformation , however 6.0、6.1 built-in TensorRT Of export.
Catalog
Version correspondence :( If this part has been completed , You can skip directly to the next link )
First step : install CUDA and CUDNN
The second step : Configure environment variables
The third step : install tensorrt To python Environmental Science (pip)
Model transformation (pt --> engine)
Command line parameter parsing :
edit export.py Command line :
torchserve Production of deployment files
Data loading ( Preprocessing ) Method
Execute the packaging command to generate mar file
Preface
- The operating system I use is windows10, But the same way Linux You can also use .
- This operation Not based on TensorRTx Tools .< This is a 1~5 edition yolov5 It is required for model transformation >
- The following operations will not be used OpenCV and Cmake, But the download method will be given .
- Welcome to discuss 、 communication :QQ | 1757093754
Version correspondence :( If this part has been completed , You can skip directly to the next link )
tensorrtx Download link <wang-xinyu The share of >:
GitHub - wang-xinyu/tensorrtx: Implementation of popular deep learning networks with TensorRT network definition API https://github.com/wang-xinyu/tensorrtx Anaconda and python Correspondence of :
Old package lists — Anaconda documentation
Index of /anaconda/archive/ | Tsinghua University open source software image station | Tsinghua Open Source MirrorIndex of /anaconda/archive/ | Tsinghua University open source software image station , We are committed to providing high-quality open source software images for domestic and school users 、Linux Image source service , Help users more easily access open source software . This mirror station is sponsored by Tsinghua University TUNA The association is responsible for operation and maintenance . https://mirrors.tuna.tsinghua.edu.cn/anaconda/archive/Cmake download < I won't use it this time , be limited to windows Systematic yolov5 1~5 Version deployment >:
Download | CMakehttps://cmake.org/download/OpenCV download < I won't use it this time , be limited to windows Systematic yolov5 1~5 Version deployment >:
Releases - OpenCVhttps://opencv.org/releases/opencv And vs Corresponding relation :
vc6 = Visual Studio 6
vc7 = Visual Studio 2003
vc8 = Visual Studio 2005
vc9 = Visual Studio 2008
vc10 = Visual Studio 2010
vc11 = Visual Studio 2012
vc12 = Visual Studio 2013
vc14 = Visual Studio 2015
vc15 = Visual Studio 2017
vc16 = Visual Studio 2019notes : So here I'm going to use theta vs2019, But it not only supports vc16, Also supports the vc15、vc14, When you download opencv When , The installation package will indicate its built-in vc edition .
CUDA Download version relationship ( Pay attention to your computer driver version):
| CUDA Toolkit | Toolkit Driver Version | |
|---|---|---|
| Linux x86_64 Driver Version | Windows x86_64 Driver Version | |
| CUDA 11.7 GA | >=515.43.04 | >=516.01 |
| CUDA 11.6 Update 2 | >=510.47.03 | >=511.65 |
| CUDA 11.6 Update 1 | >=510.47.03 | >=511.65 |
| CUDA 11.6 GA | >=510.39.01 | >=511.23 |
| CUDA 11.5 Update 2 | >=495.29.05 | >=496.13 |
| CUDA 11.5 Update 1 | >=495.29.05 | >=496.13 |
| CUDA 11.5 GA | >=495.29.05 | >=496.04 |
| CUDA 11.4 Update 4 | >=470.82.01 | >=472.50 |
| CUDA 11.4 Update 3 | >=470.82.01 | >=472.50 |
| CUDA 11.4 Update 2 | >=470.57.02 | >=471.41 |
| CUDA 11.4 Update 1 | >=470.57.02 | >=471.41 |
| CUDA 11.4.0 GA | >=470.42.01 | >=471.11 |
| CUDA 11.3.1 Update 1 | >=465.19.01 | >=465.89 |
| CUDA 11.3.0 GA | >=465.19.01 | >=465.89 |
| CUDA 11.2.2 Update 2 | >=460.32.03 | >=461.33 |
| CUDA 11.2.1 Update 1 | >=460.32.03 | >=461.09 |
| CUDA 11.2.0 GA | >=460.27.03 | >=460.82 |
| CUDA 11.1.1 Update 1 | >=455.32 | >=456.81 |
| CUDA 11.1 GA | >=455.23 | >=456.38 |
| CUDA 11.0.3 Update 1 | >= 450.51.06 | >= 451.82 |
| CUDA 11.0.2 GA | >= 450.51.05 | >= 451.48 |
| CUDA 11.0.1 RC | >= 450.36.06 | >= 451.22 |
| CUDA 10.2.89 | >= 440.33 | >= 441.22 |
| CUDA 10.1 (10.1.105 general release, and updates) | >= 418.39 | >= 418.96 |
| CUDA 10.0.130 | >= 410.48 | >= 411.31 |
| CUDA 9.2 (9.2.148 Update 1) | >= 396.37 | >= 398.26 |
| CUDA 9.2 (9.2.88) | >= 396.26 | >= 397.44 |
| CUDA 9.1 (9.1.85) | >= 390.46 | >= 391.29 |
| CUDA 9.0 (9.0.76) | >= 384.81 | >= 385.54 |
| CUDA 8.0 (8.0.61 GA2) | >= 375.26 | >= 376.51 |
| CUDA 8.0 (8.0.44) | >= 367.48 | >= 369.30 |
| CUDA 7.5 (7.5.16) | >= 352.31 | >= 353.66 |
| CUDA 7.0 (7.0.28) | >= 346.46 | >= 347.62 |
notes : This version is the minimum driver version , It can be larger than this version .
cudnn And cuda Correspondence and download :
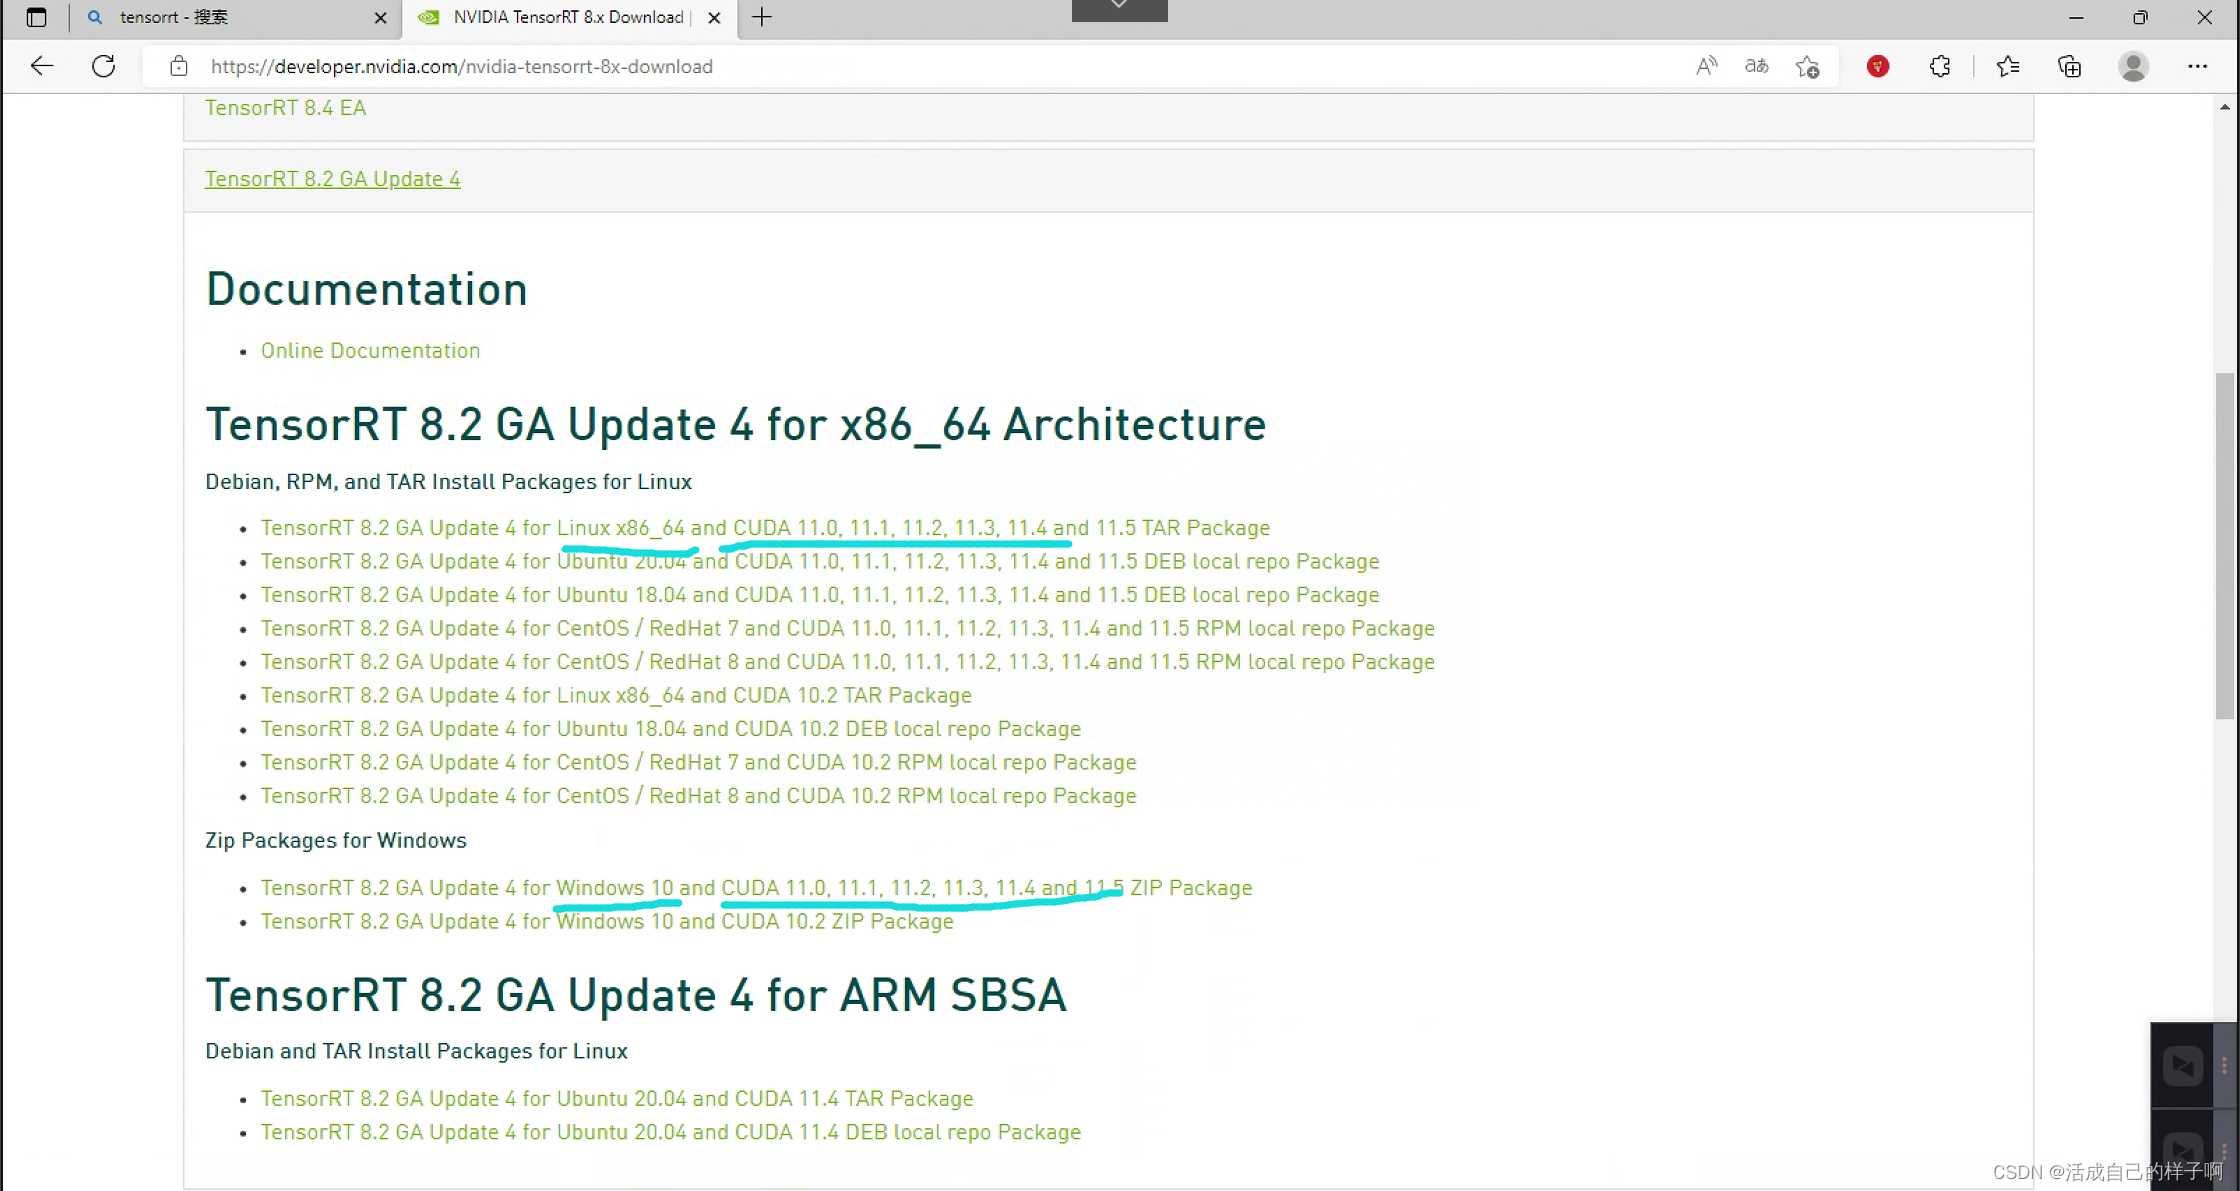
cuDNN Archive | NVIDIA Developerhttps://developer.nvidia.com/rdp/cudnn-archive#a-collapse742-10 cuda And TensorRT Correspondence and download :
NVIDIA TensorRT Download | NVIDIA Developerhttps://developer.nvidia.com/nvidia-tensorrt-download notes : download TensorRT Remember to order this when you :
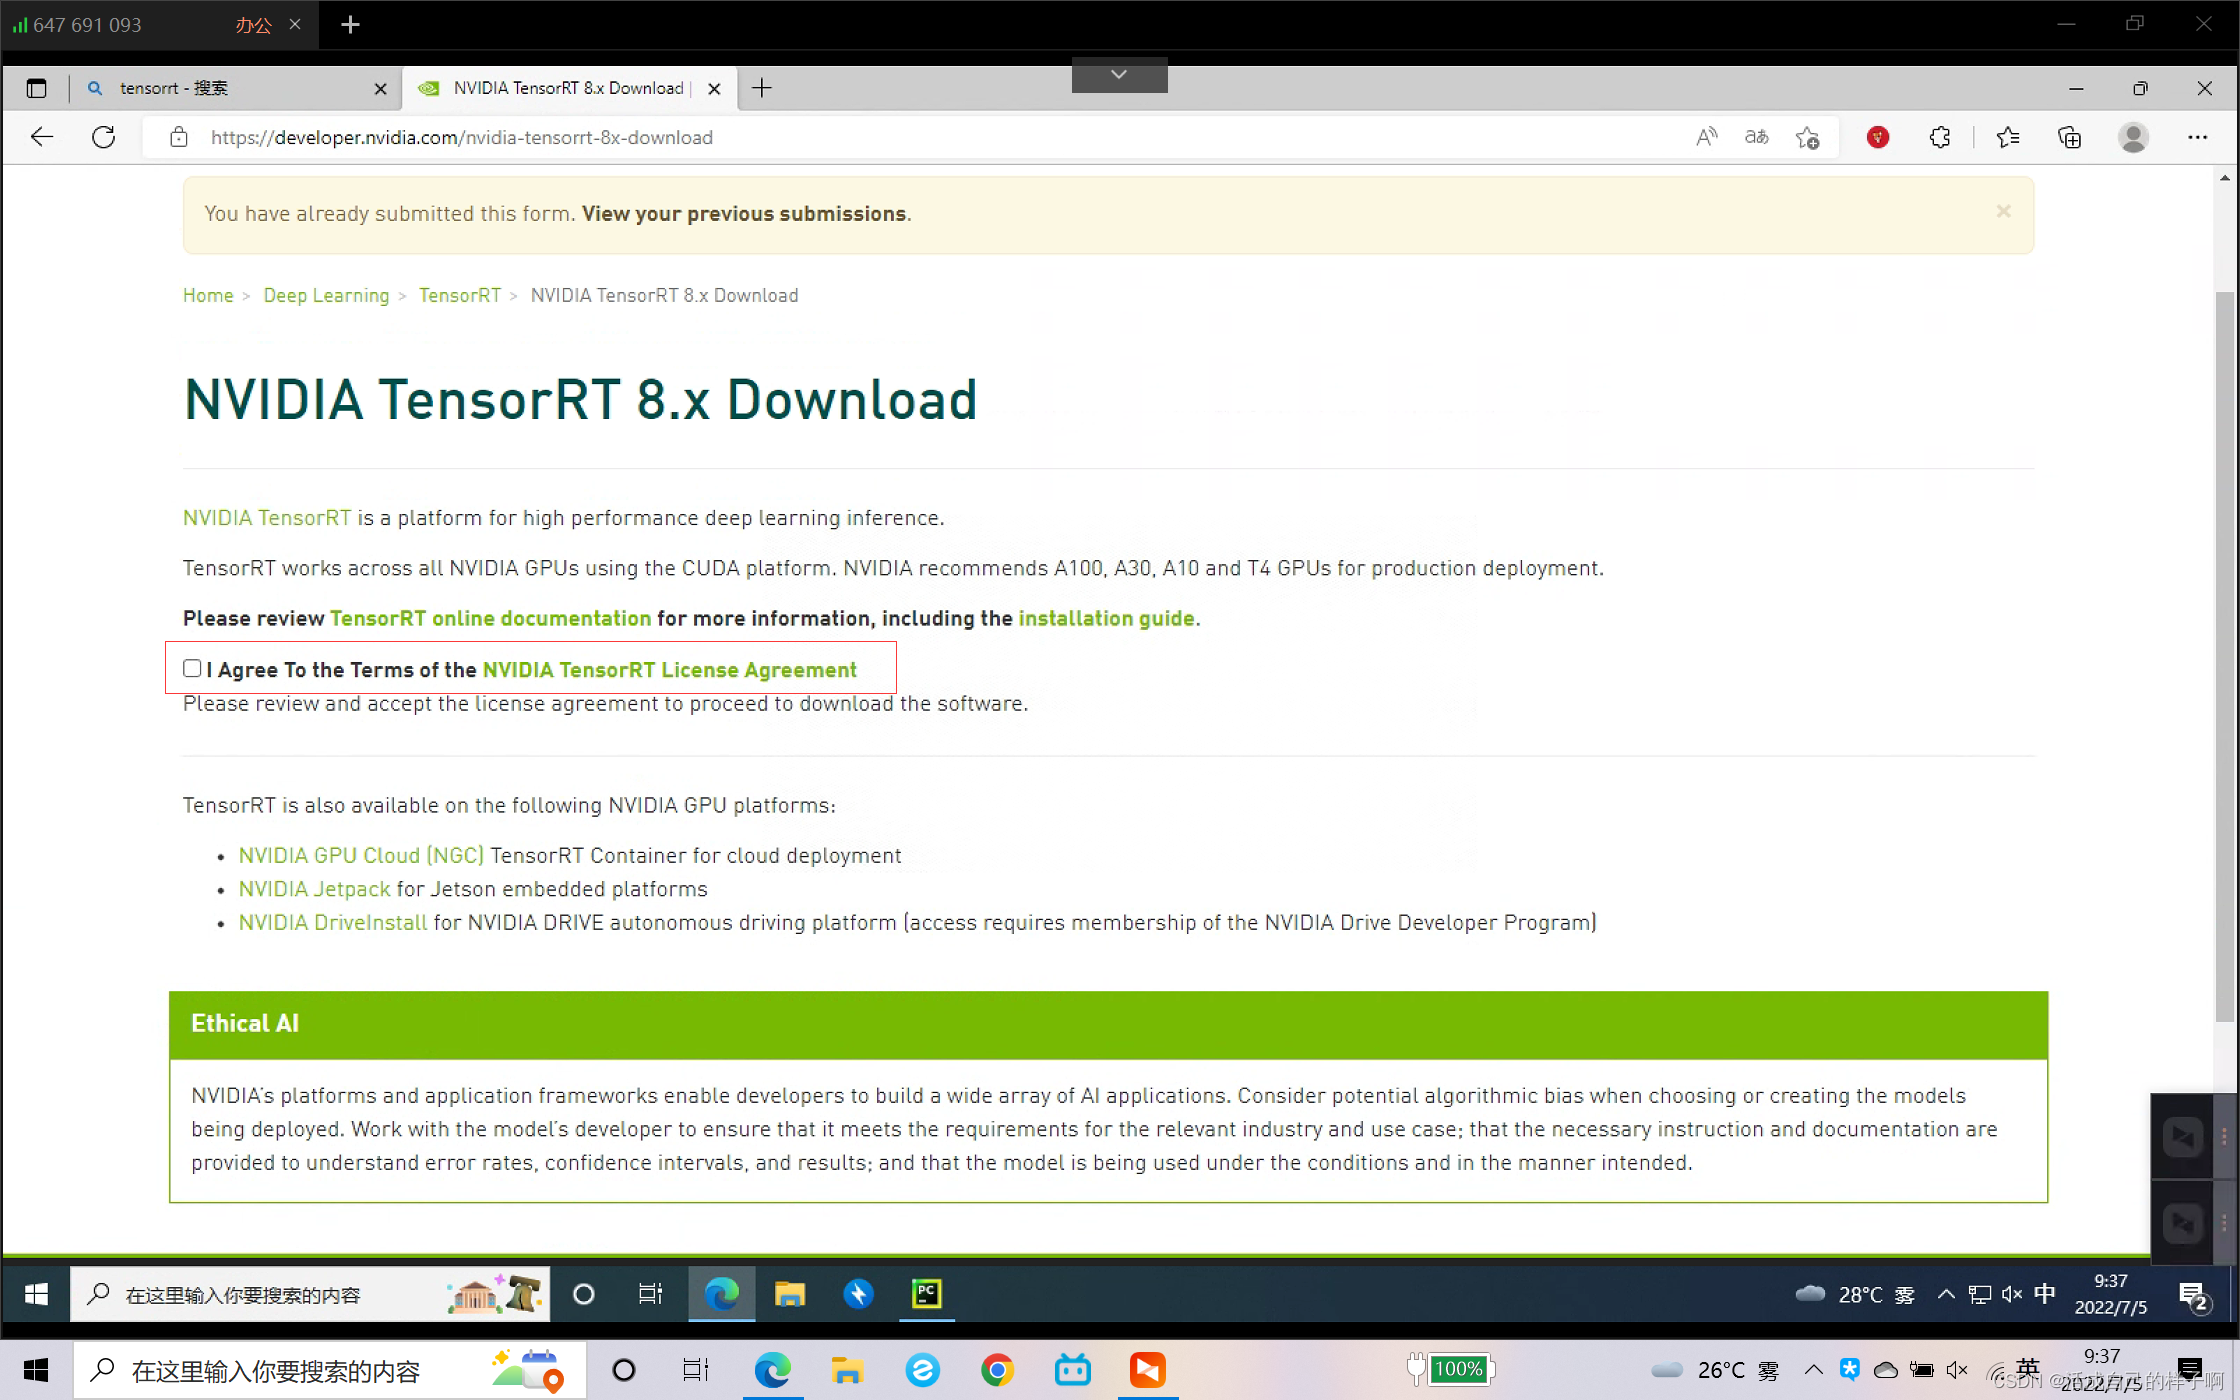
Click on any , You can see the given version correspondence , Download it yourself !
congratulations ! The first step is done , Successfully downloaded all environments !
Environmental installation
- We talked about the relationship between the required environment and its version , This section talks about how to build an environment .
First step : install CUDA and CUDNN
CUDA The default installation path of is set at :C:\Program Files\NVIDIA GPU Computing Toolkit\CUDA
Don't move this , It is convenient for later modification and search . Multiple CUDA Versions can coexist without affecting ( Pay attention to distinguish between your driver and CUDA The relationship between , They are not the same , The driver must not be installed more ) , The actual work of CUDA Depends on your environment variables .
Install well CUDA after , You need to install cudnn, The method is a little special :
- take cuda\bin Copy the file in to C:\Program Files\NVIDIA GPU Computing Toolkit\CUDA\v10.2\bin
- take cuda\include Copy the file in to C:\Program Files\NVIDIA GPU Computing Toolkit\CUDA\v10.2\include
- take cuda\lib Copy the file in to C:\Program Files\NVIDIA GPU Computing Toolkit\CUDA\v10.2\lib
The second step : Configure environment variables
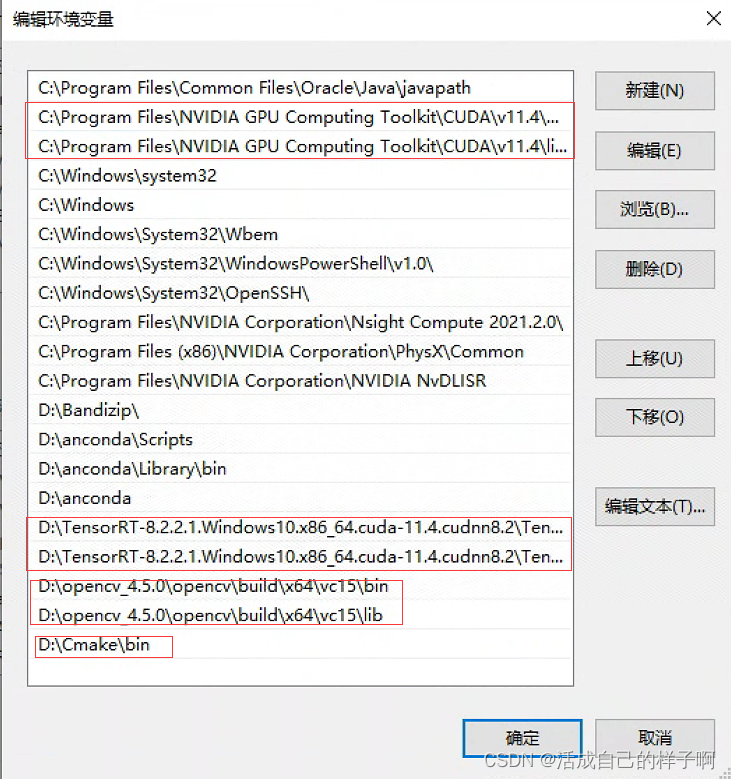
- C:\Program Files\NVIDIA GPU Computing Toolkit\CUDA\v11.4\bin
- C:\Program Files\NVIDIA GPU Computing Toolkit\CUDA\v11.4\libnvvp
- D:\TensorRT-8.2.2.1.Windows10.x86_64.cuda-11.4.cudnn8.2\TensorRT-8.2.2.1\include
- D:\TensorRT-8.2.2.1.Windows10.x86_64.cuda-11.4.cudnn8.2\TensorRT-8.2.2.1\lib
- D:\opencv_4.5.0\opencv\build\x64\vc15\bin
- D:\opencv_4.5.0\opencv\build\x64\vc15\lib
- D:\Cmake\bin
notes :OpenCV、Cmake If it is not installed, there is no need to configure , Check only tensorrt、cuda、anaconda The environment is OK .
The third step : install tensorrt To python Environmental Science (pip)
Open it up and download okay tensorrt, Note the following 4 A folder , We need to install the inside whl To python In the environment .
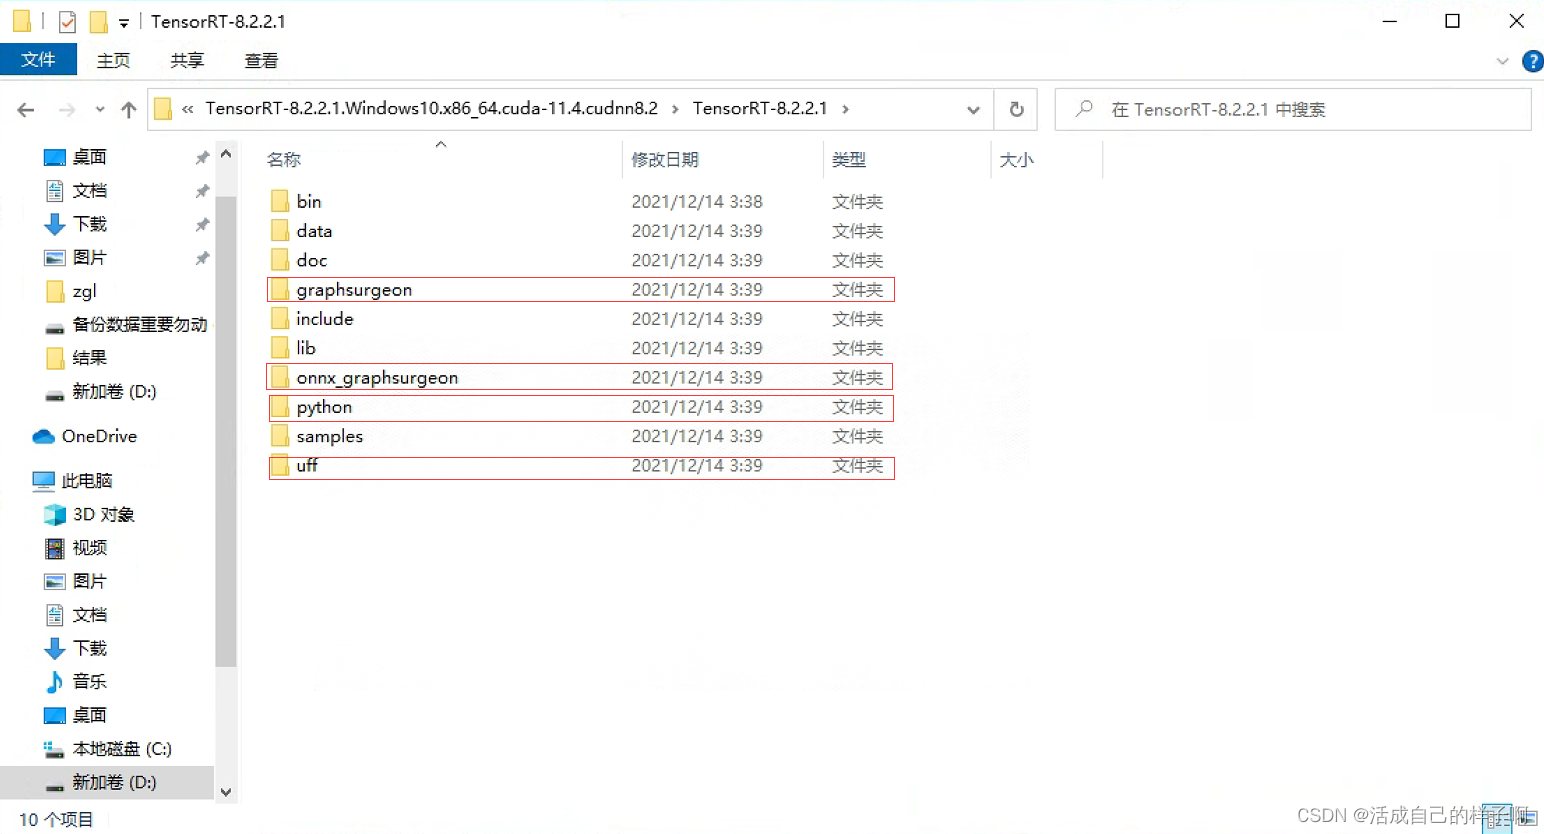
pip install graphsurgeon\graphsurgeon-0.4.5-py2.py3-none-any.whl
pip install onnx_graphsurgeon\onnx_graphsurgeon-0.3.12-py2.py3-none-any.whl
pip install python\tensorrt-8.2.2.1-cp38-none-win_amd64.whl
pip install uff\uff-0.6.9-py2.py3-none-any.whl
notes : stay python There is... Under the folder 4 individual whl, Here mine python The environment is 3.8, Therefore, only cp38 Version of whl that will do .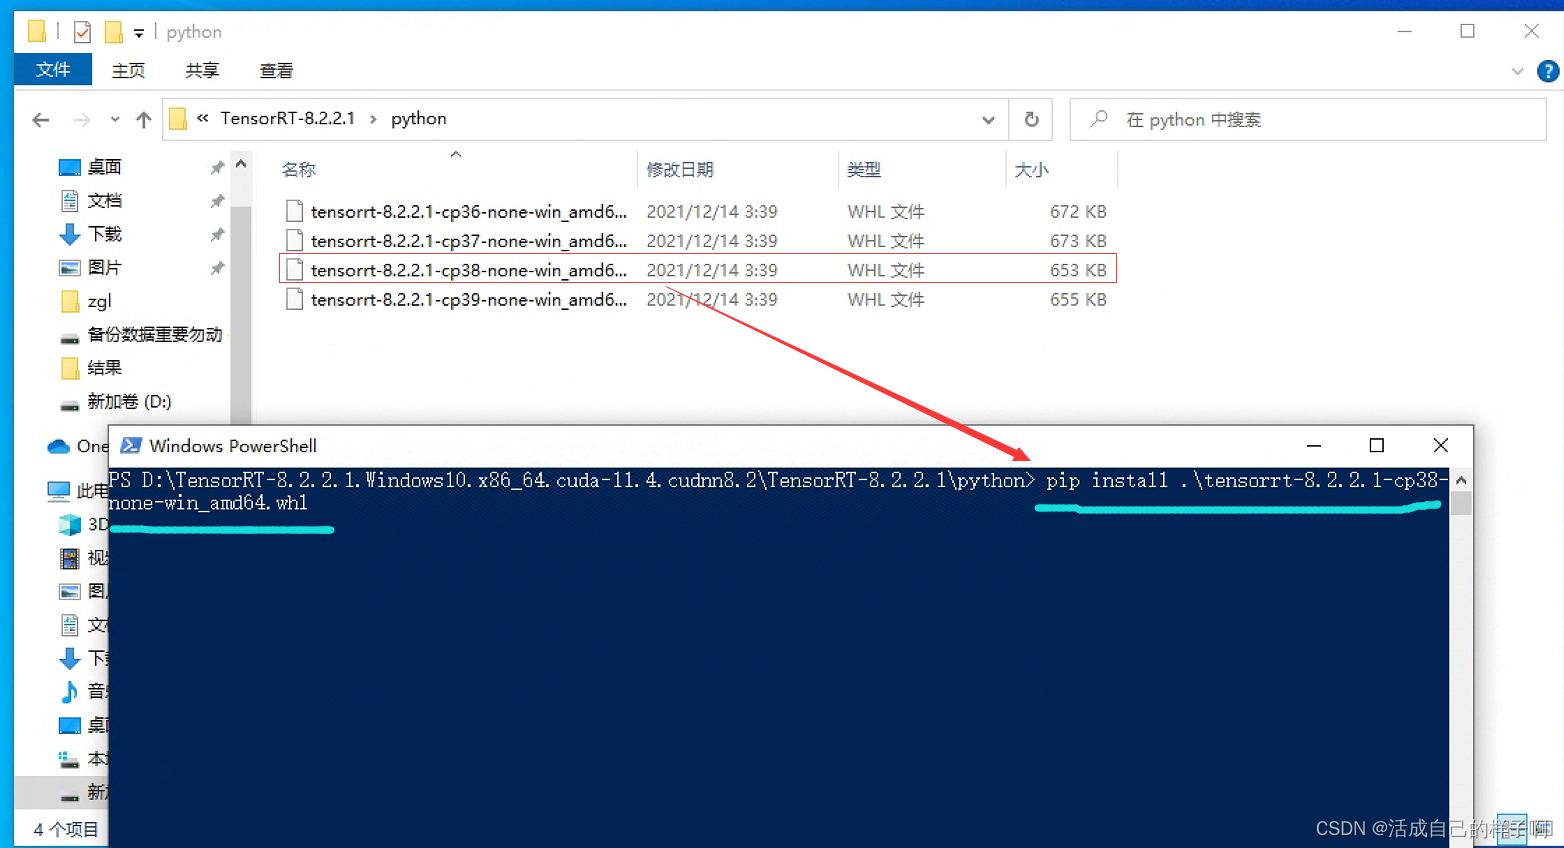
notes : The above processes will not report errors under normal circumstances .
Model transformation (pt --> engine)
stay yolov5 6 In the version , The transformation scheme of the mainstream model in the market is given , The following is the weight diagram supporting the model :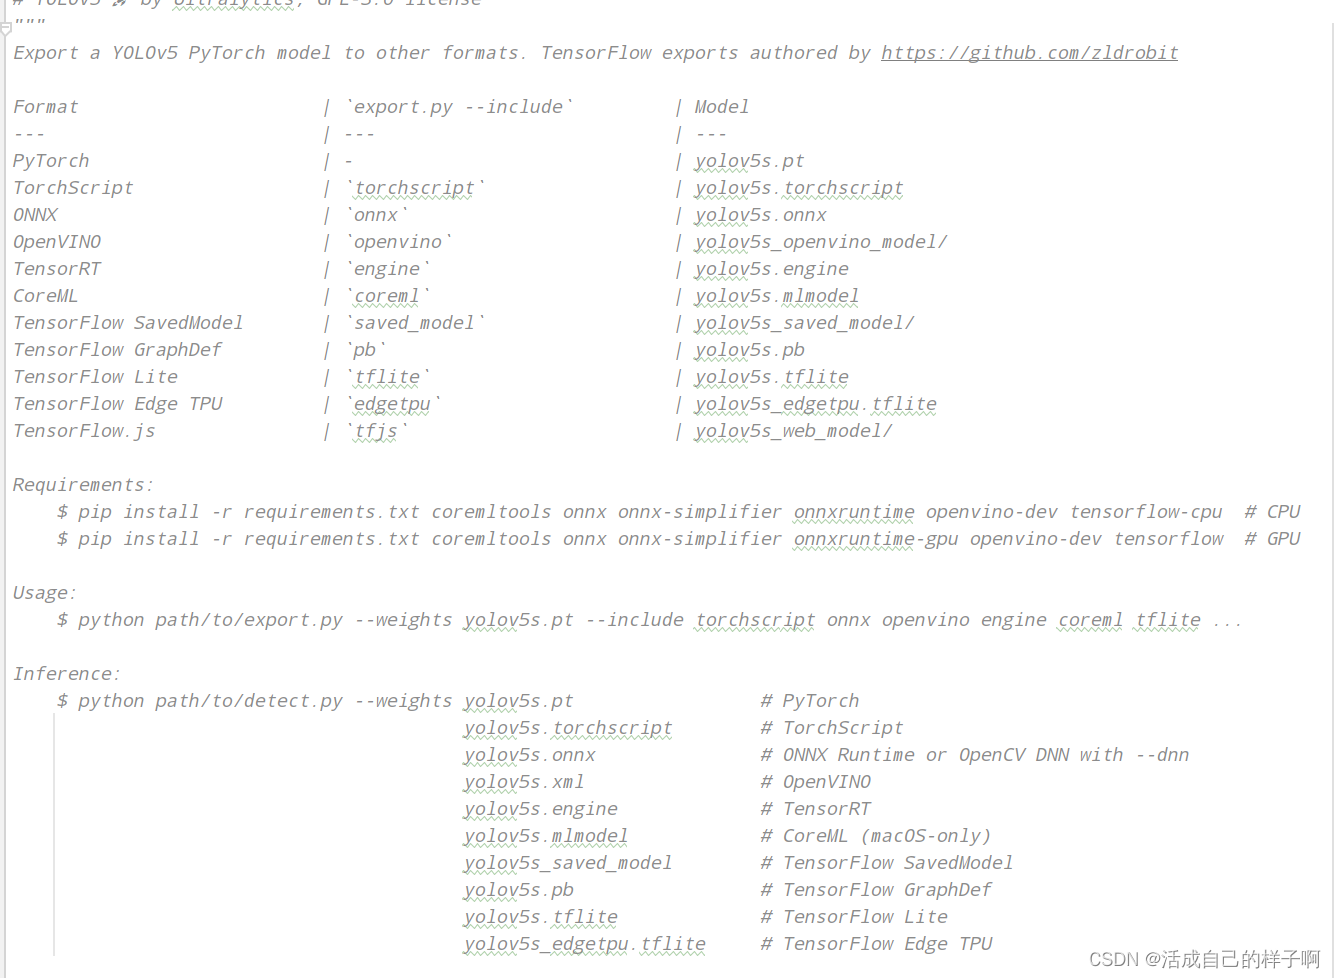
We use it directly export.py You can directly transform the model :( If there is no problem with your previous process )
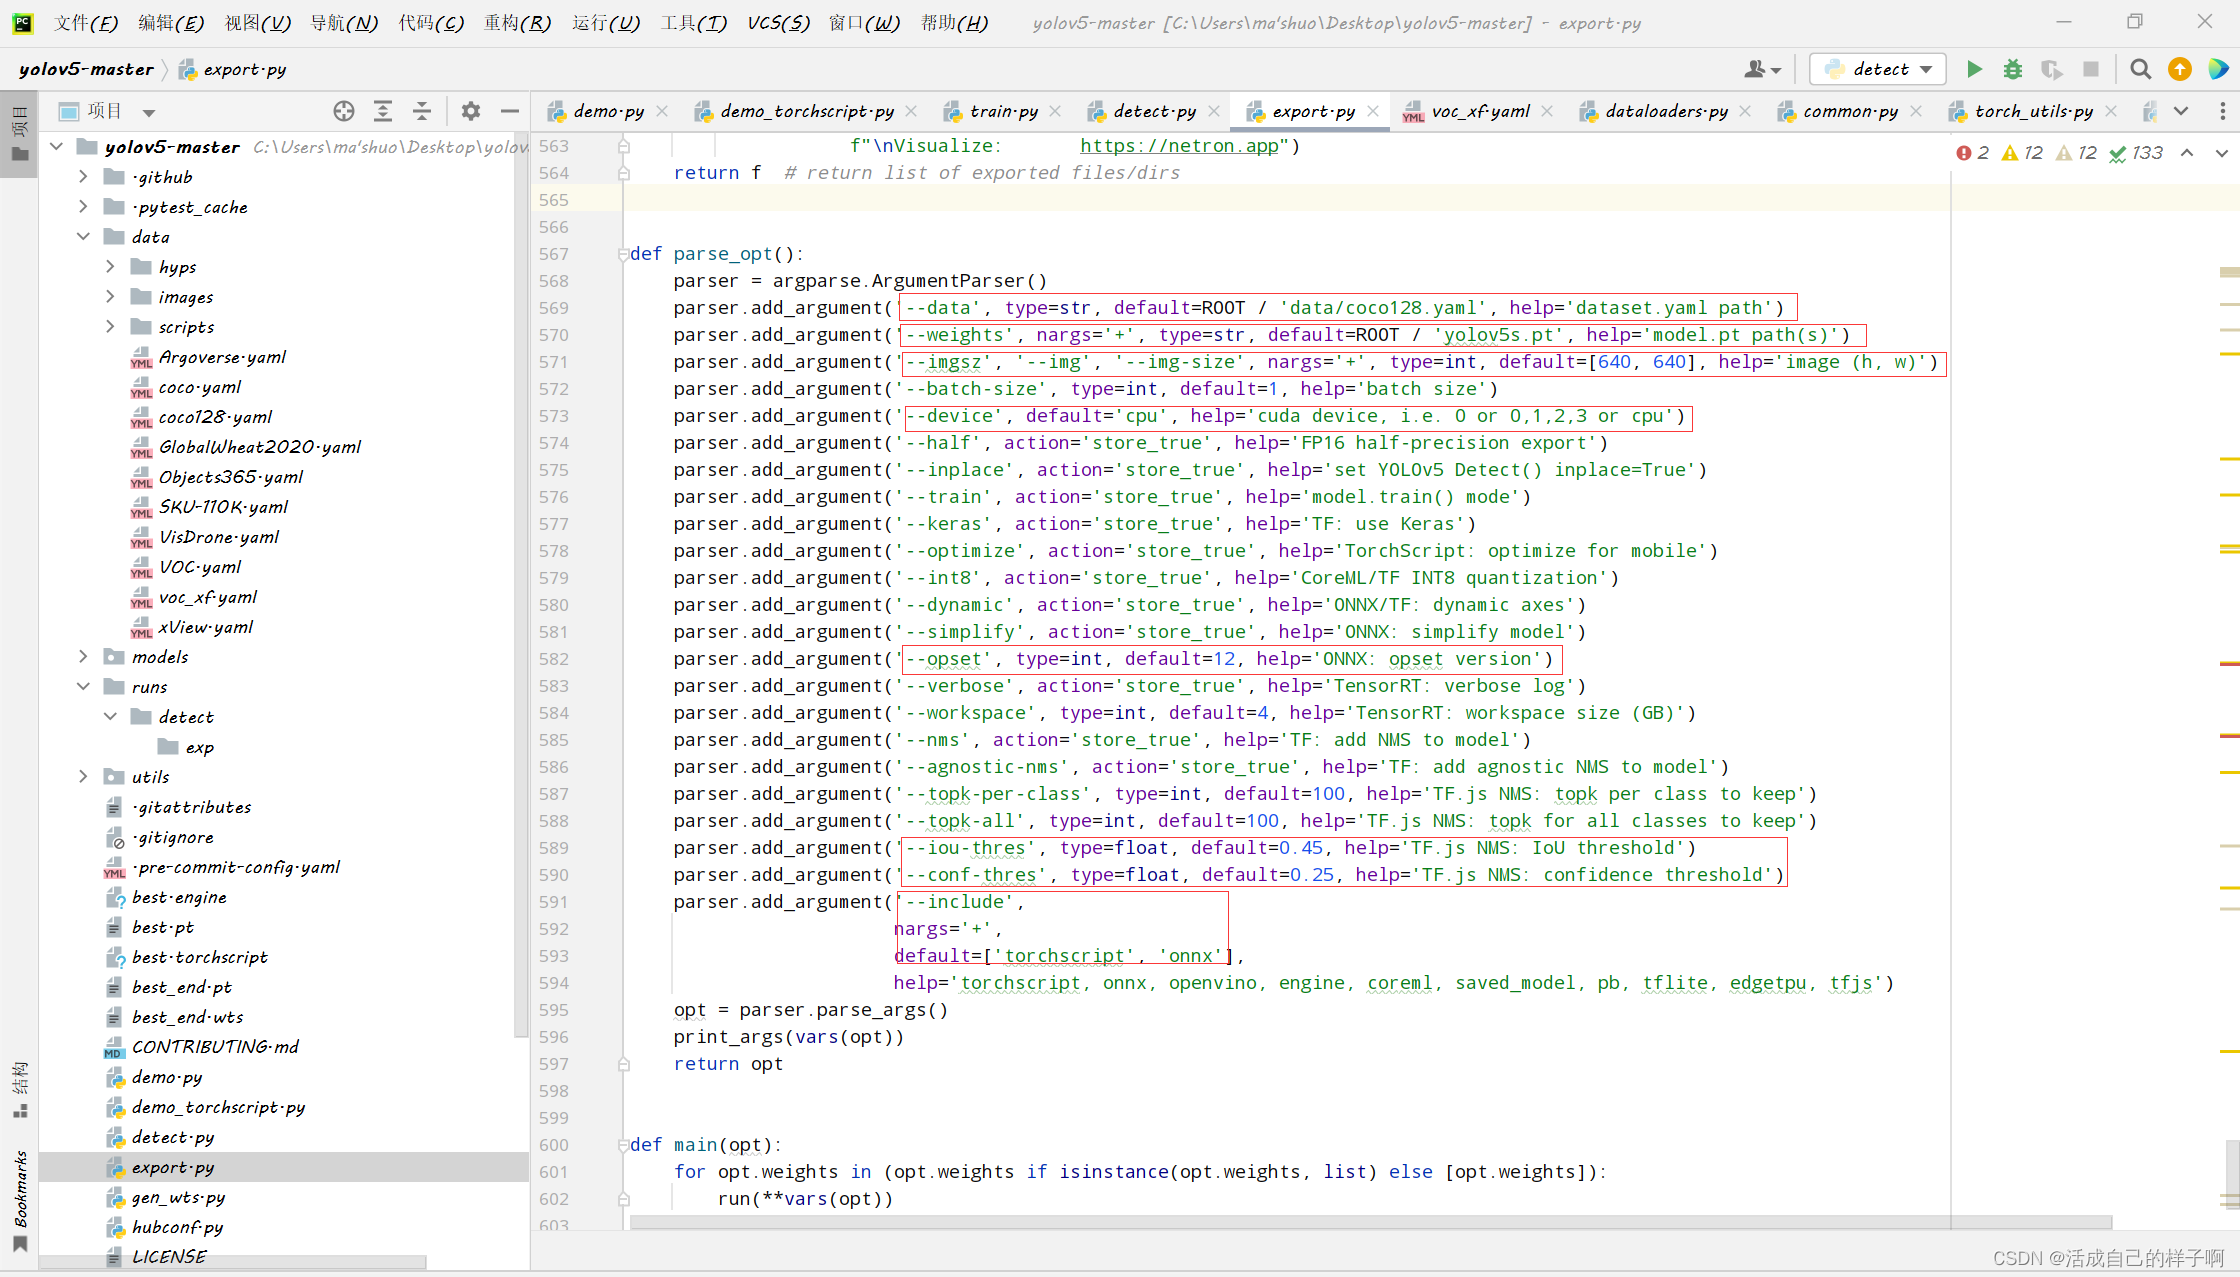
Command line parameter parsing :
- --data: Because the weight of conversion is no longer yolo.py Inside the model class , So there is no longer names Member variables of , We need to specify data File to load category information !
- --weights: We have finished our training pt The weight .(best.pt、epoch.pt Fine )
- --imgsz: Fix a size to simulate reasoning , Here's what I suggest you use when training resize, What do you write here .( When the specified size is completed , The generated weights can only input images of this size into the model prediction )
- --device: Be sure to use GPU!!! Be sure to use GPU!!! Be sure to use GPU!!! Say the important things 3 All over , This is for reasoning calculation , It has nothing to do with the generated model , I use GPU all Ran for half an hour !!!
- --opset: Yours onnx opset model .( If you have the same process as me , Namely 12, Otherwise 12 【doge】)( In fact, it doesn't matter if you change this place .. Because the source code defaults 13 了 【 If the opset Wrong version , You need to modify the following source code 】)
- --conf-thres: The result of your prediction Confidence threshold , Greater than this value displays
- --include: Just write engine Just go .
The other parameters :
- --workspace: In the process of reasoning Maximum overhead of video memory , The default is 4, I set it up. 7. 【 This parameter can reduce the model conversion time 】
notes : If you report opset Version error , Please change this place to 12.(opset version)
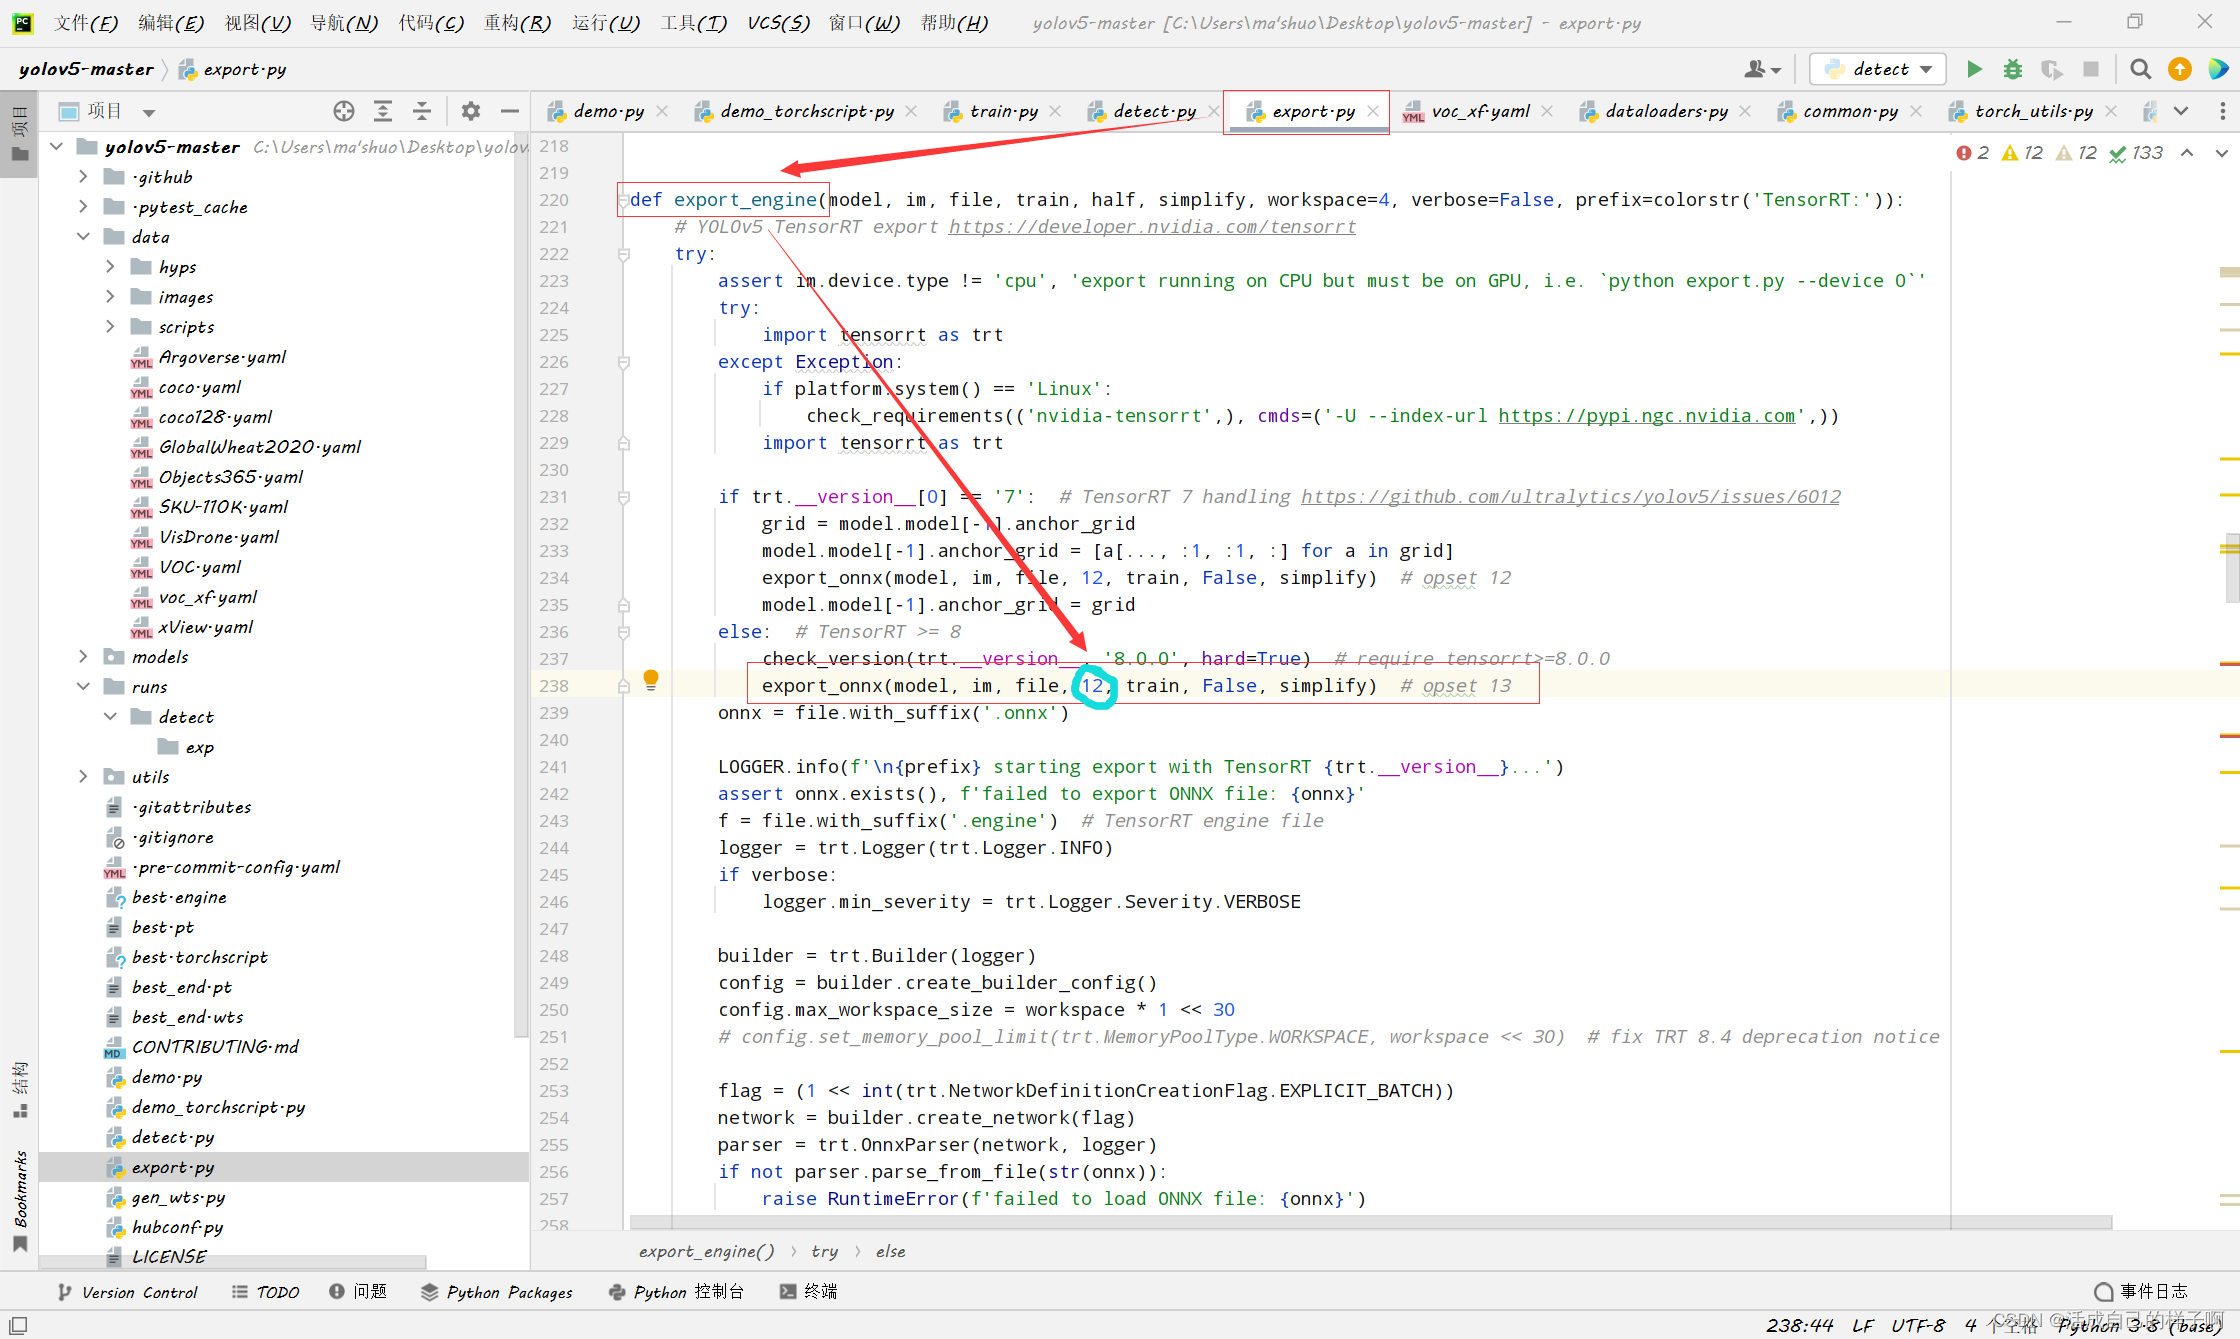 export.py Command line :
python .\export.py --data .\data\voc_xf.yaml --weights .\best.pt --imgsz 640,640 --batch-size 1 --device 0 --workspace 7 --conf-thres 0.6 --include engine
notes :
- export adopt onnx As an intermediary , Therefore, a onnx Model of , And then generate engine.
- The conversion time is very long , Probably Half an hour ( open 4G Video memory words , I opened 7G, yes 10 More minutes ).
- During the conversion, the video memory used will continue to increase , You can open the terminal of another process to check the usage of video memory .
- Warnings may appear during conversion , As long as the program doesn't end , Description is still changing , Don't pause !!!
Check the usage of video memory :
nvidia-smiGenerated engine and onnx:
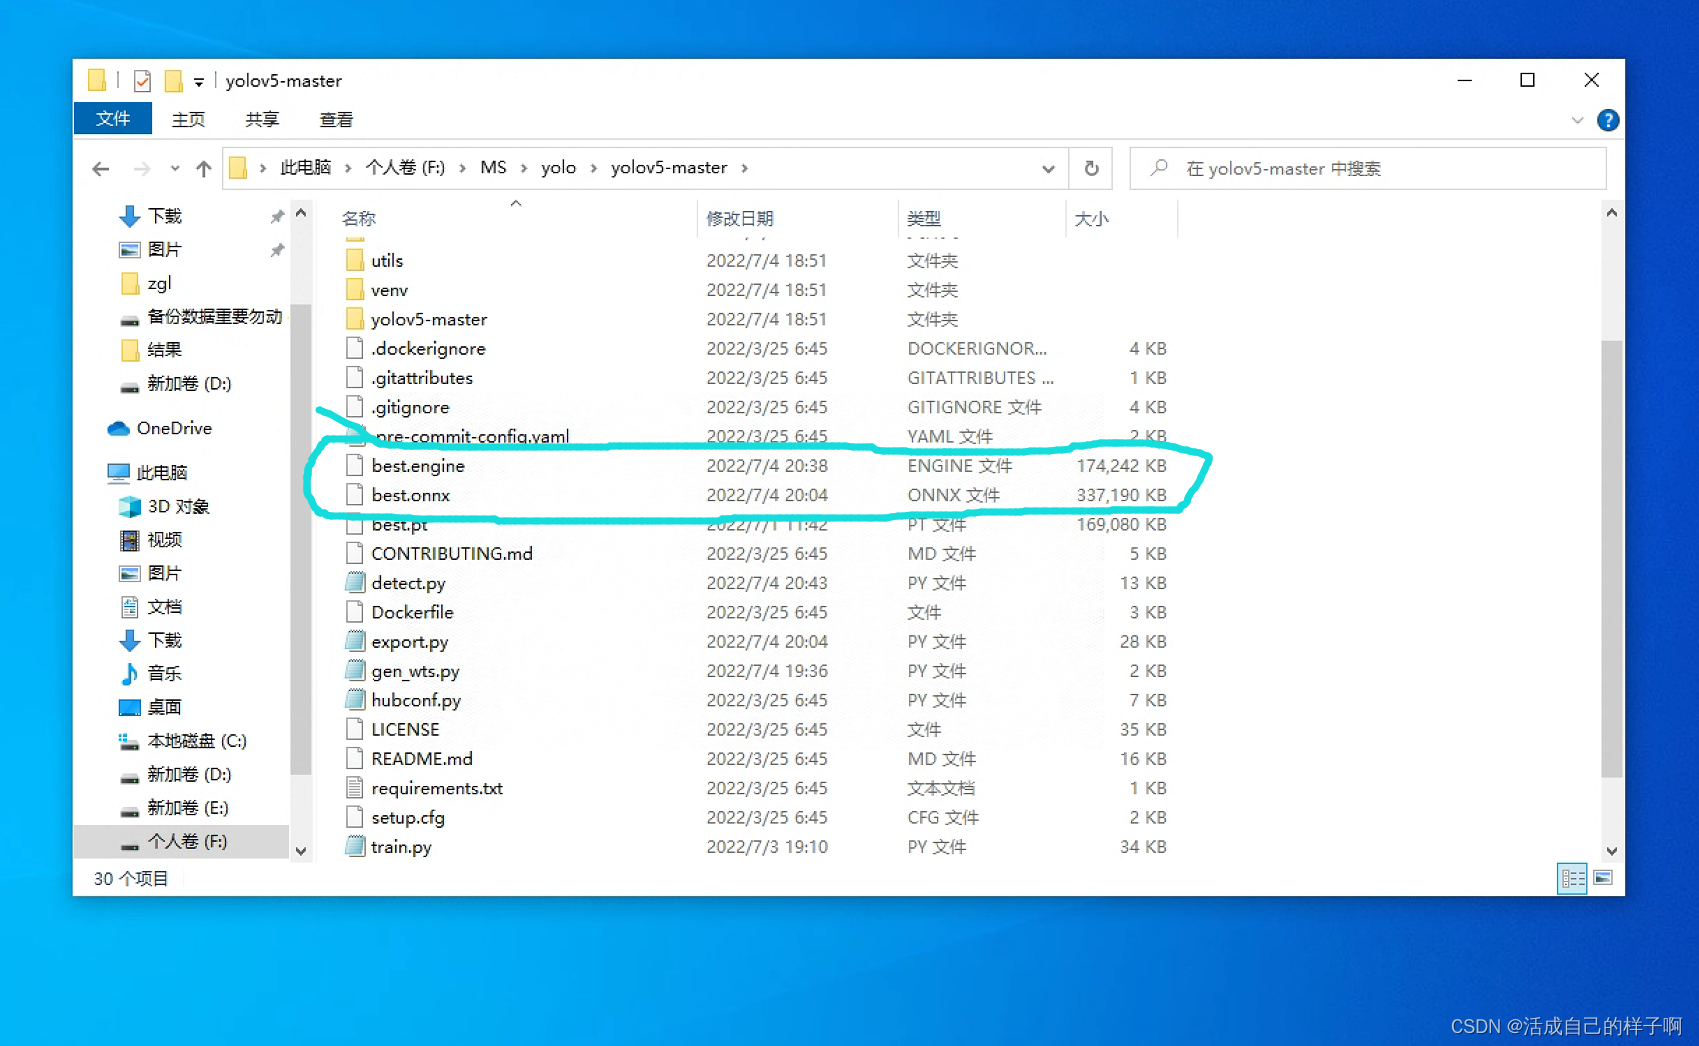
You can see the generated engine Still very small .
torchserve Production of deployment files
- In previous work , We've got engine The weight , It can speed up our model prediction , We will deploy it on the server , This section will describe how to make torchserve Files for deployment .
Preface
Before , I wrote a blog , Recorded torchserve Installation and use process of : ( You can refer to it )
handler.py The writing of
The blog above mentioned ,handler.py We should realize our own Model loading method 、 Data loading ( Preprocessing ) Method 、 Reasoning method 、 Post processing method . This time, , Just do it yourself yolov5 Of handler To write :
Model loading method
How to load the model , We use yolov5 Inside detect.py The use of DetectMultiBackend class .
Let's make a custom one model.py Inherit this class , It's convenient for us to handler Call in :
model.py:
from models.common import DetectMultiBackend

class YOLOV5ObjectDetector(DetectMultiBackend):
    def __init__(self, weights, device, data):
        super(YOLOV5ObjectDetector, self).__init__(weights=weights, device=device, data=data)
At the time of inheritance , We just need to pass in 3 Just one parameter , One is the path of weight , One is used for prediction GPU still CPU, One is our dataset format file (voc_xf.yaml)
Then we began to realize handler.py The model loading method :
names = []
def _load_pickled_model(self, model_dir, model_file, model_pt_path):
        """
        Loads the pickle file from the given model path.
        Args:
            model_dir (str): Points to the location of the model artefacts.
            model_file (.py): the file which contains the model class.
            model_pt_path (str): points to the location of the model pickle file.
        Raises:
            RuntimeError: It raises this error when the model.py file is missing.
            ValueError: Raises value error when there is more than one class in the label,
                        since the mapping supports only one label per class.
        Returns:
            serialized model file: Returns the pickled pytorch model file
        """
        #  Check if there is model.py
        model_def_path = os.path.join(model_dir, model_file)
        if not os.path.isfile(model_def_path):
            raise RuntimeError("Missing the model.py file")

        #  testing model.py Is there only one class
        module = importlib.import_module(model_file.split(".")[0])
        model_class_definitions = list_classes_from_module(module)
        if len(model_class_definitions) != 1:
            raise ValueError(
                "Expected only one class as model definition. {}".format(model_class_definitions)
            )

        model_class = model_class_definitions[0]  # YOLOV5ObjectDetector class

        self.device = torch.device('cuda:0' if torch.cuda.is_available() else 'cpu')

        model = model_class(model_pt_path, self.device, 'voc_xf.yaml')

        self.names = model.names
        self.names[0] = 'xf_road'
        return model
because DetectMultiBackend Class loads both the dataset format file and the model , So we can change its member variables names Assign a value to handler.py Member variables of names in ( This variable needs to be defined by yourself , As in the first line of the code block above ).
notes :
- Reciprocal in code 2 Row is to adjust my own dataset , Used to change the name of the first category , This is not necessary .
- This names Is the name of the forecast category , Again, you can use Chinese, but you need to download a Chinese ttf.
Data loading ( Preprocessing ) Method
handler.py Medium preprocess Method realizes a preprocessing of the data to be detected , Parameters data It may be diverse , It depends on how you upload .
    def preprocess(self, data):
        print("DEBUG--%d" % len(data))
        images = []
        for row in data:
            image = row.get("data") or row.get("body")
            if isinstance(image, str):
                # if the image is a string of bytesarray.
                image = base64.b64decode(image)
            elif isinstance(image, (bytearray, bytes)):  # if the image is sent as bytesarray
                image = Image.open(io.BytesIO(image))
                # #  take bgr To rbg
                image = cv2.cvtColor(np.asarray(image), cv2.COLOR_RGB2BGR)
            else:  # if the image is a data list
                image = image.get('instances')[0]
                image = np.divide(torch.HalfTensor(image), 255)

            img0 = image  #  Save the original image information
            img = letterbox(image, 640, stride=32, auto=self.model.pt)[0]

            # Convert
            img = img.transpose((2, 0, 1))[::-1]  # HWC to CHW, BGR to RGB
            image = np.ascontiguousarray(img)

            image = torch.from_numpy(image).float().to(self.device)

            image /= 255

            if len(image.shape) == 3:
                image = image[None]  #  stay batch-size Dimension expansion

            images.append([image, img0])
        # images = torch.stack(images).to(self.device)  #  Splicing and dimension expansion of data sets
        return images
It is worth mentioning that :
Because after the conversion tensorrt The model has fixed the size of the input characteristic matrix , So we need to record the size of the image before and after preprocessing , It is convenient to restore the predicted dimension box in the post-processing process .
img0 Corresponding to the original image .
image Corresponding to the image after data enhancement .
Reasoning method
handler.py Pass through inference Method to realize the data processing and inference process of the model .
We use yolov5 The data processing and inference process of the model :
 def inference(self, data, *args, **kwargs):
        results = []

        for each_data in data:
            im, im0 = each_data
            pred = self.model(im, augment=False, visualize=False)
            results.append([each_data, pred])

        return results
It is worth mentioning that :
preprocess、inference、postprocess The parameters and return values of are passed , The return value of the previous method is the parameter of the next method .
Post processing method
Here is what we are going to write handler.py The last method in , He is responsible for the processing and output of the prediction results .
Due to the confidentiality of the project , I have Hide important code :
    def postprocess(self, data):
        all_result = []

        for each_data, pred in data:
            result = []

            #  Non maximum suppression
            pred = non_max_suppression(pred, conf_thres=0.3, iou_thres=0.45, classes=None, agnostic=False, max_det=1000)[0]

            if pred is None:
                print('No target detected.')
                result.append({"classes": [], "scores": [], "boxes": []})
                return result
            else:
                #  Change the box from img Rescale the size to im0 size
                object = []
                pred[:, :4] = scale_coords(each_data[0].shape[2:], pred[:, :4], each_data[1].shape).round()

                pred[:, :4] = pred[:, :4].round()
                boxes = pred[:, :4].detach().cpu().numpy()
                scores = pred[:, 4].detach().cpu().numpy()
                classes = pred[:, 5].detach().cpu().numpy().astype(np.int)
                new_classes = [self.names[i] for i in classes]

                for i in range(len(classes)):
                    object.append([new_classes[i], boxes[i][0], boxes[i][1], boxes[i][2], boxes[i][3], scores[i]])

                new_cars = object  #  Important code is hidden here

                if new_cars:
                    result.append({
                        "classes": [classes for classes, _, _, _, _, _ in new_cars],
                        "scores": [str(scores) for _, _, _, _, _, scores in new_cars],
                        "boxes": [str([b0, b1, b2, b3]) for _, b0, b1, b2, b3, _ in new_cars]
                    }
                    )

                    print('GYYDEBUG--RESULT:{}'.format(result))

                    all_result.append(result)

                    return all_result
                else:
                    result.append({"classes": [], "scores": [], "boxes": []})
                    return result
Last
handler.py The completion of the file means that the prerequisite work of deployment has been completed .
Finally, all files ( Include the files needed for dependencies ) Put together : Pack it up packet_trt
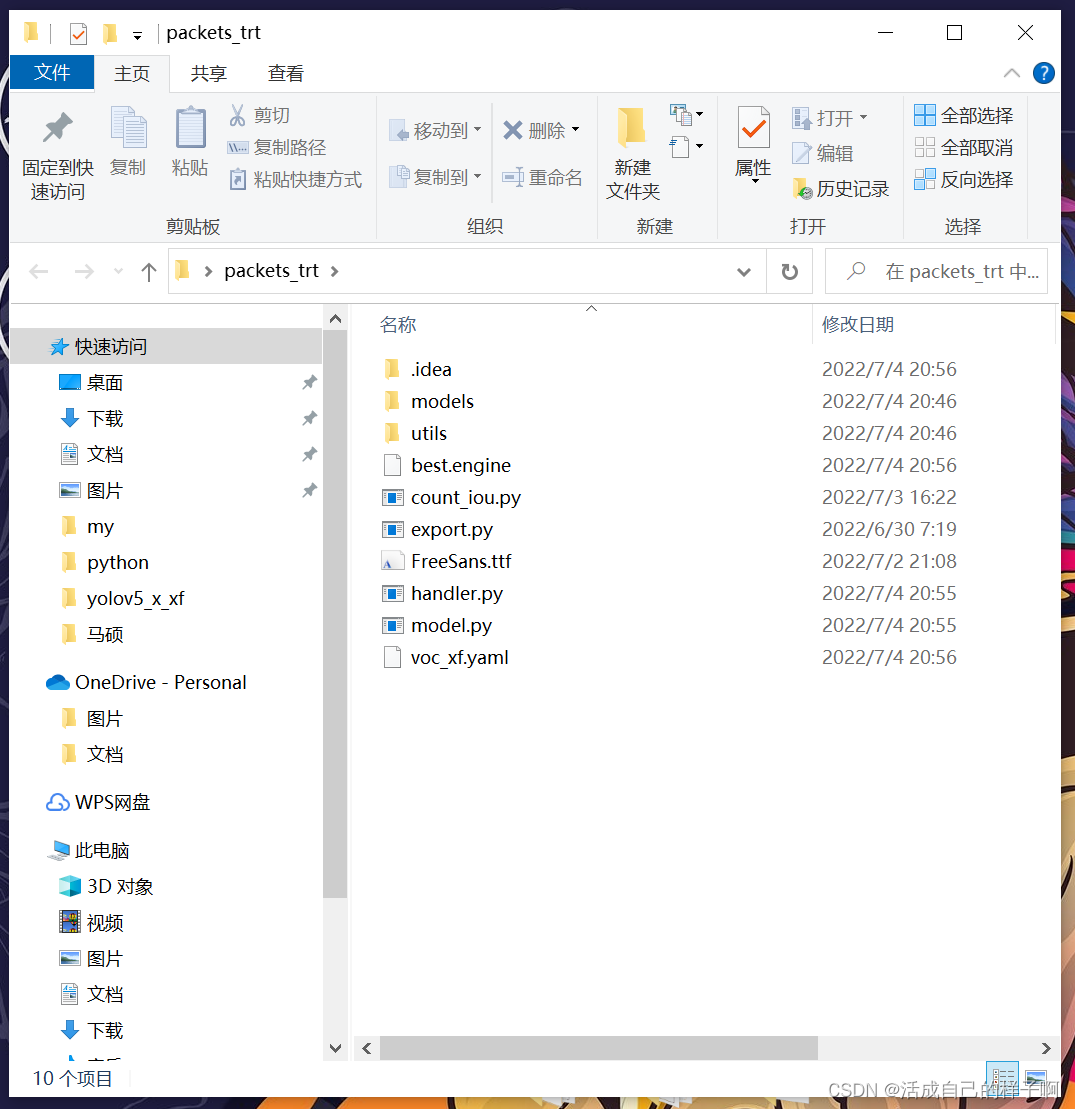
notes : The steps in this article are for reference only , direct cv It is no use , This is my own project handler, If you really want to learn , Please also carefully study the principle of the code . This code is successfully deployed .
Deployment work
- When you have finished preparing all your documents , You can officially start your deployment .
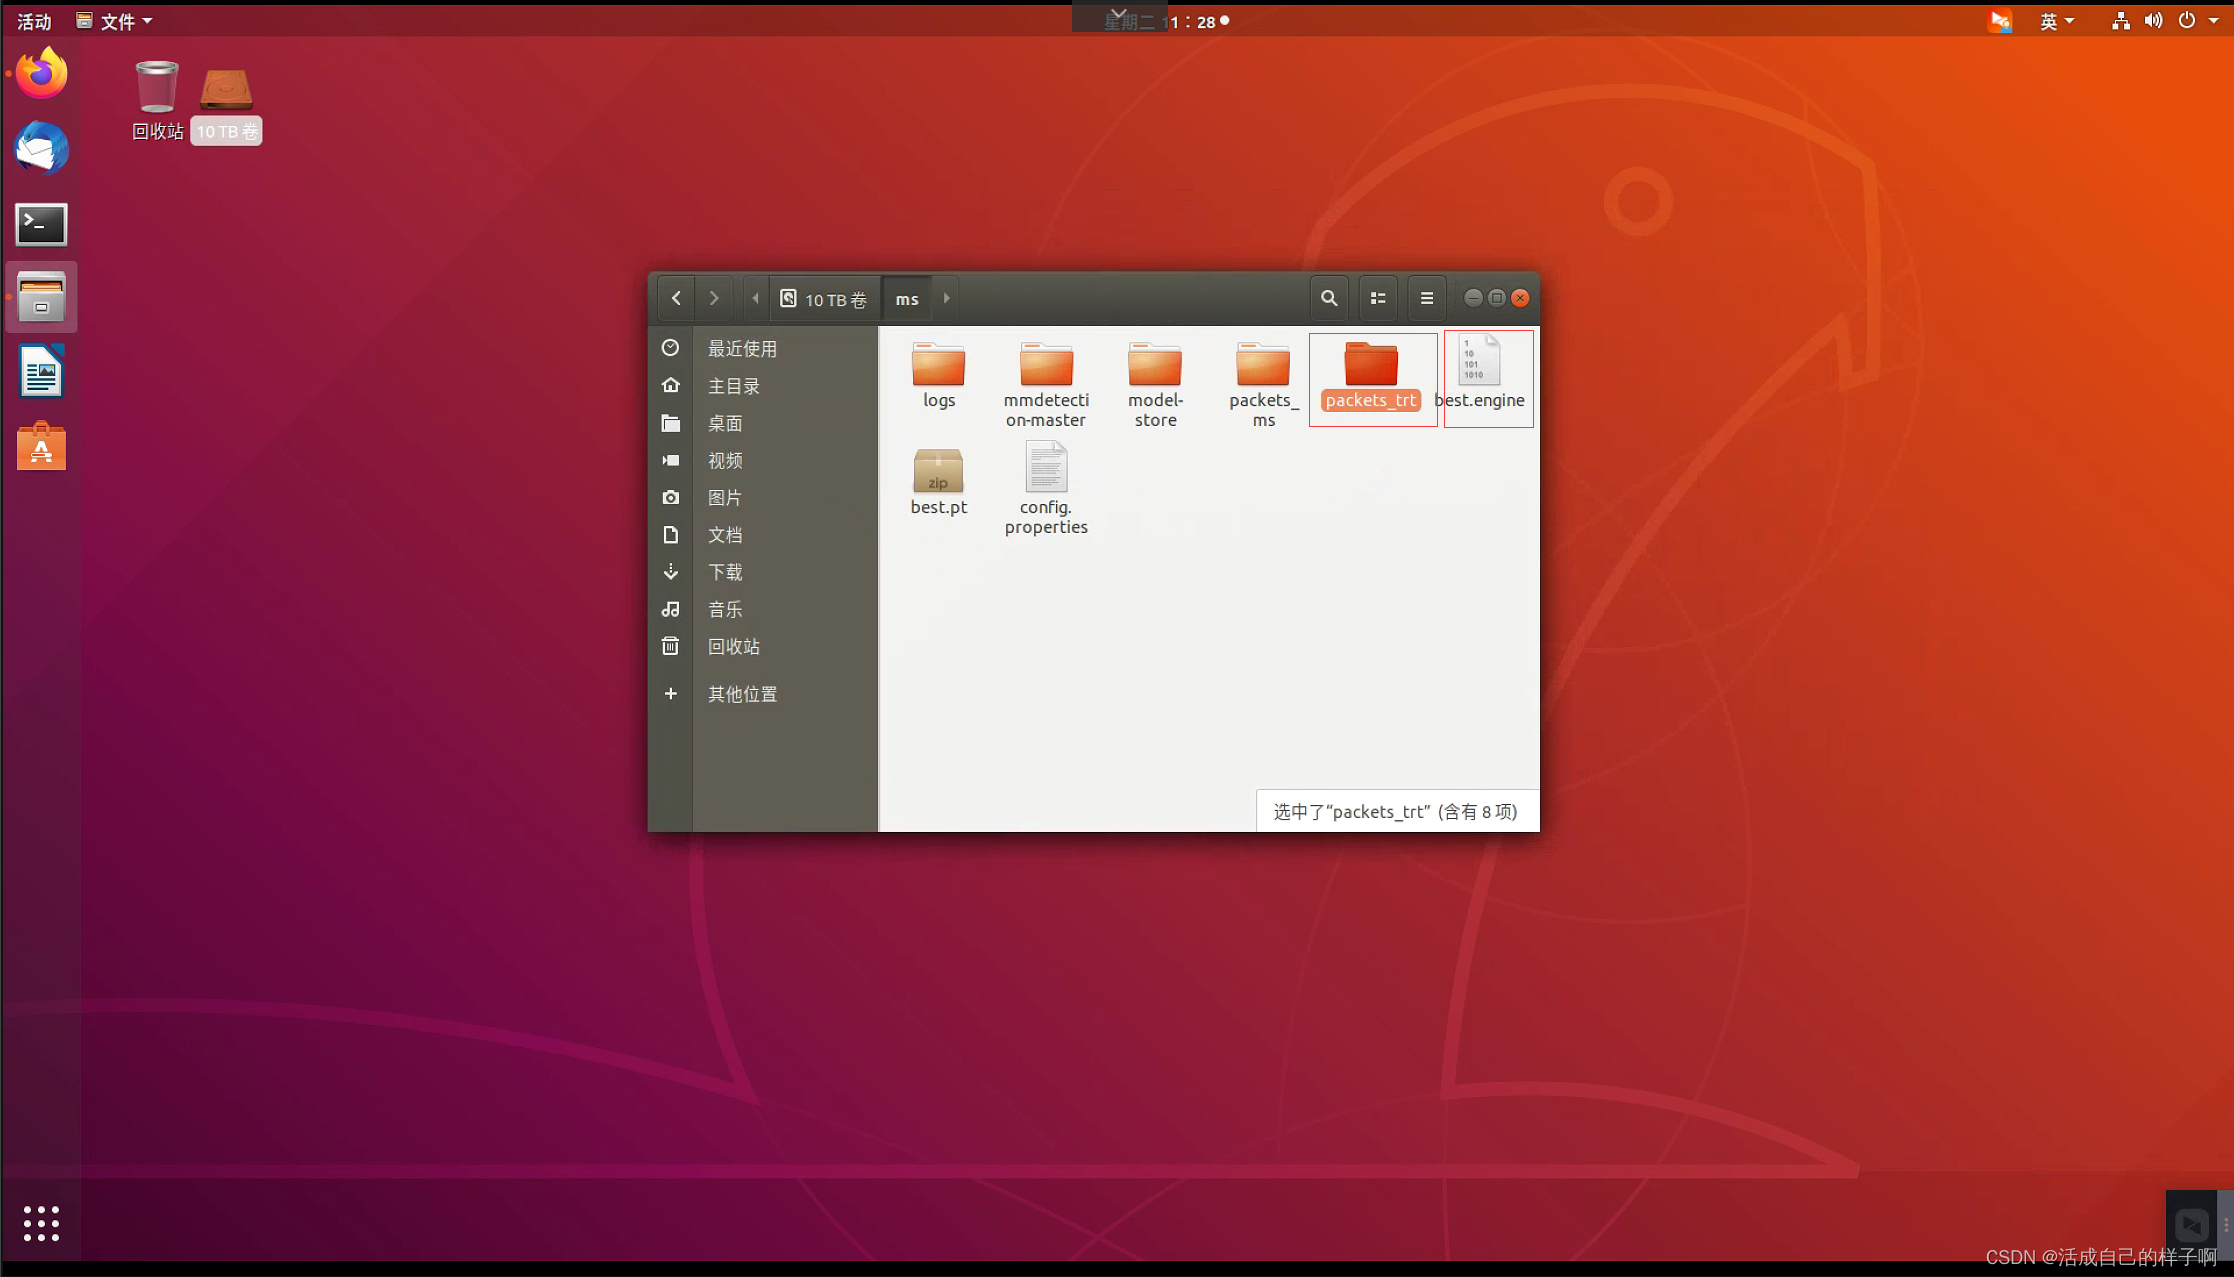
Pack your packet_trt Put it on the server you want to deploy :
notes : Here I move the weight out .
Execute the packaging command to generate mar file
Note the relative path of the file :
torch-model-archiver --model-name test_trt --version 1 --serialized-file best.engine --handler packets_trt/handler.py --model-file packets_trt/model.py --extra-file packets_trt -f( Generated mar I moved it to model-store Under the folder 【 Create a new one by yourself model-store Folder 】)

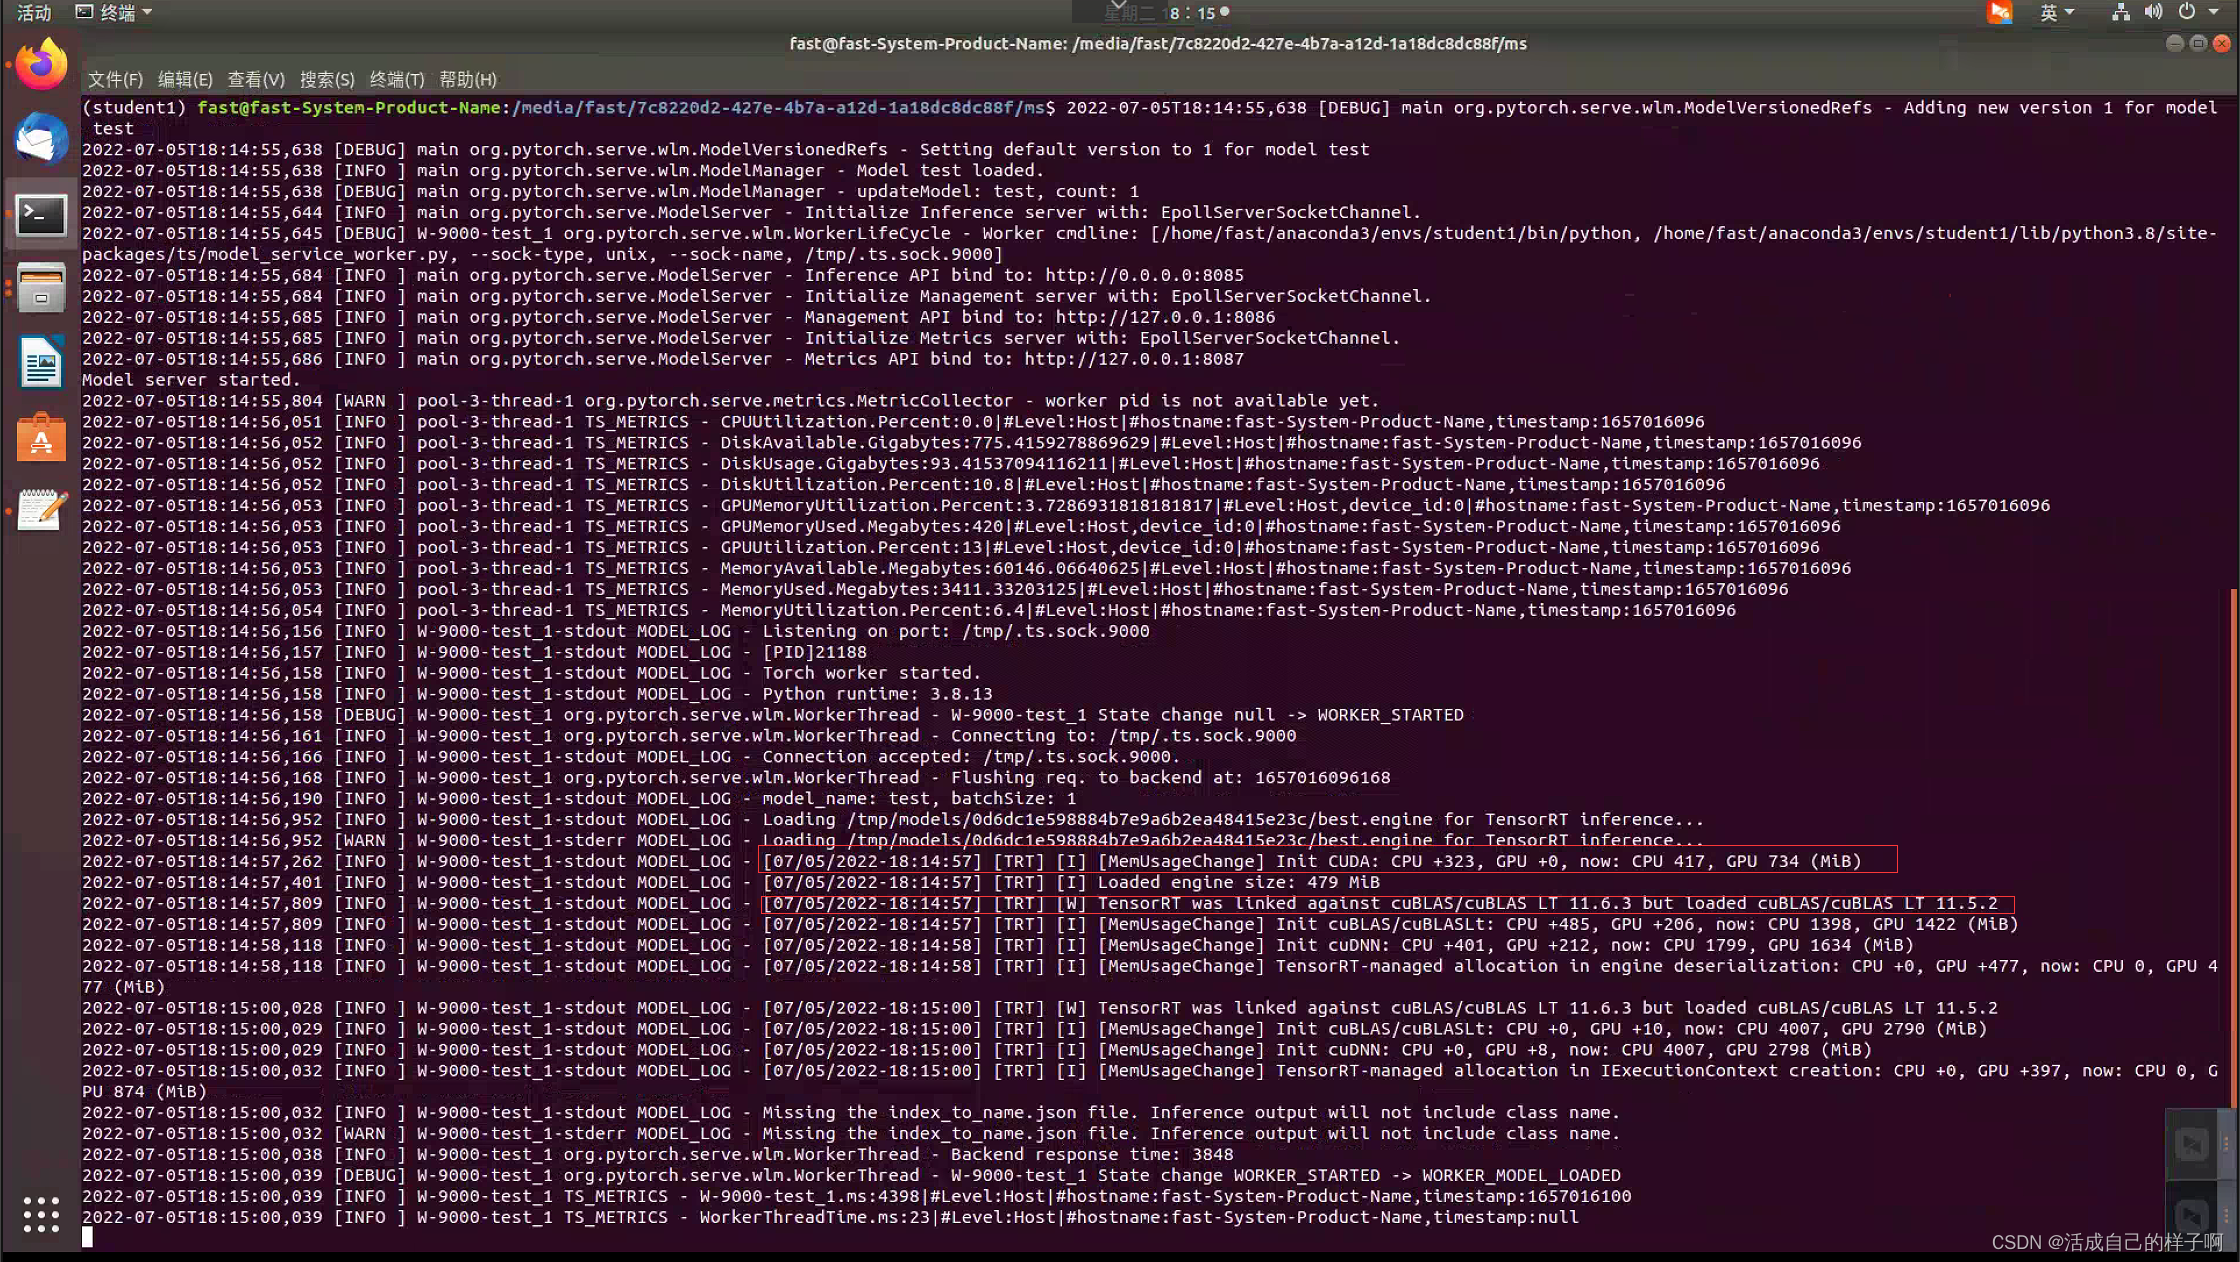
open torchserve service
torchserve --start --model-store model-store --models test=test_trt.mar --ts_config ./config.propertiesDisplay of normal deployment :( Yes TensorRT Information about )
notes :
- [I]: yes tensorrt Normal information log report .
- [W]: yes tensorrt Warning of , This is not an error report , Don't worry about it .
- [E] : This is an error report , The emergence of this represents a problem in the process .
The test image
Here I tested one-time Load multiple different formats Pictures of the :
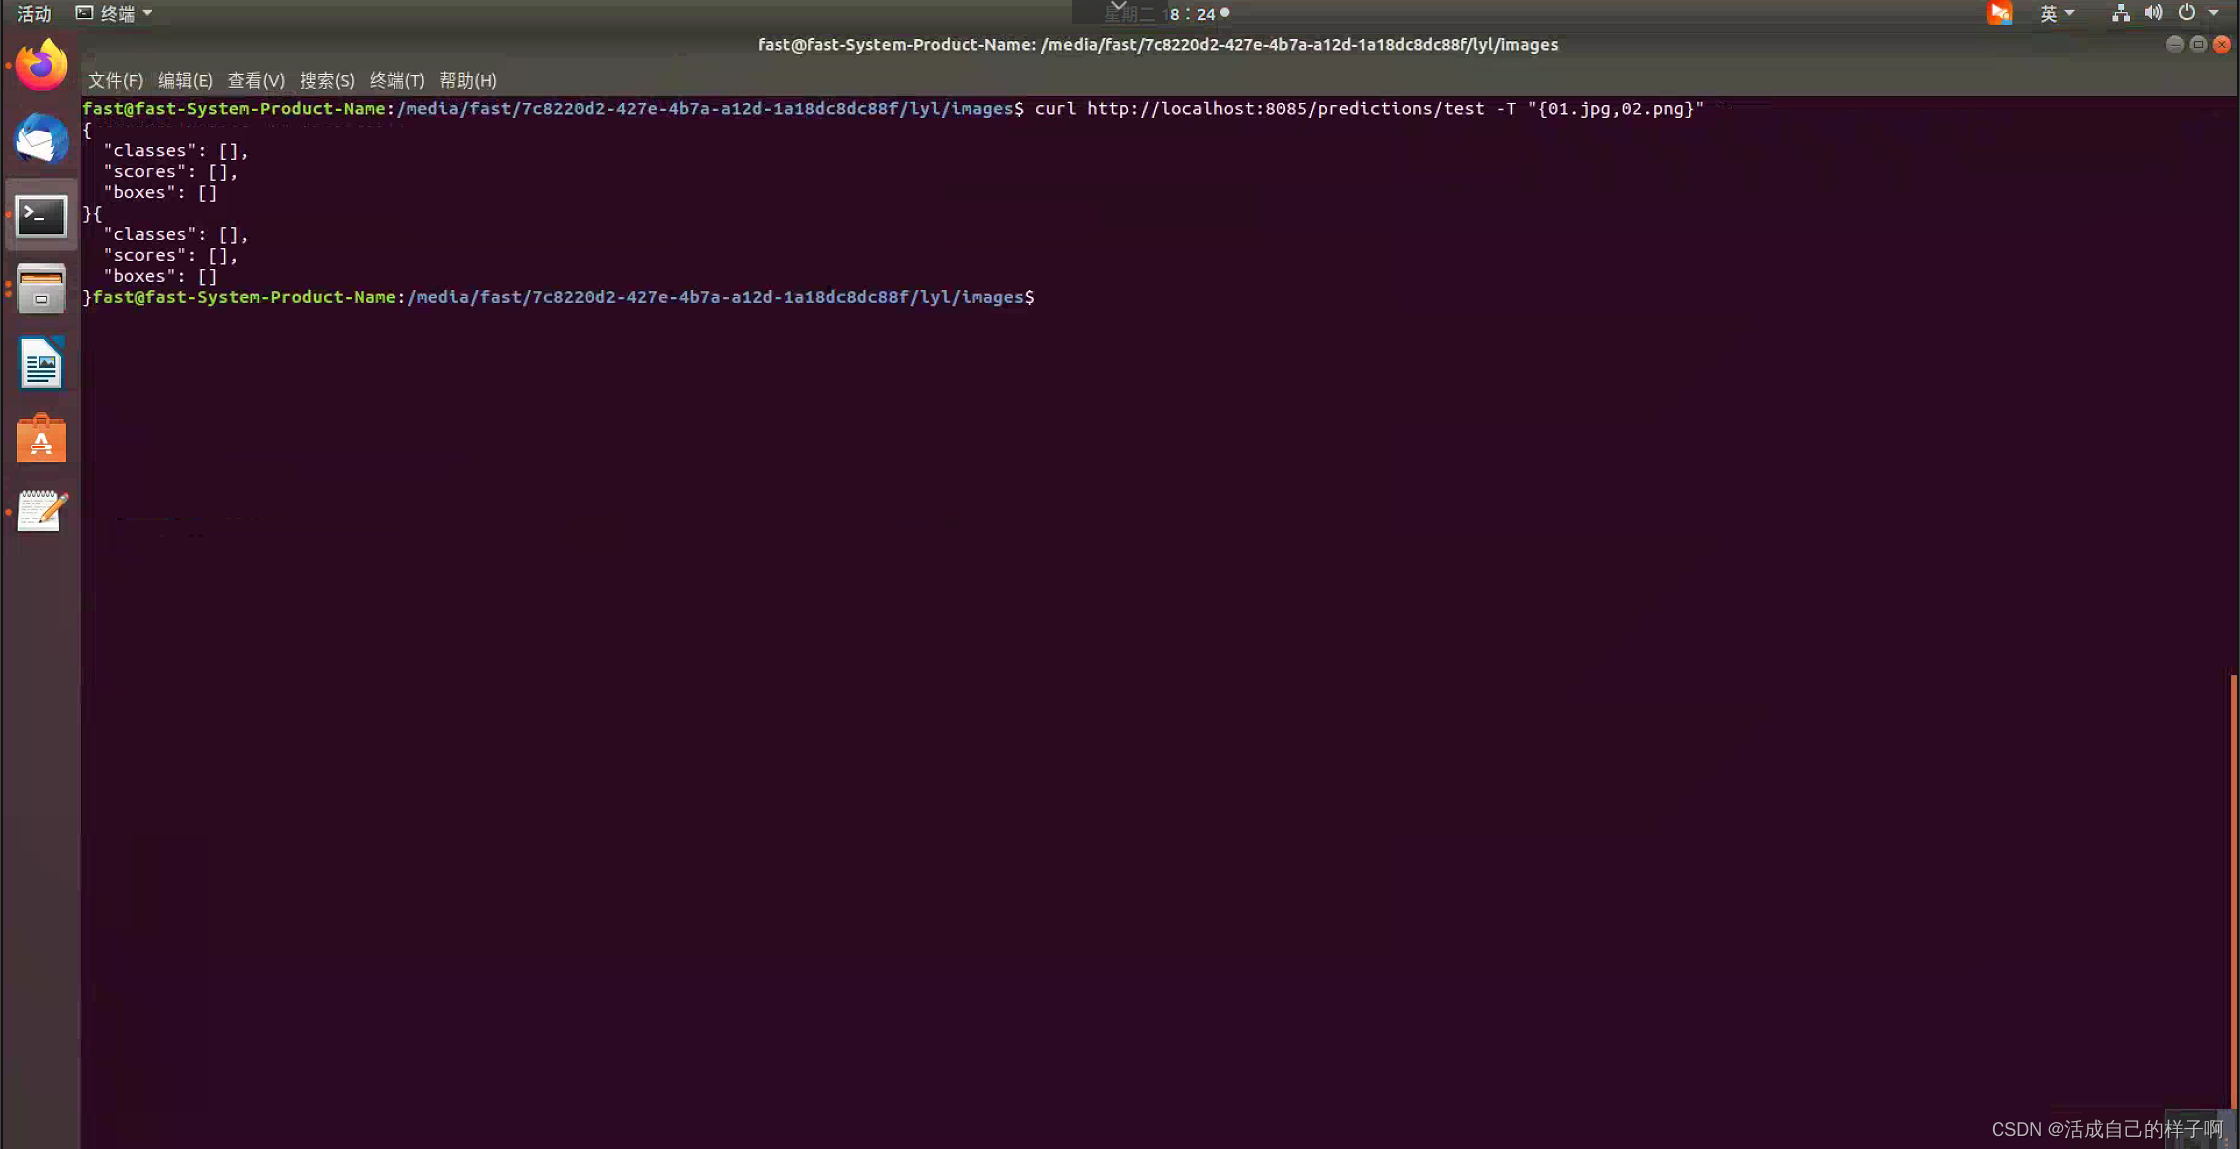
curl http://localhost:8085/predictions/test -T "{01.jpg,02.png}"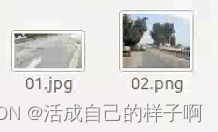
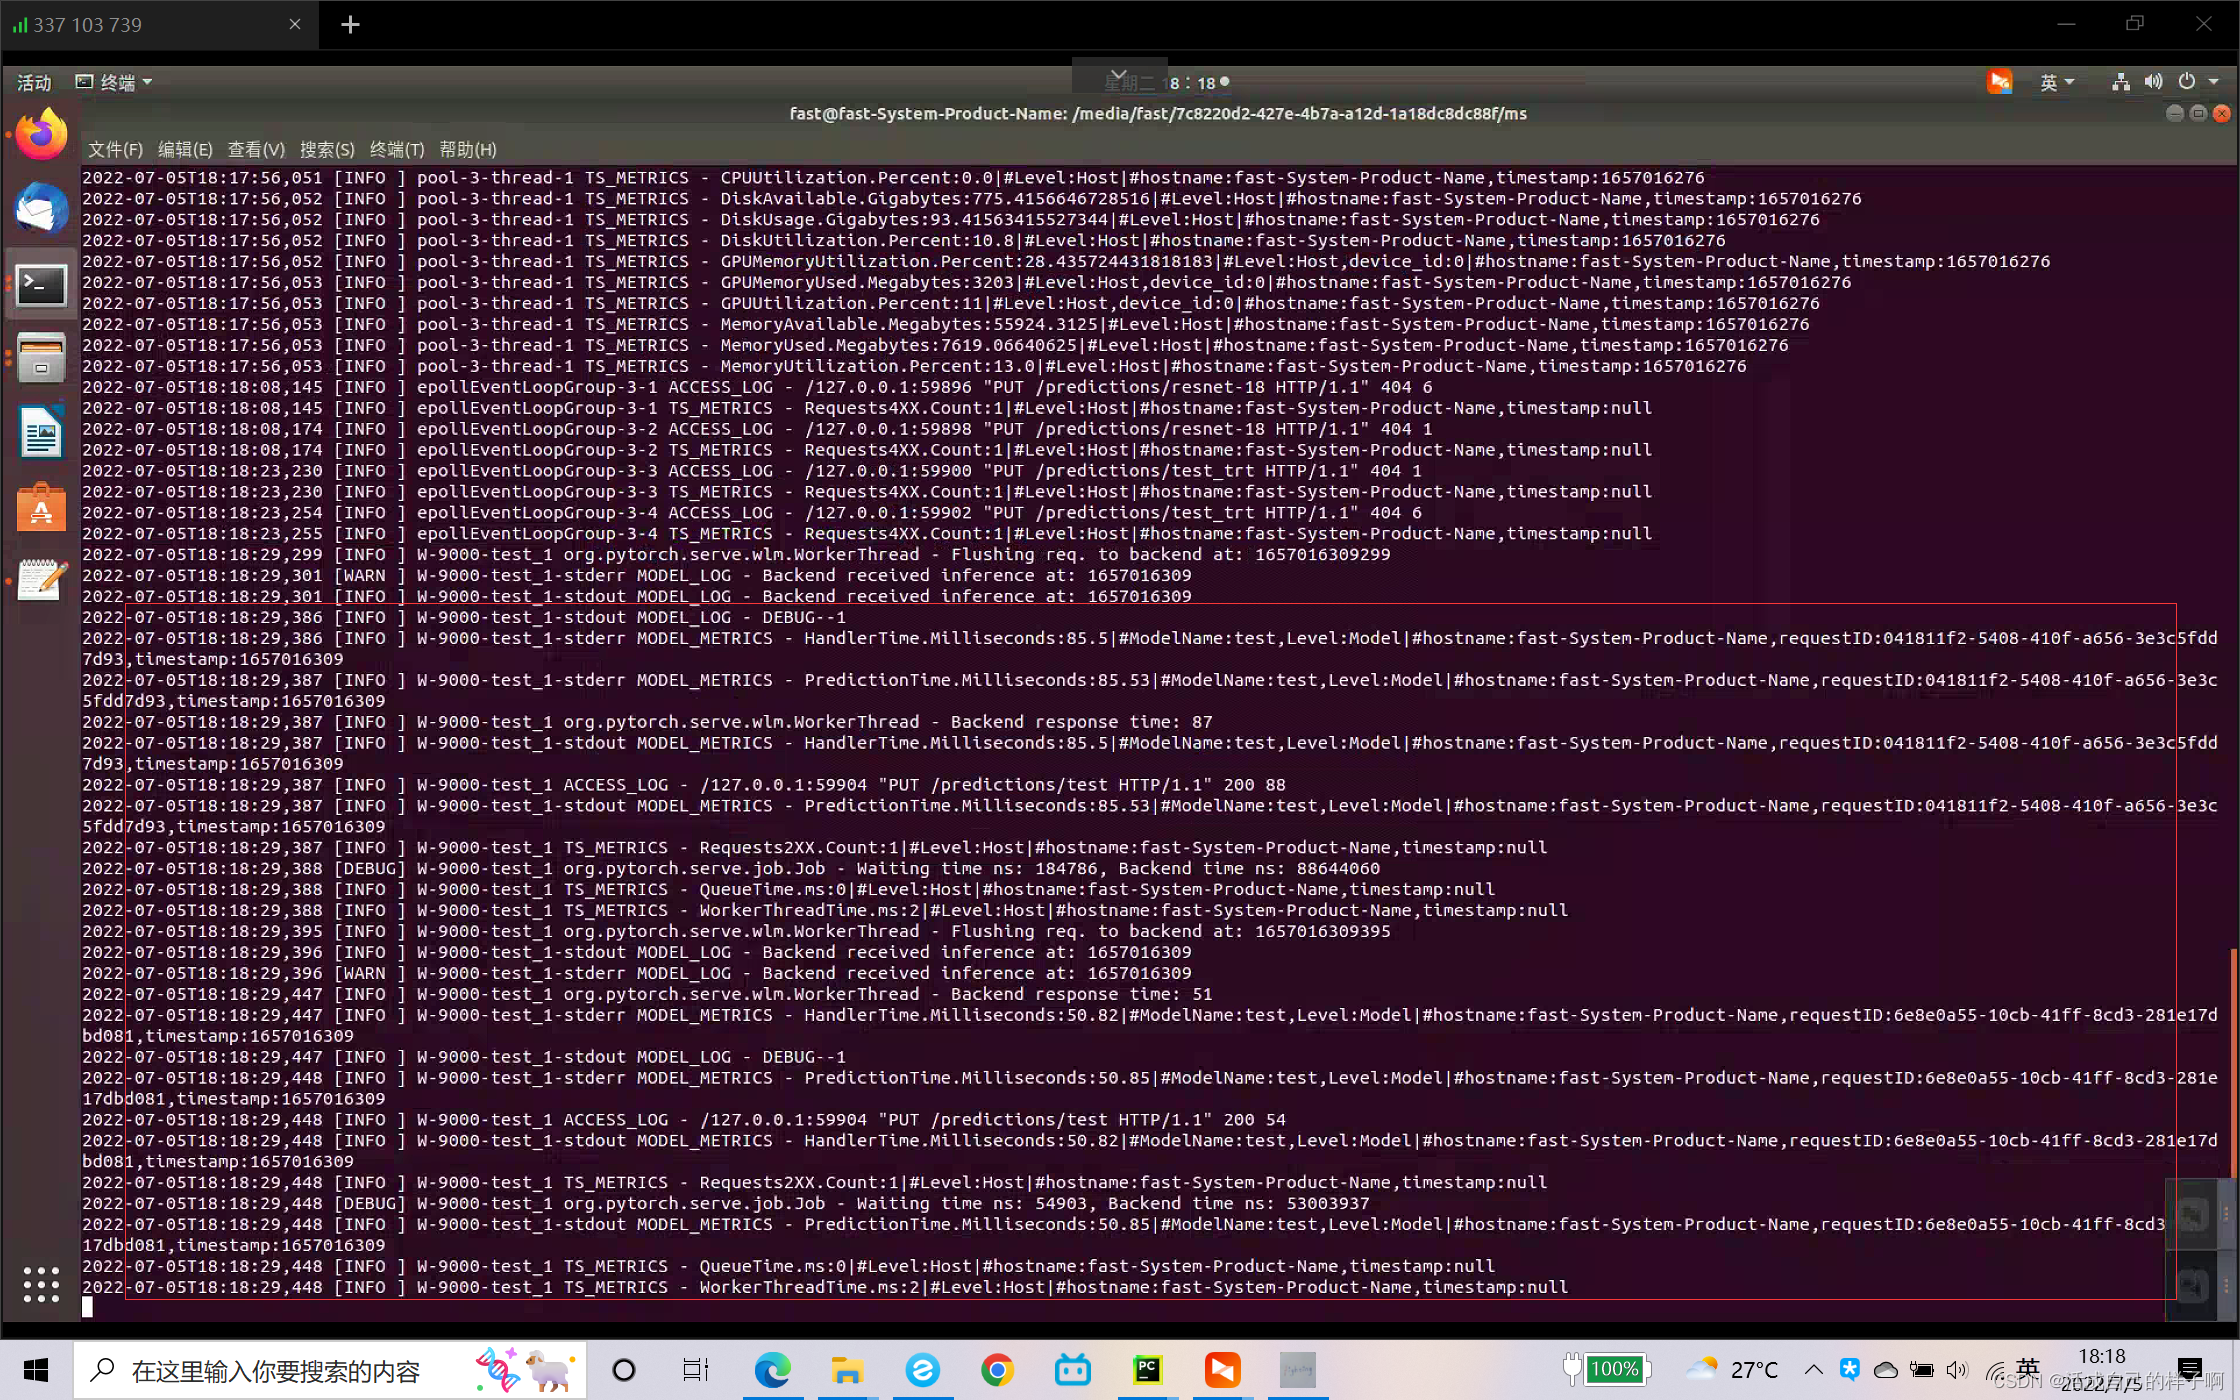
Successful test Generated logs :( Please ignore the above lines in the figure below , I made a mistake in the test 【doge】)
Successful test Result :( notes : Nothing is detected here because I hide it with code , Due to the confidentiality of the project , Please also understand !!!)
Postscript
notes :
- Generate engine Of TensorRT Environment and model loading at deployment TensorRT The need is the same , It is suggested that the model transformation and deployment should be carried out in the same environment .
- It is recommended to open 2 Terminals , One to display the deployment information , The other is used to test , In this way, it is convenient to check whether there will be problems in the reasoning part of the model .
- If the model is not loaded after deployment torchserve Inside , Then check in turn Generated mar Is the document correct 、handler Whether the writing is correct 、 Whether the environment is installed correctly .
- It's not easy to write , Please also tweet for me ~~~【doge】
Reference material :
yolov5 The seventh step of deployment is completed tensorRT Model reasoning is accelerated _Christo3 The blog of -CSDN Blog _tensorrt Deploy yolov5https://blog.csdn.net/weixin_41552975/article/details/114398669?spm=1001.2101.3001.6661.1&utm_medium=distribute.pc_relevant_t0.none-task-blog-2~default~CTRLIST~default-1-114398669-blog-125082939.pc_relevant_aa&depth_1-utm_source=distribute.pc_relevant_t0.none-task-blog-2~default~CTRLIST~default-1-114398669-blog-125082939.pc_relevant_aa&utm_relevant_index=1
TorchServe Deploy pytorch Model _lulu_ Stranger's blog -CSDN Blog _torchservehttps://blog.csdn.net/qq_41360255/article/details/116707586
1. TorchServe — PyTorch/Serve master documentationhttps://pytorch.org/serve/TensorRT SDK | NVIDIA Developerhttps://developer.nvidia.com/tensorrt
边栏推荐
- 浅谈测试开发怎么入门,如何提升?
- 48页数字政府智慧政务一网通办解决方案
- DAY TWO
- How engineers treat open source -- the heartfelt words of an old engineer
- DAY SIX
- QT tutorial: creating the first QT program
- stm32F407-------SPI通信
- 509 certificat basé sur Go
- @TableId can‘t more than one in Class: “com.example.CloseContactSearcher.entity.Activity“.
- DAY ONE
猜你喜欢

The way of intelligent operation and maintenance application, bid farewell to the crisis of enterprise digital transformation
ldap创建公司组织、人员
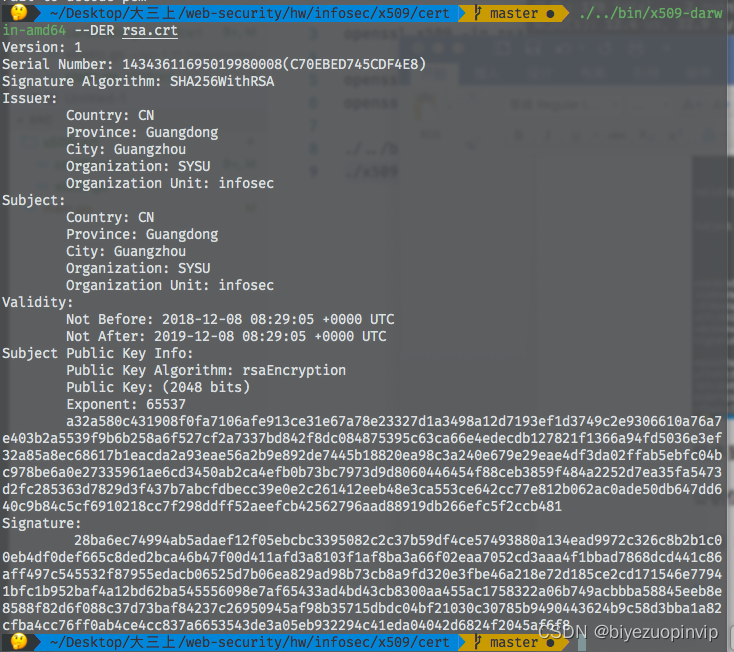
基於GO語言實現的X.509證書
DAY FIVE

JS+SVG爱心扩散动画js特效
![[2022 the finest in the whole network] how to test the interface test generally? Process and steps of interface test](/img/8d/b59cf466031f36eb50d4d06aa5fbe4.jpg)
[2022 the finest in the whole network] how to test the interface test generally? Process and steps of interface test

一图看懂对程序员的误解:西方程序员眼中的中国程序员
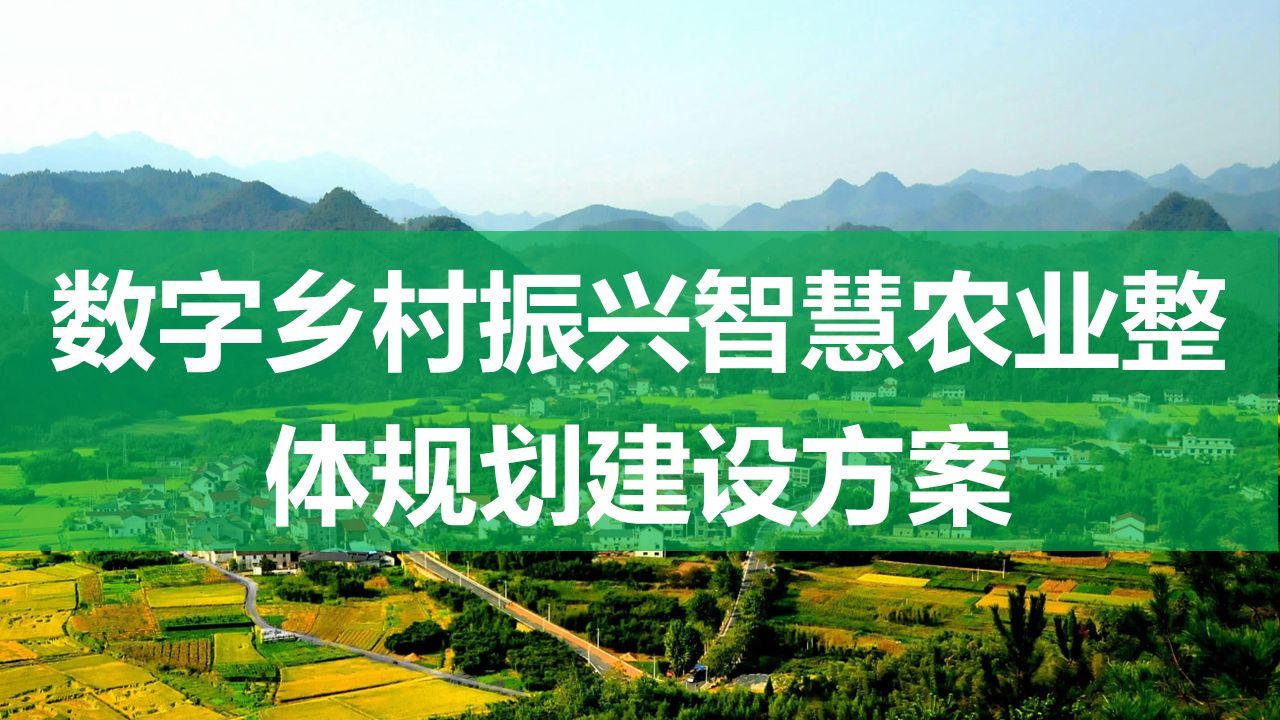
37页数字乡村振兴智慧农业整体规划建设方案
2022/2/10 summary
2022 PMP project management examination agile knowledge points (9)
随机推荐
2022 PMP project management examination agile knowledge points (9)
The difference between redirectto and navigateto in uniapp
Quaternion attitude calculation of madgwick
Advanced learning of MySQL -- basics -- transactions
How to use vector_ How to use vector pointer
Racher integrates LDAP to realize unified account login
[daily problem insight] prefix and -- count the number of fertile pyramids in the farm
Advanced learning of MySQL -- Fundamentals -- concurrency of transactions
Devops can help reduce technology debt in ten ways
What is web penetration testing_ Infiltration practice
stm32F407-------SPI通信
X.509 certificate based on go language
GEO数据挖掘(三)使用DAVID数据库进行GO、KEGG富集分析
After leaving a foreign company, I know what respect and compliance are
Typescript incremental compilation
DAY THREE
VTK volume rendering program design of 3D scanned volume data
Introduction au GPIO
If the college entrance examination goes well, I'm already graying out at the construction site at the moment
Personal digestion of DDD