当前位置:网站首页>QT基础第一天 (1)QT,GUI(图形用户接口)开发
QT基础第一天 (1)QT,GUI(图形用户接口)开发
2022-07-26 20:00:00 【飞赴】
其实关于c++还有一个STL的内容,由于比较繁多,我后面来更,今天我们说界面开发,
当然学东西我们不能只学怎么用,直接去学函数和参数,我们应该了解本质。
现在我们开始说今天的内容。
一.图形显示原理
1.像素点,分辨率,RGB,透明度,显存...
二.Linux上如何编程显示器
linux帧缓存(frambuffer)
编程:其实就是操作/dev/fb*文件
举个例子,如何画点,横线,竖线
#include <stdio.h>
#include <sys/types.h>
#include <sys/stat.h>
#include <fcntl.h>
#include <sys/mman.h>
#include <sys/types.h>
#include <sys/stat.h>
#include <fcntl.h>
#include <sys/ioctl.h>
#include <errno.h>
#include <stdio.h>
#include <linux/fb.h>
#include <sys/mman.h>
#include <time.h>
#include <sys/time.h>
#include <string.h>
#include <stdlib.h>
int main(int argc, char *argv[])
{
int ret ;
struct fb_var_screeninfo fbi_var;//定义可变参数
struct fb_fix_screeninfo fbi_fix;//定义固定参数
struct fb_cmap cmap;
//打开屏幕设备
int fd = open("/dev/fb0",O_RDWR);
if(fd < 0){
perror("open");
close(fd);
}
//得到虚拟屏幕参数
ret = ioctl(fd,FBIOGET_VSCREENINFO,&fbi_var);
if(ret < 0){
perror("ioctl");
return NULL;
}
3. QT是什么
一堆可用于图形界面开发的C++类库
4. QT环境的安装(QT IDE)
1. QT类库
2. 编程编译环境
printf("fbi.var.xres:%u ,fbi.var.yres:%u ,var.bpp:%d\n",fbi_var.xres
,fbi_var.yres,fbi_var.bits_per_pixel);
printf("fbi.var.xoffset:%u ,fbi.var.yoffset:%u\n",fbi_var.xoffset
,fbi_var.yoffset);
//得到实际屏幕参数
ret = ioctl(fd,FBIOGET_FSCREENINFO,&fbi_fix);
if(ret < 0){
perror("ioctl");
return NULL;
}
printf("fbi.fix.smem_start:%lu
,fbi.fix.smem_len:%u\n",fbi_fix.smem_start ,fbi_fix.smem_len);
printf("line_length: %u\n",fbi_fix.line_length);
//获取显存起始地址
int *addr =
mmap(NULL,fbi_fix.smem_len,PROT_READ|PROT_WRITE,MAP_SHARED,fd,0);
if(addr == NULL){
perror("mmap");
ret = munmap(addr,fbi_fix.smem_len);
return NULL;
}
//画竖线
int i = 100;
while(i--)
{
*addr = 0xff00ff00;
addr += 2048; //(得到下一行像素点的显存地址)
}
/*
//画横线
int i = 2048+400;
while(i--)
{
*addr = 0xffff0000;
addr++;
}
*/
close(fd);
return 0;
}
效果图
这个图不是上面的代码,却是改来的,为了看着更清晰

那说到这里,我们怎么去实现我们想要的图形呢?
大家可以看出一个一个去操控点,线,面是很麻烦的,这里要感谢外国的两个大学生,他们用一个假期,用c++封装了大量的库供后面人使用,所以 现在我们来进入今天的内容 QT。
三.QT是什么?
一堆可用于图形开发的c++库
四.QT的安装环境
1. QT类库
2. 编程编译环境

3. 创建工程
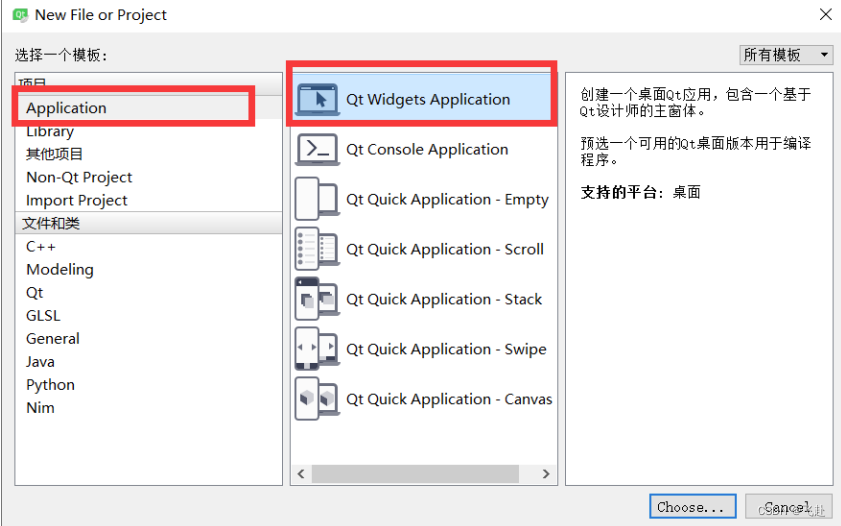
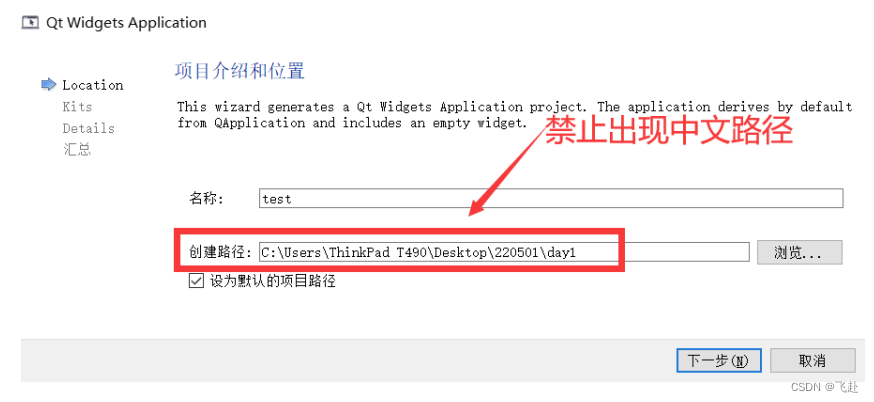

五.必要的补充
1. QPushButton 和 QLineEdit
#include "widget.h"

Widget::Widget(QWidget *parent)
    : QWidget(parent)
{
    //2. 将控件真正的new出来
    //将按钮new出来
    bt = new QPushButton;
    bt->setText("登录");
    //bt->show();
    bt->setParent(this);

    le = new QLineEdit;
    le->setParent(this);

    //3. 排版
    le->setGeometry(10, 10, 200, 30);
    bt->setGeometry(100, 100, 100, 50);

    //4. 前后台功能挂接(信号与槽)
    /*按钮发出点击信号的时候,当前界面请关闭*/
    //connect(bt, SIGNAL(clicked(bool)), this, SLOT(close()));
    connect(bt, SIGNAL(clicked(bool)), this, SLOT(le_to_Uper()));
}

Widget::~Widget()
{

}
#ifndef WIDGET_H
#define WIDGET_H

#include <QWidget>
#include <QPushButton>
#include <QLineEdit>

class Widget : public QWidget
{
    Q_OBJECT
//申明槽函数: 此函数未来可以直接调用 也可以  用信号绑定调用
public slots:
    void le_to_Uper()
    {
        QString str = le->text();  //提取文字
        str = str.toUpper(); //文字小写变大写
        le->setText(str); //显示文字
    }

public:
    Widget(QWidget *parent = 0);
    ~Widget();

private:
    //1. 申明自己界面上想要的“子部件”
    //希望界面上有个“按钮”
    QPushButton *bt;
    //希望界面上有一个 行输入框
    QLineEdit *le;
};

#endif // WIDGET_H
#include "widget.h"
#include <QApplication>

int main(int argc, char *argv[])
{
    QApplication a(argc, argv);
    Widget w;
    w.show();

    return a.exec();
}
2.布局
#include "widget.h"
#include <QDebug>

Widget::Widget(QWidget *parent)
    : QWidget(parent)
{
    bt = new QPushButton;
    bt->setParent(this); //设置父控件:回收和显示和父一起了
    bt->setText("登录");  //设置按钮上的文字
    QString str = bt->text(); //提取按钮上的文字
    qDebug()<<str;
    bt->setGeometry(100, 100, 100, 50); //强制设置 控/部件 位置
    bt->setFixedSize(10, 10);//设置固定大小
    bt->setMinimumSize(10, 10);//设置最小大小
    bt->setMaximumSize(10, 10);//设置最大大小

    le = new QLineEdit;
    le->setParent(this);
    le->setText("xxxxxx");
    str = le->text(); //提取按钮上的文字
    qDebug()<<str;
    le->setGeometry(100, 200, 100, 50); //强制设置 控/部件 位置
    le->setEchoMode(QLineEdit::Password); //设置回显方式
    le->setAlignment(Qt::AlignRight); //设置对其方式
    le->setFixedSize(10, 10);//设置固定大小
    le->setMinimumSize(10, 10);//设置最小大小
    le->setMaximumSize(10, 10);//设置最大大小
}

Widget::~Widget()
{

}
#ifndef WIDGET_H
#define WIDGET_H

#include <QWidget>
#include <QPushButton>
#include <QLineEdit>

class Widget : public QWidget
{
    Q_OBJECT

public:
    Widget(QWidget *parent = 0);
    ~Widget();

    //申明需要按钮
    QPushButton *bt;

    //申明需要行编辑框(输入框)
    QLineEdit *le;
};

#endif // WIDGET_H
#include "widget.h"
#include <QApplication>

int main(int argc, char *argv[])
{
    QApplication a(argc, argv);
    Widget w;
    w.show();

    return a.exec();
}
3.QString
#include "widget.h"
#include <QVBoxLayout>

Widget::Widget(QWidget *parent)
    : QWidget(parent)
{
    bt = new QPushButton("1");
    bt1 = new QPushButton("2");
    le = new QLineEdit;

    QVBoxLayout *vbox = new QVBoxLayout;
    vbox->addWidget(le);
    vbox->addWidget(bt);
    vbox->addWidget(bt1);
    setLayout(vbox);

    connect(bt, SIGNAL(clicked(bool)), this, SLOT(xxx()));
    connect(bt1, SIGNAL(clicked(bool)), this, SLOT(xxx()));
}

Widget::~Widget()
{

}
#ifndef WIDGET_H
#define WIDGET_H
#include <QWidget>
#include <QLineEdit>
#include <QPushButton>
#include <QDebug>
class Widget : public QWidget
{
Q_OBJECT
public slots:
void xxx()
{
//0.提取按钮(可能来自于任意的按钮)
QPushButton *xbt = static_cast<QPushButton*>( sender() );
//1.提取按钮的文字
QString str = xbt->text();
//2.追加显示在行编辑框
//a.提取原来的文字
QString str1 = le->text();
//b.拼接新文字
str1.append(str);
//c.重新设置回去
le->setText(str1);
int a = str1.toInt(); //字符串转整型数
qDebug()<<a;
}
public:
Widget(QWidget *parent = 0);
~Widget();
QLineEdit *le;
QPushButton *bt, *bt1;
};
#endif // WIDGET_H
#include "widget.h"
#include <QApplication>

int main(int argc, char *argv[])
{
    QApplication a(argc, argv);
    Widget w;
    w.show();

    return a.exec();
}
4.打印调试
#include "widget.h"
#include <QVBoxLayout>

Widget::Widget(QWidget *parent)
    : QWidget(parent)
{
    //构造需要的控件
    bt = new QPushButton("1");
    bt1 = new QPushButton("2");
    le = new QLineEdit;
    le->setAlignment(Qt::AlignRight);
#if 0
    //垂直布局
    QVBoxLayout *vbox = new QVBoxLayout; //构造一个布局管理器
    vbox->addWidget(le);                 //将需要布局的控件加入布局管理器
    vbox->addWidget(bt);
    this->setLayout(vbox);               //将布局管理器贴在当前界面
#endif

#if 0
    //水平布局
    QHBoxLayout *vbox = new QHBoxLayout; //构造一个布局管理器
    vbox->addWidget(le);                 //将需要布局的控件加入布局管理器
    vbox->addWidget(bt);
    this->setLayout(vbox);               //将布局管理器贴在当前界面
#endif

#if 0
    //网格布局
    QGridLayout *vbox = new QGridLayout; //构造一个布局管理器
    vbox->addWidget(le, 0, 0, 1, 2);     //将需要布局的控件加入布局管理器
    vbox->addWidget(bt, 1, 1);
    this->setLayout(vbox);               //将布局管理器贴在当前界面
#endif

    //混合布局
    QHBoxLayout *hbox = new QHBoxLayout;
    hbox->addWidget(bt);
    hbox->addWidget(bt1);
    QVBoxLayout *vbox = new QVBoxLayout;
    vbox->addWidget(le);
    vbox->addLayout(hbox);
    this->setLayout(vbox);

}

Widget::~Widget()
{

}
#ifndef WIDGET_H
#define WIDGET_H
#include <QWidget>
#include <QPushButton>
#include <QLineEdit>
class Widget : public QWidget
{
Q_OBJECT
public:
Widget(QWidget *parent = 0);
~Widget();
QPushButton *bt, *bt1;
QLineEdit *le;
};
#endif // WIDGET_H
#include "widget.h"
#include <QApplication>

int main(int argc, char *argv[])
{
    QApplication a(argc, argv);
    Widget w;
    w.show();

    return a.exec();
}
边栏推荐
- [pyqt5 basic control usage analysis]
- It is said that HP / Dell / Microsoft / Amazon are considering transferring some hardware production lines outside the mainland
- What is the role of cache in the storage system of data blocks?
- How to upload and download files
- 如何组装一个注册中心?
- PSPICE 仿真石英晶体振荡电路
- 美司法部律师团队要求法官拒绝受理华为诉讼
- The UK and Germany have successively launched 5g commercial services, and Huawei has become a behind the scenes hero
- [wechat applet] zero basics | applet syntax
- [基础服务] [数据库] ClickHouse的安装和配置
猜你喜欢
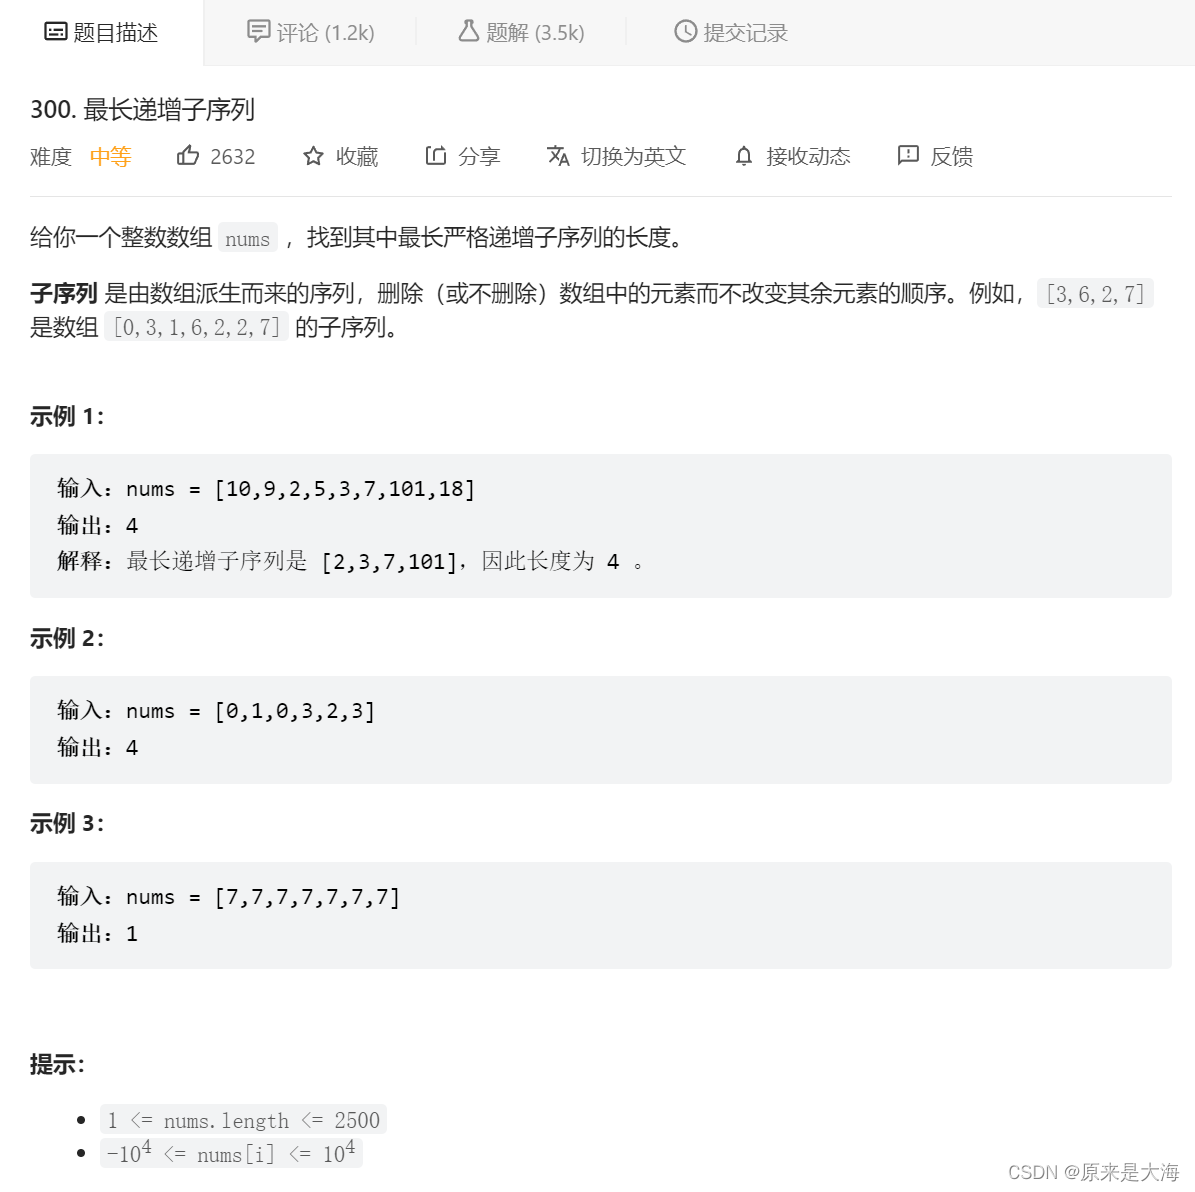
Leetcode-300 最长递增子序列

Software testing - development test content specification (project test template)

执行上下文与词法环境

Houdini notes 2

7-year-old boy playing chess too fast? The robot actually broke its finger

MPLS multi protocol label switching technology

BUU刷题记4
Leetcode-300 longest increasing subsequence

易基因|宏病毒组测序技术介绍

【【实验分享】CCIE—BGP路由黑洞实验】
随机推荐
LCP 11. 期望个数统计
08_ue4进阶_开始结束暂停菜单等ui
BUU刷题记-网鼎杯专栏2
leetcode 哈希表类
Execution context and Lexical Environment
St table, weighted and search set
The 50 Smartest Companies in the world announced that Chinese manufacturers account for nearly half, and Huawei ranks first
Chapter 2: encounter obstacles! Bypass WAF filtering! [SQL injection attack]
Fitting the new direction of curriculum standards, ape guidance, creating a characteristic new concept content system
Buu brush inscription - WANGDING cup column 2
Experiment 5 OSPF comprehensive experiment
BUU刷题记1
Buu brush inscription 3
Bean injection and lifecycle
CentOS7关于Oracle RAC 11GR2部署磁盘分区问题
Transaction rollback and record exception information at the same time
The UK and Germany have successively launched 5g commercial services, and Huawei has become a behind the scenes hero
LCP 11. Statistics of expected number
Kotlin - coroutinebuilder
【PyQt5基本控件使用解析】