当前位置:网站首页>YUV444、YUV422、YUV420、YUV420P、YUV420SP、YV12、YU12、NV12、NV21
YUV444、YUV422、YUV420、YUV420P、YUV420SP、YV12、YU12、NV12、NV21
2022-06-25 22:02:00 【android_cai_niao】
前言
各种YUV格式多如牛毛啊,刚开始学起来确实很费劲,网上搜索的文章讲的并不是很明白。
各种不同的YUV格式其实只是采样方式和存储方式不同,就这两点,不同的采样方式是为了实现节省内存,不同的存储方式暂时不了解有什么用处。
RGB转YUV444
我们假设有一张宽为4像素,高为2像素的图片,则这张图片一共有8个像素,我用一个格子代表一个像素,8个像素就是8个格子,如下图: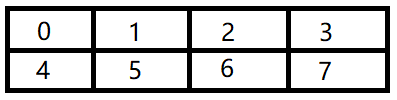
如上图,共有8个格子代表8个像素,0 ~ 7代表像素的位置。事实上一个像素是非常小的,在电脑上的一个像素用肉眼几乎看不见,所以我用一个大格子表示一个像素,方便理解。电脑中的像素是由RGB三原色组成的,这里我把RGB标注到像素中,如下:
每个R用1个字节来存储,G用1个字节存储,B也用1个字节存储,所以1个像素中的RGB需要3个字节来存储,而上图中有8个像素,也就是有8对RGB值,需要24字节来存储。
RGB通过数学公式可以转换为YUV,至于转换的原理我们不用去理解,只要知道通过公式能相互转换就行了,把上图的RGB转换为YUV格式,如下:
Y需要1个字节来存储,U需要1个字节来存储,V也需要1个字节来存储,所以8个像素的YUV图片也是需要24个字节来存储,和RGB一样。这感觉好像YUV没什么优势啊,别急,后面就知道有什么好处了。
YV12的采集方式(YUV444 * YV12)
前面RGB转换后的YUV数据称为YUV444,这种格式的YUV采样是完整的,没有丢失任何精度。而我们从摄像头拿到的YUV图像数据绝对不可能是YUV444格式的,而是其它的YUV格式,是那些有丢失精度的格式,比如YV12,在Android系统中,可以设置摄像头采集的数据出来就是YV12格式(或者NV21格式),YV12是一种丢失精度的YUV格式,它在采样时,Y不会有丢失,而在采集U时,隔一个采一个,而且隔一行采一行,采集V时也是隔一个采一个,隔一行采一行,假设一张图片高为6像素(6行),则YV12格式采集的方式为:
第一行:Y都采集,采集U,隔一个采集一个,不采集V
第二行:Y都采集,采集V,隔一个采集一个,不采集U
第三行:Y都采集,采集U,隔一个采集一个,不采集V
第四行:Y都采集,采集V,隔一个采集一个,不采集U
第五行:Y都采集,采集U,隔一个采集一个,不采集V
第六行:Y都采集,采集V,隔一个采集一个,不采集U
应该很容易理解了,U和V有丢失,所以需要的存储空间就会变少,YV12相比YUV444要节省一半的存储空间,这就是为什么摄像头出来的数据都是YUV格式而不是RGB格式的原因,因为需要的存储空间小,而且虽然丢失了一些U和V,但是图像质量用肉眼看几乎是没有下降的。
按照YV12格式的采样方式,我们把之前YUV444的图片采样为YV12格式,如下:
第一行:Y都采集,采集U,隔一个采集一个,不采集V,如下:
第二行:Y都采集,采集V,隔一个采集一个,不采集U,如下:
两行合起来看,如下:
从上图也可以看出,YUV444的每一行都有12个YUV相关数据,需要12个字节来存储,采集成YV12后,每一行就只有6个YUV相关的数据了,只需要6个字节即可存储,比原来节省了一半的存储空间,这就是为什么摄像头采集的数据一般都是YUV格式的原因了。
YV12的存储方式
YV12的存储方式是:把Y、U、V分别保存,先存Y,再存V,再存U,如下:
YV12的这种方式把Y、U、V都分别存储了,专业术语叫做分成了3个平面,看起来需要用3个数组来存储,实际上摄像头采集画面传给我们的YUV数据是一个一维数组,并不是二维的,如下:
所以,我们不要以为YV12分三个平面就是用3个数组来存储,摄像头出来的YV12是一个一维数组,保存文件时直接保存这个一维数组即可。当然了,在代码中,为了方便操作这个YV12数据,可以把一维数组转换为分别保存Y、U、V的三个数组。
讲到这里,我们顺便了解另一种YUV格式:YU12(也叫 I420),它和YV12很像,只是存储时YU12先存的U再存V,如下:
YV12的还原(YV12 * YUV444)
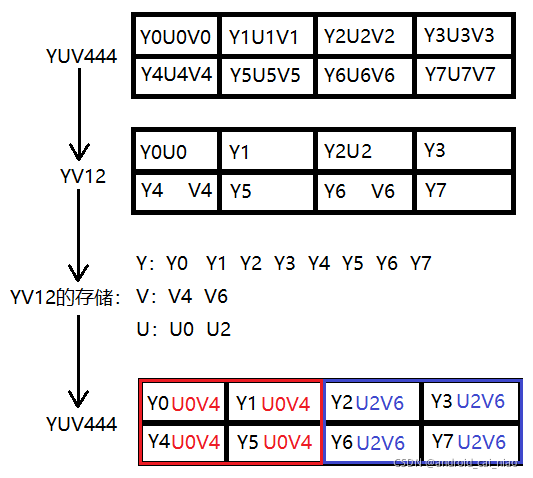
通过YV12采样的数据是丢失了一些U和V的,那怎么还原呢?如下:
如上图可以看到,YV12的还原方式为:每两行中,每4个相邻的Y共用一套UV(即红色框中的4个Y共用一套UV,蓝色框中的4个Y共用一套UV),当再把YUV转换回RGB时,和之前的原始RGB肯定是不太一样的,但是在实际效果上看,我们肉眼几乎是看不出差别来的(只看一个颜色是可以看出来差别,但是如果看一张整体的图片就看不出来差别了)。
根据这个YV12还原回YUV444的原理,可以知道,图像的宽和高都应该是偶数,所以我们在做练习时,在设置图像的宽高的时候就不要搞出单数的宽高来,以免出现异常!我们在看一些手机或者摄像机的分辨率设置也都是偶数的,没有单数的情况。
通过代码模拟YUV444 * YV12 * YUV444
1、图解
如上图所示,接下来我们就通过代码的方式来模拟YUV444到YV12数据的采集和存储过程,然后还原回YUV444。为了方便后面操作YUV数据的方便,YV12的数据在存储时我们使用三个数组来保存,而不是用一个数组保存。
2、模拟出YUV444数据
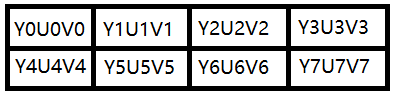
通过代码的方式模拟出如上图的YUV444数据,如下:
fun main() {

    val yuv444Bytes = arrayOf(
        arrayOf("Y0", "U0", "V0", "Y1", "U1", "V1", "Y2", "U2", "V2", "Y3", "U3", "V3"),
        arrayOf("Y4", "U4", "V4", "Y5", "U5", "V5", "Y6", "U6", "V6", "Y7", "U7", "V7")
    )
    printYUV444(yuv444Bytes)
}

fun printYUV444(yuv444Bytes: Array<Array<String>>) {

    println("下面输出YUV444数据")
    for (oneLine in yuv444Bytes) {

        for (columnIndex in oneLine.indices step 3) {

            val y = oneLine[columnIndex + 0]
            val u = oneLine[columnIndex + 1]
            val v = oneLine[columnIndex + 2]
            print("$y $u $v | ")
        }
        println()
    }
}
运行结果如下:
下面输出YUV444数据
Y0 U0 V0 | Y1 U1 V1 | Y2 U2 V2 | Y3 U3 V3 |
Y4 U4 V4 | Y5 U5 V5 | Y6 U6 V6 | Y7 U7 V7 |
这里我们通过一个二维的字符串数组来表示了一张宽为4,高为2的图片的YUV444数据,使用字符串来模拟YUV数据是为了方便大家查看结果。接下来要实现从YUV444中采集出YV12数据。
3、从YUV444中采集出YV12数据

如上图,我们要从YUV444的数据中采集出YV12的数据,代码如下:
fun main() {

    val yuv444Bytes = arrayOf(
        arrayOf("Y0", "U0", "V0", "Y1", "U1", "V1", "Y2", "U2", "V2", "Y3", "U3", "V3"),
        arrayOf("Y4", "U4", "V4", "Y5", "U5", "V5", "Y6", "U6", "V6", "Y7", "U7", "V7")
    )
    printYUV444(yuv444Bytes)

    val (yBytes, uBytes, vBytes) = yuv444ToYv12(yuv444Bytes)
    printYV12(yBytes, uBytes, vBytes)
}

fun printYUV444(yuv444Bytes: Array<Array<String>>) {

    println("下面输出YUV444数据")
    for (oneLine in yuv444Bytes) {

        for (columnIndex in oneLine.indices step 3) {

            val y = oneLine[columnIndex + 0]
            val u = oneLine[columnIndex + 1]
            val v = oneLine[columnIndex + 2]
            print("$y $u $v | ")
        }
        println()
    }
}

fun printYV12(yBytes: Array<String>, uBytes: Array<String>, vBytes: Array<String>) {

    println("下面输出YV12数据")
    yBytes.forEach {
     print("$it ") }
    println()
    vBytes.forEach {
     print("$it ") }
    println()
    uBytes.forEach {
     print("$it ") }
    println()
}

private fun yuv444ToYv12(yuv444Bytes: Array<Array<String>>): Triple<Array<String>, Array<String>, Array<String>> {

    val width = yuv444Bytes[0].size / 3 // 注:因为yuv444格式的一个像素是3个字节,所以要除以3
    val height = yuv444Bytes.size
    val ySize = width * height
    val vSize = ySize / 4
    val yBytes = Array(ySize) {
     "" }
    val uBytes = Array(vSize) {
     "" }
    val vBytes = Array(vSize) {
     "" }
    var yIndex = 0
    var uIndex = 0
    var vIndex = 0
    var saveU = true
    var saveV = true
    for (rowIndex in 0 until height) {

        val oneLine = yuv444Bytes[rowIndex]
        for (columnIndex in oneLine.indices step 3) {

            val y = oneLine[columnIndex + 0]
            val u = oneLine[columnIndex + 1]
            val v = oneLine[columnIndex + 2]
            yBytes[yIndex++] = y
            if (rowIndex % 2 == 0) {

                // 偶数行取U,隔一个取一个
                if (saveU) {

                    uBytes[uIndex++] = u
                }
                saveU = !saveU
            } else {

                // 单数行取V,隔一个取一个
                if (saveV) {

                    vBytes[vIndex++] = v
                }
                saveV = !saveV
            }
        }
    }
    return Triple(yBytes, uBytes, vBytes)
}
运行效果如下:
下面输出YUV444数据
Y0 U0 V0 | Y1 U1 V1 | Y2 U2 V2 | Y3 U3 V3 |
Y4 U4 V4 | Y5 U5 V5 | Y6 U6 V6 | Y7 U7 V7 |
下面输出YV12数据
Y0 Y1 Y2 Y3 Y4 Y5 Y6 Y7
V4 V6
U0 U2
4、把YV12还原为YUV444

实现代码如下:
fun main() {

    val yuv444Bytes = arrayOf(
        arrayOf("Y0", "U0", "V0", "Y1", "U1", "V1", "Y2", "U2", "V2", "Y3", "U3", "V3"),
        arrayOf("Y4", "U4", "V4", "Y5", "U5", "V5", "Y6", "U6", "V6", "Y7", "U7", "V7")
    )
    printYUV444(yuv444Bytes)

    val (yBytes, uBytes, vBytes) = yuv444ToYv12(yuv444Bytes)
    printYV12(yBytes, uBytes, vBytes)

    val width = yuv444Bytes[0].size
    val height = yuv444Bytes.size
    val yuv444 = yv12ToYuv444(width, height, yBytes, uBytes, vBytes)
    printYUV444(yuv444)
}

fun yv12ToYuv444(width: Int, height: Int, yBytes: Array<String>, uBytes: Array<String>, vBytes: Array<String>): Array<Array<String>> {

    var yIndex = 0
    val yuv444Bytes = Array(height) {
     Array(width) {
     " " } }
    val oneLineUvSize = width / 2 // 在YV12中,一行中的U或V的数量
    var twoLineIndex = -1  // 每两行的计数
    for (rowIndex in 0 until height) {

        val oneLineBytes = yuv444Bytes[rowIndex]
        var u = ""
        var v = ""

        // 因为每两行读取UV的时起始位置是一样的,所以我们只在这两行的偶数行时把twoLineIndex进行加加即可
        if (rowIndex % 2 == 0) {

            twoLineIndex++
        }

        // 计算每一行在取UV时uvIndex的起始位置
        var uvIndex = twoLineIndex * oneLineUvSize

        for (columnIndex in oneLineBytes.indices step 3) {

            if (yIndex % 2 == 0) {

                // 一行之中,每两个Y只取一次UV
                u = uBytes[uvIndex]
                v = vBytes[uvIndex]
                uvIndex++
            }

            val y = yBytes[yIndex++]
            oneLineBytes[columnIndex + 0] = y
            oneLineBytes[columnIndex + 1] = u
            oneLineBytes[columnIndex + 2] = v
        }
    }

    return yuv444Bytes
}
运行结果如下:
下面输出YUV444数据
Y0 U0 V0 | Y1 U1 V1 | Y2 U2 V2 | Y3 U3 V3 |
Y4 U4 V4 | Y5 U5 V5 | Y6 U6 V6 | Y7 U7 V7 |
下面输出YV12数据
Y0 Y1 Y2 Y3 Y4 Y5 Y6 Y7
V4 V6
U0 U2
下面输出YUV444数据
Y0 U0 V4 | Y1 U0 V4 | Y2 U2 V6 | Y3 U2 V6 |
Y4 U0 V4 | Y5 U0 V4 | Y6 U2 V6 | Y7 U2 V6 |
可以和之前的截图对比一下结果 :
可以看到,4个Y共用一套UV,这样的话,每个像素的YUV值并不是之前原始的YUV值了,所以颜色效果肯定有偏差,但是就整张图片来看的话,肉眼几乎看不出差别,前面也说到过的,这个我们需要清楚。
YUV444到YV12是比较简单的,但是把YV12还原回YUV444的逻辑是挺复杂的,所以这里对一些细节进行分析:
如上图所示,一行之中,每两个Y共用一套UV,所以,每两个Y只读取一次UV即可,我们观察一下保存Y的数组的每个元素的索引,如下:
即然是每两个Y读一次UV,通过上图发现,其实在y的索引为双数时读取就行了,也就是在0、2、4、6的时候读取,所以实现代码如下:
if (yIndex % 2 == 0) {

    u = uBytes[uvIndex]
    v = vBytes[uvIndex]
    uvIndex++
}
每两个Y读取一次UV还比较容易实现,比较难的是第二行、第三行、第四行的UV怎么取?这个确实是比较难,属于逻辑问题,要找到它的规律:
- 第一行取UV和第二行取UV是一模一样的,都是从0开始读取的,所以只要让他们的uvIndex在读第一行和第二行时保持一样即可。
- 第三行取UV和第四行取UV是一样一样的,与第一、二行不同的是,uvIndex的起始位置不是从0开始了。
所以,难点就是如何找出uvIndex的起始位置即可,为了找出规律,我们需要数据多一点,假设宽为8像素,高为6像素,则一共有 6 x 8 = 48像素,就会有48个Y,我们知道每4个Y对应一个U和V,则48 / 4 = 12,即会有12个U和12个V,画图分析如下:
如上图,它是分析计算每一行读取UV时的起始位置的公式的,对应的实现代码如下:
。。。
fun yv12ToYuv444(。。。): Array<Array<String>> {

    。。。
    val oneLineUvSize = width / 2 // 在YV12中,一行中的U或V的数量
    var twoLineIndex = -1  // 每两行的计数
    for (rowIndex in 0 until height) {

        。。。
        // 因为每两行读取UV的时起始位置是一样的,所以我们只在这两行的偶数行时把twoLineIndex进行加加即可
        if (rowIndex % 2 == 0) {

            twoLineIndex++
        }

        // 计算每一行在读取UV时uvIndex的起始位置
        var uvIndex = twoLineIndex * oneLineUvSize
        。。。
    }

    return yuv444Bytes
}
5、完整代码
fun main() {

    val yuv444Bytes = arrayOf(
        arrayOf("Y0", "U0", "V0", "Y1", "U1", "V1", "Y2", "U2", "V2", "Y3", "U3", "V3"),
        arrayOf("Y4", "U4", "V4", "Y5", "U5", "V5", "Y6", "U6", "V6", "Y7", "U7", "V7")
    )
    printYUV444(yuv444Bytes)

    val (yBytes, uBytes, vBytes) = yuv444ToYv12(yuv444Bytes)
    printYV12(yBytes, uBytes, vBytes)

    val width = yuv444Bytes[0].size
    val height = yuv444Bytes.size
    val yuv444 = yv12ToYuv444(width, height, yBytes, uBytes, vBytes)
    printYUV444(yuv444)
}

fun yv12ToYuv444(width: Int, height: Int, yBytes: Array<String>, uBytes: Array<String>, vBytes: Array<String>): Array<Array<String>> {

    var yIndex = 0
    val yuv444Bytes = Array(height) {
     Array(width) {
     " " } }
    val oneLineUvSize = width / 2 // 在YV12中,一行中的U或V的数量
    var twoLineIndex = -1  // 每两行的计数
    for (rowIndex in 0 until height) {

        val oneLineBytes = yuv444Bytes[rowIndex]
        var u = ""
        var v = ""

        // 因为每两行读取UV的时起始位置是一样的,所以我们只在这两行的偶数行时把twoLineIndex进行加加即可
        if (rowIndex % 2 == 0) {

            twoLineIndex++
        }

        // 计算每一行在取UV时uvIndex的起始位置
        var uvIndex = twoLineIndex * oneLineUvSize

        for (columnIndex in oneLineBytes.indices step 3) {

            if (yIndex % 2 == 0) {

                // 一行之中,每两个Y只取一次UV
                u = uBytes[uvIndex]
                v = vBytes[uvIndex]
                uvIndex++
            }

            val y = yBytes[yIndex++]
            oneLineBytes[columnIndex + 0] = y
            oneLineBytes[columnIndex + 1] = u
            oneLineBytes[columnIndex + 2] = v
        }
    }

    return yuv444Bytes
}

fun printYUV444(yuv444Bytes: Array<Array<String>>) {

    println("下面输出YUV444数据")
    for (oneLine in yuv444Bytes) {

        for (columnIndex in oneLine.indices step 3) {

            val y = oneLine[columnIndex + 0]
            val u = oneLine[columnIndex + 1]
            val v = oneLine[columnIndex + 2]
            print("$y $u $v | ")
        }
        println()
    }
}

fun printYV12(yBytes: Array<String>, uBytes: Array<String>, vBytes: Array<String>) {

    println("下面输出YV12数据")
    yBytes.forEach {
     print("$it ") }
    println()
    vBytes.forEach {
     print("$it ") }
    println()
    uBytes.forEach {
     print("$it ") }
    println()
}

fun yuv444ToYv12(yuv444Bytes: Array<Array<String>>): Triple<Array<String>, Array<String>, Array<String>> {

    val width = yuv444Bytes[0].size / 3
    val height = yuv444Bytes.size
    val ySize = width * height
    val vSize = ySize / 4
    val yBytes = Array(ySize) {
     "" }
    val uBytes = Array(vSize) {
     "" }
    val vBytes = Array(vSize) {
     "" }
    var yIndex = 0
    var uIndex = 0
    var vIndex = 0
    var saveU = true
    var saveV = true
    for (rowIndex in 0 until height) {

        val oneLine = yuv444Bytes[rowIndex]
        for (columnIndex in oneLine.indices step 3) {

            val y = oneLine[columnIndex + 0]
            val u = oneLine[columnIndex + 1]
            val v = oneLine[columnIndex + 2]
            yBytes[yIndex++] = y
            if (rowIndex % 2 == 0) {

                // 偶数行取U,隔一个取一个
                if (saveU) {

                    uBytes[uIndex++] = u
                }
                saveU = !saveU
            } else {

                // 单数行取V,隔一个取一个
                if (saveV) {

                    vBytes[vIndex++] = v
                }
                saveV = !saveV
            }
        }
    }
    return Triple(yBytes, uBytes, vBytes)
}
6、完整代码(把String换为byte)
下面,我们把yuv444转YV12和YV12转YUV444的代码修改为使用byte,并封装到YuvUtil中,以方便复用,需要特别注意的是,这里一行数据的byte数组大小是要用宽度乘以3的,因为1个像素要用3个字节来存储的,反过来,当我们通过一行byte数组计算出宽时,就需要拿数组大小除以3。
object YuvUtil {


    fun yv12ToYuv444(width: Int, height: Int, yBytes: Array<Byte>, uBytes: Array<Byte>, vBytes: Array<Byte>): Array<ByteArray> {

        var yIndex = 0
        val yuv444Bytes = Array(height) {
     ByteArray(width * 3) } // 因为每个像素需要3个字节,所以这里乘以3
        val oneLineUvSize = width / 2 // 在YV12中,一行中的U或V的数量
        var twoLineIndex = -1  // 每两行的计数
        for (rowIndex in 0 until height) {

            val oneLineBytes = yuv444Bytes[rowIndex]
            var u: Byte = 0
            var v: Byte = 0

            // 因为每两行读取UV的时起始位置是一样的,所以我们只在这两行的偶数行时把twoLineIndex进行加加即可
            if (rowIndex % 2 == 0) {

                twoLineIndex++
            }

            // 计算每一行在取UV时uvIndex的起始位置
            var uvIndex = twoLineIndex * oneLineUvSize

            for (columnIndex in oneLineBytes.indices step 3) {

                if (yIndex % 2 == 0) {

                    // 一行之中,每两个Y只取一次UV
                    u = uBytes[uvIndex]
                    v = vBytes[uvIndex]
                    uvIndex++
                }

                val y = yBytes[yIndex++]
                oneLineBytes[columnIndex + 0] = y
                oneLineBytes[columnIndex + 1] = u
                oneLineBytes[columnIndex + 2] = v
            }
        }

        return yuv444Bytes
    }

    private fun yuv444ToYv12(yuv444Bytes: Array<ByteArray>): Triple<ByteArray, ByteArray, ByteArray> {

        val width = yuv444Bytes[0].size / 3 // 因为每个像素占3个字节,所以要除以3
        val height = yuv444Bytes.size
        val ySize = width * height
        val vSize = ySize / 4
        val yBytes = ByteArray(ySize)
        val uBytes = ByteArray(vSize)
        val vBytes = ByteArray(vSize)
        var yIndex = 0
        var uIndex = 0
        var vIndex = 0
        var saveU = true
        var saveV = true
        for (rowIndex in 0 until height) {

            val oneLine = yuv444Bytes[rowIndex]
            for (columnIndex in oneLine.indices step 3) {

                val y = oneLine[columnIndex + 0]
                val u = oneLine[columnIndex + 1]
                val v = oneLine[columnIndex + 2]
                yBytes[yIndex++] = y
                if (rowIndex % 2 == 0) {

                    // 偶数行取U,隔一个取一个
                    if (saveU) {

                        uBytes[uIndex++] = u
                    }
                    saveU = !saveU
                } else {

                    // 单数行取V,隔一个取一个
                    if (saveV) {

                        vBytes[vIndex++] = v
                    }
                    saveV = !saveV
                }
            }
        }
        return Triple(yBytes, uBytes, vBytes)
    }

    fun printYUV444(yuv444Bytes: Array<ByteArray>) {

        println("下面输出YUV444数据")
        for (oneLine in yuv444Bytes) {

            for (columnIndex in oneLine.indices step 3) {

                val y = oneLine[columnIndex + 0]
                val u = oneLine[columnIndex + 1]
                val v = oneLine[columnIndex + 2]
                print("$y $u $v | ")
            }
            println()
        }
    }

    fun printYV12(yBytes: ByteArray, uBytes: ByteArray, vBytes: ByteArray) {

        // 以16进制进行打印
        println("下面输出YV12数据")
        println("下面输出Y数据")
        yBytes.forEach {
     print("${
      toHexString(byteToInt(it))} ") }
        println("\n下面输出V数据")
        vBytes.forEach {
     print("${
      toHexString(byteToInt(it))} ") }
        println("\n下面输出U数据")
        uBytes.forEach {
     print("${
      toHexString(byteToInt(it))} ") }
        println()
    }

    fun byteToInt(byte: Byte): Int = byte.toInt() shl 24 ushr 24
    fun toHexString(int: Int): String = Integer.toHexString(int)

}
YV12图片与bmp图片相互
bmp图片的相关知识可以参考这篇文件:https://blog.csdn.net/android_cai_niao/article/details/120528734
YV12与bmp的转换,说白了就是yuv和rgb的转换,找到转换公式即可。在网上转换公式有很多,这些转换公式到底哪个靠谱,我也不清楚,因为这里面的知识点太多了,不同的颜色空间有不同的转换公式,我就以手机摄像头出来的一张YUV图片转换为bmp图片在电脑下查看,颜色差不多我就认为它是正确的公式,我也懒得去想它是个什么颜色空间了。
RGB转YUV公式
- Y = 0.299 * R + 0.587 * G + 0.114 * B
- U = -0.169 * R - 0.331 * G + 0.499 * B + 128
- V = 0.499 * R - 0.418 * G - 0.0813 * B + 128
需要注意的是,R、G、B的范围是0 ~ 255,正好一个byte可以表示,我们从内存中读取RGB时,也是byte类型的数据,但是在参与转换公式时需要注意,java中的byte是有符号的,一个byte有8个比特位,如果全是1,在byte中就是-1,如果在int中就是255,所以我们需要把byte转换为一个正数的int值,否则计算公式就不管用了。还要注意的是:byte.toInt()这个函数,一个-1的byte转换为int后还是-1,所以需要注意,我们要取int的最低8位,然后把高位都变成0,然后就变成正数了。还有就是转换公式计算出来的Y、U、V值也范围也是0 ~ 255的,需要做超范围的处理。
相应的Kotlin实现代码如下:
object YuvUtil {


    fun byteToInt(byte: Byte): Int = byte.toInt() shl 24 ushr 24
    fun verify(int: Int) = if (int < 0) 0 else if (int > 255) 255 else int
    fun toHexString(int: Int): String = Integer.toHexString(int)

    fun rgbToYuv(R: Byte, G: Byte, B: Byte): Triple<Byte, Byte, Byte> {

        // 注:R、G、B值的范围是0 ~ 255,是没有负数的,需要转换为正数的int。
        // 一个负数用byte.toInt()转换后还是一个负数,所以我们通过位运算符来进行转换,Byte的-1转换为Int值应该是255
        return rgbToYuv(byteToInt(R), byteToInt(G), byteToInt(B))
    }

    fun rgbToYuv(R: Int, G: Int, B: Int): Triple<Byte, Byte, Byte> {

        var Y = (0.299 * R + 0.587 * G + 0.114 * B).toInt()
        var U = (-0.169 * R - 0.331 * G + 0.499 * B + 128).toInt()
        var V = (0.499 * R - 0.418 * G - 0.0813 * B + 128).toInt()
        Y = verify(Y)
        U = verify(U)
        V = verify(V)
        println("rgb: ${
      toHexString(R)} ${
      toHexString(G)} ${
      toHexString(B)} -> yuv: ${
      toHexString(Y)} ${
      toHexString(U)} ${
      toHexString(V)}")
        return Triple(Y.toByte(), U.toByte(), V.toByte())
    }
}
YUV转RGB公式
- R = Y + 1.4075 * (V - 128)
- G = Y - 0.3455 * (U - 128) - 0.7169 * (V - 128)
- B = Y + 1.7790 * (U - 128)
这里同样需要注意byte数据在参与公式计算前的处理,还有计算结果的超范围处理。
相应的Kotlin实现代码如下:
object YuvUtil {


    fun byteToInt(byte: Byte): Int = byte.toInt() shl 24 ushr 24
    fun verify(int: Int) = if (int < 0) 0 else if (int > 255) 255 else int
    fun toHexString(int: Int): String = Integer.toHexString(int)

    fun yuvToRgb(Y: Byte, U: Byte, V: Byte): Triple<Byte, Byte, Byte> {

        // 注:Y、U、V值的范围是0 ~ 255,是没有负数的,需要转换为正数的int。
        // 一个负数用byte.toInt()转换后还是一个负数,所以我们通过位运算符来进行转换,Byte的-1转换为Int值应该是255
        return yuvToRgb(byteToInt(Y), byteToInt(U), byteToInt(V))
    }

    fun yuvToRgb(Y: Int, U: Int, V: Int): Triple<Byte, Byte, Byte> {

        var R = (Y + 1.4075 * (V - 128)).toInt()
        var G = (Y - 0.3455 * (U - 128) - 0.7169 * (V - 128)).toInt()
        var B = (Y + 1.779 * (U - 128)).toInt()
        R = verify(R)
        G = verify(G)
        B = verify(B)
        println("yuv: ${
      toHexString(Y)} ${
      toHexString(U)} ${
      toHexString(V)} -> rgb: ${
      toHexString(R)} ${
      toHexString(G)} ${
      toHexString(B)}")
        return Triple(R.toByte(), G.toByte(), B.toByte())
    }

}
RGB和YUV互转偏差
RGB和YUV不可能完美互转的,也就是说RGB转换为YUV后,再转换回GRB时跟原来的RGB可能会有偏差,示例如下:
fun main() {

    val (Y, U, V) = YuvUtil.rgbToYuv(0xff, 0, 0)
    val (R, G, B) = YuvUtil.yuvToRgb(Y, U, V)
}
运行结果如下:
rgb: ff 0 0 -> yuv: 4c 54 ff
yuv: 4c 54 ff -> rgb: fe 0 0
从结果可以看到,最初的RGB为:0xff0000,转换为YUV为:0x4c54ff,再转换回RGB为:0xfe0000,和最初的RGB值不一样了,但是很接近,也就是说都是红色,最初的红色和转换后的红色用肉眼看几乎没有差别。
bmp图片转 YUV图片
import java.io.*

object YuvUtil {


    fun bmpFileToYV12FileDemo() {

        val grbBytes = BmpUtil.createRgbBytes(4, 2)
        println("下面输出RGB像素数据:")
        BmpUtil.printColorBytes(grbBytes)
        val yuv444Bytes = rgbBytesToYuv444Bytes(grbBytes)
        println("下面输出YUV像素数据:")
        BmpUtil.printColorBytes(yuv444Bytes)
        val (yBytes, uBytes, vBytes) = yuv444BytesToYv12Bytes(yuv444Bytes)
        printYV12(yBytes, uBytes, vBytes)
        val yv12File = File("C:\\Users\\Even\\Pictures\\demo.yuv")
        writeYv12BytesToFile(yv12File, yBytes, vBytes, uBytes)
    }

    fun bmpFileToYV12FileDemo2() {

        val bmpFile = File("C:\\Users\\Even\\Pictures\\海琴烟.bmp")
        val yv12File = File("C:\\Users\\Even\\Pictures\\海琴烟.yuv")
        val rgbBytes = BmpUtil.readBmpFilePixelBytes(bmpFile)
        val yuv444Bytes = rgbBytesToYuv444Bytes(rgbBytes)
        val (yBytes, uBytes, vBytes) = yuv444BytesToYv12Bytes(yuv444Bytes)
        writeYv12BytesToFile(yv12File, yBytes, vBytes, uBytes)
    }

    private fun writeYv12BytesToFile(yv12File: File, yBytes: ByteArray, vBytes: ByteArray, uBytes: ByteArray) {

        FileOutputStream(yv12File).use {
     fos ->
            BufferedOutputStream(fos).use {
     bos ->
                bos.write(yBytes)
                bos.write(vBytes)
                bos.write(uBytes)
            }
        }
    }

    fun rgbBytesToYuv444Bytes(rgbBytes: Array<ByteArray>): Array<ByteArray> {

        val yuv444Bytes = Array(rgbBytes.size) {
     ByteArray(rgbBytes[0].size) }
        for (rowIndex in rgbBytes.indices) {

            val oneLineBytes = rgbBytes[rowIndex]
            val oneLineYuv444Bytes = yuv444Bytes[rowIndex]
            for (columnIndex in oneLineBytes.indices step 3) {

                val red   = oneLineBytes[columnIndex + 0]
                val green = oneLineBytes[columnIndex + 1]
                val blue  = oneLineBytes[columnIndex + 2]
                val (Y, U, V) = rgbToYuv(red, green, blue)
                oneLineYuv444Bytes[columnIndex + 0] = Y
                oneLineYuv444Bytes[columnIndex + 1] = U
                oneLineYuv444Bytes[columnIndex + 2] = V
            }
        }
        return yuv444Bytes
    }

    fun byteToInt(byte: Byte): Int = byte.toInt() shl 24 ushr 24
    fun verify(int: Int) = if (int < 0) 0 else if (int > 255) 255 else int
    fun toHexString(int: Int): String = Integer.toHexString(int)

    fun rgbToYuv(R: Byte, G: Byte, B: Byte): Triple<Byte, Byte, Byte> {

        // 注:R、G、B值的范围是0 ~ 255,是没有负数的,需要转换为正数的int。
        // 一个负数用byte.toInt()转换后还是一个负数,所以我们通过位运算符来进行转换,Byte的-1转换为Int值应该是255
        return rgbToYuv(byteToInt(R), byteToInt(G), byteToInt(B))
    }

    fun rgbToYuv(R: Int, G: Int, B: Int): Triple<Byte, Byte, Byte> {

        var Y = (0.299 * R + 0.587 * G + 0.114 * B).toInt()
        var U = (-0.169 * R - 0.331 * G + 0.499 * B + 128).toInt()
        var V = (0.499 * R - 0.418 * G - 0.0813 * B + 128).toInt()
        Y = verify(Y)
        U = verify(U)
        V = verify(V)
        //println("rgb: ${toHexString(R)} ${toHexString(G)} ${toHexString(B)} -> yuv: ${toHexString(Y)} ${toHexString(U)} ${toHexString(V)}")
        return Triple(Y.toByte(), U.toByte(), V.toByte())
    }

    fun yuvToRgb(Y: Byte, U: Byte, V: Byte): Triple<Byte, Byte, Byte> {

        // 注:Y、U、V值的范围是0 ~ 255,是没有负数的,需要转换为正数的int。
        // 一个负数用byte.toInt()转换后还是一个负数,所以我们通过位运算符来进行转换,Byte的-1转换为Int值应该是255
        return yuvToRgb(byteToInt(Y), byteToInt(U), byteToInt(V))
    }

    fun yuvToRgb(Y: Int, U: Int, V: Int): Triple<Byte, Byte, Byte> {

        var R = (Y + 1.4075 * (V - 128)).toInt()
        var G = (Y - 0.3455 * (U - 128) - 0.7169 * (V - 128)).toInt()
        var B = (Y + 1.779 * (U - 128)).toInt()
        R = verify(R)
        G = verify(G)
        B = verify(B)
        //println("yuv: ${toHexString(Y)} ${toHexString(U)} ${toHexString(V)} -> rgb: ${toHexString(R)} ${toHexString(G)} ${toHexString(B)}")
        return Triple(R.toByte(), G.toByte(), B.toByte())
    }


    fun yv12BytesToYuv444Bytes(width: Int, height: Int, yBytes: ByteArray, uBytes: ByteArray, vBytes: ByteArray): Array<ByteArray> {

        var yIndex = 0
        val yuv444Bytes = Array(height) {
     ByteArray(width * 3) }
        val oneLineUvSize = width / 2 // 在YV12中,一行中的U或V的数量
        var twoLineIndex = -1  // 每两行的计数
        for (rowIndex in 0 until height) {

            val oneLineBytes = yuv444Bytes[rowIndex]
            var u: Byte = 0
            var v: Byte = 0

            // 因为每两行读取UV的时起始位置是一样的,所以我们只在这两行的偶数行时把twoLineIndex进行加加即可
            if (rowIndex % 2 == 0) {

                twoLineIndex++
            }

            // 计算每一行在取UV时uvIndex的起始位置
            var uvIndex = twoLineIndex * oneLineUvSize

            for (columnIndex in oneLineBytes.indices step 3) {

                if (yIndex % 2 == 0) {

                    // 一行之中,每两个Y只取一次UV
                    u = uBytes[uvIndex]
                    v = vBytes[uvIndex]
                    uvIndex++
                }

                val y = yBytes[yIndex++]
                oneLineBytes[columnIndex + 0] = y
                oneLineBytes[columnIndex + 1] = u
                oneLineBytes[columnIndex + 2] = v
            }
        }

        return yuv444Bytes
    }

    private fun yuv444BytesToYv12Bytes(yuv444Bytes: Array<ByteArray>): Triple<ByteArray, ByteArray, ByteArray> {

        val width = yuv444Bytes[0].size / 3  // 每个像素占3个字节,所以要除以3
        val height = yuv444Bytes.size
        val ySize = width * height
        val vSize = ySize / 4
        val yBytes = ByteArray(ySize)
        val uBytes = ByteArray(vSize)
        val vBytes = ByteArray(vSize)
        var yIndex = 0
        var uIndex = 0
        var vIndex = 0
        var saveU = true
        var saveV = true
        for (rowIndex in 0 until height) {

            val oneLine = yuv444Bytes[rowIndex]
            for (columnIndex in oneLine.indices step 3) {

                val y = oneLine[columnIndex + 0]
                val u = oneLine[columnIndex + 1]
                val v = oneLine[columnIndex + 2]
                yBytes[yIndex++] = y
                if (rowIndex % 2 == 0) {

                    // 偶数行取U,隔一个取一个
                    if (saveU) {

                        uBytes[uIndex++] = u
                    }
                    saveU = !saveU
                } else {

                    // 单数行取V,隔一个取一个
                    if (saveV) {

                        vBytes[vIndex++] = v
                    }
                    saveV = !saveV
                }
            }
        }
        return Triple(yBytes, uBytes, vBytes)
    }

    fun printYUV444(yuv444Bytes: Array<ByteArray>) {

        println("下面输出YUV444数据")
        for (oneLine in yuv444Bytes) {

            for (columnIndex in oneLine.indices step 3) {

                val y = oneLine[columnIndex + 0]
                val u = oneLine[columnIndex + 1]
                val v = oneLine[columnIndex + 2]
                print("$y $u $v | ")
            }
            println()
        }
    }

    fun printYV12(yBytes: ByteArray, uBytes: ByteArray, vBytes: ByteArray) {

        // 以16进制进行打印
        println("下面输出YV12数据")
        println("下面输出Y数据")
        yBytes.forEach {
     print("${
      toHexString(byteToInt(it))} ") }
        println("\n下面输出V数据")
        vBytes.forEach {
     print("${
      toHexString(byteToInt(it))} ") }
        println("\n下面输出U数据")
        uBytes.forEach {
     print("${
      toHexString(byteToInt(it))} ") }
        println()
    }

}
import java.io.*

object BmpUtil {


    /** 创建Bitmap的示例:通过读取一个bmp文件的像素,再把这些像素写入一个新的bmp文件 */
    fun createBitmapDemo2() {

        val bmpFilePixelBytes = readBmpFilePixelBytes(File("C:\\Users\\Even\\Pictures\\海琴烟.bmp"))
        //printPixelBytes(bmpFilePixelBytes)
        createBmpFile(bmpFilePixelBytes, File("C:\\Users\\Even\\Pictures\\demo.bmp"))
    }

    /** 创建Bitmap的示例:创建一个上一半为红色,下一半为绿色的bmp文件 */
    fun createBitmapDemo() {

        val width = 300 // 注意:宽高要设置为4的倍数,以避免需要进行补位的操作
        val height = 200
        val pixelBytes = createRgbBytes(width, height)
        //printPixelBytes(pixelBytes)
        val bmpFile = File("C:\\Users\\Even\\Pictures\\demo.bmp")
        createBmpFile(pixelBytes, bmpFile)
    }

    fun readBmpFilePixelBytes(bmpFile: File): Array<ByteArray> {

        // 得到bmp文件的所有字节
        val bmpFileBytes = bmpFile.readBytes()

        // 从bmp文件中获取图像的宽和高的字节数组
        val widthLittleEndianBytes = ByteArray(4)
        val heightLittleEndianBytes = ByteArray(4)
        System.arraycopy(bmpFileBytes, 0x12, widthLittleEndianBytes, 0, 4)
        System.arraycopy(bmpFileBytes, 0x16, heightLittleEndianBytes, 0, 4)

        // 把小端的字节数组转换为Int
        val width = littleEndianBytesToInt(widthLittleEndianBytes)
        val height = littleEndianBytesToInt(heightLittleEndianBytes)
        println("读取到bmp图像width = $width, height = $height")
        val pixelBytes = Array(height) {
     ByteArray(width * 3) }
        var rowIndex = height - 1 // 因为bmp图片是从最后一行开始保存的,读取的时候我们把它往到正确的位置
        var columnIndex = 0
        var oneLineBytes = pixelBytes[rowIndex]
        val oneLineBytesSize = oneLineBytes.size
        // 像素值都是从0x36的位置开始保存的,而且每个像素点3个字节
        for (i in 0x36 until bmpFileBytes.size step 3) {

            if (columnIndex == oneLineBytesSize) {

                // 存满一行了,需要换行保存了。这里--rowIndex是因为原图片是从最后一行向前面行的顺序保存的
                oneLineBytes = pixelBytes[--rowIndex]
                columnIndex = 0
            }

            // 注意:bmp文件的颜色是按蓝、绿、红的顺序保存的
            val blue  = bmpFileBytes[i + 0]
            val green = bmpFileBytes[i + 1]
            val red   = bmpFileBytes[i + 2]

            oneLineBytes[columnIndex++] = red
            oneLineBytes[columnIndex++] = green
            oneLineBytes[columnIndex++] = blue
        }

        return pixelBytes
    }

    /** 把小端的字节数组转换为int */
    private fun littleEndianBytesToInt(littleEndianBytes: ByteArray): Int {

        val bigEndianBytes = littleEndianBytes.reversedArray()
        val bais = ByteArrayInputStream(bigEndianBytes)
        val dis = DataInputStream(bais)
        return dis.readInt()
    }

    /** 创建像素矩阵,注意:宽要设置为4的倍数 */
    fun createRgbBytes(width: Int, height: Int) : Array<ByteArray> {

        val redColor   = 0xFF0000
        val greenColor = 0x00FF00
        val redBytes   = getColorBytes(redColor)
        val greenBytes = getColorBytes(greenColor)
        val rgbBytes = Array(height) {
     ByteArray(width * 3) }
        for (rowIndex in 0 until height) {

            val colorBytes = if (rowIndex < height / 2) redBytes else greenBytes
            val oneLineBytes = rgbBytes[rowIndex]
            for (columnIndex in oneLineBytes.indices step 3) {

                val red   = colorBytes[0x00]
                val green = colorBytes[0x01]
                val blue  = colorBytes[0x02]
                oneLineBytes[columnIndex + 0] = red
                oneLineBytes[columnIndex + 1] = green
                oneLineBytes[columnIndex + 2] = blue
            }
        }
        return rgbBytes
    }

    fun getColorBytes(color: Int): ByteArray {

        val red   = (color and 0xFF0000 ushr 16).toByte()
        val green = (color and 0x00FF00 ushr 8).toByte()
        val blue  = (color and 0x0000FF).toByte()
        val colorBytes = byteArrayOf(red, green, blue)
        return colorBytes
    }

    /** 打印颜色值,可打印rgb颜色值,也可以打印yuv444颜色值 */
    fun printColorBytes(pixelBytes: Array<ByteArray>) {

        for (rowIndex in pixelBytes.indices) {

            val oneLine = pixelBytes[rowIndex]
            for (columnIndex in oneLine.indices step 3) {

                // 获取1个像素的3个颜色通道:R、G、B 或 Y、U、V
                val colorChannel1 =   oneLine[columnIndex + 0]
                val colorChannel2 =  oneLine[columnIndex + 1]
                val colorChannel3 = oneLine[columnIndex + 2]

                // 把byte转为int,再以16进制进行输出
                val colorChannelInt1 = toHexString(byteToInt(colorChannel1))
                val colorChannelInt2 = toHexString(byteToInt(colorChannel2))
                val colorChannelInt3 = toHexString(byteToInt(colorChannel3))

                // 以16进制进行打印
                print("$colorChannelInt1 $colorChannelInt2 $colorChannelInt3| ")
            }
            println()
        }
    }

    fun byteToInt(byte: Byte): Int = byte.toInt() shl 24 ushr 24
    fun toHexString(int: Int): String = Integer.toHexString(int)

    /** 根据给定的像素二维数据,按照bmp文件规范保存到指定的bmp文件中 */
    fun createBmpFile(pixelBytes: Array<ByteArray>, saveFile: File) {

        // 因为一行像素中每个像素是占3个字节的,除以3就得到图像的宽度了
        val pixelWidth = pixelBytes[0].size / 3
        val pixelHeight = pixelBytes.size
        // 每个像素占3个byte,所以要乘以3
        val pixelBytesCount = pixelWidth * pixelHeight * 3
        // 文件总大小为:像素数据大小 + 头文件大小
        val fileBytesCount = pixelBytesCount + 54
        // 创建一个byte数组,用于保存bmp文件的所有byte数据
        val bmpFileBytes = ByteArray(fileBytesCount)
        // 往bmpFileBytes中添加bmp文件头
        addBmpFileHeader(pixelWidth, pixelHeight, bmpFileBytes)
        // 往bmpFileBytes中添加像素数据
        addPixelBytes(pixelBytes, bmpFileBytes)
        // 把所有的字节写到文件
        saveFile.writeBytes(bmpFileBytes)
    }

    fun addBmpFileHeader(width: Int, height: Int, bmpFileBytes: ByteArray) {

        val pixelBytesCount = width * height * 3
        val fileBytesCount = pixelBytesCount + 54

        // 424d
        bmpFileBytes[0x00] = 0x42
        bmpFileBytes[0x01] = 0x4d

        // 文件大小
        var bytes = getLittleEndianBytes(fileBytesCount)
        bmpFileBytes[0x02] = bytes[0]
        bmpFileBytes[0x03] = bytes[1]
        bmpFileBytes[0x04] = bytes[2]
        bmpFileBytes[0x05] = bytes[3]

        // 保留数据
        bmpFileBytes[0x06] = 0x00
        bmpFileBytes[0x07] = 0x00
        bmpFileBytes[0x08] = 0x00
        bmpFileBytes[0x09] = 0x00

        // 像素存储位置
        bmpFileBytes[0x0a] = 0x36
        bmpFileBytes[0x0b] = 0x00
        bmpFileBytes[0x0c] = 0x00
        bmpFileBytes[0x0d] = 0x00

        // bmp头文件大小
        bmpFileBytes[0x0e] = 0x28
        bmpFileBytes[0x0f] = 0x00
        bmpFileBytes[0x10] = 0x00
        bmpFileBytes[0x11] = 0x00

        // 图像宽度
        bytes = getLittleEndianBytes(width)
        bmpFileBytes[0x12] = bytes[0]
        bmpFileBytes[0x13] = bytes[1]
        bmpFileBytes[0x14] = bytes[2]
        bmpFileBytes[0x15] = bytes[3]

        // 图像高度
        bytes = getLittleEndianBytes(height)
        bmpFileBytes[0x16] = bytes[0]
        bmpFileBytes[0x17] = bytes[1]
        bmpFileBytes[0x18] = bytes[2]
        bmpFileBytes[0x19] = bytes[3]

        // 色彩平面数
        bmpFileBytes[0x1a] = 0x01
        bmpFileBytes[0x1b] = 0x00

        // 像素位数
        bmpFileBytes[0x1c] = 0x18
        bmpFileBytes[0x1d] = 0x00

        // 压缩方式
        bmpFileBytes[0x1e] = 0x00
        bmpFileBytes[0x1f] = 0x00
        bmpFileBytes[0x20] = 0x00
        bmpFileBytes[0x21] = 0x00

        // 像素数据大小
        bytes = getLittleEndianBytes(pixelBytesCount)
        bmpFileBytes[0x22] = bytes[0]
        bmpFileBytes[0x23] = bytes[1]
        bmpFileBytes[0x24] = bytes[2]
        bmpFileBytes[0x25] = bytes[3]

        // 横向分辨率
        bmpFileBytes[0x26] = 0x00
        bmpFileBytes[0x27] = 0x00
        bmpFileBytes[0x28] = 0x00
        bmpFileBytes[0x29] = 0x00

        // 纵向分辨率
        bmpFileBytes[0x2a] = 0x00
        bmpFileBytes[0x2b] = 0x00
        bmpFileBytes[0x2c] = 0x00
        bmpFileBytes[0x2d] = 0x00

        // 调色板颜色数
        bmpFileBytes[0x2e] = 0x00
        bmpFileBytes[0x2f] = 0x00
        bmpFileBytes[0x30] = 0x00
        bmpFileBytes[0x31] = 0x00

        // 重要颜色数
        bmpFileBytes[0x32] = 0x00
        bmpFileBytes[0x33] = 0x00
        bmpFileBytes[0x34] = 0x00
        bmpFileBytes[0x35] = 0x00
    }

    /** 把指定的像素数据添加到bmp文件数组中 */
    fun addPixelBytes(pixelBytes: Array<ByteArray>, bmpFileBytes: ByteArray) {

        val height = pixelBytes.size
        var index = 0x36

        // 设置像素数据,注意:要从像素的最后一行开始进行存储
        for (rowIndex in height - 1 downTo 0) {

            val oneLineBytes = pixelBytes[rowIndex]
            for (columnIndex in oneLineBytes.indices step 3) {

                val red   = oneLineBytes[columnIndex + 0]
                val green = oneLineBytes[columnIndex + 1]
                val blue  = oneLineBytes[columnIndex + 2]

                // 每个像素的三原色按倒序存储
                bmpFileBytes[index++] = blue
                bmpFileBytes[index++] = green
                bmpFileBytes[index++] = red
            }
        }
    }

    /** 把int转换为byte数组,默认是大端方式的数组,返回转换为小端方式的数组 */
    fun getLittleEndianBytes(number: Int): ByteArray {

        val baos = ByteArrayOutputStream()
        val dos = DataOutputStream(baos)
        dos.writeInt(number)
        val bigEndianBytes = baos.toByteArray()
        val littleEndianBytes = bigEndianBytes.reversedArray()
        return littleEndianBytes
    }

}
fun main() {

    YuvUtil.bmpFileToYV12FileDemo()
    //YuvUtil.bmpFileToYV12FileDemo2()
}
这里我们写了两个Demo:bmpFileToYV12FileDemo()、bmpFileToYV12FileDemo2(),第一个Demo是通过代码的方式创建的rgbBytes数据,只有红色和绿色,而且是4 x 2的大小,这样方便我们查看数据是否正确,这在得不到正确结果是排查问题会很方便,运行结果如下:
下面输出RGB像素数据:
ff 0 0| ff 0 0| ff 0 0| ff 0 0|
0 ff 0| 0 ff 0| 0 ff 0| 0 ff 0|
下面输出YUV像素数据:
4c 54 ff| 4c 54 ff| 4c 54 ff| 4c 54 ff|
95 2b 15| 95 2b 15| 95 2b 15| 95 2b 15|
下面输出YV12数据
下面输出Y数据
4c 4c 4c 4c 95 95 95 95
下面输出V数据
15 15
下面输出U数据
54 54
因为数据量很少,可以看到数据是正确的,甚至可以用16进制打开生成的demo.yuv查看数据,如下: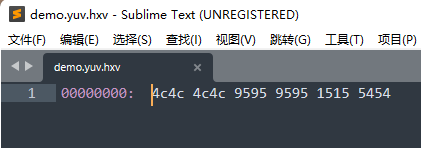
因为数据量很少,所以很容易查看数据是否有误。现在我们这个数据是对的,然后我们就可以运行bmpFileToYV12FileDemo2()这个函数,这个是读了了一张bmp图片,宽高为640 x 480,下面是bmp图片,和生成的yuv图片效果对比:
左边是用Windows 11自带的看图软件打开的bmp图片,右边是用YUV Player打开的yuv图片,可以看到bmp转换为yuv后颜色是有偏差的,而且是能看的出来的,也不知道是不是我选的公式不对导致的问题。
YUV Player下载地址:https://github.com/latelee/YUVPlayer/tree/master/bin,这个已经很久没更新了,但是使用简单。更多更新的有另一个,但是这个设置感觉比较复杂,不知道怎么调参数:https://github.com/IENT/YUView,下载地址:https://github.com/IENT/YUView/releases
YUV图片转bmp图片
import java.io.BufferedOutputStream
import java.io.File
import java.io.FileOutputStream

object YuvUtil {


    fun yv12FileToBmpFile() {

        val yv12File = File("C:\\Users\\Even\\Pictures\\海琴烟.yuv")
        val bmpFile = File("C:\\Users\\Even\\Pictures\\海琴烟(yuv转bmp).bmp")
        val (yBytes, uBytes, vBytes) = readYuvFilePlanarBytes(yv12File, 640, 480)
        val yuv444Bytes = yv12BytesToYuv444Bytes(640, 480, yBytes, uBytes, vBytes)
        val rgbBytes = yuv444BytesToRgbBytes(yuv444Bytes)
        BmpUtil.createBmpFile(rgbBytes, bmpFile)
    }

    fun bmpFileToYV12FileDemo() {

        val grbBytes = BmpUtil.createRgbBytes(4, 2)
        println("下面输出RGB像素数据:")
        BmpUtil.printColorBytes(grbBytes)
        val yuv444Bytes = rgbBytesToYuv444Bytes(grbBytes)
        println("下面输出YUV像素数据:")
        BmpUtil.printColorBytes(yuv444Bytes)
        val (yBytes, uBytes, vBytes) = yuv444BytesToYv12Bytes(yuv444Bytes)
        printYV12(yBytes, uBytes, vBytes)
        val yv12File = File("C:\\Users\\Even\\Pictures\\demo.yuv")
        writeYv12BytesToFile(yv12File, yBytes, vBytes, uBytes)
    }

    fun bmpFileToYV12FileDemo2() {

        val bmpFile = File("C:\\Users\\Even\\Pictures\\海琴烟.bmp")
        val yv12File = File("C:\\Users\\Even\\Pictures\\海琴烟.yuv")
        val rgbBytes = BmpUtil.readBmpFilePixelBytes(bmpFile)
        val yuv444Bytes = rgbBytesToYuv444Bytes(rgbBytes)
        val (yBytes, uBytes, vBytes) = yuv444BytesToYv12Bytes(yuv444Bytes)
        writeYv12BytesToFile(yv12File, yBytes, vBytes, uBytes)
    }

    /** 读取YUV文件的三个平面保存到三个数组中,分别保存Y、U、V三个平面 */
    fun readYuvFilePlanarBytes(yuvFile: File, width: Int, height: Int): Triple<ByteArray, ByteArray, ByteArray> {

        return readYuvFilePlanarBytes(yuvFile.readBytes(), width, height)
    }

    fun readYuvFilePlanarBytes(yuvBytes: ByteArray, width: Int, height: Int): Triple<ByteArray, ByteArray, ByteArray> {

        val ySize = width * height
        val vSize = ySize / 4
        val yBytes = ByteArray(ySize)
        val uBytes = ByteArray(vSize)
        val vBytes = ByteArray(vSize)
        var i = 0
        yuvBytes.forEachIndexed {
     index, byte ->
            val bytes = when {

                index < ySize -> yBytes
                index < ySize + vSize -> vBytes
                else -> uBytes
            }
            if (index == ySize || index == ySize + vSize) {

                i = 0
            }
            bytes[i++] = byte
        }
        return Triple(yBytes, uBytes, vBytes)
    }

    private fun writeYv12BytesToFile(yv12File: File, yBytes: ByteArray, vBytes: ByteArray, uBytes: ByteArray) {

        FileOutputStream(yv12File).use {
     fos ->
            BufferedOutputStream(fos).use {
     bos ->
                bos.write(yBytes)
                bos.write(vBytes)
                bos.write(uBytes)
            }
        }
    }

    fun rgbBytesToYuv444Bytes(rgbBytes: Array<ByteArray>): Array<ByteArray> {

        val yuv444Bytes = Array(rgbBytes.size) {
     ByteArray(rgbBytes[0].size) }
        for (rowIndex in rgbBytes.indices) {

            val oneLineBytes = rgbBytes[rowIndex]
            val oneLineYuv444Bytes = yuv444Bytes[rowIndex]
            for (columnIndex in oneLineBytes.indices step 3) {

                val red   = oneLineBytes[columnIndex + 0]
                val green = oneLineBytes[columnIndex + 1]
                val blue  = oneLineBytes[columnIndex + 2]
                val (Y, U, V) = rgbToYuv(red, green, blue)
                oneLineYuv444Bytes[columnIndex + 0] = Y
                oneLineYuv444Bytes[columnIndex + 1] = U
                oneLineYuv444Bytes[columnIndex + 2] = V
            }
        }
        return yuv444Bytes
    }

    fun byteToInt(byte: Byte): Int = byte.toInt() shl 24 ushr 24
    fun verify(int: Int) = if (int < 0) 0 else if (int > 255) 255 else int
    fun toHexString(int: Int): String = Integer.toHexString(int)

    fun rgbToYuv(R: Byte, G: Byte, B: Byte): Triple<Byte, Byte, Byte> {

        // 注:R、G、B值的范围是0 ~ 255,是没有负数的,需要转换为正数的int。
        // 一个负数用byte.toInt()转换后还是一个负数,所以我们通过位运算符来进行转换,Byte的-1转换为Int值应该是255
        return rgbToYuv(byteToInt(R), byteToInt(G), byteToInt(B))
    }

    fun rgbToYuv(R: Int, G: Int, B: Int): Triple<Byte, Byte, Byte> {

        var Y = (0.299 * R + 0.587 * G + 0.114 * B).toInt()
        var U = (-0.169 * R - 0.331 * G + 0.499 * B + 128).toInt()
        var V = (0.499 * R - 0.418 * G - 0.0813 * B + 128).toInt()
        Y = verify(Y)
        U = verify(U)
        V = verify(V)
        //println("rgb: ${toHexString(R)} ${toHexString(G)} ${toHexString(B)} -> yuv: ${toHexString(Y)} ${toHexString(U)} ${toHexString(V)}")
        return Triple(Y.toByte(), U.toByte(), V.toByte())
    }

    fun yuvToRgb(Y: Byte, U: Byte, V: Byte): Triple<Byte, Byte, Byte> {

        // 注:Y、U、V值的范围是0 ~ 255,是没有负数的,需要转换为正数的int。
        // 一个负数用byte.toInt()转换后还是一个负数,所以我们通过位运算符来进行转换,Byte的-1转换为Int值应该是255
        return yuvToRgb(byteToInt(Y), byteToInt(U), byteToInt(V))
    }

    fun yuvToRgb(Y: Int, U: Int, V: Int): Triple<Byte, Byte, Byte> {

        var R = (Y + 1.4075 * (V - 128)).toInt()
        var G = (Y - 0.3455 * (U - 128) - 0.7169 * (V - 128)).toInt()
        var B = (Y + 1.779 * (U - 128)).toInt()
        R = verify(R)
        G = verify(G)
        B = verify(B)
        //println("yuv: ${toHexString(Y)} ${toHexString(U)} ${toHexString(V)} -> rgb: ${toHexString(R)} ${toHexString(G)} ${toHexString(B)}")
        return Triple(R.toByte(), G.toByte(), B.toByte())
    }


    fun yv12BytesToYuv444Bytes(width: Int, height: Int, yBytes: ByteArray, uBytes: ByteArray, vBytes: ByteArray): Array<ByteArray> {

        var yIndex = 0
        val yuv444Bytes = Array(height) {
     ByteArray(width * 3) }
        val oneLineUvSize = width / 2 // 在YV12中,一行中的U或V的数量
        var twoLineIndex = -1  // 每两行的计数
        for (rowIndex in 0 until height) {

            val oneLineBytes = yuv444Bytes[rowIndex]
            var u: Byte = 0
            var v: Byte = 0

            // 因为每两行读取UV的时起始位置是一样的,所以我们只在这两行的偶数行时把twoLineIndex进行加加即可
            if (rowIndex % 2 == 0) {

                twoLineIndex++
            }

            // 计算每一行在取UV时uvIndex的起始位置
            var uvIndex = twoLineIndex * oneLineUvSize

            for (columnIndex in oneLineBytes.indices step 3) {

                if (yIndex % 2 == 0) {

                    // 一行之中,每两个Y只取一次UV
                    u = uBytes[uvIndex]
                    v = vBytes[uvIndex]
                    uvIndex++
                }

                val y = yBytes[yIndex++]
                oneLineBytes[columnIndex + 0] = y
                oneLineBytes[columnIndex + 1] = u
                oneLineBytes[columnIndex + 2] = v
            }
        }

        return yuv444Bytes
    }

    private fun yuv444BytesToYv12Bytes(yuv444Bytes: Array<ByteArray>): Triple<ByteArray, ByteArray, ByteArray> {

        val width = yuv444Bytes[0].size / 3  // 每个像素占3个字节,所以要除以3
        val height = yuv444Bytes.size
        val ySize = width * height
        val vSize = ySize / 4
        val yBytes = ByteArray(ySize)
        val uBytes = ByteArray(vSize)
        val vBytes = ByteArray(vSize)
        var yIndex = 0
        var uIndex = 0
        var vIndex = 0
        var saveU = true
        var saveV = true
        for (rowIndex in 0 until height) {

            val oneLine = yuv444Bytes[rowIndex]
            for (columnIndex in oneLine.indices step 3) {

                val y = oneLine[columnIndex + 0]
                val u = oneLine[columnIndex + 1]
                val v = oneLine[columnIndex + 2]
                yBytes[yIndex++] = y
                if (rowIndex % 2 == 0) {

                    // 偶数行取U,隔一个取一个
                    if (saveU) {

                        uBytes[uIndex++] = u
                    }
                    saveU = !saveU
                } else {

                    // 单数行取V,隔一个取一个
                    if (saveV) {

                        vBytes[vIndex++] = v
                    }
                    saveV = !saveV
                }
            }
        }
        return Triple(yBytes, uBytes, vBytes)
    }

    fun yuv444BytesToRgbBytes(yuv444Bytes: Array<ByteArray>): Array<ByteArray> {

        val rgbBytes = Array(yuv444Bytes.size) {
     ByteArray(yuv444Bytes[0].size) }
        for (rowIndex in yuv444Bytes.indices) {

            val oneLineYuv444Bytes = yuv444Bytes[rowIndex]
            val oneLineRgbBytes = rgbBytes[rowIndex]
            for (columnIndex in oneLineYuv444Bytes.indices step 3) {

                val Y   = oneLineYuv444Bytes[columnIndex + 0]
                val U = oneLineYuv444Bytes[columnIndex + 1]
                val V  = oneLineYuv444Bytes[columnIndex + 2]
                val (R, G, B) = yuvToRgb(Y, U, V)
                oneLineRgbBytes[columnIndex + 0] = R
                oneLineRgbBytes[columnIndex + 1] = G
                oneLineRgbBytes[columnIndex + 2] = B
            }
        }
        return rgbBytes
    }

    fun printYUV444(yuv444Bytes: Array<ByteArray>) {

        println("下面输出YUV444数据")
        for (oneLine in yuv444Bytes) {

            for (columnIndex in oneLine.indices step 3) {

                val y = oneLine[columnIndex + 0]
                val u = oneLine[columnIndex + 1]
                val v = oneLine[columnIndex + 2]
                print("$y $u $v | ")
            }
            println()
        }
    }

    fun printYV12(yBytes: ByteArray, uBytes: ByteArray, vBytes: ByteArray) {

        // 以16进制进行打印
        println("下面输出YV12数据")
        println("下面输出Y数据")
        yBytes.forEach {
     print("${
      toHexString(byteToInt(it))} ") }
        println("\n下面输出V数据")
        vBytes.forEach {
     print("${
      toHexString(byteToInt(it))} ") }
        println("\n下面输出U数据")
        uBytes.forEach {
     print("${
      toHexString(byteToInt(it))} ") }
        println()
    }

}
import java.io.*

object BmpUtil {


    /** 创建Bitmap的示例:通过读取一个bmp文件的像素,再把这些像素写入一个新的bmp文件 */
    fun createBitmapDemo2() {

        val bmpFilePixelBytes = readBmpFilePixelBytes(File("C:\\Users\\Even\\Pictures\\海琴烟.bmp"))
        //printPixelBytes(bmpFilePixelBytes)
        createBmpFile(bmpFilePixelBytes, File("C:\\Users\\Even\\Pictures\\demo.bmp"))
    }

    /** 创建Bitmap的示例:创建一个上一半为红色,下一半为绿色的bmp文件 */
    fun createBitmapDemo() {

        val width = 300 // 注意:宽高要设置为4的倍数,以避免需要进行补位的操作
        val height = 200
        val pixelBytes = createRgbBytes(width, height)
        //printPixelBytes(pixelBytes)
        val bmpFile = File("C:\\Users\\Even\\Pictures\\demo.bmp")
        createBmpFile(pixelBytes, bmpFile)
    }

    fun readBmpFilePixelBytes(bmpFile: File): Array<ByteArray> {

        // 得到bmp文件的所有字节
        val bmpFileBytes = bmpFile.readBytes()

        // 从bmp文件中获取图像的宽和高的字节数组
        val widthLittleEndianBytes = ByteArray(4)
        val heightLittleEndianBytes = ByteArray(4)
        System.arraycopy(bmpFileBytes, 0x12, widthLittleEndianBytes, 0, 4)
        System.arraycopy(bmpFileBytes, 0x16, heightLittleEndianBytes, 0, 4)

        // 把大端的字节数组转换为Int
        val width = littleEndianBytesToInt(widthLittleEndianBytes)
        val height = littleEndianBytesToInt(heightLittleEndianBytes)
        println("读取到bmp图像width = $width, height = $height")
        val pixelBytes = Array(height) {
     ByteArray(width * 3) }
        var rowIndex = height - 1 // 因为bmp图片是从最后一行开始保存的,读取的时候我们把它往到正确的位置
        var columnIndex = 0
        var oneLineBytes = pixelBytes[rowIndex]
        val oneLineBytesSize = oneLineBytes.size
        // 像素值都是从0x36的位置开始保存的,而且每个像素点3个字节
        for (i in 0x36 until bmpFileBytes.size step 3) {

            if (columnIndex == oneLineBytesSize) {

                // 存满一行了,需要换行保存了。这里--rowIndex是因为原图片是从最后一行向前面行的顺序保存的
                oneLineBytes = pixelBytes[--rowIndex]
                columnIndex = 0
            }

            // 注意:bmp文件的颜色是按蓝、绿、红的顺序保存的
            val blue  = bmpFileBytes[i + 0]
            val green = bmpFileBytes[i + 1]
            val red   = bmpFileBytes[i + 2]

            oneLineBytes[columnIndex++] = red
            oneLineBytes[columnIndex++] = green
            oneLineBytes[columnIndex++] = blue
        }

        return pixelBytes
    }

    /** 把小端的字节数组转换为int */
    private fun littleEndianBytesToInt(littleEndianBytes: ByteArray): Int {

        val bigEndianBytes = littleEndianBytes.reversedArray()
        val bais = ByteArrayInputStream(bigEndianBytes)
        val dis = DataInputStream(bais)
        return dis.readInt()
    }

    /** 创建像素矩阵,注意:宽要设置为4的倍数 */
    fun createRgbBytes(width: Int, height: Int) : Array<ByteArray> {

        val redColor   = 0xFF0000
        val greenColor = 0x00FF00
        val redBytes   = getColorBytes(redColor)
        val greenBytes = getColorBytes(greenColor)
        val rgbBytes = Array(height) {
     ByteArray(width * 3) }
        for (rowIndex in 0 until height) {

            val colorBytes = if (rowIndex < height / 2) redBytes else greenBytes
            val oneLineBytes = rgbBytes[rowIndex]
            for (columnIndex in oneLineBytes.indices step 3) {

                val red   = colorBytes[0x00]
                val green = colorBytes[0x01]
                val blue  = colorBytes[0x02]
                oneLineBytes[columnIndex + 0] = red
                oneLineBytes[columnIndex + 1] = green
                oneLineBytes[columnIndex + 2] = blue
            }
        }
        return rgbBytes
    }

    fun getColorBytes(color: Int): ByteArray {

        val red   = (color and 0xFF0000 ushr 16).toByte()
        val green = (color and 0x00FF00 ushr 8).toByte()
        val blue  = (color and 0x0000FF).toByte()
        val colorBytes = byteArrayOf(red, green, blue)
        return colorBytes
    }

    /** 打印颜色值,可打印rgb颜色值,也可以打印yuv444颜色值 */
    fun printColorBytes(pixelBytes: Array<ByteArray>) {

        for (rowIndex in pixelBytes.indices) {

            val oneLine = pixelBytes[rowIndex]
            for (columnIndex in oneLine.indices step 3) {

                // 获取1个像素的3个颜色通道:R、G、B 或 Y、U、V
                val colorChannel1 =   oneLine[columnIndex + 0]
                val colorChannel2 =  oneLine[columnIndex + 1]
                val colorChannel3 = oneLine[columnIndex + 2]

                // 把byte转为int,再以16进制进行输出
                val colorChannelInt1 = toHexString(byteToInt(colorChannel1))
                val colorChannelInt2 = toHexString(byteToInt(colorChannel2))
                val colorChannelInt3 = toHexString(byteToInt(colorChannel3))

                // 以16进制进行打印
                print("$colorChannelInt1 $colorChannelInt2 $colorChannelInt3| ")
            }
            println()
        }
    }

    fun byteToInt(byte: Byte): Int = byte.toInt() shl 24 ushr 24
    fun toHexString(int: Int): String = Integer.toHexString(int)

    /** 根据给定的像素二维数据,按照bmp文件规范保存到指定的bmp文件中 */
    fun createBmpFile(rgbBytes: Array<ByteArray>, saveFile: File) {

        // 因为一行像素中每个像素是占3个字节的,除以3就得到图像的宽度了
        val pixelWidth = rgbBytes[0].size / 3
        val pixelHeight = rgbBytes.size
        // 每个像素占3个byte,所以要乘以3
        val pixelBytesCount = pixelWidth * pixelHeight * 3
        // 文件总大小为:像素数据大小 + 头文件大小
        val fileBytesCount = pixelBytesCount + 54
        // 创建一个byte数组,用于保存bmp文件的所有byte数据
        val bmpFileBytes = ByteArray(fileBytesCount)
        // 往bmpFileBytes中添加bmp文件头
        addBmpFileHeader(pixelWidth, pixelHeight, bmpFileBytes)
        // 往bmpFileBytes中添加像素数据
        addPixelBytes(rgbBytes, bmpFileBytes)
        // 把所有的字节写到文件
        saveFile.writeBytes(bmpFileBytes)
    }

    fun addBmpFileHeader(width: Int, height: Int, bmpFileBytes: ByteArray) {

        val pixelBytesCount = width * height * 3
        val fileBytesCount = pixelBytesCount + 54

        // 424d
        bmpFileBytes[0x00] = 0x42
        bmpFileBytes[0x01] = 0x4d

        // 文件大小
        var bytes = getLittleEndianBytes(fileBytesCount)
        bmpFileBytes[0x02] = bytes[0]
        bmpFileBytes[0x03] = bytes[1]
        bmpFileBytes[0x04] = bytes[2]
        bmpFileBytes[0x05] = bytes[3]

        // 保留数据
        bmpFileBytes[0x06] = 0x00
        bmpFileBytes[0x07] = 0x00
        bmpFileBytes[0x08] = 0x00
        bmpFileBytes[0x09] = 0x00

        // 像素存储位置
        bmpFileBytes[0x0a] = 0x36
        bmpFileBytes[0x0b] = 0x00
        bmpFileBytes[0x0c] = 0x00
        bmpFileBytes[0x0d] = 0x00

        // bmp头文件大小
        bmpFileBytes[0x0e] = 0x28
        bmpFileBytes[0x0f] = 0x00
        bmpFileBytes[0x10] = 0x00
        bmpFileBytes[0x11] = 0x00

        // 图像宽度
        bytes = getLittleEndianBytes(width)
        bmpFileBytes[0x12] = bytes[0]
        bmpFileBytes[0x13] = bytes[1]
        bmpFileBytes[0x14] = bytes[2]
        bmpFileBytes[0x15] = bytes[3]

        // 图像高度
        bytes = getLittleEndianBytes(height)
        bmpFileBytes[0x16] = bytes[0]
        bmpFileBytes[0x17] = bytes[1]
        bmpFileBytes[0x18] = bytes[2]
        bmpFileBytes[0x19] = bytes[3]

        // 色彩平面数
        bmpFileBytes[0x1a] = 0x01
        bmpFileBytes[0x1b] = 0x00

        // 像素位数
        bmpFileBytes[0x1c] = 0x18
        bmpFileBytes[0x1d] = 0x00

        // 压缩方式
        bmpFileBytes[0x1e] = 0x00
        bmpFileBytes[0x1f] = 0x00
        bmpFileBytes[0x20] = 0x00
        bmpFileBytes[0x21] = 0x00

        // 像素数据大小
        bytes = getLittleEndianBytes(pixelBytesCount)
        bmpFileBytes[0x22] = bytes[0]
        bmpFileBytes[0x23] = bytes[1]
        bmpFileBytes[0x24] = bytes[2]
        bmpFileBytes[0x25] = bytes[3]

        // 横向分辨率
        bmpFileBytes[0x26] = 0x00
        bmpFileBytes[0x27] = 0x00
        bmpFileBytes[0x28] = 0x00
        bmpFileBytes[0x29] = 0x00

        // 纵向分辨率
        bmpFileBytes[0x2a] = 0x00
        bmpFileBytes[0x2b] = 0x00
        bmpFileBytes[0x2c] = 0x00
        bmpFileBytes[0x2d] = 0x00

        // 调色板颜色数
        bmpFileBytes[0x2e] = 0x00
        bmpFileBytes[0x2f] = 0x00
        bmpFileBytes[0x30] = 0x00
        bmpFileBytes[0x31] = 0x00

        // 重要颜色数
        bmpFileBytes[0x32] = 0x00
        bmpFileBytes[0x33] = 0x00
        bmpFileBytes[0x34] = 0x00
        bmpFileBytes[0x35] = 0x00
    }

    /** 把指定的像素数据添加到bmp文件数组中 */
    fun addPixelBytes(pixelBytes: Array<ByteArray>, bmpFileBytes: ByteArray) {

        val height = pixelBytes.size
        var index = 0x36

        // 设置像素数据,注意:要从像素的最后一行开始进行存储
        for (rowIndex in height - 1 downTo 0) {

            val oneLineBytes = pixelBytes[rowIndex]
            for (columnIndex in oneLineBytes.indices step 3) {

                val red   = oneLineBytes[columnIndex + 0]
                val green = oneLineBytes[columnIndex + 1]
                val blue  = oneLineBytes[columnIndex + 2]

                // 每个像素的三原色按倒序存储
                bmpFileBytes[index++] = blue
                bmpFileBytes[index++] = green
                bmpFileBytes[index++] = red
            }
        }
    }

    /** 把int转换为byte数组,默认是小端方式的数组,返回转换为大端方式的数组 */
    fun getLittleEndianBytes(number: Int): ByteArray {

        val baos = ByteArrayOutputStream()
        val dos = DataOutputStream(baos)
        dos.writeInt(number)
        val bigEndianBytes = baos.toByteArray()
        val littleEndianBytes = bigEndianBytes.reversedArray()
        return littleEndianBytes
    }

}
fun main() {

// YuvUtil.bmpFileToYV12FileDemo()
// YuvUtil.bmpFileToYV12FileDemo2()
    YuvUtil.yv12FileToBmpFile()
}
运行效果如下:
最左边为截图软件截图后保存的bmp原始文件,中间为bmp转换的yuv图片,右边为yuv转换回的bmp图片,不知道可有差别啊,感觉差别还是比较小的,如果没有原图对比的话一般是感觉不到差别的!
YUV444、YUV422、YUV420、YUV420P、YUV420SP、YV12、YU12、NV12、NV21
如标题,YUV的格式如此之多,了解起来确实困难,在前面,我们主要讲解了YV12格式,不论你要了解哪一种YUV格式,在了解了最复杂的YV12格式之后,再来了解其它的格式就轻而易举了,这就是为什么我把这些多个格式的区别放到最后讲解的原因。
为什么使用YUV而不用RGB
R(red)、G(green)、B(blue)被称为三原色,通过这三原色可以组合成任意的颜色,我们修改RGB的值,颜色就会改变,而且颜色的亮度也会发生改变,可以说RGB的亮度信息和颜色信息是混合在一起的。
Y、U、V简单理解,Y表示亮度,U和V表示颜色。与RGB相比,YUV将亮度和颜色信息分开,这种编码方式非常适合人眼,根据研究,人眼对亮度信息比对颜色信息更敏感,举个例子,你把一个红色调的没那么红,可能看起来你发现不了红色被下调了,而你把红色的亮度调暗了,就比较容易发现,根据这个特点,我们在采集图像信息时,就可以把亮度全部采集了,但是采集颜色信息时就可以丢掉一些,因为丢掉一些之后人的眼睛也发现不了,这样,我们通过YUV得到了质量比较好的图像,而需要的存储空间又比RGB方式要小。
YUV把亮度和颜色信息分开,也比较方便我们对亮度和颜色分别进行处理,比如要把图像调亮一些,把Y的值调大即可,而对于RGB,要把一个颜色调亮你需要修改3个值,比如你把3个值都改大,可能颜色也发生变化了,不单单是亮度的改变,调起来就比较困难。
另外一个好处就是可以兼容黑白电视机和彩色电视机,对于黑白电视机,只要解析Y信息即可,对于彩色电视机就解析YUV信息。
YUV根据采样方式分类
YUV根据采样方式主要分为三种:
- YUV444,每4个Y,有对应的4个U和4个V,所以叫YUV444
- YUV422,每4个Y,有对应的2个U和2个V,所以叫YUV422
- YUV420,每4个Y,有对应的2个U和0个V,或者每4个Y有对应的2个V和0个U,所以叫YUV420
1、YUV444的采样方式

如上图,对于每个像素,它都采集Y、U、V值,所以每4个像素都会有4个Y、4个U、4个V,这是YUV444名称的由来。
2、YUV422的采样方式

如上图,对于每个像素,Y都是采集的,而U或V只采集其中一个,如上图的规律为,第一个像素采集U,第二个像素采集V,第三个像素采集U,第四个像素采集V。。。如此重复循环,则每4个像素必然有4个Y、2个U、2个V,这就是YUV422名称的由来。
在还原的时候,每两个Y共用一对UV,这还原后肯定不能和之前一模一样了,但是我们前面有说过,人眼对颜色信息的感觉是比较低的,只要亮度没变,我们修改了U或Y的值,一般是感觉不出来有变化的,而且大多数相邻的两个像素颜色是差不多的,也就是说大多数相邻的两个像素的U和V值差不了多少,这就是为什么第1个像素用第2个像素的V,第2个像素用第1个像素的U,而我们也感觉不到图像颜色不对的原因了!
3、YUV420的采样方式

如上图,对于每个像素,Y都是采集的。对于U和V都是采一行隔一行的,如下:
第1行:采集1个U,隔一个再采集一个U。。。依次类推
第2行:采集1个V,隔一个再采集一个V。。。依次类推
如果还有更多的行,也是这个规律采集,如下:
第3行:采集1个U,隔一个再采集一个U。。。依次类推
第4行:采集1个V,隔一个再采集一个V。。。依次类推
第一行,每4个Y就会有2个U和0个V。
第二行,每4个Y就会有2个V和0个U。
这或许就是YUV420的由来,我也没找到官网说明,反正这也算是一个合理的解释吧!
在还原的时候,两行合起来看,第一行的两个Y和第二行的两个Y共用1个U和1个V,也就是说4个Y对应1个U和1个V,相比YUV422还原的精度就更低了,但是用人眼看依然是看不出什么区别的,这就是YUV的强大这处了,所以由此可知,YUV420的采集方式应该是最常用的,因为它最省空间,而且图像质量也很好嘛!
YUV根据存储方式分类
YUV格式首先按采集方式进行一次分类,然后还可以按照存储方式进行第二次分类,比如YUV420格式,这是按采集格式分类的,YUV420存储的时候按照不同的方式存储时又可以分为多种格式,比如:YV12、YU12、NV21、NV12,这4种格式都是以YUV420的方式采样的,只是存储的时候存储顺序有点不一样而已。
YV12、YU12

如上图,把Y、U、V都分开存储的方式叫Planar(平面)格式,结合YUV420就叫YUV420P。在存储的时候先存V再存U的叫YV12,先存U再存V的叫YU12(也叫 I420)。YV12格式和YU12格式属于YUV420P格式下的子格式。
NV21、NV12
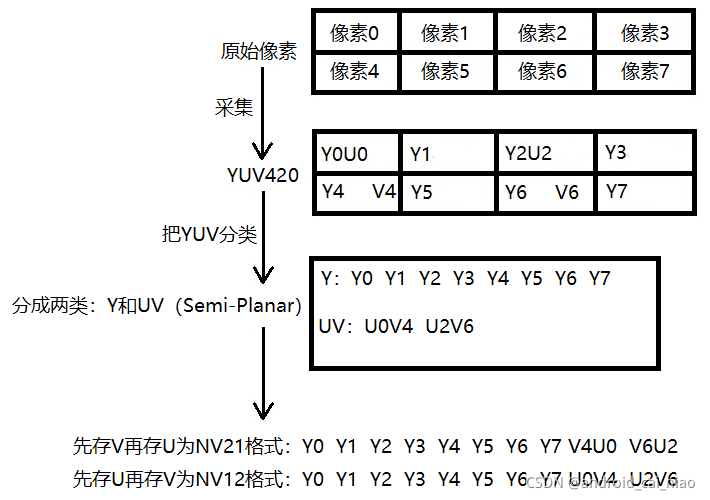
如上图,Y和UV是分开的存储的,属于Planar(平面)格式,但是U和V是每两个打包(Packed)在一起的,所以叫Semi-Planar(半平面)格式,和YUV420组合起来就是YUV420SP。在U和V的顺序中,先存V后存U的是NV21格式,先存U后存V的是NV12格式,NV21和NV12都是YUV420SP的子格式。
对于Planar、Semi-Planar的格式,还有一种叫Packed(打包)格式,比如在YUV444格式中,存储时把每个像素的Y、U、V都打包到一起来存储,这种就叫Packed格式,示例如下:
由于YUV420是最常用的,所以我这里把YUV420的种格式分类统计一下:
格式之间的转换
了解了各种格式的原理之后,其实不用去网上搜索转换公式的,自己写代码实现即可,当然,如果要追求效率的,要找开源库,比如 libyuv 库。
这里简单介绍一下常用格式的转换,如下:
YU12转YV12:
YU12转NV12:
NV21转NV12:
边栏推荐
猜你喜欢
![[modulebuilder] GP service realizes the intersection selection of two layers in SDE](/img/4a/899a3c2a0505d2ec2eaae97a3948c9.png)
[modulebuilder] GP service realizes the intersection selection of two layers in SDE
How to add cartoon characters to the blog park?

What aspects should we start with in the feasibility analysis of dry goods?

Live800 online customer service system: do business across time and space, starting from each interaction

Circuit module analysis exercise 5 (power supply)

Baidu: in 2022, the top ten hot spots will rise and the profession will be released. There is no suspense about the first place!

Leaky API interface practical development series (13): gooseneck cloud service php-api two-dimensional array parameter transfer solution

Xampp重启后,MySQL服务就启动不了。
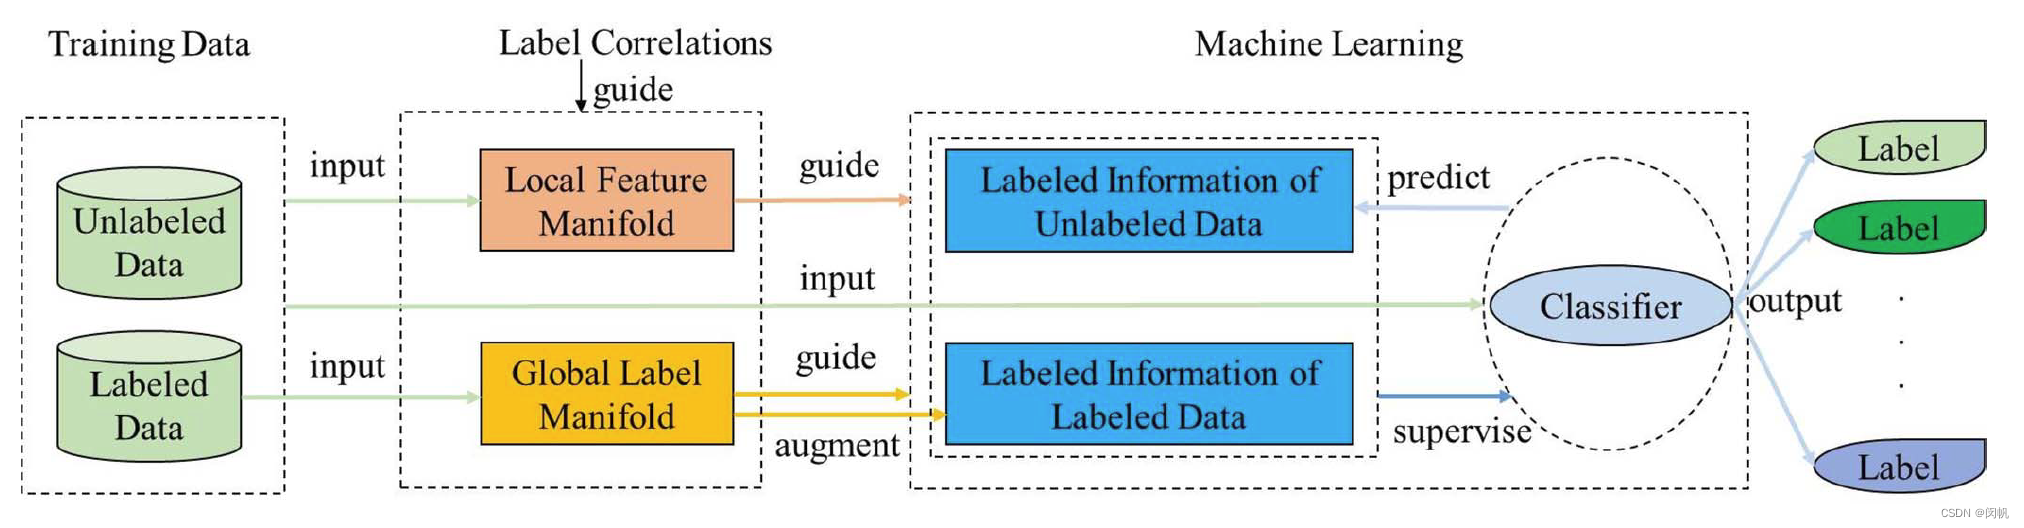
论文笔记: 多标签学习 MSWL

UE4_UE5结合offline voice recognition插件做语音识别功能
随机推荐
Xampp重启后,MySQL服务就启动不了。
Repoptimizer: it's actually repvgg2
How to use drawing comparison function in CAD
golang Make a list of intervals with sequential numbers
记录一下Qt将少量图片输出为MP4的思路及注意事项
Episode 3: thread synchronization using thread lock
A. Balance the Bits--Codeforces Round #712 (Div. 1)
hiberate核心API/配置文件/一级缓存详解
论文笔记: 多标签学习 MSWL
Leetcode (605) -- flower planting
[Axi] interpretation of Axi protocol atomic access
Circuit module analysis exercise 6 (switch)
Windows redis installation and simple use
转载: QTableWidget详解(样式、右键菜单、表头塌陷、多选等)
Leetcode(435)——无重叠区间
Qt Utf8 与 Unicode 编码的互相转换, Unicode编码输出为格式为 &#xXXXX
MySQL queries data by day, week, month, quarter and year
我的vscode
【ModuleBuilder】GP服务实现SDE中两个图层相交选取
Implementation of importing vscode from PDM