当前位置:网站首页>CaDDN code debugging
CaDDN code debugging
2022-08-02 05:31:00 【hello689】
文章目录
CaDDN代码调试-我的电脑
CaDDNI have translated this one,链接地址
Let me talk about the configuration of my computer first:
HP暗影精灵5
双系统:win10+ubuntu1804(The code debugging process is behindubuntu系统中进行的)
内存:8+16G
硬盘:512G SSD + 1TB 机械
显卡:RTX 2060 (6G)
1、环境配置:
配置cuda10.2的环境
之前安装过cuda10.1的,There are a lot of problems in the debugging process,Then reinstalled10.2,The result is still a bunch of problems.安装过程的话,就推荐这篇博客吧.
使用conda创建一个caddn虚拟环境
我是推荐使用Anaconda来创建caddn虚拟环境的,因为需要python3.8的环境,There may be many problems in the later stage of using the system environment directly.
conda create -n caddn python=3.8下载CaDDN代码
git clone https://mirror.ghproxy.com/https://github.com/TRAILab/CaDDN.git安装编译pcdet v0.3
First you need to install a library,如torch等.使用阿里云加速
pip install -r requirements.txt -i https://mirrors.aliyun.com/pypi/simple注: It needs to be used in the actual code running processcudatoolkit和cudnn这两个库,而requirements.txtNot in this file.If it is already installed in the computer environment,则不用管,没有的话需要安装一下.
本人使用conda进行安装的,命令如下:conda install cudatoolkit = 10.2 conda install cudnn = 7.6.5This next step may go wrong:
python setup.py developIf there is no problem,那就没事,如果出现了pcdet/ops/iou3d_nms/src/iou3d_cpu.cpp:12:18: fatal error: cuda.h: 这样的错误,可以参考这篇博客.
2、数据集准备
数据集的格式如下所示:
CaDDN
├── data
│   ├── kitti
│   │   │── ImageSets
│   │   │── training
│   │   │   ├──calib & velodyne & label_2 & image_2 & depth_2
│   │   │── testing
│   │   │   ├──calib & velodyne & image_2
├── pcdet
├── tools
You can prepare less data first,比如300张图片.In addition, the depth map needs to be downloaded depth maps.如果没有梯子,可以去CSDN下载,I uploaded this depth data,不过只有300张深度图,For scientific research and academic exchanges only,如有侵权,可联系我删除.
执行如下命令生成data infos信息:
python -m pcdet.datasets.kitti.kitti_dataset create_kitti_infos tools/cfgs/dataset_configs/kitti_dataset.yaml
这里如果出现Assertion问题,You can take a look at itcalibIt's still an image problem,ImageSets里train.txt、val.txt和test.txtThere is a one-to-one correspondence with the data in the dataset,There can be multiple data in a dataset,但不能没有ImageSets里包含的数据.Like in the originaltrain.txt中有0009这个文件,But the corresponding label could not be foundlabel文件,The error message shown below will appear:
It can be seen that it is therekitti_dataset.py的118行get_calib出现了问题,So find the code here,在assert前边加上一个print,这样再次运行,You can see which file is missing,在train.txt或者val.txt删除就ok了.
  def get_calib(self, idx):
        calib_file = self.root_split_path / 'calib' / ('%s.txt' % idx)
# print(calib_file)
        assert calib_file.exists()
        return calibration_kitti.Calibration(calib_file)
It is too complicated to find out and delete one by one,太麻烦了,I wrote a script below to automatically filter out some incomplete data,生成新的/data/kitti/ImageSets/train.txt、val.txt和test.txt.
基本思想:
Time efficiency is not considered、空间效率,Pure violence to solve;
1. 读取原始train.txt中的数据,存放列表train_txt中,Value if present1,否则为0;
2. 并读取calib、image_2etc. folder file directory,获取文件名,stored in the corresponding variable list;
3. 按照train_txt或者val_txt或test_txt循环,如果indexThe corresponding variable values are 1,is written to the new onetrain.txt文件中.
test清洗代码(代码仅供参考,Actual use needs to be modified,另外train和val.txtIt needs to be added when generatingdepth_2和label_2):
import numpy as np
import glob
N = 8000

train_txt = np.zeros(N)

calib = np.zeros(N)
image_2 = np.zeros(N)
velodyne = np.zeros(N)

root_path = '/home/CaDDN/data/kitti'

with open(root_path + "/ImageSets/test.txt", "r") as f:
    for line in f.readlines():
        line = int(line.strip('\n'))
        train_txt[line] = 1

files = glob.glob(root_path+'/testing/calib/*.txt')
for file in files:
    calib[int(file.split('/')[-1].split('.')[0])] = 1

files = glob.glob(root_path+'/testing/image_2/*.png')
for file in files:
    image_2[int(file.split('/')[-1].split('.')[0])] = 1

files = glob.glob(root_path+'/testing/velodyne/*.bin')
for file in files:
    velodyne[int(file.split('/')[-1].split('.')[0])] = 1

with open("test.txt", "w") as f:
    for i in range(N):
        if (calib[i] and image_2[i] and velodyne[i] and train_txt[i]):
            f.write(str(i).zfill(6)+"\n")
3、训练一个模型
首先需要下载预训练模型 DeepLabV3 model,将其放入checkpoints文件下,其文件结构如下:
CaDDN
├── checkpoints
│   ├── deeplabv3_resnet101_coco-586e9e4e.pth
├── data
├── pcdet
├── tools
修改train.py
 parser.add_argument('--cfg_file', type=str, default='./cfgs/kitti_models/CaDDN.yaml', help='specify the config for training')

    parser.add_argument('--batch_size', type=int, default=4, required=False, help='batch size for training')
    parser.add_argument('--epochs', type=int, default=10, required=False, help='number of epochs to train for')
    parser.add_argument('--workers', type=int, default=8, help='number of workers for dataloader')
    parser.add_argument('--extra_tag', type=str, default='default', help='extra tag for this experiment')
    parser.add_argument('--ckpt', type=str, default=None, help='checkpoint to start from')
    parser.add_argument('--pretrained_model', type=str, default='../checkpoints/deeplabv3_resnet101_coco-586e9e4e.pth', help='pretrained_model')
The main thing is to modify the configuration file path,batch_size、epochs、Pretrained model location information,如下图所示,Also this information is available at CaDDN.yaml文件进行修改.
TerminalNote on the command linecd到tools目录下,开始训练:
python3.8 train.py
The command for Doka training is shown below(数字4就是有4张卡):
python3.8 -m torch.distributed.launch --nproc_per_node=4 train.py --launcher 'pytorch'
注意,一定要用python3.8,直接用python可能会出错.
Then there is not enough memory,Out Of Memery.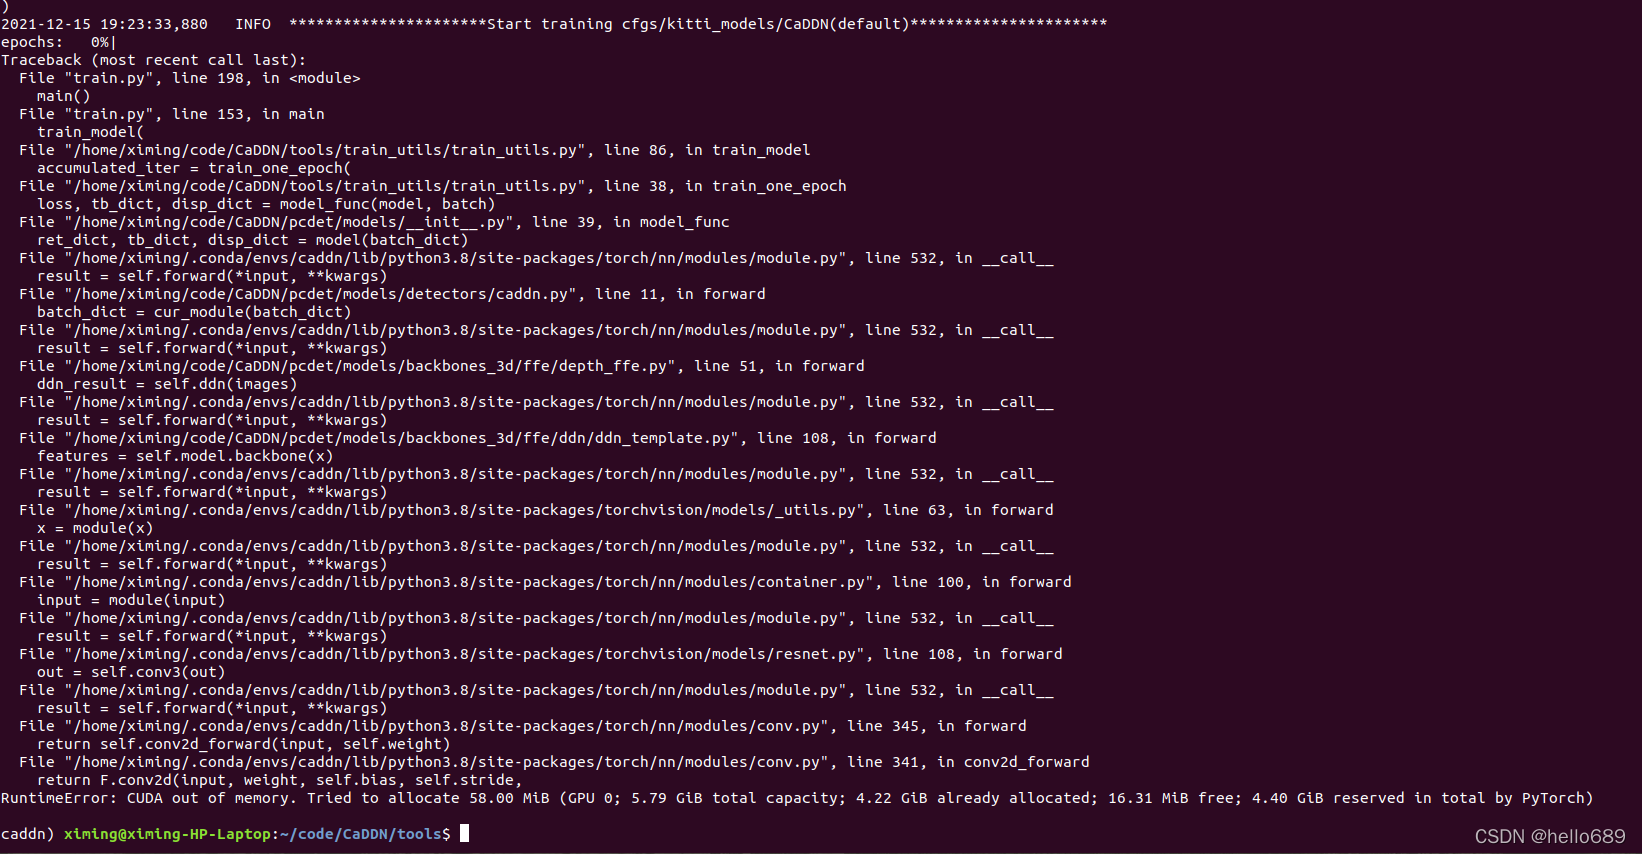
CaDDN代码调试-云环境
This cloud environment has1块V100(4核32G),There should be no memory issues.
1、The dataset is packaged and uploaded
- 无法解压data目录下的文件
![[外链图片转存失败,源站可能有防盗链机制,建议将图片保存下来直接上传(img-Witeu8kM-1639492974723)(imgs/image-20211213211558652.png)]](/img/09/d462ba46c21b1ff47a73054cd01437.png)
将其移动到share目录下,再进行解压.
cp 原文件地址 目标地址
2、环境配置
Similar to local configuration,But in the cloud servercudaWhat is installed,cuda是10.1版本,经测试,也可以跑CaDDN代码,So no belowcudaThe installation steps are straightforward.
- First tested a piece8G显存的GPU,Finally, there is the problem of insufficient memory
![[外链图片转存失败,源站可能有防盗链机制,建议将图片保存下来直接上传(img-PhXYAztb-1639492974724)(imgs/image-20211214220050938.png)]](/img/42/e2de9d1ac08d0de9934db409c0f405.png)

So I replaced oneV100继续调试
3、错误信息

出现这种错误,以我的经验来看,解决方法有两个,It can be solved in the following order:
- 我用pythonRunning this problem occurs,应该是运行python3.8 train.py
- Because a pretrained model is used,预训练模型的model_stateYou don't know the name,But it is used in the codecheckpoint[‘model_state’],我的解决办法是:
修改CaDDN/pcdet/models/detectors/detector3d_template.py的第359行,如下所示:
 loc_type = torch.device('cpu') if to_cpu else None
        checkpoint = torch.load(filename, map_location=loc_type)
        #model_state_disk = checkpoint['model_state']

        if 'version' in checkpoint:
            logger.info('==> Checkpoint trained from version: %s' % checkpoint['version'])

        update_model_state = {
    }
        for key, val in checkpoint.items():
            if key in self.state_dict() and self.state_dict()[key].shape == checkpoint[key].shape:
                update_model_state[key] = val
                # logger.info('Update weight %s: %s' % (key, str(val.shape)))

        state_dict = self.state_dict()
        state_dict.update(update_model_state)
        self.load_state_dict(state_dict, False)
Regarding the solution above,I refer to these blogs:
https://www.cnblogs.com/jinjunweina/p/12671833.html
成功运行
成功运行起来了,大功告成~~
It's a real drain on training!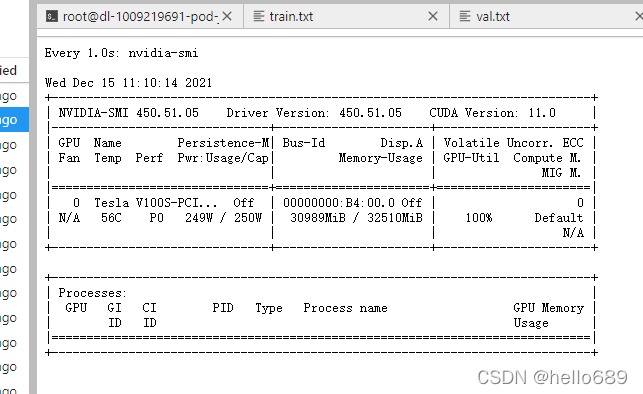
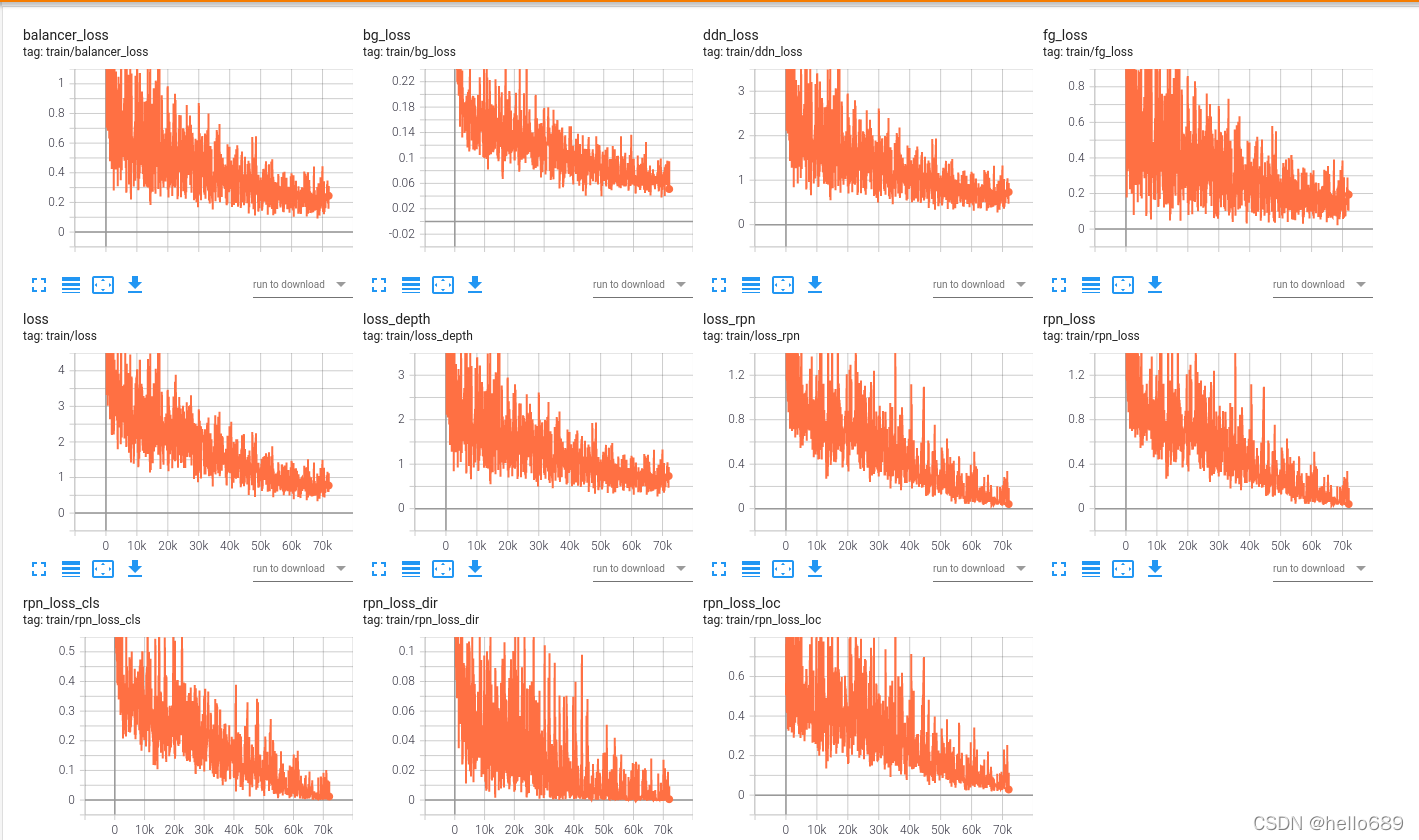
Tensorboard日志信息
There will be one after trainingoutput文件夹,One can be found insidetensorboard文件夹,This folder stores some information during training,可以用tensorboard进行可视化观察.我的tensorboard文件
运行命令:
tensorboard --logdir=output/tensorboard/ --host=127.0.0.1

模型评估:
Car类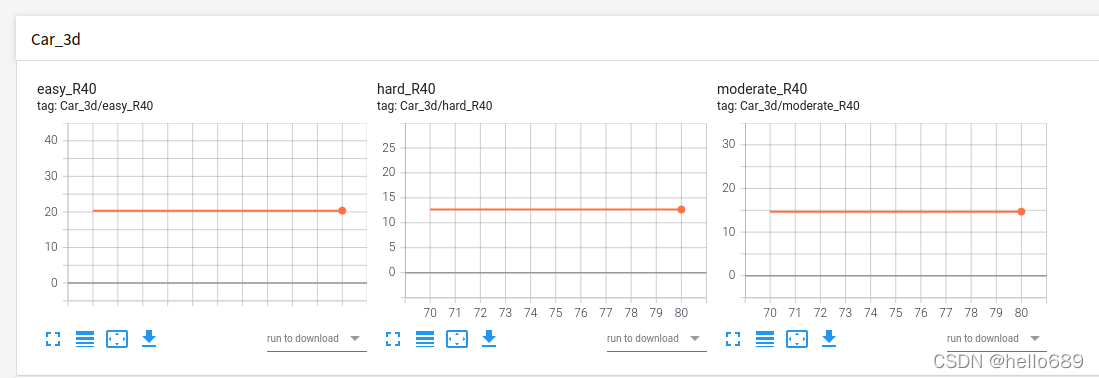 From my evaluation results,因为ckpt模型文件是从70epoch开始的,从图中可以看出,70-80epochbetween models3DThe test results are basically unchanged.easy类达到20.36%,hard类达到12.65%,moderate类达到14.7%,It is basically consistent with the results of the paper.
Cyclist类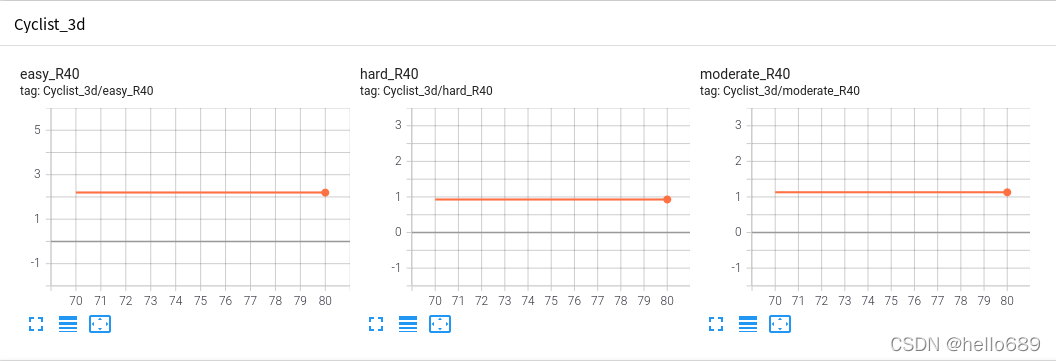
easy类:2.195% hard类:0.9287% moderate类:1.13%
Pedestrian类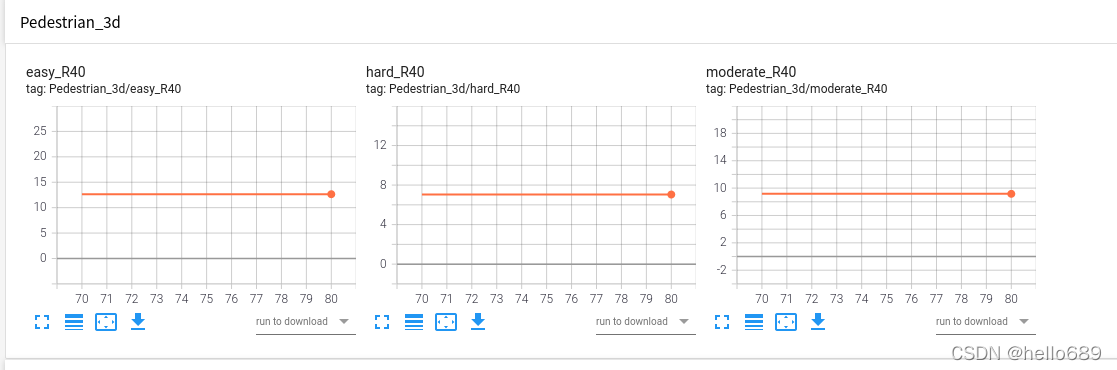 easy类:15.7% hard类:8.828% moderate类:11.38%
可视化demo
It needs to be installed before visualizationopen3d和mayavi两个库,命令如下:
pip install open3d -i https://mirrors.aliyun.com/pypi/simple
pip install vtk==9.0.1 -i https://mirrors.aliyun.com/pypi/simple
pip install mayavi==4.7.3 -i https://mirrors.aliyun.com/pypi/simple
CaDDNcode debugging docker环境的安装
Test again later![[外链图片转存失败,源站可能有防盗链机制,建议将图片保存下来直接上传(img-JB75hTKC-1639492974725)(imgs/image-20211213212330196.png)]](/img/c4/8f1dc6941a172b8ba34212839420f8.png)
边栏推荐
- 吴恩达机器学习系列课程笔记——第十三章:聚类(Clustering)
- [Study Notes] How to Create an Operation and Maintenance Organizational Structure
- 2022-08-01:以下go语言代码输出什么?A:panic;B:5;C:6;D:编译错误。 package main import ( “fmt“ ) func main() {
- ADSP21489工程中LDF文件配置详解
- Scalar value for argument ‘color‘ is not numeric错误处理
- HyperLynx中层叠设计实例
- 8月1日“海豹数藏”将全网首发民族英雄林则徐《四行行书》数字藏品!
- 最后写入胜利(丢弃并发写入)
- 可视水印的实现——1使用加法实现(add,+)
- Transfer of UKlog.dat and QQ, WeChat files
猜你喜欢


随机推荐
强化学习(西瓜书第16章)思维导图
最后写入胜利(丢弃并发写入)
无主复制系统(1)-节点故障时写DB
Location、navigator和History对象
ScholarOne Manuscripts submits journal LaTeX file and cannot convert PDF successfully!
深蓝学院-手写VIO作业-第二章
不会多线程还想进 BAT?精选 19 道多线程面试题,有答案边看边学
PHP5.6安装ssh2扩展用与执行远程命令
列表总结
深蓝学院-手写VIO作业-第一章
offset、client 和 scroll
Arduino框架下 ESP32看门狗使用示例
盒子移动和滚动加载效果练习
数据复制系统设计(2)-同步复制与异步复制
ADSP21489仿真:Failed to set breakpoint: Can‘t set breakpoints in the current state: Running
el-dropdown(下拉菜单)的入门学习
SCI期刊最权威的信息查询步骤!
How to save a section of pages in a PDF as a new PDF file
Nexus 5 phone uses Nexmon tool to get CSI information
DOM系列之 click 延时解决方案