当前位置:网站首页>Istio1.12:安装和快速入门
Istio1.12:安装和快速入门
2022-07-02 18:38:00 【琦彦】
前言
Istio 使用功能强大的 Envoy 服务代理扩展了 Kubernetes,以建立一个可编程的、可感知的应用程序网络。Istio 与 Kubernetes 和传统工作负载一起使用,为复杂的部署带来了标准的通用流量管理、遥测和安全性。
[外链图片转存失败,源站可能有防盗链机制,建议将图片保存下来直接上传(img-pNqBrfTt-1656680343352)(https://istio.io/latest/img/service-mesh.svg)]
下载 Istio
0. Istio 版本的支持状态
| Version | Currently Supported | Release Date | End of Life | Supported Kubernetes Versions | Tested, but not supported |
|---|---|---|---|---|---|
| master | No, development only | ||||
| 1.14 | Yes | May 24, 2022 | ~January 2023 (Expected) | 1.21, 1.22, 1.23, 1.24 | 1.16, 1.17, 1.18, 1.19, 1.20 |
| 1.13 | Yes | February 11, 2022 | ~October 2022 (Expected) | 1.20, 1.21, 1.22, 1.23 | 1.16, 1.17, 1.18, 1.19 |
| 1.12 | Yes | November 18, 2021 | Jul 12, 2022 | 1.19, 1.20, 1.21, 1.22 | 1.16, 1.17, 1.18 |
| 1.11 | No | August 12, 2021 | Mar 25, 2022 | 1.18, 1.19, 1.20, 1.21, 1.22 | 1.16, 1.17 |
| 1.10 | No | May 18, 2021 | Jan 7, 2022 | 1.18, 1.19, 1.20, 1.21 | 1.16, 1.17, 1.22 |
| 1.9 | No | February 9, 2021 | Oct 8, 2021 | 1.17, 1.18, 1.19, 1.20 | 1.15, 1.16 |
| 1.8 | No | November 10, 2020 | May 12, 2021 | 1.16, 1.17, 1.18, 1.19 | 1.15 |
| 1.7 | No | August 21, 2020 | Feb 25, 2021 | 1.16, 1.17, 1.18 | 1.15 |
| 1.6 and earlier | No |
注意:Kubernetes 1.22 删除了一些已弃用的 API,因此 1.10.0 之前的 Istio 版本将不再工作。如果您要升级 Kubernetes 版本,请确保您的 Istio 版本仍受支持。
1. 下载Istio安装包
到 Istio 发布 页面,下载针对你操作系统的安装文件, 或用自动化工具下载并提取最新版本(Linux 或 macOS):
$ curl -L https://istio.io/downloadIstio | sh -
上面的命令下载最新版本(用数值表示)的 Istio。 你可以给命令行传递变量,用来下载指定的、不同处理器体系的版本。 例如,下载 x86_64 架构的、1.6.8 版本的 Istio ,运行:
curl -L https://istio.io/downloadIstio | ISTIO_VERSION=1.12.0 TARGET_ARCH=x86_64 sh -

# 或者

wget https://github.com/istio/istio/releases/download/1.14.1/istio-1.14.1-linux-amd64.tar.gz
tar zxvf istio-1.14.1-linux-amd64.tar.gz -C /usr/local/
2. 进入Istio安装目录
转到 Istio 包目录。例如,如果包是 istio-1.14.1:
$ cd istio-1.14.1
安装目录包含:
samples/目录下的示例应用程序bin/目录下的istioctl客户端二进制文件 .
3. 添加环境变量 PATH
将 istioctl 客户端加入搜索路径(Linux or macOS):
$ export PATH=$PWD/bin:$PATH

#或者设置环境变量
echo 'export ISTIO_HOME=/usr/local/istio-1.14.1' >> /etc/profile
echo 'export PATH=$PATH:$ISTIO_HOME/bin' >> /etc/profile
#加载变量
source /etc/profile
4. 验证效果(查看版本)
istioctl version

*  istio-1.12.0 istioctl version
no running Istio pods in "istio-system"
1.12.0
You have new mail.
安装 Istio
对于本次安装,我们采用
demo配置组合。 选择它是因为它包含了一组专为测试准备的功能集合,另外还有用于生产或性能测试的配置组合。如果你的平台有供应商提供的配置组合,比如:Openshift,则在下面命令中替换掉
demo配置项。更多细节请参阅你的 平台说明$ istioctl install --set profile=demo -y Istio core installed Istiod installed Egress gateways installed Ingress gateways installed Installation complete istioctl install --set profile=demo -y Istio core installed Istiod installed Egress gateways installed Ingress gateways installed Installation complete Making this installation the default for injection and validation. Thank you for installing Istio 1.12. Please take a few minutes to tell us about your install/upgrade experience! https://forms.gle/FegQbc9UvePd4Z9z7 You have new mail.给命名空间添加标签,指示 Istio 在部署应用的时候,自动注入 Envoy 边车代理:
$ kubectl label namespace default istio-injection=enabled
namespace/default labeled
部署示例应用
部署
Bookinfo示例应用:$ kubectl apply -f samples/bookinfo/platform/kube/bookinfo.yaml service/details created serviceaccount/bookinfo-details created deployment.apps/details-v1 created service/ratings created serviceaccount/bookinfo-ratings created deployment.apps/ratings-v1 created service/reviews created serviceaccount/bookinfo-reviews created deployment.apps/reviews-v1 created deployment.apps/reviews-v2 created deployment.apps/reviews-v3 created service/productpage created serviceaccount/bookinfo-productpage created deployment.apps/productpage-v1 created应用很快会启动起来。当每个 Pod 准备就绪时,Istio 边车代理将伴随它们一起部署。
$ kubectl get services
NAME          TYPE        CLUSTER-IP      EXTERNAL-IP   PORT(S)    AGE
details       ClusterIP   10.0.0.212      <none>        9080/TCP   29s
kubernetes    ClusterIP   10.0.0.1        <none>        443/TCP    25m
productpage   ClusterIP   10.0.0.57       <none>        9080/TCP   28s
ratings       ClusterIP   10.0.0.33       <none>        9080/TCP   29s
reviews       ClusterIP   10.0.0.28       <none>        9080/TCP   29s
和
$ kubectl get pods
NAME READY STATUS RESTARTS AGE
details-v1-558b8b4b76-2llld 2/2 Running 0 2m41s
productpage-v1-6987489c74-lpkgl 2/2 Running 0 2m40s
ratings-v1-7dc98c7588-vzftc 2/2 Running 0 2m41s
reviews-v1-7f99cc4496-gdxfn 2/2 Running 0 2m41s
reviews-v2-7d79d5bd5d-8zzqd 2/2 Running 0 2m41s
reviews-v3-7dbcdcbc56-m8dph 2/2 Running 0 2m41s
重新运行前面的命令,在执行下面步骤之前,要等待并确保所有的 Pod 达到此状态: 就绪状态(READY)的值为 `2/2` 、状态(STATUS)的值为 `Running` 。 基于你平台的不同,这个操作过程可能会花费几分钟的时间。

3. 验证方方面面均工作无误。运行下面命令,通过检查返回的页面标题,来验证应用是否已在集群中运行,并已提供网页服务:
$ kubectl exec “$(kubectl get pod -l app=ratings -o jsonpath=‘{.items[0].metadata.name}’)” -c ratings – curl -s productpage:9080/productpage | grep -o “
对外开放应用程序
此时,BookInfo 应用已经部署,但还不能被外界访问。 要开放访问,你需要创建 Istio 入站网关(Ingress Gateway), 它会在网格边缘把一个路径映射到路由。
把应用关联到 Istio 网关:
$ kubectl apply -f samples/bookinfo/networking/bookinfo-gateway.yaml
gateway.networking.istio.io/bookinfo-gateway created
virtualservice.networking.istio.io/bookinfo created
确保配置文件没有问题:
$ istioctl analyze
 No validation issues found when analyzing namespace: default.
确定入站 IP 和端口
按照说明,为访问网关设置两个变量:INGRESS_HOST 和 INGRESS_PORT。 使用标签页,切换到你选用平台的说明:
Minikube其他平台
设置入站端口:
$ export INGRESS_PORT=$(kubectl -n istio-system get service istio-ingressgateway -o jsonpath='{.spec.ports[?(@.name=="http2")].nodePort}')
$ export SECURE_INGRESS_PORT=$(kubectl -n istio-system get service istio-ingressgateway -o jsonpath='{.spec.ports[?(@.name=="https")].nodePort}')
确认端口被成功的赋值给了每一个环境变量:
$ echo "$INGRESS_PORT"
32194
$ echo "$SECURE_INGRESS_PORT"
31632
设置入站 IP:
$ export INGRESS_HOST=$(minikube ip)
确认 IP 地址被成功的赋值给了环境变量:
$ echo "$INGRESS_HOST"
192.168.4.102
在一个新的终端窗口中执行此命令,启动一个 Minikube 隧道,它将把流量发送到你的 Istio 入站网关:
$ minikube tunnel
设置环境变量
GATEWAY_URL:$ export GATEWAY_URL=$INGRESS_HOST:$INGRESS_PORT确保 IP 地址和端口均成功的赋值给了环境变量:
$ echo "$GATEWAY_URL"
192.168.99.100:32194
验证外部访问
用浏览器查看 Bookinfo 应用的产品页面,验证 Bookinfo 已经实现了外部访问。
运行下面命令,获取 Bookinfo 应用的外部访问地址。
$ echo "http://$GATEWAY_URL/productpage"把上面命令的输出地址复制粘贴到浏览器并访问,确认 Bookinfo 应用的产品页面是否可以打开。
查看仪表板
Istio 和几个遥测应用做了集成。 遥测能帮你了解服务网格的结构、展示网络的拓扑结构、分析网格的健康状态。
使用下面说明部署 Kiali 仪表板、 以及 Prometheus、 Grafana、 还有 Jaeger
安装 Kiali 和其他插件,等待部署完成。
$ kubectl apply -f samples/addons
$ kubectl rollout status deployment/kiali -n istio-system
Waiting for deployment "kiali" rollout to finish: 0 of 1 updated replicas are available...
deployment "kiali" successfully rolled out
如果在安装插件时出错,再运行一次命令。 有一些和时间相关的问题,再运行就能解决。
访问 Kiali 仪表板。
$ istioctl dashboard kiali在左侧的导航菜单,选择 Graph ,然后在 Namespace 下拉列表中,选择 default 。
Kiali 仪表板展示了网格的概览、以及
Bookinfo示例应用的各个服务之间的关系。 它还提供过滤器来可视化流量的流动。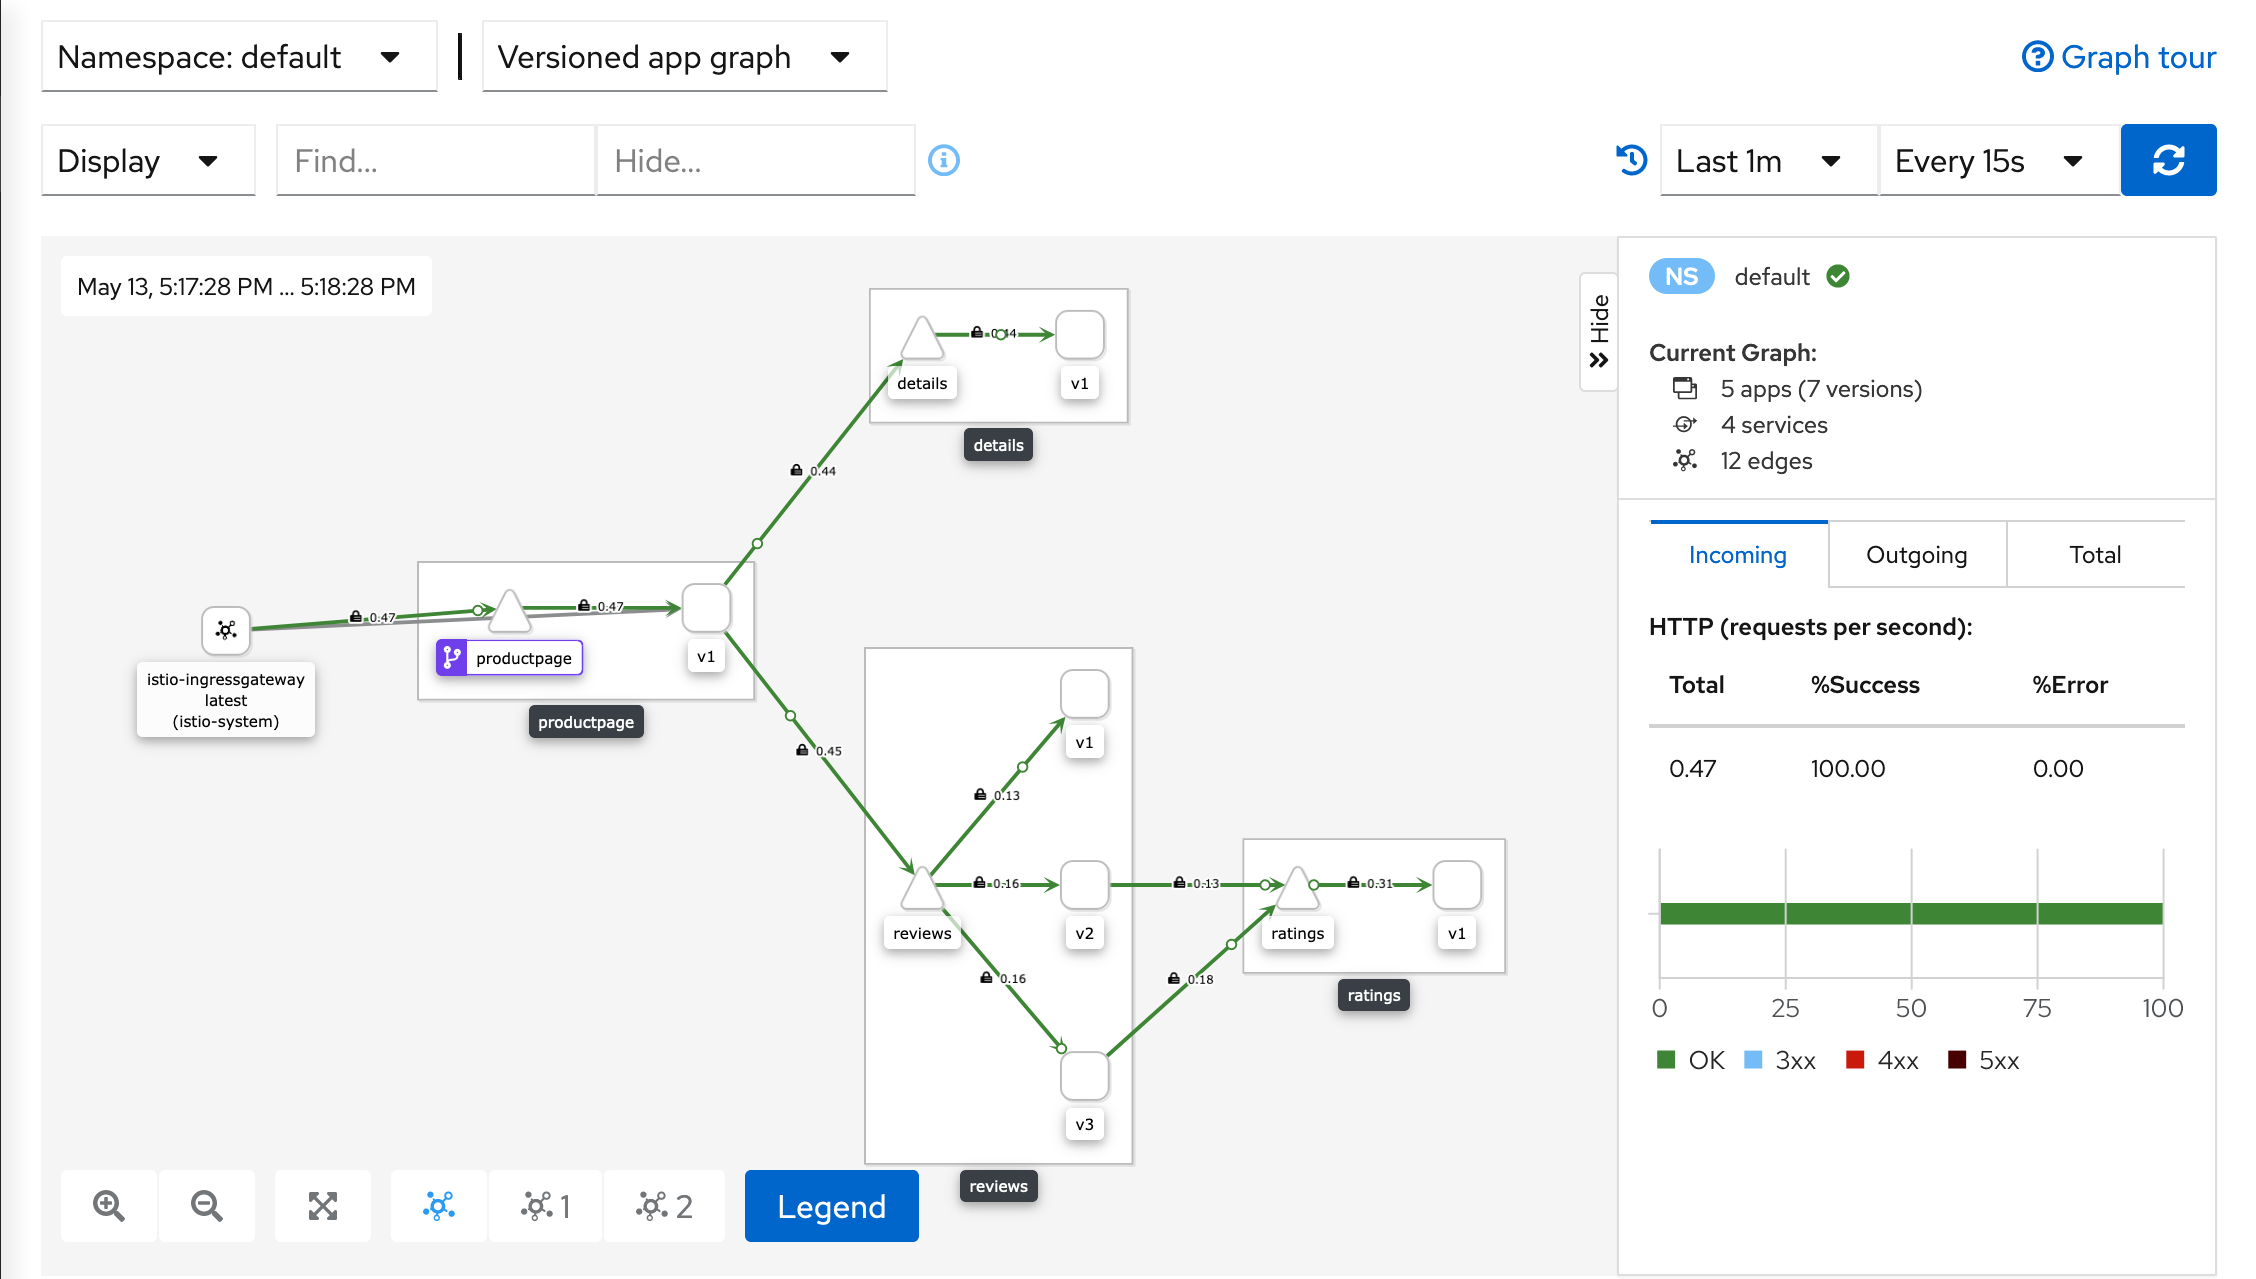
Kiali Dashboard

卸载 Istio
要从集群中完整卸载 Istio,运行下面命令:
$ istioctl x uninstall --purge
可选的 --purge 参数将删除所有 Istio 资源,包括可能被其他 Istio 控制平面共享的、集群范围的资源。
或者,只删除指定的 Istio 控制平面,运行以下命令:
$ istioctl x uninstall <your original installation options>
或
$ istioctl manifest generate <your original installation options> | kubectl delete -f -
控制平面的命名空间(例如:istio-system)默认不会删除, 如果确认不再需要,用下面命令删除它:
$ kubectl delete namespace istio-system
参考链接
https://istio.io/latest/zh/docs/setup/getting-started/#download
options> | kubectl delete -f -
控制平面的命名空间(例如:`istio-system`)默认不会删除, 如果确认不再需要,用下面命令删除它:
$ kubectl delete namespace istio-system
## 参考链接

[Istio中文网站](https://istio.io/latest/zh/)

[Istio架构](https://istio.io/latest/zh/docs/ops/deployment/architecture/)

https://istio.io/latest/zh/docs/setup/getting-started/#download

https://github.com/istio/istio/releases/tag/1.12.0
边栏推荐
- AcWing 1127. 香甜的黄油 题解(最短路—spfa)
- Tutoriel (5.0) 10. Dépannage * fortiedr * fortinet Network Security expert NSE 5
- Juypter notebook modify the default open folder and default browser
- Notes de lecture sur le code propre
- Binary operation
- MySQL
- Is there any security guarantee for the ranking of stock and securities companies
- 《重构:改善既有代码的设计》读书笔记(上)
- Implementation of 452 strcpy, strcat, StrCmp, strstr, strchr
- AcWing 342. Road and route problem solving (shortest path, topological sorting)
猜你喜欢
AcWing 340. 通信线路 题解(二分+双端队列BFS求最短路)
Educational Codeforces Round 129 (Rated for Div. 2) 补题题解
IDEA编辑器去掉sql语句背景颜色SQL语句警告No data sources are configured to run this SQL...和SQL Dialect is Not Config

Develop fixed asset management system, what voice is used to develop fixed asset management system
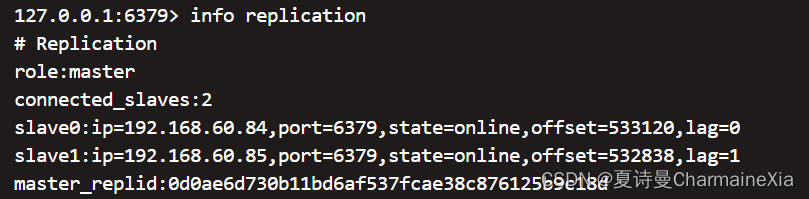
搭建哨兵模式reids、redis从节点脱离哨兵集群
高级性能测试系列《24. 通过jdbc执行sql脚本》
《架构整洁之道》读书笔记(下)
冒泡排序数组

机器学习笔记 - 时间序列预测研究:法国香槟的月销量
AcWing 1126. 最小花费 题解(最短路—dijkstra)
随机推荐
Thread application instance
450 Shenxin Mianjing 1
Preprocessing and preprocessing macros
Web2.0的巨头纷纷布局VC,Tiger DAO VC或成抵达Web3捷径
Gamefi链游系统开发(NFT链游开发功能)丨NFT链游系统开发(Gamefi链游开发源码)
SQLite 3.39.0 发布,支持右外连接和全外连接
Educational Codeforces Round 129 (Rated for Div. 2) 补题题解
Chic Lang: completely solve the problem of markdown pictures - no need to upload pictures - no need to network - there is no lack of pictures forwarded to others
Tutoriel (5.0) 10. Dépannage * fortiedr * fortinet Network Security expert NSE 5
[pytorch learning notes] tensor
453-atoi函数的实现
End to end object detection with transformers (Detr) paper reading and understanding
Machine learning notes - time series prediction research: monthly sales of French champagne
数据湖(十二):Spark3.1.2与Iceberg0.12.1整合
移动机器人路径规划:人工势场法[通俗易懂]
LeetCode 0871. Minimum refueling times - similar to poj2431 jungle adventure
Windows2008R2 安装 PHP7.4.30 必须 LocalSystem 启动应用程序池 不然500错误 FastCGI 进程意外退出
《代码整洁之道》读书笔记
AcWing 343. 排序 题解(floyd性质实现传递闭包)
Yunna | why use the fixed asset management system and how to enable it