当前位置:网站首页>Numpy those things
Numpy those things
2022-08-02 19:02:00 【not reassuring】
一、引言
- Numpy(Numerical Python)是一个开源的Python科学计算库,Its appearance allows us to use arrays more conveniently、进行矩阵运算,It also provides a large number of mathematical function libraries for users to directly call.
- For the same numerical operation task,使用numpythan writing directlypythonThe code has cleaner code and more efficient performance,而且numpy是sklearn、tensorflowThe basic library of major data science frameworks,对于numpyThe learning of these libraries is very helpful for us to further understand these libraries.
- numpy的学习,The primary purpose is to read,Try to get in quickly(It is recommended to type the code by hand),All related operations don't need to be memorized by rote,用时再查.
## numpy安装
# pip install Numpy
import numpy as np
np.__version__
二、创建array对象
2.1 Created from other data typesarray
# 从Python的列表创建array
## 一维数组
arr1 = np.array([0,2,4,6,8])
## 二维数组
arr2 = np.array(
    [
        [0,2,4,6,8],
        [1,3,5,7,9]
    ]
)
2.1 Create directly from other data typesarray
# Created from other library function dataarray
from PIL import Image  ## 也可以借助cv2

image_dog=Image.open('./images/dog.png')
print(type(image_dog))
image_dog_np=np.array(image_dog)
print(type(image_dog_np))
print(image_dog_np.shape)  ## 打印数组的维度
print(image_dog_np.dtype)  ## 打印ndarray对象的元素类型
打印结果:
2.2 借助numpyThe predetermined function such as:arange、ones、empty等进行创建
# 使用np.arange创建数组
array_arange = np.arange(0,10,2)    ## 创建0-10步数为2的数组,用过Matlab的同学应该很熟悉

# 使用np.zeros创建全零数组
array_zeros = np.zeros((2,3))    ## 创建2行3列的全零数组

# 使用np.full创建指定值的数组
array_full = np.full((2,2),"polars")  ## 注意numpy的arrayAlso able to accommodatestr类型的数据
打印结果: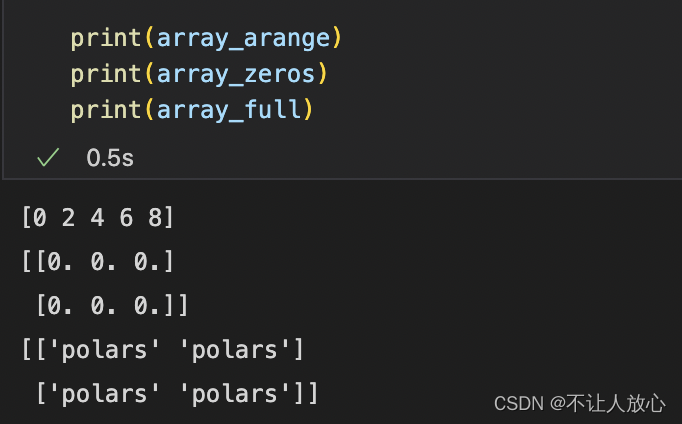
# 使用np.emptyCreates an uninitialized array of the specified shape and data type:
array_empty = np.empty([3,2], dtype = float)
## 注:此方法得到的arrayThe data are all uninitialized,This means that the value inside is an indeterminate value,Try not to use it without clear assignment
tips:
- Except for the functions listed above,还有诸如linspace、logspace、ones_like等函数,You can use it flexibly according to your needs.
- numpyAll element types of the arrays in must be unique,它本质上是 dtype 对象的实例,并对应唯一的字符.
2.3 使用random模块生成随机数的数组
# 使用np.random.random创建数组
array_random = np.random.random((3,2))  ## 创建3行2列的数组,里面的值是0-1之间的随机数
案例1:随机漫步
A simple example of array creation:从0开始,known step size1和-1出现的概率相等,achieved in various ways1000步的随机漫步.
%%time
# (1)通过内置的random模块以纯Python的方式实现
import random
position = 0
walk = [position]
steps = 1000
for i in range(steps):
    step = 1 if random.randint(0, 1) else -1
    position += step
    walk.append(position)
# 画出折线图
import matplotlib.pyplot as plt
plt.plot(walk[:100])
%%timeis a magic command,它是IPython的一部分,Can be used to print the execution time of the entire cell.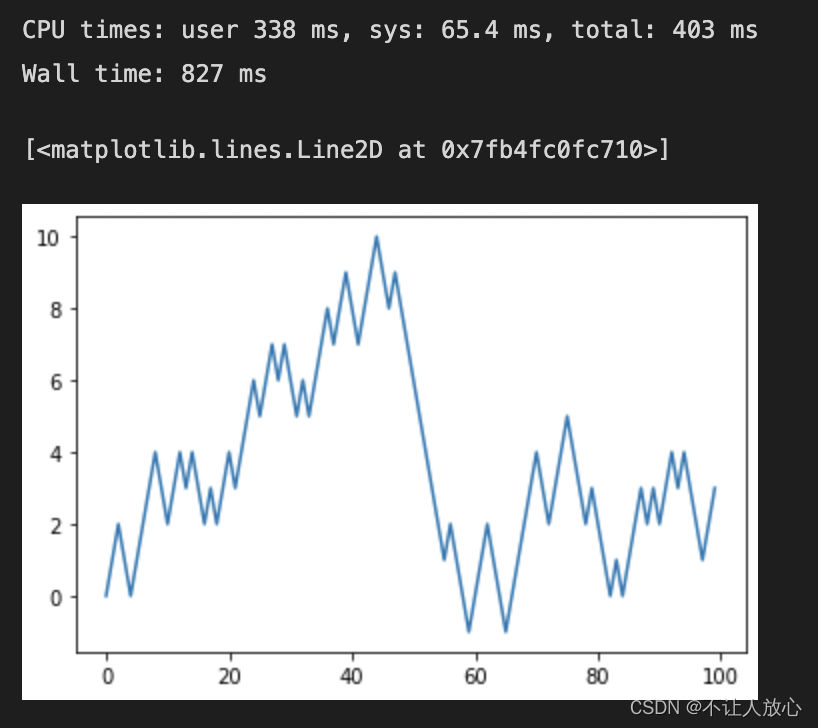
%%time
# (2)用np.random模块一次性随机产生
nsteps = 1000
draws = np.random.randint(0, 2, size=nsteps)
steps = np.where(draws > 0, 1, -1)
walk = steps.cumsum()
plt.plot(walk[:100])
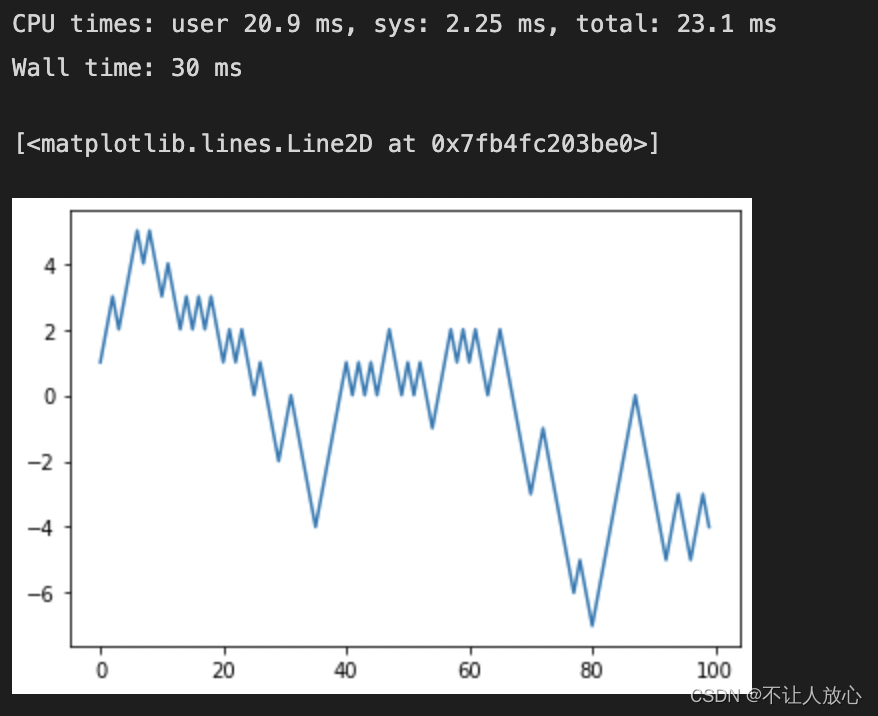
对比一下不难发现,相同的问题,基于NumPyThe data processing speed is faster than purePython快10到100倍(甚至更快),并且使用的内存更少.
三、Numpy基本运算
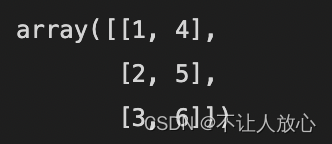
3.1 数组的变形
# 将数字 1~6 放入一个 2×3 的矩阵中
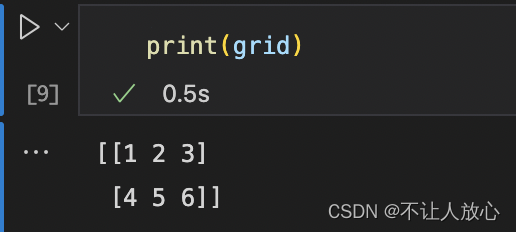
grid = np.arange(1, 7).reshape((2, 3))
# 矩阵的转置
grid.T
3.2 数组的运算
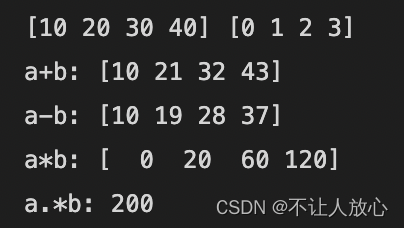
# 一维矩阵运算
a = np.array([10,20,30,40])
b = np.arange(4)
print(a,b)
print("a+b:",a+b)
print("a-b:",a-b)
print("a*b:",a*b)  # 对应项相乘,若a和b大小不同,The broadcast mechanism will be triggered
print("a.*b:",a.dot(b))  # 向量点击 , 等价于np.dot(a, b)
# 2D matrix operations
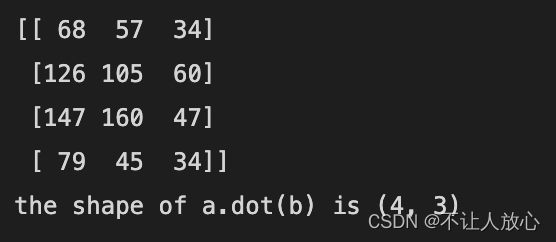
a = np.random.randint(0, 10, size = (4, 5))
b = np.random.randint(0, 10, size = (5, 3))
print(np.dot(a, b))   # At this point, matrix multiplication is performed
print("the shape of a.dot(b) is " + str(np.dot(a, b).shape))
3.3 统计运算
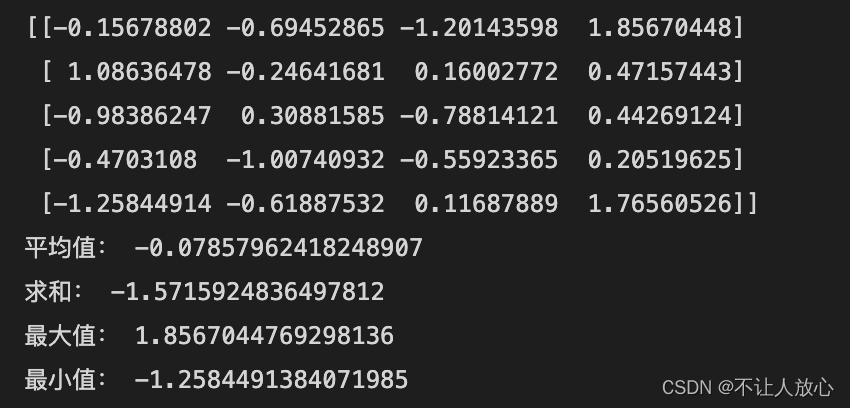
arr = np.random.randn(5, 4)  # 正态分布随机数据
print(arr)
print('平均值:',np.mean(arr))   ## 等价于arr.mean()
print('求和:',np.sum(arr))     ## 等价于arr.sum()
print('最大值:',np.max(arr))    ## 等价于arr.max()
print('最小值:',np.min(arr))    ## 等价于arr.min()
案例2(转):利用numpyArrays implement neural networks
- 原文链接:https://blog.csdn.net/lianwaiyuwusheng/article/details/109517997
There are certain thresholds in this case,Theoretically requires a pair of perceptrons(BP神经网络)有所了解,But after gnawing it down, it is very helpful to reproduce the relevant formulas later,If possible, it is recommended to give it a try.
""" 1. Get input data and labels 2. 定义网络,Forward pass to get the output 3. 定义损失函数, 4. 训练,反向传播更新网络参数 """

import numpy as np

N, D_in, H, D_out = 64, 1000, 100, 10

# 输入x和标签y
x = np.random.randn(N, D_in)
y = np.random.randn(N, D_out)

# 初始化参数
w1 = np.random.randn(D_in, H)
w2 = np.random.randn(H, D_out)

learning_rate = 1e-6

for t in range(500):
    # 前向传播 batch_size=all
    h = x.dot(w1)
    h_relu = np.maximum(h, 0)
    y_pred = h_relu.dot(w2)

    # 损失函数
    loss = np.square(y_pred - y).sum()
    if t % 100 == 99:print(t, loss)

    # 反向传播
    grad_y_pred = 2.0 * (y_pred - y)
    grad_w2 = h_relu.T.dot(grad_y_pred) # l=s(y) y=f(x) J=[y_dim*x_dim]; grad l/x=sum[grad(l/y)*grad(y/x)] =J^T*grad y
    grad_h_relu = grad_y_pred.dot(w2.T)
    grad_h = grad_h_relu.copy()
    grad_h[h < 0] = 0
    grad_w1 = x.T.dot(grad_h)

    # 更新参数
    w1 -= learning_rate * grad_w1
    w2 -= learning_rate * grad_w2
四、索引与切片
4.1 常规用法
# 一维数组
a1 = np.arange(10)
print(a1)
print("_____________________")
print("获取第五个元素:",a1[4])   ## 取单个元素
print("Get the fifth to sixth elements:",a1[4:6])  ## 切片
print("Sampling is equidistant in two steps:",a1[::2])  ## 按照固定步长
print("取出最后一个元素:",a1[-1])   ## Use negative numbers as indices,这里返回最后一个

# 多维数组
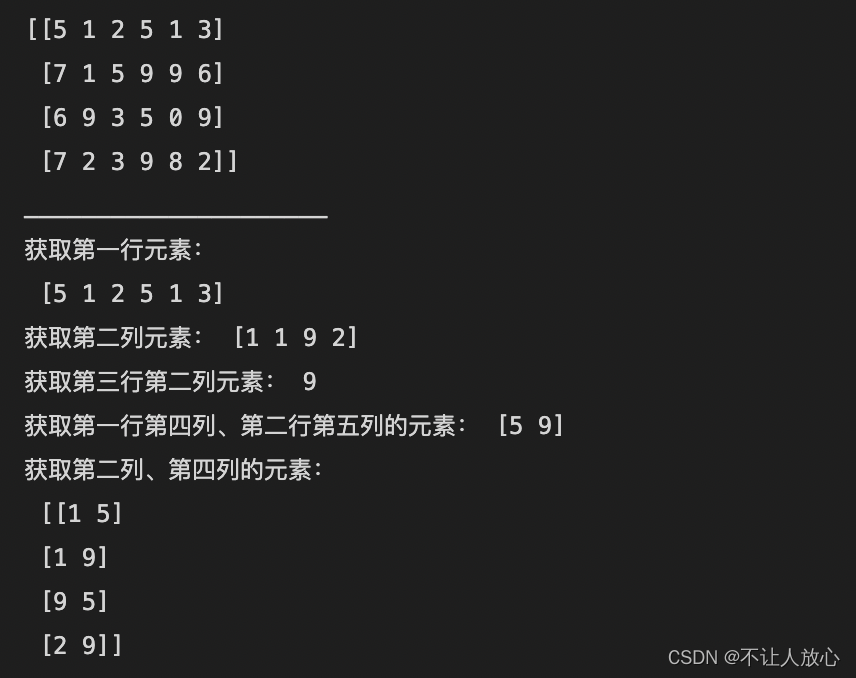
a2 = np.random.randint(0,10,size=(4,6))
print(a2)
print("_____________________")
print("获取第一行元素:\n",a2[0])  #Get the specified row element
print("Get the second column element:",a2[:,1])  #Get the specified column element
print("Get the element in the third row and the second column:",a2[2,1]) #Get a specific position element
print("Get the first row and fourth column、The element in the second row and fifth column:",a2[[0,1],[3,4]])  #Get multiple specified position elements
print("获取第二列、第四列的元素:\n",a2[:,[1,3]])  #Get all data for multiple specified columns
4.2 进阶用法
# 布尔索引
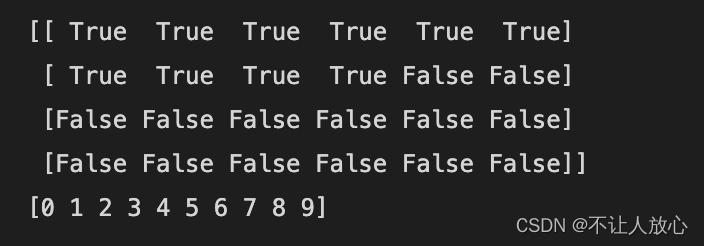
a3 = np.arange(24).reshape((4,6))
print(a3<10)
print(a3[a3<10])
# 花式索引(利用整数数组进行索引)
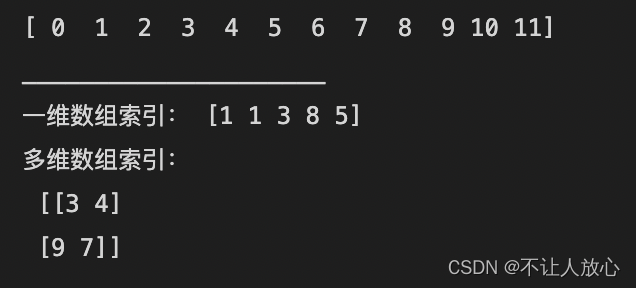
a4  = np.arange(12)
i = np.array([1,1,3,8,5])
print(a4[i])
j = np.array([[3,4],[9,7]])
print(a4[j])  # The final returned format followsj一致
# Swap any two rows in an array
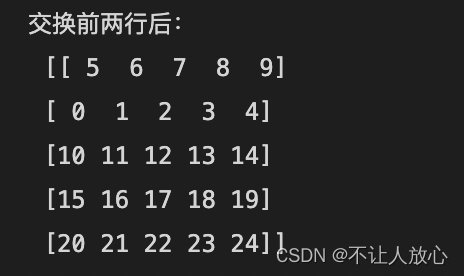
A = np.arange(25).reshape(5,5)
A[[0,1]] = A[[1,0]]
print("After swapping the first two lines:\n",A)
案例3:利用numpyArray counts the number of colors an image contains
from PIL import Image
image=Image.open('./images/dog.png')
print(type(image))
image=np.array(image)
F = image[...,0]*(256*256) + image[...,1]*256 + image[...,2]  #Think about why you should do this
number_color = len(np.unique(F))
print(number_color)

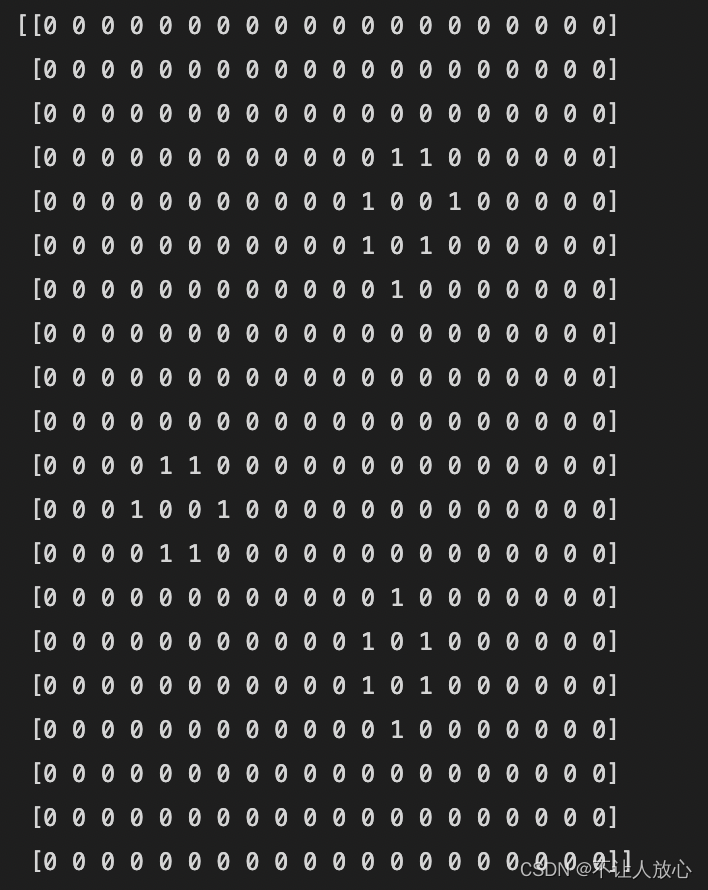
案例4:利用numpy数组实现Game of Life
def iterate(Z):
    # Count neighbours
    N = (Z[0:-2,0:-2] + Z[0:-2,1:-1] + Z[0:-2,2:] +
         Z[1:-1,0:-2]                + Z[1:-1,2:] +
         Z[2:  ,0:-2] + Z[2:  ,1:-1] + Z[2:  ,2:])

    # Apply rules
    birth = (N==3) & (Z[1:-1,1:-1]==0)
    survive = ((N==2) | (N==3)) & (Z[1:-1,1:-1]==1)
    Z[...] = 0
    Z[1:-1,1:-1][birth | survive] = 1
    return Z

Z = np.random.randint(0,2,(20,20))
itera = 1000
for i in range(itera):
    Z = iterate(Z)
print(Z)
五、广播
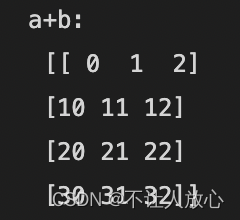
numpy数组间的基础运算是一对一,也就是a.shape==b.shape,但是当两者不一样的时候,就会自动触发广播机制,The broadcasting principle of the array is as follows:
- 规则 1:如果两个数组的维度数不相同,Then the shape of the small dimension array will be 会在最左边补 1.
- 规则 2:如果两个数组的形状在任何一个维度上都不匹配,那么数 The shape of the group will be along the dimension 1 的维度扩展以匹配另外一个数组的形状.
- 规则 3:If the shapes of the two arrays do not match in either dimension and no Any one dimension equals 1,那么会引发异常.
# Array and array operations
a = np.array([[ 0, 0, 0],
           [10,10,10],
           [20,20,20],
           [30,30,30]])
b = np.array([0,1,2])
print(a+b)  # 对b的[0,1,2]行重复3次,再与a相加
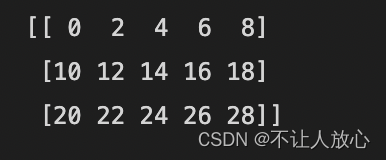
# Arrays and Number Operations
arr = np.arange(15).reshape(3,5)
#All elements in the array are multiplied2
print(arr*2)
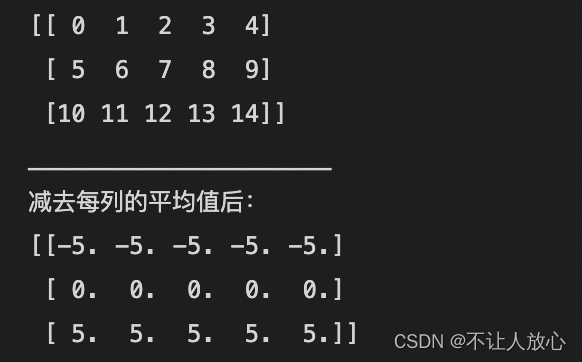
案例5:Subtract the mean of each column of the array
sample = np.arange(15).reshape(3,5)
print(sample)
print("_____________________")
print("After subtracting the mean of each column:")
mu = sample.mean(axis=0)
result = sample - mu
print(result)
# 更进一步:Normalize each column,Make each cell have relative to its respective columnz-score:
(sample - sample.mean(axis=0)) / sample.std(axis=0)

六、数组操作
6.1 Array shape changes
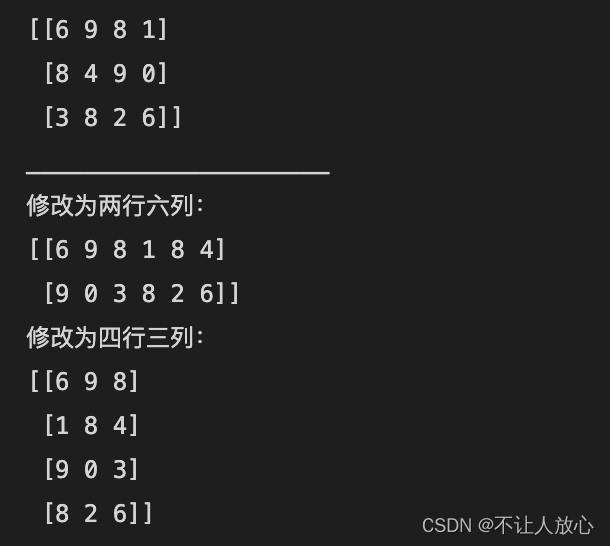
# reshape与resize,改变数组形状
a1 = np.random.randint(0,10,size=(3,4))
print(a1)
print("_____________________")
print("Modified to two rows and six columns:")
reshape_a1 = a1.reshape((2,6))  # reshape是将数组转换成指定的形状,然后返回转换后的结果,对于原数组的形状是不会发生改变的
print(reshape_a1)
print("Modified to four rows and three columns:")
a1.resize((4,3)) # resize是将数组转换成指定的形状,会直接修改数组本身,并且不会返回任何值
print(a1)
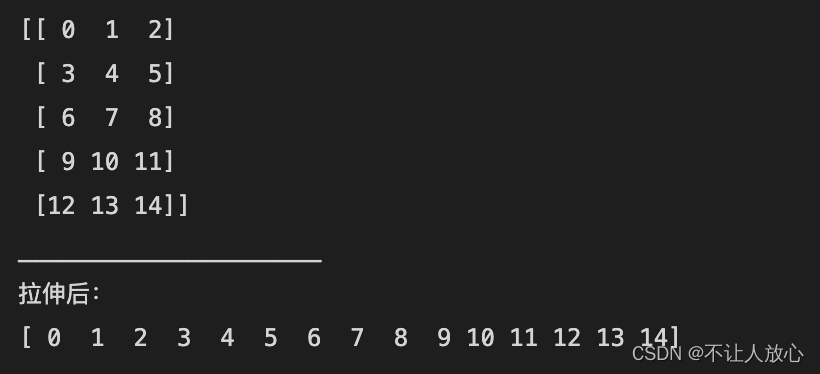
# 将多维数组转换为一维数组(扁平化)
a2 = np.arange(15).reshape((5, 3))
print(a2)
print("_____________________")
a2_flatten = a2.flatten()  # 等价于a2.ravel()
print("拉伸后:")
print(a2_flatten)
6.2 数组的叠加
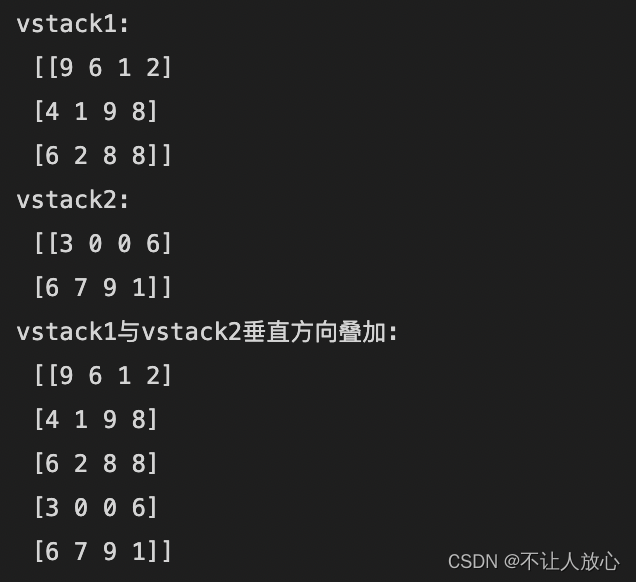
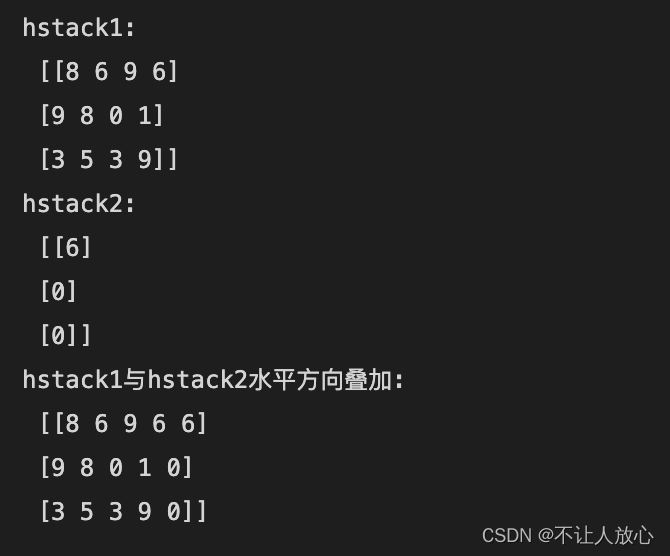
''' vstack代表在垂直方向叠加,如果想要叠加成功,那么列数必须一致 hstack代表在水平方向叠加,如果想要叠加成功,那么行数必须一致 concatenateCan be specified manuallyaxisIn which direction the parameters are superimposed #(1)如果axis=0,代表在水平方向叠加 #(2)如果axis=1,代表在垂直方向叠加 #(3)如果axis=None,会先进行叠加,再转化为1维数组 '''
vstack1 = np.random.randint(0,10,size=(3,4))
print('vstack1:\n',vstack1)
vstack2 = np.random.randint(0,10,size=(2,4))
print('vstack2:\n',vstack2)
#Two ways of stacking vertically
vstack3 = np.vstack([vstack1,vstack2])  # 等价于np.concatenate([vstack1,vstack2],axis=0)
print('vstack1与vstack2垂直方向叠加:\n',vstack3)
h1 = np.random.randint(0,10,size=(3,4))
print('h1:\n',h1)
h2 = np.random.randint(0,10,size=(3,1))
print('h2:\n',h2)

#Two ways to stack horizontally
h3 = np.hstack([h1,h2])  # 等价于np.concatenate([h2,h1],axis=1)
print('h1与h2水平方向叠加:\n',h3)
七、其它
7.1 torch与NumPy之间的转换
import torch
import numpy as np

### numpy to tensor
npy	= np.random.rand(2,3)
tor = torch.from_numpy(npy)
print("Type: {}".format(tor.type()))
print("Shape/size: {}".format(tor.shape))
print("Values:\n{}".format(tor))

### tensor to numpy
tor_one = torch.ones(6)
npy_one = tor_one.numpy()
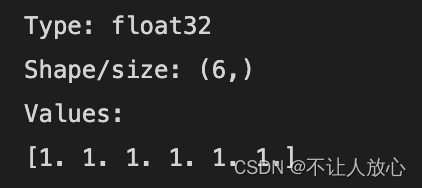
print("Type: {}".format(npy_one.dtype))
print("Shape/size: {}".format(npy_one.shape))
print("Values:\n{}".format(npy_one))
7.2 NumPy文件操作
# 将数组保存到文件中
''' 函数:np.savetxt(frame,array,fmt="%.18e",delimiter=None) 参数说明: · frame:文件、字符串或产生器,可以是.gz或.bz2的压缩文件 · array:存入文件的数组 · fmt:写入文件的格式,例如:%d %.2f %.18e · delimter:分割字符串,默认是空格 '''

from PIL import Image
image=Image.open('./images/dog.png')
print(type(image))
image_flatten=np.array(image).flatten()
np.savetxt("../data/image.csv",image_flatten,fmt="%d",delimiter=",")
# 读取文件
''' 函数:np.loadtxt(frame,dtype=np.float,delimiter=None,unpack=False) 参数说明: · frame:文件、字符串或产生器,可以是.gz或.bz2的压缩文件 · dtype:数据类型,可选 · delimiter:分割字符串,默认是任何空格 · skiprows:跳过前面x行 · usecols:读取指定的列,用元组组合 · unpack:如果True,读取出来的数组是转置后的 '''
#读取csv文件
image_np = np.loadtxt("../data/image.csv",dtype='uint8',delimiter=",")
image = image_np.reshape(700, 639, 3)
参考链接
- NumPy菜鸟教程: https://www.runoob.com/numpy/numpy-tutorial.html
- NumPy官网: http://www.numpy.org/
- NumPy中文网:https://www.numpy.org.cn/article/basics/understanding_numpy.html
边栏推荐
猜你喜欢
随机推荐
内网渗透之kerberos认证(三)
sql2008数据库置疑的解决方法_sqlserver2008数据库可疑
基于深度学习的机器人目标识别和跟踪
《独行月球》
一文搞懂│php 中的 DI 依赖注入
exness:欧元区经济意外向好,欧元震荡蓄势等待突破
尚硅谷尚品项目汇笔记(三)
Summary of CNN classic models [easy to understand]
【面经】被虐了之后,我翻烂了equals源码,总结如下
【服务器数据恢复】Raid阵列更换故障硬盘后数据同步失败的数据恢复案例
博世「求援」,毫米波雷达重构
let块级作用域,var变量提升
#yyds干货盘点# 面试必刷TOP101: 删除链表的倒数第n个节点
【300+精选大厂面试题持续分享】大数据运维尖刀面试题专栏(十)
julia系列3:函数、模块与宏
金仓数据库 OCCI 迁移指南(4. KingbaseES 的 OCCI 迁移指南)
网御数据库审计系统配置Radius启用双因素/双因子(2FA/MFA)身份认证
numpy的学习笔记
JZ9 用两个栈实现队列
JZ56 数组中只出现一次的两个数字



![链表的归并排序[自顶向下分治 || 自低向上合并]](/img/7b/81c5d876567a2017df64e87ee3b478.png)
